|
|
 How is it going out there? I hope well. In case you have not heard, I am one of the 20 finalists for Paper Crafts Gallery Idol contest! How exciting is that?! I submitted this card as an entry, but this card was selected instead. Love the Indian theme! All of the finalists are fantastic! I have to admit that although I am extremely excited for the next round, I'm also really nervous. So nervous, you would think I was on the real American Idol! These ladies are talented so this is going to be a big challenge.
For this card, I was inspired by a scrapbook page by Anabelle O'Malley here. She used wrapped wire to create her branch. I stitched the entire branch, which I still can't believe. I will admit, it took me quite a bit of time. But, it's something to do if you aren't feeling too crafty sometimes. I think it took me at least 30 minutes to stitch, if not more, but I wasn't timing myself so I really don't know.
Thanks so much for visiting and enjoy your day!
Card Instructions
- Trim dark chocolate cardstock into an A2 card.
- Draw branch design in pencil.
- Pierce holes and stitch branch.
- Ink chipboard bird and adhere.
- Die cut scallop oval circle, distress, stamp, and adhere.
:: My Goodies {Youth is Nature, Age is Art} ::
Stamps: Papertrey Ink - birthday basics + out on a limb
Ink: Stampin' Up! - chocolate chip
Cardstock: Papertrey Ink - dark chocolate + summer sunrise
Accessories: Provo Craft - cuttlebug; Spellbinders - nestabilities; Bazzill - floss; paper piecer; KaiserCraft -rhinestone
Card Size: 4.25" x 5.5"
Thanks so much for all of your comments on the photo card for the Card Creations 7 Blog Tour. I read EVERY one of the 416 comments. I think shadow boxes win to keep wedding items in a safe place and also display them in your home. I actually have four shadow boxes I purchased soon after the wedding and started a couple, but never finished them. I think I am going to have to start over now that my style has changed. I hope you get a chance to read through the comments to gather some ideas because there are plenty more. The winner of Card Creations 7 is lucky commenter # 41, who is Anya! Anya, please e-mail me your mailing information so I can forward it to Paper Crafts and they'll send you a copy of the magazine soon! Congratulations!
 Happy Monday Everyone! Today's card is inspired by Loonie's Stampers Challenge. Sorry, I do not have any photos of the new studio yet, but this weekend was really a lazy one for me. I barely made anything and just felt like lounging! We got an iMac and literally played with it all weekend long! If you have any Mac/iPhone tips and tricks/shortcuts to share, please leave a comment! My first computer was a Mac (years ago), so it will be a bit of a learning curve to readjust. There is some familiarity with the computer, but not with everything. I did get a chance to step out for a bit to the Great American Scrapbook Convention. I picked up a few items that have been on my list for a bit, such as Spellbinders Label 4 dies, Melissa Frances appliques, Basic Grey small chipboard letters, Quick Quotes Amaretto chalk ink, ColorBox inks (becoming my favorite ink now) and a few Copic markers. I think I did fairly well, but went past the budget just a bit! :) I do not know what I am going to do at the CHA Super Show next month! I should only have a gift card to spend to control my budget! Maybe that idea will work! This week is a short work week for me. Looking forward to our trip to New Orleans to attend the Essence Music Festival and photograph Susan G. Komen's Circle of Promise affairs! This should be really exciting. Well, thanks for stopping by today and take time to enjoy yourself (even if it's only for 30 minutes)! Card Instructions- Trim kraft cardstock into an A2 card.
- Trim so saffron cardstock, stamp leaf pattern, heat emboss, tear, and adhere to card front.
- Tie twin around card front and add button and leaves.
- Ink chipboard, stamp polka dot on wing, adhere to card front.
- Stamp sentiment and adhere.
- Draw faux stitching
:: My Goodies {Have a Wonderful Day} ::Stamps: Hero Arts - floating leaf pattern ; Papertrey Ink - out of the box; Art Warehouse - journal Ink: Versamark; Close to My Heart - twilight; Stampin' Up! - white Cardstock: Papertrey Ink - kraft + spring moss; Stampin' Up! - so saffron Accessories: Stampin' Up! - chipboard; Making Memories - button; twine; heat gun; white embossing powder; white gel pen Card Size: 5.5" x 4.25"
 Before Before
 After AfterHey there! Aren't you glad it's the weekend? I know I am! Today, I'm participating in Lisa's Scribble This challenge. It involves sharpening your image. I was able to sharpen my image slightly, so I am pleased with the outcome. This was a super easy tutorial to follow. Thanks, Lisa! Don't forget about the Paper Crafts Card Creations 7 Blog Tour. You have until midnight Sunday (MST) to enter the contest! Also, check out my card at Jen del Muro's blog for a Sketch for You to Try! It is my last card as this month's guest designer. Boy, did June FLY BY! I had lots of fun participating and so happy Jen asked me to be the guest designer!! Go check out her card and the design team's cards too! Thanks for stopping by! Today, I'm off to do a tid bit of craft shopping at the Great American Scrapbook Convention in Chantilly, VA at the Dulles Expo. We're also planning to pick up something special! Follow my tweets to find out what! Card Instructions- Trim rich razzleberry cardstock into an A2 card.
- Stamped grass on card front.
- Trim dark chocolate cardstock and adhere to card front.
- Trim kraft cardstock and scallop edge punch with slot punch.
- Draw dotted lines around scalloped edge and adhere to card front.
- Tie ribbon into a bow.
- On kraft cardstock, stamp monkey, color, cut out, then adhere to ribbon bow.
- Using a word processer, type sentiment, print, cut out, then adhere to card front.
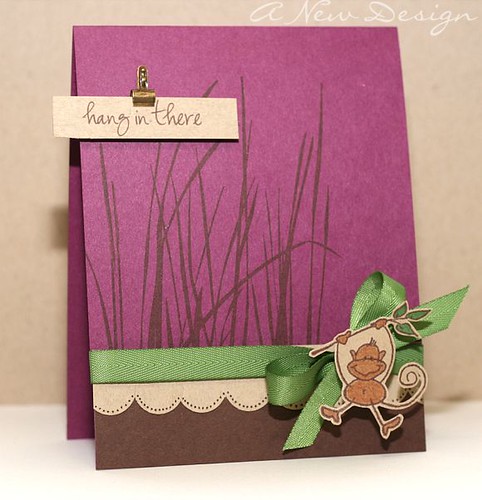
- Add mini library clip.
:: My Goodies {Hang in There} ::Stamps: Stampin' Up! - inspired by nature; Stampendous - monkey Ink: Stampin' Up! - creamy caramel + chocolate chip (marker); ColorBox - chestnut; Copic - nike green (marker) Cardstock: Papertrey Ink - dark chocolate + kraft; Stampin' Up! - rich razzleberry Accessories: Papertrey Ink - new leaf ribbon; Stampin' Up! - slot punch + mini library clip; foam adhesive Card Size: 4.25" x 5.5"
 Happy Friday Everyone! This is not a typical Fast Friday Card post, but I'm sure you're still going to like it! The anniversary card I gave McArthur last year is pictured above. It is featured in Paper Crafts Card Creations 7 magazine (which was released Tuesday, June 23rd). My InspirationI'm not sure about everyone else, but wedding keepsakes are important to me; however, they are all stashed away in a drawer. I was determined to use some of my own wedding keepsakes for an anniversary card. To make this card, I started with an A7 (or 5" x 7") card. I found a sentimental picture, then adhered it to the card front. Next, I grabbed some leftover satin ribbon that I used at the reception. A Bit About the Ribbon One of our wedding favors was a DVD copy of the Perfect Proposal (a TLC show that aired a few years ago featuring McArthur proposing to me). To package the DVD, we placed them in a bag and secured the bag with satin ribbon and a tag with the guests name and their table name. We purchased lots of ribbon for fear that we would run out, so I ended up with a great amount of ribbon leftover. I tied the ribbon around the card front (cutting a slit on the fold of the card) and used an antique metal ribbon charm to dress the card up a bit. To add some texture, I stitched around the card using a sewing machine. And the final touch was to add a sentiment. Last, I inked the edges of the sentiment and the card to add a vintage touch. Feel free to read more about our story here.  The Giveaway Details The Giveaway DetailsSo, do you want to see my other cards in the magazine or better yet, over 290 inspiring card designs? Well, you can win a copy of the magazine by leaving a comment here today! You can also win one of 10 prizes offered by Paper Crafts Connections and Moxie Fab World blogs too! Please leave a comment. Feel free to share how to use wedding keepsakes in creative ways or comment about anything else! We all want to know how to get those special items out of the drawer! After leaving a comment here, please hop along to 14 other amazing card designers' blogs to increase your chances of winning Card Creations 7 magazine (and also get a peek of one of their cards) and one of the 10 prize packages offered by Paper Crafts Connections and Moxie Fab World blogs o Charlene Austin o Beatriz Jennings o Teri Anderson o Kim Hughes o Carla Peicheff o Dawn McVey o Betsy Veldman o Kim Kesti o Alli Miles o Maren Benedict o Melissa Phillips o Sherry Wright o Debbie Olsen o Layle Koncar Thanks for stopping by today! I hope each of you enjoy blog hopping. Have a fantastic weekend and good luck!
 Hey there everyone! It's Blog Hop time! I always want to participate, but usually wait to the last minute and miss the deadline. This is only my second Blog Hop and I'm excited like it's my first. I almost missed this deadline because of the terrible Michael Jackson breaking news death. I dedicate this card to Michael Jackson because he has given so much to the world. So, here are lots of presents for him!  As for the Blog Hop theme, I chose this color pallette because the summer is very colorful to me. I used a black card base because I rarely use black, but in fashion, I think it's very sleek. So, the black card base is like a simple black dress and the colorful presents/squares are the punches of color and design that make the ensemble pop. I think the presents were enough and the card did not need a front sentiment. Here is a dress that shows my idea of black dress with pops of color. The dress is by Forever 21. I hope you like it! Thanks for hopping by tonight! Card Instructions- Trim true black cardstock into an A2 card.
- Punch 9 squares in various cardstocks.
- Corner round the edges of the squares.
- Stamp presents on various cardstocks, cut out, then adhere to squares with foam adhesive.
- Add rhinestones to the presents and adhere squares to the card front.
- Corner round the bottom card front edges.
:: My Goodies {Presents} ::Stamps: Papertrey Ink - Out of the Box Ink: Close to My Heart - Black Cardstock: Papertrey Ink - true black + aqua mist + summer sunrise + lemon tart + spring moss + spring rain + lavender moon + raspberry fizz + ocean tides + berry sorbet Accessories: EK Success - corner rounder; Creative Memories - 1" square punch; Kaiser Craft + Hero Arts -rhinestones; foam adhesive Card Size: 4.25" x 5.5"
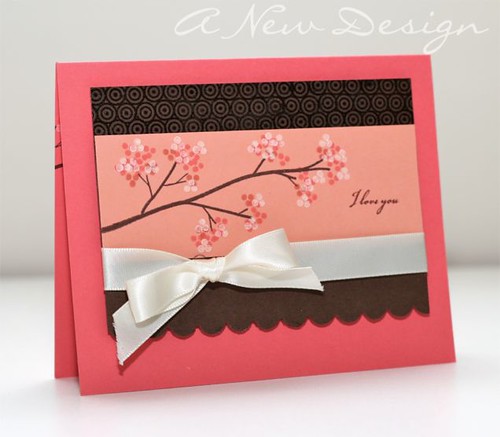
 We're making great progress! Today is Thursday and the weekend will be here before we know it. I'm happy to share with you today a card that I sketched yesterday in preparation for Dawn's color challenge. Sometimes my sketches do not quite work, but this sketch was used to the tee. When I got to my studio, it was so easy and fast to make it knowing exactly what supplies to pull out and what to do. It came together just how I envisioned it and very fast too! If only I could do that for every project! I was on a roll, so I even finished the inside! Finishing the insides of cards is something that I would like to do more of, even if there is no greeting, I'd like to carry the design to the inside to 'finish' it off. What do you think? Let me know and thanks for stopping by today! Have a great day and I'll be back later with a PTI Blog Hop post around 6:00 EST this evening. Hope to see you there! It's easy...just a summer-themed card! ETA: Did you see Paper Crafts' Moxie Fab World posting today? Well, one of my cards is featured over there. It's one of the few that are published in Card Creations 7 magazine. So, hop on over and take a peek so you can see it! This is my first time being published in any Paper Crafts publication and I'm so happy it is a Card Creations specialty publication because it is one of my favorite issues they produce. I'm so excited they listed me as well as the other first timers, like my friend Char! Card Instructions- Trim berry sorbet cardstock into an A2 card.
- Trim dark chocolate cardstock into a rectange and stamp design at the top, then heat emboss.
- Scallop edge punch the bottom edge of the dark chocolate cardstock.
- Trim melon berry cardstock into a rectangle and stamp tree image and sentiment.
- Adhere melon berry cardstock to the dark chocolate cardstock.
- Tie ribbon around the cardstock.
- Adhere to card front with foam adhesive.
- Stamp sentiment and tree limb on the inside of card.
:: My Goodies {I Love You...} ::Stamps: Papertrey Ink - Men of Life + Out on a Limb Ink: Stampin' Up! - chocolate chip; Papertrey Ink - vintage cream + berry sorbet + melon berry; Versamark Cardstock: Papertrey Ink - dark chocolate + berry sorbet + melon berry Accessories: Papertrey Ink - vintage cream ribbon; Stampin' Up! - scallop edge punch; heat gun; clear embossing powder Card Size: 5.5" x 4.25"
  Hey there...again! I know a second post today, but I wanted you all to jump over to Splitcoaststampers (SCS) to read all of the review on the Clip it Up! Ribbon Organizer. So, you all know I just moved my studio about 3 weeks ago. Well, right before the move, I found out that we were reviewing the ribbon organizer and how excited I was!! I definitely needed a ribbon organizer in my new space and it was perfect timing because I was able to place it on an empty wall first before adding other shelving or organizers. This organizer is a dream come true! So, go on over to SCS and read all of our reviews here. The second picture shows how I installed my ribbon organizer. I used Hercules Hooks, which can be purchased at Bed, Bath, and Beyond (BBB). I suggest BBB because you can use a 20% coupon off of each item you purchase in the store! It's not hard to install ladies! I did it in about 15 minutes all by myself! :) The only hurdle you need to cross is making sure where you place the hook is not a stud - it only works through the drywall, which is what makes it an easy install. --I also wanted to share some sneak peeks of my new studio space! I'm going to make every effort to finish it this weekend, photograph (and maybe video it) to share with you next week! Enjoy the rest of your day!
Happy Wednesday to you all! I can't believe it's Hump Day already! This week is going faster than I thought it would. Anyway, today's card was made for the Gallery Idol challenge sponsored by good ole' Paper Crafts! The card is a 4.25" square. I used some SEI goodies provided by Moxie Fab World blog when I won the Citrus Color Challenge last month! I know I've mentioned this before, but that Bridgeport SEI collection is so nice! It's great for wedding ensembles too (hmmmm)! I used a leftover paper from this card. It s double-sided, so you get two-for-one! Using my Scor-Bug, I paper pierced the patterned paper, then added faux stitching with a Uniball Signo white gel pen. The edges were distressed with Tim Holtz distresser. Card Instructions- Trim lemon tart cardstock into a 4.25" square card.
- Trim patterned papers to 4" x 4".
- Paper pierce the patterned paper, then add faux stitching with gel pen.
- Distress the edges of the patterned paper, then tie ribbon around it.
- Stamp sentiment on tag, adhere to patterned paper, then adhere to card front.
- Add buttons.
:: My Goodies {Happy Birthday} ::Stamps: Papertrey Ink - birthday basics Ink: Stampin' Up!- purely pomegranate Cardstock: Papertrey Ink -lemon tart Patterned Paper: SEI Bridgeport collection Accessories: Michaels - white ribbon; SEI- tag (Bridgeport collection); Scor-Bug; Tim Holtz-paper distresser; Craft Supply - buttons Card Size: 4.25" x 4.25"
Hey everyone! How's it going? Well, today is the BIG day! Paper Crafts' Card Creations 7 has been released. You can pick it up at your local bookstore, like Borders or Barnes and Noble or click HERE to get at 10% off the list price! I got my copy on Saturday and haven't put it down since. There are so many great cards in there I do not know what to do with myself. I am truly inspired by each design. I have a handful of cards in there as well, so go pick up your copy and tell me what you think! Today's card was inspired by K. Werner's color challenge. It's a very simple design that can be used for any occasion by altering the sentiment. As a side note, I plan to start recording new videos after returning from my trip to New Orleans (next month). I just wanted everyone to know that I have not stopped doing them completely. I'm waiting on some new technology we're getting soon! Hopefully, the new technology will make editing the videos much easier. Have a great day and thanks for visiting! Card Instructions- Trim really rust cardstock into an A2 card.
- Stamp label design on cream cardstock, then cut out.
- Trim gray cardstock strip and adhere to card front.
- Adhere label to card front with foam adhesive.
- Stamp sentiment on more mustard cardstock, then adhere to card front.
- Add buttons and draw dots above and below the gray cardstock.
:: My Goodies {On Your Birthday...} ::Stamps: Stampin' Up! - great friends + birthday greetings Ink: Stampin' Up! - really rust (marker) Cardstock: Stampin' Up! - really rust + more mustard + vanilla + basic gray Accessories: Craft Supply - buttons Card Size: 4.25" x 5.5"
 Click here to buy this card How was your weekend? Mine was great! I got a lot of studio time in. Sorry no pictures yet, but it's not completely finished. I have some organizers to hang on the wall and I have not decided where I want them yet. So, I wanted to take my time first before hanging stuff anywhere. Hopefully, next weekend I can have photos for you all to see the new space! Today's card was inspired by Loonie's Stampers Challenge. Most of this weeks cards are inspired by Paper Crafts' Gallery Idol contest. Are you participating? Well, if not, today is the last day to upload your cards to the Flickr Gallery HERE. Sounds like some entertaining summer fun! I have a handful of cards entered in the pool for the initial open 'birthday card' call. I can't wait to see who the winner is at the end of next month! July should be very fun to follow the contest. Enjoy your Monday (if that's possible) and thanks for stopping by today! Card Instructions- Trim smokey shadow cardstock into an A2 card.
- Stamp flowers on spring rain cardstock, then die cut squares.
- Adhere buttons, stamp sentiments, then adhwere to card front.
- Stamp sentiment.
:: My Goodies {Wish, Smile, Enjoy Birthday Wishes} ::Stamps: Papertrey Ink - mixed messages; Inkadinkado - doodle flowers Ink: Papertrey Ink - smokey shadow + vintage cream Cardstock: Papertrey Ink - smokey shadow + spring rain Accessories: Craft Supply - cream buttons Card Size: 5.5" x 4.25"
 Click here to buy this card Finally Friday! Finally, a fast card! Today's card was inspired by a Paper Source promotional e-mail I received yesterday. They are hosting a Girl's Night Out class featuring hand stamped cards and other crafts in an Indian theme. I picked up this stamp from Paper Source last year and have only used it once, so I decided it's perfect for a simple one-layer card. This design is great for cards to be made in large quantities or as a quick card gift set. Any sentiment can be added on the front or leave it blank for none at all. It's all up to you in your paper crafting world! I hope you enjoy your weekend and as always, I appreciate your visit to my blog! Card Instructions- Trim dark chocolate cardstock into an A2 card.
- Stamp Indian flowers on left side of card front and heat emboss.
- Tie ribbon into a knot around card front.
- Stamp sentiment and heat emboss.
:: My Goodies {Happy Birthday} ::Stamps: Papertrey Ink - birthday basics; Paper Source - Indian flower Ink: Versamark Cardstock: Papertrey Ink -smokey shadow Accessories: Papertrey Ink - raspberry fizz ribbon; white embossing powder; heat gun Card Size: 5.5" x 4.25"
 To Buy this card, click hereHey there! How is it going? Everything is going great around my way. Last night, I had to run to Georgetown (Ritz Carlton) to help McArthur photograph a music release party. A few local celebrities like TV anchors, Leon Harris, Jim Vance, and Andrea Roane were there. Ginuwine and his wife Sole also made an appearance and were very cordial. They loved taking pictures and here is one that I took of them! Neat, huh?! His new album is to be released next month I believe. He is a DC Metro native and grew up not too far from my Maryland hometown. I saw him in concert while I was in undergrad, so it was so fun to see him again! He's a really nice person, along with his wife as well.  Anyway, I made today's card last night after returning from Georgetown and needed to make something quick because I was tired. So, I pulled out the SEI Bridgeport collection. I won the collection from Cath's Moxie Fab World blog from the Citrus Color challenge a few weeks ago. When I received my package, I was so happy to see that she sent an SEI collection because I really like SEI and this collection is beautiful. The textures and colors are by far my favortie parts to this collection. I can't wait to use it again. Thanks for stopping by and enjoy your day! Card Instructions- Trim smokey shadow cardstock into an A2 card.
- Trim patterned papers to 4" x 5.25" and adhere together.
- Tie ribbons around (first grey ribbon, then purple ribbon into a bow).
- Adhere to card front.
- Stamp sentiment on cardstock sticker and adhere to card front with foam adhesive.
:: My Goodies {Best Wishes} ::Stamps: Papertrey Ink - mixed messages Ink: Papertrey Ink - smokey shadow Cardstock: Papertrey Ink -smokey shadow Patterned Paper: SEI Bridgeport collection Accessories: SEI- ribbon + cardstock sticker (Bridgeport collection) Card Size: 4.25" x 5.5"
 Click here to buy this card. Hey there! How's it going? We're still excited about our upcoming trip to New Orleans! We can't wait! I wanted to thank you all for your kind words and support. We truly appreciate it. Here's more about the Essence Music Festival. The link leads you to a list of sponsors and you can see Susan G. Komen's Circle of Promise (who we will be photographing for) is listed there! Isn't that neat?! Anyway, I made this card last night for Lisa's Scribble This challenge, but the photo was not quite right for the challenge. It ended up that my original photo did not have enough grey gloom for the challenge, so I used a picture of a card I took Sunday, which shows a complete change! This card was super easy to make. Using patterned paper by Fancy Pants Designs, I trimmed the square (on this sheet of patterned paper, there are multiple squares with various designs) to fit the card. You can use these squares as quick designs for cards. I drew the frame on the card front to simulate the design on the patterned paper. Can you see it? Wait...I just noticed a tiny white square on my photo. That must have happened when I was in Photoshop. I'm such a dork! :) I'll learn how to breeze through Photoshop soon (that is, with Lisa's help)! Card Instructions- Trim aqua mist cardstock into an A2 card.
- Trim patterned paper and tie ribbon into a knot.
- Adhere patterned paper to white cardstock, then adhere to card front.
- Stamp sentiment on label on patterned paper.
- Draw frame around card front with gel pen.
:: My Goodies {Happy Birthday} ::Stamps: Papertrey Ink - handwritten notes Ink: Stampin' Up! - white Cardstock: Papertrey Ink - aqua mist + white Patterned Paper: Fancy Pants Designs Accessories: Papertrey Ink - aqua mist ribbon; Uniball - white gel pen Card Size: 4.25" x 5.5"
 Before Before After AfterSorry about the repeat card for Lisa's Scribble This tutorial, but the card I made for the tutorial did not show the changes well. So, I decided to take a gloomy photo of a card to see the adjustments. The "after" photo may be a tad to bright, but I did get a chance to see how the eyedropper brightens the white in the photo dramatically. As you can tell from the comparison photos, the photoshop editing really enhances the picture of the card. Lisa is really giving out great tricks to editing photos, so if you have not joined us in the challenges yet, I highly recommend you start. They're fun and very informative. Thanks, Lisa! The original posting of this card can be found here with all of the details.
 To buy this card, click here. Here's an easy one for you! A simple one-layer father's day card. This card was inspired by Dawn's color challenge. The inside reads: the love of a
FATHER
is one of nature's
greatest
MASTERPIECES
We received great news yesterday! Mac and I were commissioned to photograph Susan G. Komen's Circle of Life presence at the Essence festival in New Orleans in a couple of weeks! How great is that? You should have seen us when we got off the phone. Oh those times are when you wish someone was recording to see our joy, laughter, and excitement because it was darn right funny! So, remember those Race for the Cure pictures we took on the National Mall a couple of weeks ago? Well, they are the reasons we will be able to photograph them at the Essence festival. We hope to see/photograph/meet some celebrities too! Want to look at more of McArthur's pictures? Click here for some new creative (story-telling) shots. Also, he appreciates all of the comments he has received from you all regarding his pictures. He gets all happy when you all go to see them! Thanks so much for stoppin by and enjoy your day! Card Instructions- Trim vintage cream cardstock into an A2 card.
- Stamp trees.
- Draw border frame.
- Add buttons.
- Stamp sentiment.
:: My Goodies {Father} ::Stamps: Stampin' Up! - trendy trees; Papertrey Ink - mixed messages Ink: Papertrey Ink - new moon; Close to My Heart - black; Copic black marker Cardstock: Papertrey Ink - cream Accessories: Papertrey Ink - black buttons Card Size: 5.5" x 4.25"
Happy Monday, everyone! How was your weekend? Mine was very refreshing! I got to spend time in my studio, adding some items (not purchased - just organizing) and even made a few cards. I went to my friend's dinner party at Maggiano's and that was very delicious and fun. Yesterday seemed quite long, but I didn't mind that at all! I enjoyed a hot cup of coffee while some electrical contractors completed a few jobs around the house. I did lots and lots of laundry. I finished the second family room (which is located off of the studio). We were able to enjoy it for most of the day and are loving the new spaces. Mac can watch TV/play video games, while I'm crafting away! I'm glad I'm not in a room all alone anymore! Anyway, here are two cards inspired by the last couple of Loonie Stampers challenges. The colors was very challenging for me, but I finished them (WHEW)! Oh yeah, those bridal pictures I 'modeled' for McArthur are posted here. It may not look like it, but I honestly could barely breathe! Yeah, I got in my wedding dress, but it's nothing like when I wore it on the wedding day. He is a great photographer. I just tried to help him out since he wanted to take some pictures of a wedding gown in a creative way.
 Card Instructions Card Instructions- Trim lavender moon cardstock into an A2 card.
- Stamp background text on aqua mist cardstock and adhere to card front.
- Punch spirals on white cardstock, stamp lines + sentiment, then corner round the edges.
- Tie a ribbon around the white cardstock.
- Stamp "G" and die cut into a circle.
- Die cut a star and adhere to white cardstock.
- Add "G" circle die cut with foam adhesive.
- Adhere white cardstock to card front using foam adhesive.
:: My Goodies {Congratulations G} ::Stamps: Stampin' Up! - great grads; Rusty Pickle - journal stamp Ink: Papertrey Ink - aqua mist + lavender moon Cardstock: Papertrey Ink - white + lavender moon + lemon tart Accessories: Papertrey Ink - lemon tart ribbon; Provo Craft - cuttlebug + concentric star die EK Success - corner rounder; Stampin' Up! - spiral punch; Spellbinders - circle nestabilities Card Size: 4.25" x 5.5"  Click Here to Buy This Card
Card Instructions- Trim smokey shadow cardstock into an A2 card. Trim about 1/4" off the card front.
- Stamp background retro designs on hibiscus burst and lemon tart cardstocks.
- Add smokey shadow strip and adhere altogether.
- Stamp flowers and sentiment.
- Add ribbon.
- Adhere to card front.
- Add cardstock to side of the card front and inside of card (hisbiscus and lemon tart).
:: My Goodies {Wishing you a Happy Birthday} ::Stamps: Papertrey Ink - background basics (retro) + wishing you; Stampin' Up! - pocket silhouettes Ink: Papertrey Ink - smokey shadow Cardstock: Papertrey Ink - hisbiscus burst + lemon tart + smokey shadow Accessories: Papertrey Ink - white ribbon Card Size: 4.25" x 5.5"
 How's your Sunday going? Mine has been very full, yet relaxing. I even put on my wedding dress today and took pictures. You read that right! I squeeeeeezed into my wedding dress (could barely breathe) and took some bridal shots for Mac's portfolio. We went to a weed infested area and it was a bit scary, but I did it! I'll share some pictures with you when he's finished. I also got a chance to finish this card for K. Werner's color challenge. I thought about a baby boy when I saw the colors. I actually forgot about the green. Then remembered suddenly. So, I added a strip below the ribbon and no one knew I forgot, right?! Well, now you do because I spilled the beans! I hope to make a couple of cards tonight for the Loonie Stampers Challenge that I did not do last week and the one for this week. Let's hope I get done becaus I am also in the processing of making dinner. Thanks for visiting and enjoy the rest of your weekend! I'll be at the Papertrey Ink release party tonight in the forum if you want to chat too! To purchase this card, click here. Card Instructions- Trim white cardstock into an A2 card.
- Stamp background stars onto teal cardstock, heat emboss with white embossing powder.
- Adhere orange, green, and blue cardstocks to the teal cardstock and corner round edges.
- Tie ribbon into a bow.
- Stamp sentiment.
- Adhere to card front with foam adhesive.
- Corner round edge.
:: My Goodies {Ahoy Sailor} ::Stamps: Papertrey Ink - background basics (stars) + bitty baby blessing Ink: Stampin' Up! - pumpkin pie (marker); Versamark Cardstock: Papertrey Ink - white + spring rain; Stampin' Up! - taken with teal + kiwi kiss + pumpkin pie Accessories: Papertrey Ink - white ribbon; white embossing powder; heat gun; EK Success - corner rounder Card Size: 5.5" x 4.25"
Happy Saturday to you! I'm up bright and early so I can hit up the local farmer's market. I have not gotten the chance to go since it has opened in April, so I am very eager to get my hands on some fresh fruits and veggies for the week. It may seem like I may not have a card for you today, but I do! You have go check it out here, on Jen del Muro's blog for today's Sketch for You to Try! So, click on over and try out the sketch too while you're there! Yesterday, I updated my shopping site with new cards. You can purchase them here. I also added a "Buy Cards Here" link on the left sidebar so you can find just in case you want one of the cards I've shown on the blog. I plan to add a link to buy for each card that is available for sale at the end of each blog posting. If there is no link to buy, then it's probably (1) a personal card I will be using, (2) a commissioned card made for someone else, or (3) for contest or publication submission. I think this will be easier for people who view my blog and want the most recent card to buy! I hope you all enjoy your weekend and as always, I appreciate you stopping by!
 Hey everyone! TGIF! I've had a busy week moving and organizing my studio and it is still not finished, but hopefully with some time this weekend, I can get a lot more completed. Today's card is SUPER FAST! I ran out of steam last night after working on another card, so I had no choice but to make it really quick and easy. I also practiced on my camera a bit, taking tips learned from Lisa Spangler's Scribble This challenge. Since I did not have time to customize my white balance for the picture, I did use an auto white balance setting in the manual mode! That is a big step for me to get out of an automatic macro (flower) setting! Since my pictures were a bit blown out (due to over-brightness), I asked Mac what to do about it. So, he suggested I adjust the apeture setting. It worked a lot better! :) The card is cream, but the brightness is still there. Do you think the photo turned out good or a little too bright still? As for the studio update, I did add a major element to the room, but I can't share it just yet. I'll reveal it soon! Sorry folks, no sneak peeks on this hot item! I appreciate your comments and thanks for stopping by! Have a great weekend! Card Instructions- Trim vintage cream cardstock into an A2 card.
- Stamp flowers onto card front.
- Stamp sentiment.
:: My Goodies {Enjoy} ::Stamps: Papertrey Ink - handwritten notes; Verve Visual - abundant blessings Ink: Stampin' Up! - chocolate chip + tangerine tango + kiwi kiss Cardstock: Papertrey Ink - vintage cream Card Size: 5.5" x 4.25"
 I'm so glad the weekend is fast approaching! My studio is coming along pretty well. Remember, to stay up-to-date on my progress, check out my tweets, which include sneak peek pictures as well! McArthur played electrician last night and added a sweet number to the room! Please note, it could be a month before I get everything as I want it to photograph it for you all to see the details! I was having a difficult time organizing the room because I'm not sure where I wanted things to go. So, since I did not feel comfortable in the new space, I did what makes me comfortable and that's make something! So, I placed supplies where I thought I'd like them and made a card to see if it worked. I think it's going to work for the most part. I'm definitely going to tweak a few things here and there, but my main items, like adhesive, baby wipes, stamps, ink, and scissors are right where they need to be...close by! I think I can adjust to everything else later. I made this card really quick. I pulled out my stack of SEI Dill Blossom patterned paper and selected a couple of coordinating pieces. You can pick up the stack of 12x12 patterned paper at Michaels. Make sure you use a coupon! The only other tip I have to offer is when pulling the twill tape/ribbon through button holes, make sure the holes are not too small in comparison to your ribbon size. Next, use a sharp edge to get it started through the button hole until you can use your fingers to pull it through. I used my Cutterbee Tweezers! The twill tape frayed at the ends, but I trimmed it, only to re-fray the ends again! By the way, I hope to feature my eco-friendly post soon. I plan to use limited supplies to make a variety of cards. After I get settled in, I will pull a few items out of my stash, then figure out ways to use them all. How many times do you buy something, then never use it again? Join me in my soon-to-be adventure to use scraps and limited supplies! One more item of interest. If you are looking to purchase cost-effective paper crafting supplies, I will be selling some soon. After going through my supplies, I will be collecting items that deserve a better home! Stay tuned! Thanks for stopping by! Card Instructions- Trim dark chocolate cardstock into an A2 card.
- Trim patterned paper and adhere to card front.
- Tie twill tape around card front, then fit through button, and tie a knot.
- Stamp sentiment on spring moss cardstock, add buttons, and adhere to card front with foam adhesive.
:: My Goodies {Always There} ::Stamps: Papertrey Ink - heartfelt basics Ink: Stampin' Up! - chocolate chip; Papertrey Ink - melon berry Cardstock: Papertrey Ink - spring moss + dark chocolate Patterned Paper: SEI - Dill Blossom collection Accessories: Technique Tuesday - twill tape; Craft Supply - buttons Card Size: 5.5" x 4.25"
 How's it going out there in the blogging world? I'm so tired typing this post. We finished assembling the furniture, which is a huge relief. I moved majority of my supplies to the new space! However, it is not in any kind of order. It's fun to get a new space, but daunting to figure out new organization and how you will work best in the new room. I sat in the room for a while to try to get myself acquainted, but it just doesn't feel 'lived in' yet. Perhaps making a card or two will allow me to determine where and how I would like things to be organized. Anyway, if you want to see pictures on the progress, a few are posted as twitpics on my twitter updates. I have a lot more stuff to add to the room, such as some hardware that is still up in the other room {sigh}. I'm not going to try to rush this because it can be a bit overwhelming. I hope to get a lot if not all accomplished by the weekend. So, here's what you came here for...a card! I made it about three months ago. It's pretty simple, but I don't think I shared it yet. If I did, my apologies!! I could not remember the name of the floral stamp set by CTMH and the stamps are in the 'new' room. Thanks for stopping by and have a great HUMP DAY! Card Instructions- Trim aqua mist cardstock into an A2 card.
- Stamp flowers and sentiment on cream cardstock, then mat on orange cardstock.
- Tie ribbon around card base.
- Adhere matted cardstock onto card base.
:: My Goodies {love ya} ::Stamps: Close to My Heart; Papertrey Ink Ink: Stampin' Up! Cardstock: Papertrey Ink - vintage cream + aqua mist; Stampin' Up!-tangerine tango Accessories: Stampin' Up!-chocolate chip ribbon
 Hey Everyone! How are you?! We tackled the IKEA furniture and it was so easy in the beginning. I did one entire piece by myself. Then, I helped Mac put together the larger pieces. We were doing so well until the end. Why is it that the easiest tasks are so daunting? We ran out of steam and left one final step to complete tomorrow. So, I'm going to start hauling stuff to the new space tomorrow night!!! I did not want to start before the furniture was in place because I thought I might have to keep moving it around other stuff. I'll keep you posted on the progress! Of course I did not make a card yesterday, so here is one that I made a few weeks ago. It is a Hawaiian-themed graduation card! This was a special request to match a graduation gift someone is giving to a graduate. Thanks for visiting today! Take a peek at the Susan B. Komen Race for the Cure pictures from last weekend. I even took a couple! I even saw VP Joe Biden and his family (very close) and photographed Lalah Hathaway. VP Biden was really funny and introduced his wife, Dr. Jill Biden who sort of participated in the race (see pictures). Lalah was a really cool person and sang at the event. I have a picture with her too and will share when Mac 'releases' it! Card Instructions- Trim white cardstock into an A2 card.
- Stamp hula ladies on white cardstock and color.
- Stamp sentiment.
- Trim kraft cardstock to fit card width, then create grass skirt with scissors, and adhere to card front.
- Add ribbon and flowers.
:: My Goodies {Congratulations to the Graduate} ::Stamps: Verve Visual - great expectations; Inkadinkado - hula ladies Ink: Close to My Heart - black; Copic Markers Cardstock: Papertrey Ink - white + kraft Accessories: Making Memories - flowers; Ranger - stickles; Papertrey Ink - hibiscus burst ribbon
Have you all heard about Northridge Media's online magazines? Well, to tell you a little more about it Northridge Media publishes CARDS, Scrapbook Trends, Simply Handmade, Bead Trends, and related Idea Books which are now available to view online! It is a great idea for crafters to obtain a copy of the magazines in an efficient and effective way. I don't know about you, but for me, it is hard to locate a copy of some of the magazines in my local bookstores. With the online publications, anyone has access to them! The cost to download an issue or subscribe is very cost-friendly, but the most rewarding part is that you can always have access to it online. No more worries if you lose your hard-copy magazine or if you are running out of space to store your magazines. This is also an eco-friendly way to support the publication industry. That's not even the great news. Right now, Northridge Media is offering a free download to its Mini Albums 2008 Idea Book publication HERE! By downloading it, you will be able to see some of the great perks about online publications, such as: - Hyperlinks to vendor websites
- Convenient toggling through the magazine using links from the Table of Contents
- Ability to increase the size of a page to view the projects in greater details
- Portability of the publication (i.e., at work, school, home, crops)
So, what are you waiting for? Go ahead and give it a try! Let me know what you think about it! There is also a link to the free download in my left sidebar!
 Custom WB Custom WB AWB AWB Flash WB Flash WB White Fluorescent Light WB White Fluorescent Light WB Non-Manual Flower Setting with AWB Non-Manual Flower Setting with AWBIn response to Lisa Spangler's Scribble This Challenge, I pulled out my Canon XTi, 50mm lens, and 580EX II flash to get started! To be honest, I had to do this challenge THREE times to get it right! Luckily, Mac was around to help during my frustrated phases! My first problem was that I forgot to change my lens to manual focus instead of auto to photograph the white paper. I knew I needed to do this, but I kept thinking about manual settings, not the focus. Once I figured that out, I did the tutorial, only to realize that somehow I photographed everything in RAW...UGH! I did not mean to do that because I only have CS2 on my computer and Mac has the newer version on his. START ALL OVER AGAIN, after asking Mac why my Photoshop isn't opening my files. So, I found out how to change my settings to shoot in jpeg and select the size of files. WOW, I learned more than I thought just trying to do the WB tutorial! So, the last and final time, I customized my WB, used a few pre-set WB settings, and photographed my card about 6 times. I edited my files in Microsoft program because I was mad at Photoshop! I did not do much to them except sharpen them up and add my watermark. So, the photos are pretty much as I shot them with the exception of sharpen a little blurry out. I was not a big fan of how the photos turned out. It was not because of the WB because they were very bright, but it was my focus that was off. I'm not sure why, but I hope Lisa will cover that sometime in a future tutorial! This was my first time photographing my cards in a manual setting. I usually use the Flower setting, which is an automatic setting (see the last picture). It came out the worse and now I am totally convinced to switch to using manual for here on! Perhaps my ISO was off or something else, but anyway, here's my card and what I learned in my tutorial! Update on the studio move: It's NOT done! I did go to IKEA and purchase a few furniture must-haves to start the move. IKEA is the best...love that store. I will be returning to pick up some organization pieces after I get the bulk of my stuff moved. I hope to get the pieces assembled tomorrow and then start the move throughout the week. I'm getting more excited since I picked out my new furniture additions, but not really ready to haul items downstairs! Thanks for stopping by and have a great day! Card Instructions- Trim white cardstock into an A2 card.
- Stamp deer on various cardstocks, cut out, then adhere to card front using foam adhesive.
- Add rhinestones
- Stamp sentiment.
- Draw lines/dots.
:: My Goodies {life is AMAZING} ::Stamps: Colorbok - friendly forest; Technique Tuesday - beautiful collector's edition Ink: ColorBox - chestnut; Close to My Heart - cranberry; Stampin' Up! - marker Cardstock: Papertrey Ink - white + pure poppy + summer sunrise + ripe avocado; Stampin' Up! - pacific point Accessories: KaiserCraft - rhinestones
I appreciate each of you for stopping by my blog every day. I wanted to show my appreciation by giving away this hard-to-find stamp set. Last year, I did not earn the anniversary set, and this year I won two! I'm really grateful for my time and commitment to papercrafting and of course to my blog readers. Thank you SO MUCH for leaving comments, encouraging me and being a special part of my life. It means so much! I never thought anyone would want to read my blog, let alone achieve 50,000 hits, so I am really shocked and honored, but excited! I'll just end my little 'speech' by saying never doubt yourself, never hold yourself to another's standards, and continue doing what you want and like to do in your hobby that makes you happy and you will be just that...happy! In response to a couple of comments: Joann, who lives in the area - I hope I run into to you one day around town! If you see me, say Hi! :) Liza Yon, who lives in Falls Church - I work there, so maybe I might run into you too one day! If you see me out and about, say Hi! :) ---------------------------------------------Random Integer Generator Here are your random numbers: 56
Timestamp: 2009-06-07 02:13:52 UTC ---------------------------------------------The winner of the Papertrey Ink 2nd Anniversary Stamp Set, Everyday Classics is...commenter number 56, who is Sarah Martina! Congratulations! ***Sarah, please e-mail me (my e-mail link is on my blog and looks like an envelope) your mailing address and I'll send this stamp set to you soon! You have until Monday, June 8 at 8 AM to claim your prize! Thanks everyone who entered to win the stamp set! I was overjoyed at the response of 72 people!
I've been holding a little secret from you all! SORRY! I am a guest designer for Jen del Muro's SFYTT during June! Isn't that so exciting?! I'm really honored and grateful for the invitation to design cards for her super sketches she creates for each Saturday! Take a look at the posting here and my first card! I hope you like it! Also, try making a card with the sketch! The sketches are posted every Saturday for you to try out. Sketches are always a challenge for me, so when I complete a card using a sketch, I'm super proud of myself. Is anyone out there like me? So, with the SFYTT, I'm sure that will help me get over my fear of sketches! Thanks again Jen for inviting me to be a guest designer and hosting the wonderful challenges on your blog! Make sure you also check out the design teams' sketches as well. They've put in lots of time to make such cute, cute cards!
 That's right, some BLOG CANDY! Today, I am giving away Papertrey Ink's Second Anniversary stamp set, Everyday Classics. This stamp set is not available for sale, so this is not readily available. It includes many sentiments, cupcakes, stars, teacup, and flowers, birds, and much more! You can view some of my cards using this set by clicking here. I'm celebrating 50,000 hits and wanted to share my appreciation with you all for visiting my blog! I really appreciate each of you. Here are the details: - Contest is open 8am-10pm EST on Saturday, June 6 ONLY.
- You may post one comment about anything.
- Winner will be announced Sunday, June 7.
- Package will be mailed soon after receiving mailing address via USPS first class mail.
- Winner must contact me within 24 hours of winning post notification.
- If original winner does not claim prize in 24 hours, another winner will be selected and announced.
- Winner will be identified using Random.org integer generator.
I hope I did not leave anything out! What are you waiting for? Start commenting, you only have a few hours!
 Hey there! It's the weekend and boy am I glad! Do you have any neat plans? I'm a photography assistant again and this morning we are photographing the Race for the Cure on the National Mall! Really neat, right?! Last night, I got a chance to make this card for Dawn's color challenge! I really liked the color choice and even postponed my studio move to complete it! Well, maybe I was a bit lazy! We also watched Twilight. I did not think I would like it because I thought it was a tween movie. BUT, I really enjoyed it...okay, loved it! I cannot wait for the sequel! I cannot believe that now I am one of those "Twilight" fans too! Anyway, about the card...it was really quick and easy to do. I enjoy doodling on my cards now and sometimes freehand, but other times, I use a ruler. I think the frame goes well with the label stamp because it could look like I drew both...NOT (only the frame)! I hope to move most of my supplies tomorrow evening. Don't forget to check for tweet pics and progress. I already have an idea on how I plan to arrange it. Thanks so much for stopping by...I truly appreciate your visits, comments, and kind words. I hope you have a great weekend. Make sure you stop back by because I am posting a BLOG CANDY later today to celebrate 50,000 hits!!! I'm giving away one item, but it's an item you cannot buy, but only earn and I have one go give (hint, hint)! Card Instructions- Trim raspberry fizz cardstock to an A2 card.
- Draw frame on card front.
- Stamp label on kraft cardstock and cut out.
- Stamp sentiment and floral sprays, then adhere to card front.
- Add buttons.
:: My Goodies {friend}:: Stamps: Stampin' Up! - great friend; Daisy Bucket desings - label
Ink: Papertrey Ink - vintage cream + raspberry fizz; Stampin' Up!-marker; ColorBox-chestnut Cardstocks: Papertrey Ink-raspberry fizz + kraft Accessories: Creative Imaginations-flower buttons; Craft Supply-cream buttons; Bazzill-french vanilla floss
|
|


What a fantastic way to turn 'just a photo' into so much more! I love the touch of the ribbon - what a great color! :)
June 26, 2009 8:45 AM