After December 4, 2010, all future posts are on a new site. Please subscribe to my NEW feed at www.ashleynewell.com or click below to subscribe to the NEW feed.
OMG...it's already Thursday! YAAAY - It's almost time for the weekend!! The other night, I made this card for K. Werner's 50th Color Challenge. I really liked the color combo and had an idea driving me crazy in my head. Has that every happened to you? It is happening to me more and more and it seems like I'm breathing card designs! HEE Anyway, I sketched out the layout, then while creating it, I selected what parts of the sketch would be certain colors. Now, this is not a technique that I use all the time. I remember a time when I could not even sketch my ideas. It's neat how we evolve over time. Since I purchased my wood-grained background stamp from Michaels earlier this month, I've been thinking of different ways to use it. When I saw this challenge, that stamp was embedded in my brain to use, so I did! The part that took the longest was deciding the sentiment. I sketched something different, but decided to use thickers. Then, I realized after adhering some of the thickers that I didn't have all of the letters in red to spell the sentiment. UH OH! SHOOT! What should I do? OOOH! Use some coordinating color thickers and alternate!! There's always a solution in paper crafting and that's why I love it. It is like problem solving to me. Since it's graduation season, 'CONGRATS!' fits perfect!
Oh yeah, I forgot to photograph the back, but there are cute red polka dots stamped on the back!!! I was going to use it on the front, but thought it was too busy. I just discovered that decorating a coordinating pattern on the back is so NEAT! Maybe I should photograph it (later)! I hope you all like how it turned out.
I hope to be back tomorrow with a fast card, but if not, you still got one on Monday this week! I will share a card regardless! There's always something laying around here to share.
One of the engagement session pictures are up!! These are just a select few of the shots taken. Enjoy them HERE! They're awesome!
Thanks for coming by today and I'll catch you tomorrow!
Card Instructions
Trim turquoise cardstock to an A2 card.
Trim brown cardstock into a rectangle and stamp wood grain pattern, then heat emboss.
Corner round brown cardstock bottom edges.
Take a strip of red cardstock and create scallops using slot punch (deeper effect).
Adhere scallop edge cardstock to top center of card base.
Tie ribbon around wood grain cardstock and adhere to card front with foam adhesive.
Add thickers and rhinestones.
Corner round the edges of card front.
:: My Goodies {CONGRATS!}::
Stamps: All Night Media - wood grain background rubber stamp (Michaels)
Ink: Versamark Cardstocks: Papertrey Ink - dark chocolate + pure poppy; Close to My Heart-turquoise Accessories: Heat Gun; White Embossing Powder; American Crafts-thickers; Kaiser Craft-rhinestones; Stampin' Up!-so saffron ribbon + slot punch; Corner Rounder
It's Wednesday already! Boy, do these weeks fly by when you have a video to record! OK, so I got a new Insignia HD mini video camera this weekend. I planned to buy the Flip, but after discovering Insignia's comparable camera, I researched the similarities and differences and it appears that Insignia had much more specs that I was interested in. Plus, the Insignia was on sale and included a bag, memory card, and a tripod in the deal! I couldn't turn that down! I'm no professional with it yet because there are many buttons I still need to press. But, I will say it was easy-to-use right out of the hard-to-open packaging. The quality of this picture is much better, but I need to fix my white balance next time. Good ole' DH fixed it for me when he edited it! So, thanks for stopping by and let's all thank McArthur for his contribution to Watch Me Wednesday videos! WOOO HOOOO for Mac!
NOTE: If you are an e-mail reader, you may not see a link to the YouTube video. So, please click on the headline to direct you to my blog site where you can view it!!
:: My Goodies {Happy Mother's Day, Mom}::
Stamps: Papertrey Ink - Women of Life
Ink: Papertrey Ink - hibiscus burst Cardstocks: Papertrey Ink - white + aqua mist + hibiscus burst + lemon tart Patterned Paper: Papertrey Ink - friends til the end Accessories: Spellbinders - tag nestabilities; SU!-slot punch; hemp twine; Papertrey Ink - lemon tart ribbon + button
Hey out there! How are you all doing? I'm getting a little tired. I have lots to do with lots of deadlines (all craft related) and must be done by Sunday. I'm in the studio working double-time! I hope I have more juice tomorrow to get a lot accomplished. I'm so glad I recorded two videos because I can now get my DH to edit it! :)
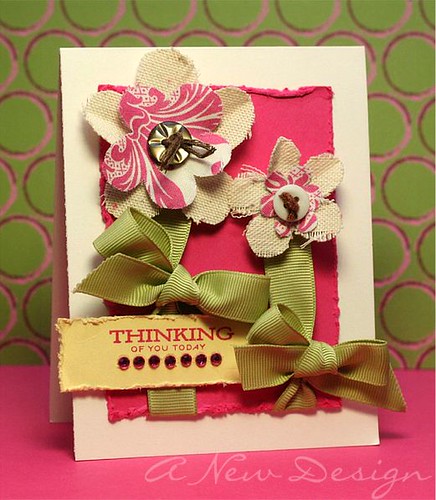
OK...anyway, this card was inspired by my fascination with fabric! I created fabric flowers by winding strips, but this time I wanted to hand-cut some. It's just that simple. I suggest drawing the flower on the reverse side of the fabric, then cut it out. I tried to cut without a sketch and that DID NOT work for me! :) I thought of the idea of using ribbon as stems/leaves and really like it! I'm sure I'm not the first to use this idea, but it's neat anyway! I roughed up everything because the fabric frays and I wanted to keep the style cohesive.
Thanks for stopping by and I'll be back tomorrow with a Mother's Day + Loonie Stamper's Challenge inspired Watch Me Wednesday.
Card Instructions
Trim vintage cream cardstock to an A2 card.
Trim raspberry fizz cardstock into a rectangle and distress the edges.
Freehand flowers on fabric, cut out, and sew buttons on them.
Cut a slit into the raspberry fizz cardstock, then tie ribbon into a bow through them.
Add fabric hand-cut flowers to ribbon stems.
Stamp sentiment, cut out, distress, and add rhinestones.
This is a Monday Fast Card! I couldn't hold it until Friday, so I decided to share today. The longest step is heat embossing and die cutting, but once that's done, the card is basically finished. I really like the heat embossing of the wood grain background, so you may see this again soon! The heat embossing shows the texture of the wood grain, so its really effective. This is a very simple card and you can hand-write your own sentiment in the empty space.
This weekend was fun-filled. I got my eyes checked and picked out some new glasses. They won't be ready for a while, so I'll share a video-blog with you when they are so you can see them and tell me what you think! I usually only wear my glasses at work, but also on occasion when I'm crafting. They're exactly what I wanted, bold and fun!
I saw Obsessed and it is your new Fatal Attraction. It was entertaining, but no movie of the year. It's a good movie, but not necessarily a must-see at the big screen, but DVD, yes! Don't worry, I won't spoil the movie for you, you'll just have to see for yourself.
We also did another infant + family session and it was great! I'll definitely share the photos with you when they're done. I have such a fun time with McArthur on these shoots and meeting new people. You get a chance to step into the lives of others and see them in their best light.
Last, but not least, I picked up my new video camera!!! I videoed TWO recordings of cards already. It's very easy to use and has much better video quality than my previous camcorder. Although I didn't get the Flip Mino, I did get a comparable HD camera that is budget-friendly and effective for my recording purposes. I'll let you know what it is after I finish editing it and am 100% sure I want to recommend it!
Have a great Monday and thanks for stopping by!
Card Instructions
Trim berry sorbet cardstock to an A2 card.
Emboss wood grain background stamp on dark chocolate cardstock.
Die cut circles and adhere to card front with foam adhesive.
Stamp sentiment.
Corner round edges.
:: My Goodies {Enjoy Everyday Enjoy Life}::
Stamps: Papertrey Ink - handwritten notes; All Night Media - wood grain background rubber stamp (Michaels)
Ink: Versamark; Stampin' Up! - chocolate chip Cardstocks: Papertrey Ink - berry sorbet + dark chocolate Accessories: Spellbinders - circle nestabilities; ProvoCraft-Cuttlebug; White Embossing Powder; Heat Gun; Corner Rounder
Hey Everyone! It's Friday and time for another fast card. Now, anyone can whip this card up in a jiffy. You know how when you want to send a little note along in a package? Well, this card is the perfect solution for that and you can make it in under 10 minutes (should be 5 if you work quickly from these steps). Drawing or handwriting on a card adds a personal touch, but is also super quick. Don't like your handwriting? Practice or purchase a handwriting stamp. Papertrey Ink has plenty, Technique Tuesday's Alli Edwards has a few, and even rubber stamps found at A.C. Moore or Michaels (like the one I used) work as a great substitute. One-layer cards can look plain, but I like them sometimes for simplicity and they remind me of graphic cards I can purchase in a pack in a store, except I made it! :)
I hope you all have a great weekend. We have some fun plans. Of course, we have another photo session. This time it's a family + newborn. I have some great ideas and I just hope the baby stays asleep so we can do them! We plan to go to the movies to see the new Beyonce movie with the lady from Heroes, Ali Larter, called Obsessed, it looks so dramatic! Other than that, I have lots of projects and cards to make in the between time to keep me happily busy. Oh yeah and I hope to pick up my new Flip Mino HD Video Camera too and play with that!
Thanks for stopping by!
Card Instructions
Trim gray cardstock to an A2 card.
Adhere felt sticker to the center of the card front.
Stamp sentiment.
Doodle a frame around the center.
:: My Goodies {Just a little Note}::
Stamps: Stampendous - just a note
Ink: Stampin' Up! - white Cardstocks: Papertrey Ink - smokey shadow Accessories:Martha Stewart - felt applique stickers; Unibal-signo gel pen
What's going on folks?! It's almost the weekend and today marks a few great weather days to come in the DC area...WOO HOOO...I {heart} warm weather! I was inspired by SCS Color Challenge and made this card. I like pink and gray together, but the rose red was throwing me off, so I added it with a floral design by coloring my acrylic stamp with my SU! marker (it worked even though it looked like it wouldn't - you have to 'huff' it or breath heavily on it to get the ink moist enough to stamp evenly). That stamp set is one of the many I won during Paper Crafts' Stamp It Week! I received so many goodies!!
Thank you all for stopping by so I can share my creations and I hope you enjoy your day!
Card Instructions
Trim pink cardstock to an A2 card.
Trim gray cardstock into a square.
Dry emboss design on gray cardstock and sand.
Stamp flowers, cut out, and adhere to gray cardstock + add rhinestones.
Hey there! It's that time of the week for Watch Me Wednesday. We had too many technical difficulties with this video, so I'm going to get a new mini HD camera sooner than later. My video camera is not even 4 years old and it's completely outdated! I need something lighter weight and easier to use, like the USB functionality of the Flip Mino HD camcorder. So, I apologize for the grainy parts of the video; I did the best with what I had without cutting the entire video.
What's going on out there? Since this week is Earth Week, I thought I'd make an eco-friendly card. I used recycled paper and reused a recylced tag. The tag was originally wrapped around a hand towel I picked up at West Elm a couple weeks ago. The towels are made from organic cotton and they marketed it with recylced papers and fibers. I liked the tags so much that I saved them! I have one more! I covered the West Elm logo with the sentiment and lightly stamped over the 'green' label with a sentiment. I left the tree that was already centered on the tag.
Since we use so much paper in our craft, try to reuse some materials this week or see if you can find some recycled paper or anything green! I know a really good way to use embellishments we already have and that's those extra buttons that come with our clothes we buy. I save all of mine in a jewelry box and then use them as needed. It's just my own way I think I contribute to conserving and saving instead of throwing them out.
GO GREEN! Thanks for stopping by and have a great Tuesday. I'll be back tomorrow with my video. I recorded it last night! I hope you like the card I made.
Card Instructions
Trim kraft cardstock to 5.5" x 4.25" (cut 8.5"x11" cardstock in half at 5.5", then score at 4.25")
Stamp sanded background on card front.
Trim patterned paper into a rectangle.
Trim slightly larger new leaf cardstock and scallop edge the right side.
Adhere patterned paper to new leaf cardstock.
Add cording and tag; doodle around tag.
Stamp sentiment and adhere.
Adhere to card front with foam adhesive.
:: My Goodies {Congratulations}::
Stamps: Stampin' Up! - sanded + great grads + congrats
Ink: ColorBox-chestnut; Stampin' Up! - chocolate chip marker Cardstocks: Papertrey Ink - new leaf + kraft Patterned Paper: DCWV - The Green Stack recycled paper Accessories: Michaels - jewelry cord; Stampin' Up! - scallop edge punch; West Elm-tag
Hey there! Here's a quick card inspired by Loonie Stampers Challenge. I needed a birthday card (which will be delivered about a day late), so I was eager to complete this challenge. It's a super simple and quick design because I did not have too many creative juices flowing.
We had a jammed-pack weekend and are exhausted. I took a nap, but I really could use an extra day of R&R. I hope I can make the video this week, but it may have to wait until next week. We'll see how the next two days go!
Oh yeah, here are some pictures of the twins! Enjoy! I'll share some of the other photos with you when they're completed. Thanks for stopping by!
Card Instructions
Trim pacific point cardstock into an A2 card.
Trim patterned paper to fit top portion of card front and adhere.
Trim kraft cardstock to fit width of card front and about 2" and punch scallop edge and adhere to card front.
Add ribbon, button with twine.
Stamp sentiment.
Round corners.
:: My Goodies {Happy Birthday To You}::
Stamps: Papertrey Ink-damask designs
Ink: ColorBox-chestnut Cardstocks: Papertrey Ink - dark chocolate + kraft Patterned Paper: Papertrey Ink - friends 'til the end Accessories: Papertrey Ink - pure poppy ribbon; Craft Supply-red twine + button; Stampin' Up!-slot punch; Corner Rounder
Hey there! I'd like to first say that if you have sent me an e-mail and I didn't respond, it was because it was spammed. Yesterday, I discovered a few important e-mails that were spammed and I was not checking that folder daily. I apologize to anyone, but please know that from this day forward, I will be sifting through my spam folder too! :) So sorry about any oversights.
The Girls Night Out event went GREAT! We were there really late and I was so tired. I sold lots of cards and realized how much people love handmade designs. I even met some of my blog readers!! Thanks so much for coming out to see me! :) I met a lot of new people and hope to receive custom orders soon!
I'm so thrilled this morning because my blog friend, Anthonette, highlighted me on Inspirational. She showcased a few of my cards and said some great things about my work. Thanks so much! She even mentioned Mac and his photography! Too sweet, right?!
Anyway, onto today's project. This is a baby frame I made for someone as a gift for their new arrival. The baby's name will be Trinity and I incorporated that into the design using metal letters by Making Memories. I stamped the design on one side using PTI Guidelines 2. I added ribbon and trim to the top. The fabric flower was added to the bottom to create balance on the frame. I painted the frame using an acrylic paint (green, then a cream overlay). I stamped the insert where the picture will be added just to make it look finished when she gives the frame away.
Thanks so much for stopping by! I am about to get my hair trimmed, then I have to head out to do the engagement session. I'm actually going to participate in the photos today since I just got my "nifty fifty" lens (50mm). I love that lens (even though you can't love something that can't love you back, you know what I mean)!
This is a not so fast card! Sorry, yesterday I was a little under the weather and took a break from the studio. But, I still have a card to share with you! I made this one after last week's K. Werner Challenge, but I decided to still use the colors (minus the green, which somehow I forgot until the end). I thought the colors screamed "teenager," so that's who I had in mind when I created it.
I hope you have a great weekend. Tonight, I am doing the Girls Night Out event at the National Harbor and will be selling cards (hopefully)! Mac will be the photographer. Click here for details if you want to come!
Tomorrow, we're doing an engagement photo session in Old Town, Alexandria (love that town)! I'll share the photos with you when they're done in about a week! We also have another engagement shoot at Washington Nationals baseball stadium on Sunday. BUSY BUSY BUSY BEES! It's going to be a beautiful weekend, so we'll have a blast and hope you do as well!
Card Instructions
Trim pacific point cardstock into an A2 card.
Trim white cardstock into a square and stamp wood grain background (stamp off on scratch paper, then stamp on your white cardstock).
Add pom pom trim and tie ribbon around into a bow.
Adhere white square to card front with foam adhesive.
Die cut scallop circle and adhere.
Add chipboard letters, embellish with white gel pen.
Add glitter to chipboard star and adhere.
Round corners.
:: My Goodies {You Rock!}::
Stamps: All Night Media - wood grain background rubber stamp (Michaels)
Ink: Stampin' Up!- pacific point Cardstocks: Papertrey Ink - white; Stampin' Up! - ruby red + pacific point Accessories: Papertrey Ink - true black ribbon; Michales-Offray pom pom trim; Spellbinders-circle nestabilities; Provo Craft - cuttlebug; corner rounder; Heide Swapp-chipboard star (originally copper); American Crafts-chipboard letters; Uniball-signo white gel pen
Yes! It's Friday EVE! I'm excited because the weather is going to start warming up today and through the weekend here in DC!
I used SCS Color Challange for inspiration. I wanted to use the Sketch Challenge too, but I'm not too good with sketches, so that didn't work out! ;) I also wanted to use some new stamp sets I won from Paper Crafts Stamp It Week contest. They aren't stamp sets I would usually buy, so I liked working with them. I used two in this card, plus a PTI stamp (couldn't resist)!
Do you see that vintage frame? Isn't it so striking? I really like it and I picked it up last week at Michaels when they were having their Easter sale. There are four frames in each package and they are made to coordinate with other Sabrina Making Memories items.
This card took me FOREVER to make. Not because I was slow cutting or something, but because I couldn't figure out the layout, what to add, embellishments, etc. Finally, it all came together. I'm just glad I had the time to devote to it. I'll sure be happy to make a fast card for tomorrow's post and be done in a JIFFY!
One of my life's moments included a FAST and easy white chicken pizza I made last night. Have you ever had leftover chicken breast? Well, if you do (or if you just buy those grilled chicken strips in the deli section) you can make this pizza super fast. I've made it before, but this time I decided to share! I discovered the recipe from Sandra Lee from the Food Network. Here is the real recipe!
Ingredients
1 Crescent Rolls package 1 Bag of Mozzarella Cheese Bit of Spinach (optional) 1 Chicken Breast cut into small bite-size pieces 2 Tbsp Alfredo Sauce (maybe less)
Instructions
Roll out crescents into one sheet (will be a rectangle shape).
Apply alfredo sauce lightly over the dough.
Add chicken breast, spinach, and mozzarella cheese.
Bake in oven at 375 degrees for about 10 minutes (or until done).
Yummy as an appetizer if you cut into mini squares, a quick lunch, or if you're like us a dinner! :) I hope you enjoy!
Thank you so much for stopping by today. I truly appreciate you all! Have a great Thursday and enjoy life's moments.
Card Instructions
Trim brown cardstock into an A2 card and emboss card front.
Adhere frame to card front.
On blue cardstock, stamp image and cut out.
Tie ribbon around image and adhere to card front.
Stamp flowers on pink cardstock, cut out and adhere under ribbon.
Stamp sentiment on yellow cardstock, cut into a rectangle, and adhere to card front.
Stamp butterfly, cut out, and adhere to card front.
Add rhinestones.
Round corners.
:: My Goodies {Life}::
Stamps: Papertrey Ink - out on a limb sentiments; Jen Wilson Laundry Line - flirty lil girl; Sandylion - french impressions
Ink: Stampin' Up!- chocolate chip Cardstocks: Papertrey Ink - dark chocolate; Stampin' Up! - so saffron + bordering blue + pink pirouette Accessories: Stampin' Up!- chocolate chip ribbon; Making Memories - vintage frame; Hero Arts - rhinestones; Provo Craft - cuttlebug + swiss dots embossing folder; corner rounder
It's Wednesday! This week's video features a quick mini square card. The card is 4.25" x 4.25" and is great because it fits into an A2 envelope (no extra postage required for this square card)!! I made sure I added a ribbon tied in a bow, so everyone could see how I did it. It's not really a tutorial, but you can watch it for what it's worth! I also show how I made the scallop edge using a slot punch. Sorry about the quality, but that camera was 'acting up' this week! :)
Hey there! I made this card a couple of weeks ago for Paper Crafts stitching challenge. I've had my floss for a while and rarely use it. Now, I feel really comfortable and love stitching! I may have gone overboard here with all those circles, but it's my first stitching focal point card. You can stitch any design and you really don't need a template. As long as you paper pierce the design, stitching can be done super fast! For instance, use a flourish stamp (in a light ink) and then paper pierce the design.
Yesterday, I recorded this week's video! I hope to edit it today and share with you tomorrow!
Thanks for stopping by and have a great Tuesday!
Card Instructions
Trim kraft cardstock into a rectangle and pierce circle template.
Stitch various circles.
Stamp sentiment.
Distress edges.
Add ribbon and button.
Mat on melon berry cardstock, then on dark chocolate cardstock.
I hope everyone had a Happy Easter! We safely journeyed to Philadelphia and back and had a great trip! We ate at the Continental yesterday for brunch. Cool spot! The twins were so adorable, tiny, and CUTE! I held them, fed them, and even put one to sleep! It was my "first" time! I had NO clue what I was doing, but quickly caught on. Twins seem like so much work, especially when you have an almost 2 year-old running around! I did get to see what their daily life is like. Better them than me!
This card is inspired by this week's Loonie Stampers Challenge. The colors were 'babyish' and also involved the use of lace. So, I think that kind of decided the baby-themed card here. I left it with a simple sentiment and I think the card could be for the unknown expecting baby (boy/girl) since the card is pink, blue, brown, and cream. I used PTI's Guidelines 2 to create the pink patterned paper. I chose to stay monotone for a few reasons: (1) the color challenge limited me in choices and (2) my sweet blush + aqua mist inks are running out (I've had them over a year now and they're very light colors, so it's time for reinkers in my next order).
Card Instructions
Trim pink cardstock into a rectangle and stamp background design.
Add aqua mist cardstock to pink cardstock and stamp sentiment at bottom.
It's almost Easter everyone...are you ready? Well, we are on our way to Philadelphia this morning to have another photo session. This time we're photographing twins + family! :) I can't wait! The pictures above are from my friend's maternity session. I met Riscee in the 6th grade where we started middle school together. We have been friends for almost 20 years (WOW...did I just put an age to myself?)! Jordyn will be her second child and daughter. I'm so happy for her. You can view some of the pictures here (taken by McArthur!).
I made the tag and baby blocks that were used in the shoot. Sorry, I have no pictures of the blocks used, but the parents held them over her baby bump (I know you get the picture)! The "Coming Soon" title to this post is for Baby Jordyn who is expected to arrive VERY close to my own birthday...we'll see.
Hey out there! Thanks for stopping by on this great Friday. Today's Fast Friday Card may not seem as fast as some of the others, but believe me it is. It is a basic one-layer card with embellishments. The cool new thing to do is create your own hand-crafted embellishments. I really love fabric, so I thought of a way to make a fabric flower (I'm sure others have done this before me). I did this before on the baby layout here and also on a baby frame that I'll share with you soon. To make the fabric flower, simply follow the steps below. I may add a video tutorial in a couple of weeks if it's needed, so let me know if you want to 'see' me create one.
The card is very simple, but the added embellishments make it seem like you worked all night on it! This card took me about 25 minutes to complete and most of that time was used thinking of what I wanted to add next! So, if you were to follow the steps, I'm sure it could be done in about 15 minutes, if not less. As you can see in the close-up photo, I leave the fabric rough on the edges. This adds lots of texture and I like the added frayed edges.
Have a great day!
Card Instructions
Trim dark chocolate cardstock into an A2 pre-scored card.
Trim patterned paper to about 4.25" x 3.5" and adhere to card front.
Add ric rac trim.
Cut a 1" thick strip of fabric.
Hold one end of fabric with your thumb, continue to gather fabric into a circle until complete, add a brad to the center, and adhere to card front.
Fold new leaf cardstock and hand-cut leaves, then adhere around fabric flower.
Hey there! So glad it's Friday EVE! Thanks so much for stopping by yesterday and watching my very first video! I appreciate all of your generous comments!! I hope to improve over time! :)
Today's card was inspired by SCS Color Challenge. I really liked the color combo, but didn't know what I was going to make! I started with Great Friends and stamped the frame using my new SU! markers because I do not own all of the stamp ink pad colors. I thought this was the most effective way (other than investing in the ink spots) to get most of the colors quickly! I used the technique where you color onto the rubber stamp. It works GREAT! Just as if I stamped it. So, I'm very pleased. Also, I used Great Grads for the sentiment and if you have it, you know that there are three congratulations sentiments on one stamp, so the marker worked wonders to stamp the one I wanted. I will be needing another graduation card, so I made it "congratulations."
I practiced using my SU! slot punch to make larger scalloped edges and love the technique. I have no idea why I haven't been using it, but I will now...watch for it soon!
By the way, I am uploading my cards on Flickr and many times before I post them here, so if you want to see cards and projects I've completed before a blog posting view them here. I've also added a Flickr badge on the left side of the blog that features the most recent uploaded card!
Speaking of photos, did you notice a slight change in my pictures? I started using Mac's camera, an Digital SLR (is that right?!), and it works wonders! Now that I have identified the correct settings to use, I feel comfortable using it. Boy, did I make his day when I said, "I love your camera!" I know he thinks I'm going to start photography now, but naaaah, only for my projects and I'll leave the rest for him! I enjoy directing the sessions just fine. Oh yeah, we will photographing a TWINS infant session this weekend....HOW FUN! I'll share with you the maternity session from a couple weekends ago soon, along with a couple of my personal projects used!
Thanks for coming by and have a wonderful day!
Card Instructions
Trim bashful blue cardstock into an A2 pre-scored card.
Trim close to cocoa cardstock into a rectangle/square, dry emboss it, scallop edge one end, and corner round the opposing two ends.
Stamp frame on baskful blue cardstock, cut out and adhere to close to cocoa cardstock with foam adhesive.
Stamp flowers on so saffron cardstock, cut out and adhere to frame.
Stamp sentiment, cut strip, add button + rhinestone, and adhere to frame/cardstock.
Tie ribbon into a bow.
Adhere close to cocoa cardstock with foam adhesive to card front.
Corner round the card base.
:: My Goodies {congratulations}::
Stamps: Stampin' Up!-great grads + great friend
Ink: Stampin' Up!-close to cocoa (marker only) Cardstocks: Stampin' Up!-bashful blue + so saffron + close to cocoa Accessories: Stampin' Up!-chocolate chip corduroy button + scallop edge punch + so saffron ribbon; KaiserCraft-rhinestone; Provo Craft-cuttlebug + swiss dots embossing folder; corner rounder
OMG, I finally finished editing my video (well, Mac did)! This was a lot of work, so since it's my first, please don't be too cruel! I'm sure my next will be better because I know what to expect and how to work things a little better. So, you get to 'hear' me and maybe one day watch me, but I hate being on camera. It's such a rough version, but I'm trying to get the hang of shooting a video!!
Anyway, this video is how I stamp a background using Papertrey Ink's Guideline 1 set. When learning how to stamp a background, I suggest starting with a small piece of cardstock for projects, then stamp larger sheets if you want once you perfect the technique. Trust me, practice makes perfect!
Have a great day and enjoy the 'show!' EDITED TO ADD: A new video will be created with a new card soon. This video and card was removed for publication purposes. Thanks in advance!
As I mentioned last month in this post, I am participating in the Genesis Girl's Night Out event to be held at the National Harbor. So, for all my blogging friends in the DC area, please come out to see me and get pampered! I will be there as an exhibitor selling cards (of course) and trying to get others into the craft! See the flyer for all details. Don't forget to RSVP!
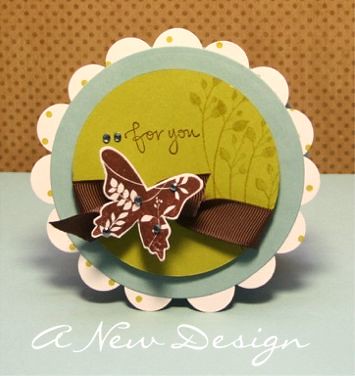
Hey there everyone! I'm back today with a card inspired by K. Werner's Color Challenge. I was in the mood to make a circle card, so I pulled out my largest circle nestie and die cut two of them! I let the design flow from there as usual.
Not feeling too chatty...so, have a good day and thanks SO much for stopping by!
Card Instructions
Die cut two circles in baja breeze cardstock (larges circle die).
Stamp polka dot background on white cardstock, then punch circles.
Adhere circles to one of the circle die cuts.
Die cut a smaller circles in kiwi kiss.
Stamp floral sprays in kiwi kiss, sentiment in brown, and tie ribbon around into a knot.
Stamp butterfly, cut out and adhere to ribbon knot.
Add rhinestones, adhere circle to baja breeze die cut with foam dimensionals.
On the second baja breeze die cut, score a line at about 1/4 from one of the ends and adhere it to the back of the newly created scalloped circle.
:: My Goodies {for you}::
Stamps: Stampin' Up!-polka dot + great friend
Ink: ColorBox-Chestnut; Stampin' Up!-kiwi kiss + chocolate chip Cardstocks: Papertrey Ink-white; Stampin' Up!-kiwi kiss + baja breeze Accessories: Stampin' Up!-chocolate chip ribbon; KaiserCraft-rhinestones; Creative Memories-3/4" circle punch
Why can't weekends by weekdays and weekdays be weekends?! Wouldn't Mondays be much better? OK back to reality! Today's card is inspired by Loonie Stampers Challenge! The challenge was extended to a background stamped design this week. So, I stamped the polka dots and the flowers!
Thanks everyone for stopping by! I won't be able to share my Easter cards with you because I goofed and accidentally deleted them from my camera memory card! UGH! They've already been placed in the mail to their 'owner,' so I'll just have to 'remember' them as they were! I was really excited about them too! Maybe I'll re-make a few. NOT!
Have a great day!
Card Instructions
Make card base.
Stamp polka dot background.
Trim brown cardstock, stamp floral background, and distress edges.
Tie ribbon around brown cardstock into a bow.
Stamp bird and cut out.
Stamp sentiment on a strip of cardstock, adhere to brown cardstock, then adhere bird.
Adhere brown cardstock to card front and add rhinestones.
How's your weekend going? Mine is great! We got our exercise in for the day by walking all through DC and Northern VA! Boy am I still pooped! We walked on the National Mall, through the Tidal Basin and Korean War Memorial to Arlington Cemetary, then ended up in Rosslyn, VA. TIRED! We did get some great pictures, thanks to McArthur and I'll share them as soon as he says they're good to go!
This card is inspired by Raspberry Suit Color Challenge. I would never selected this color combo, so I'm really grateful for the challenge. Somehow, the card just 'fell' into place unintentionally. I started with the scallop oval nestie because it was on my scrap table from Easter cards I was making. It was leftover because it was too small for the Easter card and I saved it for future use! Little to my knowledge, I would use it just a few short days later! It's funny how you select one supply, item, stamp and then the card grows from there! Here are the EASY instructions!
Thanks for stopping by and have a great day!
Card Instructions
Make card base.
Stamp polka dot background on kraft cardstock rectangle.
Die cut scallop oval and stamp flowers + sentiment.
Tie ribbon into a bow around kraft cardstock, and add button w/ twine.
Adhere scallop oval nestie and adhere kraft cardstock to card front.
Happy Saturday to you! It's Cherry Blossom time here in DC, so here's this year's Cherry Blossom card. I used this week's Raspberry Suite's Color Combo for the card because it fit perfectly with the pale pink and then the bright vibrant red! I'll be back tomorrow (or later) with my official Raspberry Suite Color Challenge card (Yes, I made two already)! I'll share photos with you as soon as they're processed!
Have a great weekend!
Card Instructions
Make card base.
Stamp cherry blossom on pink cardstock, emboss, cut out, and adhere to kraft cardstock with foam adhesive.
Tie berry ribbon into a bow around kraft cardstock, then stamp sentiment.
Mat kraft cardstock on pure poppy cardstock.
Adhere to card front.
:: My Goodies {Wishing You Love}::
Stamps: Papertrey Ink-Wishing You; Paper Source-cherry blossom
Hey there everyone! I'm doing really well because it's FRIDAY! Today's card is a Fast Friday Card! I made it very quickly and as you can see on the instructions below, it only takes 3 steps! One-layer cards are great because they remind me of graphic printed cards, but instead are stamped with blood, sweat, and tears...right?!
To be honest, PTI's Wishing You set was not initially on my list, but when it came time to make my monthly purchase, I chose it over another set and boy am I glad. I do not have any flower stamp sets like it and it's so darn CUTE. It's perfect for spring. I even made Easter cards with it. Speaking of my Easter cards, I made 5 last night, so I only have about 2 more to make tomorrow! I should definitely be able to meet my goal! YAAAAAY! It's so hard to make lots of cards in a short time frame because many times I lose my creative mojo. I usually make one card a day (sometimes more on weekends), but that is typically all I can do. I really surprised myself, but I know what helped me...earlier, I sketched some ideas, so when I got into the studio, I knew exactly what stamps to pull out and just started creating my sketched ideas. Most were not completed exactly how I sketched them, but the point is, it got me started so I was not just sitting here and watching TV (Wheel of Fortune to be exact)!
My favorite SU! item purchase this month are my markers! I invested in the entire set and I am SO GLAD! This is exactly what I've been missing. I love how it has a fine tip end and a broader tip too! I'm getting back into doodling, so this is perfect timing! I say getting back into because my very first scrapbook (completed in high school) was done with limited supplies and I used these Painters markers and doodled on pages, creating frames and designs around pictures. I had them in every color M.J. Designs carried (now Michaels) and I know my mom spent a pretty penny on just one marker every time I'd go in that store! Since it looks crazy now, I'm going to redeem myself and make doodling work better for my projects!
Well, I hope each of you have a great weekend! It's Cherry Blossom Festival time here in DC, so you know what we'll be doing...photography! McArthur already went out yesterday and took some shots. Even on a gray day, the Tidal Basin is so photogenic with all of those cherry blossoms! Hmmm that reminds me, I need to do a new cherry blossom card with my Paper Source stamp!
Anyway, I've said enough in today's post! I'll be back tomorrow and maybe with a cherry blossom card!
OMG...it's Thursday! YES! I'm starting to make Easter cards...well one so far! I have about 8 more to make! I hope to be done by Saturday morning to get them out in the mail so others can timely send them out. I'll share them with you this weekend after they're all finished.
I made this card a couple of weeks ago using some PTI oldies, but goodies. Now I look at it and think something is missing from the top! Oh well!
Thanks everyone for stopping by my blog to leave comments, look, or even send me an e-mail! Please know you are always welcome and I appreciate each of you!
Have an appreciative day!
Card Instructions
Trim vanilla cardstock into a square.
Trim melon berry cardstock into a smaller square, stamp polka dot and scallop edge the bottom.
Adhere to vanilla cardstock.
Stamp trees, cut out, and adhere to melon berry cardstock.
Tie ribbon into a bow around cardstock and add pearl trinket pin.
Stamp sentiment and adhere to a pre-scored square card base.
:: My Goodies {much appreciated}::
Stamps: Papertrey Ink-Garden of Life + Father Knows Best + polka dot basics
Guess what?! I got my monthly stamp supplies! So, that means I got to play with some new stamps. This card is inspired by SCS Color Challenge. The stamp set is SU! (except the sentiment is PTI). I have been eyeing this set for a while and after seeing it used on cards, I had to have it. I have discovered I like birds on my cards and of course the damask is PERFECT! I really like how it's kind of a vintage.
I'm so glad it's Wednesday! Happy Hump Day! Stamping definitely gets me through the weeks!
Card Instructions
Trim brown cardstock to an A2 size card.
Stamp background on card front.
Trim cream cardstock to a large square and stamp bird.
Stamp again on a different piece of cardstock in red ink and cut out the bird.
Adhere the bird on top of the brown stamped bird with foam dimensionals.