|
|
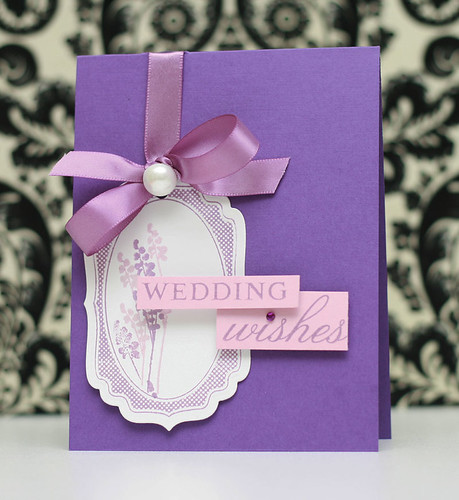 Hey there, Bleeps! TGIF! Quick poll for you all today. Do you like the color purple? I personally think the color is okay, especially for crafting, but I find many paper crafters are disgusted by the color! I thought I'd take a poll to find out the real reason behind why so many crafters dislike this girly color!
This card uses some Cut Cardstock.com cardstock! It's great because although you cannot see it, it has a slight linen texture to it. It's very subtle, yet effective. The design was inspired by Moxie Fab World's plum crazy challenge!
Enjoy your weekend!
Instructions - Trim card base to an A2 size.
- Die cut label and stamp design.
- Stamp leaves.
- Punch hole through die cut, then tie ribbon into a bow and add pearl.
- Stamp sentiment and adhere.
Supplies
Stamps :: Waltzingmouse - very vintage labels no. 4; Papertrey Ink - giga guidelines, life Ink :: Papertrey Ink - plum pudding, lavender moon Paper :: Cut Cardstock.com - purple; Papertrey Ink - white, lavender moon Embellishments :: Papertrey Ink - plum pudding ribbon; Stampin' Up! - pearl; Kaiser Craft - rhinestone Tools :: Spellbinders - labels 4 nestabilities; Provo Craft - cuttlebug
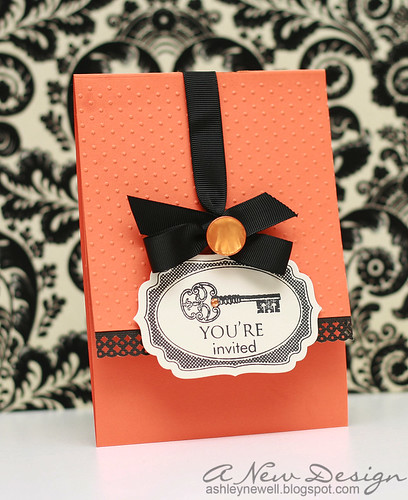 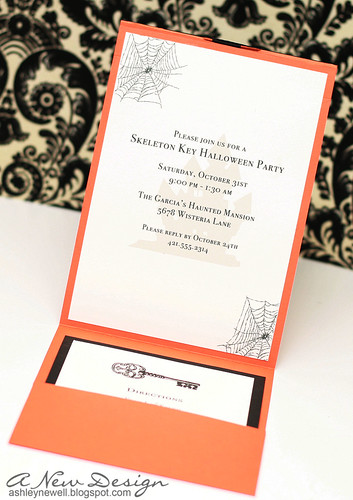
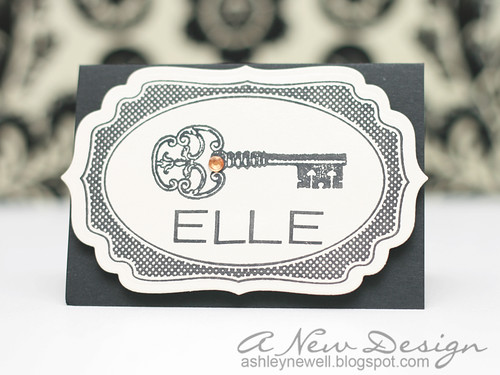 Happy Friday Eve! Today, I have a fun Halloween invitation to share with you. I received lots of cardstock and other goodies to try out from Cut Cardstock.com. So, you can say this is a personal review (over the next week). You have to check them out. They have a very large selection of all types of cardstocks, pre-scored invitations, place cards, envelopes, and other fun, hot items. I was surprised by all of the options available for paper here, so go...take a look! I decided to try out this Pocket Fold Invitation. I've always wanted to make these, but it is super difficult because cardstock just is not large enough. Then you have to deal with the pocket and everything, which means you might as well buy one, right?! This was super easy to design because the template was already there! I trimmed down the top part a bit to show off the label a little better, but everything else remained the same. I even ran the top portion through my Cuttlebug (twice) to get the polka dot embossed image! On the inside, I used some of their shimmer cardstock. It prints extremely well. I adhered a matching label, with an attendees name to a place card.
The label was stamped using Waltzingmouse Very Vintage Labels No. 4. The "antique key" is a rubber stamp by Rubber Stampede (picked up from Michaels or A.C. Moore). The decorative trim is a punch by EK Success (picked up from Michaels). The name on the place card was stamped using Papertrey Ink's fresh alphabet. The invite was created in Photoshop CS4.
More pictures are available on my Flickr page!
I also did another card for an Embellish challenge. Please go check it out here. Go make a card today too because the challenge does not end until late tonight!!
Thanks for visiting and enjoy your Thursday!
I hope this gets you feeling the need for some candy! Hurry up and go pick some up, it's already starting to go on sale (trick or treater or not)! Supplies- Stamps :: Waltzingmouse - Very Vintage Labels No. 4; Papertrey Ink - fresh alphabet; Rubber Stampede - antique key
- Ink :: Stampin' Up! - basic black
- Paper :: CutCardstock.com - pocket fold invitation, place card, shimmer cardstock; Papertrey Ink - true black, vintage cream
- Embellishments :: Spellbinders - labels 4 nestabilities; KaiserCraft - rhinestones; Papertrey Ink - button, ribbon
- Tools :: Provo Craft - cuttlebug, swiss dots embossing folder; EK Success - border punch; Photoshop - CS4
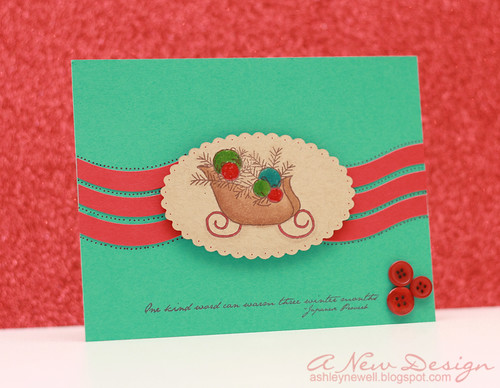 WOO! It's already Hump Day and I'm happy about that!! Today, I am sharing a card using Tracy Schultz's The Petal Press stamp line, Sleigh Ride. I decided to try out Card Positioning System's sketch for the week (CPS139). I thought it was interesting with the wavy lined background! Ric Rac trim would also look great back there, but I didn't have any that matched my design, so I used a curvy paper trimmer and good old cardstock to create the design! It looked so plain, so I doodled a bit, adding dotted lines, which gave it a little bit more pizazz I think!
Thanks for stopping by!
Instructions - Trim turquoise cardstock to an A2 card base.
- Die cut scallop oval.
- Stamp sleigh image and color.
- Add glossy accents to ornaments.
- Trim red cardstock into curvy strips and adhere to card front.
- Add scallop oval die.
- Doodle.
- Stamp sentiment and add buttons.
Supplies - Stamps :: The Petal Press - sleigh ride
- Ink :: Stampin' Up! - chocolate chip; Copic - markers
- Paper :: Stampin' Up! - bermuda bay; Papertrey Ink - kraft, pure poppy
- Embellishments :: Papertrey Ink - buttons
- Tools :: Spellbinders - scallop oval nestabilities; Provo Craft - cuttlebug; Creative Memories - curvy trimmer
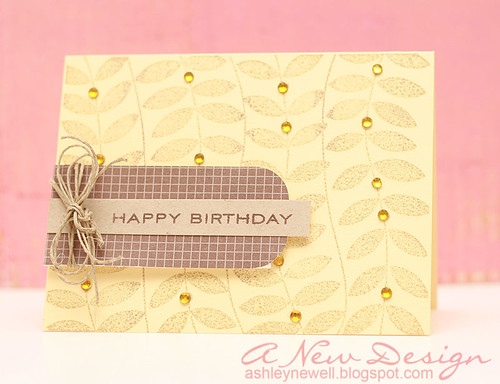
 How's it going today?! I hope well. Today's card is a simple design with very little stamping. I used a bright color combination and a simple layout. I designed quite a bit, but all for DT work, so I will share that with you later; hence the fast cards! I hope you like them!
Thanks for stopping by!
Instructions - Trim yellow cardstock to an A2 card base.
- Trim patterned paper strip, then adhere.
- Tie ribbon into a bow.
- Add brad to ribbon knot by piercing a hole, then add brad.
- Apply sticker and rhinestones.
- Trim turquoise cardstock to make a tag and stamp sentiment.
- Tie tag around ribbon.
Stamps - Stamps :: Papertrey Ink - paper tray
- Ink :: Clear Snaps - colorbox chestnut
- Paper :: DCWV - safari collection; Stampin' Up! - crushed curry, bermuda bay
- Embellishments :: Papertrey Ink - raspberry fizz ribbon; Recollections - brad; Hambly - sticker; KaiserCraft - rhinestones
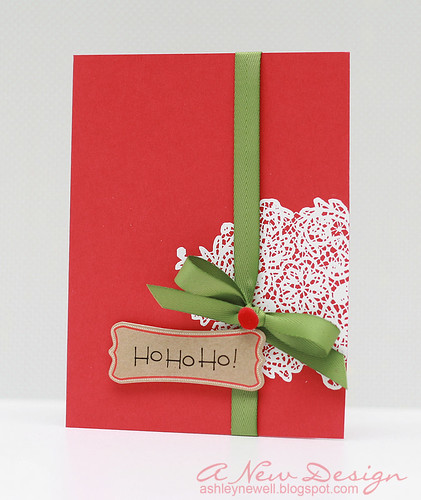 Hey there! I hope you enjoyed your weekend. I had a great class with Donna Downey yesterday and learned lots! I left so inspired and will share what we made after I finish my project. Please be aware that I probably will not finish it until December! HA HA!
Today's card is a super, duper simple card. Check out the supplies I used below; hardly none! WOW! That just amazes me! By the way, the Hambly rub-ons are AMAZING!
Thanks for stopping by and enjoy your Monday! Instructions - Trim red cardstock to create an A2 card.
- Rub-on doily design.
- Tie ribbon into a bow.
- Rub sentiment on kraft sticker, then adhere to card front with foam adhesive.
- Add velvet brad to ribbon knot. (TIP: Remove brad prongs with wire cutter, then adhere.)
Supplies - Paper :: Papertrey Ink - pure poppy
- Embellishments :: Hambly - doily rub-on, kraft frame stick; Making Memories - sentiment rub-on; Papertrey Ink - new leaf ribbon; Doodlebug Designs - velvet brad

Hey Bleeps! Happy Saturday to you! It finally stopped raining here so I guess I can come out of shelter and get some things done. Tomorrow I'm taking Donna Downey's new fabric scrapbooking class at my LSS and I need MAD SUPPLIES! So, here is a quickie post inspired by Dawn McVey's Raspberry Suite Color Challenge! These colors are so great together and are perfect holiday colors (in my opinion at least)! I made a mini card with a leftover card base. I've been dying to try out Claire's new stamp set to create a plaid design. Well, I chickened out and only did a partial plaid featuring one color!
Have a great weekend everyone and I appreciate your visit!
Instructions - Trim cardstock to 3" x 11", then score at 5.5".
- Trim kraft cardstock strip.
- Stamp background on new leaf cardstock strip, then mat on kraft cardstock.
- Tie ribbon into a bow around strip, then adhere to card front.
- Punch circle from raspberry fizz cardstock.
- Stamp circle border and sentiment on circle punch.
- Die cut scallop circle, then adhere circle die on top with foam adhesive.
- Adhere scalloped circle focal point to card center using LOTS of foam adhesive. (I doubled it up here.)
- Add button with twine.
Supplies - Stamps :: Papertrey Ink - take note, signature christmas; Waltzingmouse - off beat backgrounds
- Ink :: Clear Snaps - colorbox chestnut
- Paper :: Papertrey Ink - rustic cream, new leaf, kraft, raspberry fizz, dark chocolate
- Embellishments :: Papertrey Ink - raspberry fizz ribbon, new leaf button; jewelry twine cord
- Tools :: Spellbinders - scallop circle nestabilities; McGill Craftivity - 2-1/8" circle punch; Provo Craft - cuttlebug
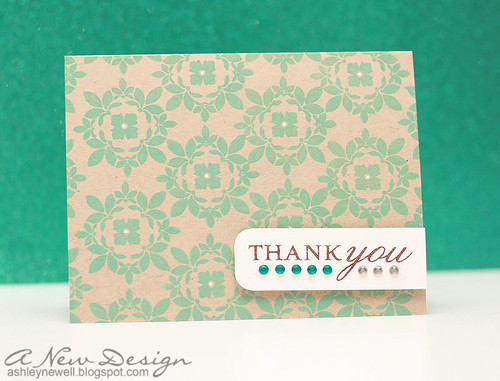
TGIF! Today, I am sharing a fast card. It took about 10 minutes to make. Stamping the background pattern is the most time consuming part, but the pattern is easy to align to create a perfect pattern. This card can easily reproduced as gifts or for those last minute thank you notes. Changing the colors can be a breeze too!
Instructions - Trim kraft cardstock to an A2 size by trimming 8.5" x 11" cardstock in half horizontally.
- Stamp background pattern. TIP: Stamp from the top down to prevent inking your hands!
- Stamp sentiment, trim, add rhinestones and adhere to card front.
- Doodle white dots.
Supplies - Stamps :: Papertrey Ink - giga guidelines
- Ink :: Clear Snaps - colorbox mint, chestnut
- Paper :: Papertrey Ink - kraft, white
- Embellishments :: Kaiser Craft - rhinestones; Uniball - white signo broad gel pen
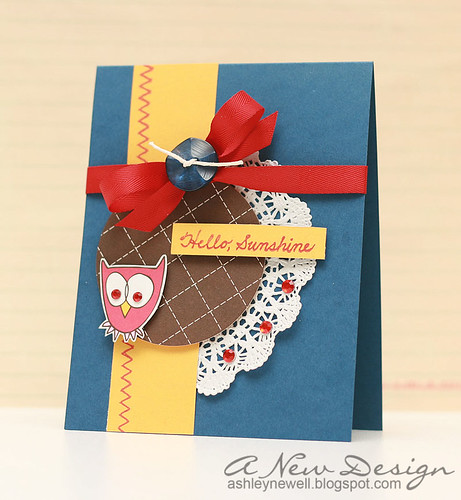 Hey, Hey! It's Friday Eve and I have a card to share with you today! It is inspired by M's Sketch #2. Of course I tweaked the sketch a bit to fit the elements that I decided to go with, but it follows the layout for the most part. This is my first time using a doily and I'm pleased with the way it turned out. I had no idea how to use them on cards, but thought they would be great paper embellishments. I'm sure they'll look great on some elegant themed cards too. I'll have to try that out later. This time, I made a fun card using bright colors that remind me of back-to-school. Does it to you? It's something about the yellow (which is the reverse side of the American Crafts patterned paper and reminds me of SU! crushed curry that I love) combined with the blue and red that screams back-to-school! The brown sort of throws it off I guess!
The winner of Sleigh Ride stamp set is Erika! So, so pretty! I have been trying to figure out my Christmas card for this year and this set would do the trick! Thanks so much, Ashley!
Thanks so much for visiting today and enjoy yourself!
Instructions - Trim blue cardstock to an A2 card by trimming 8.5" x 11" cardstock in half vertically.
- Trim doily in half and adhere to card front.
- Trim yellow paper to about 1.5", stamp faux stitching and adhere to card front.
- Die cut circle from patterned paper and adhere to card front with foam adhesive.
- Cut owl from patterned paper and pop off of circle die cut.
- Stamp sentiment and add to card front.
- Tie ribbon into a bow and add button with floss.
- Add rhinestones.
Supplies - Stamps :: Papertrey Ink - handwritten notes; Sassafras - stitchery
- Ink :: Papertrey Ink - pure poppy
- Paper :: Papertrey Ink - enchanted evening; American Crafts - craft fair collection
- Embellishments :: Papertrey Ink - pure poppy ribbon + enchanted evening button; Nice Package - doily + floss; Kaiser Craft - rhinestones
 Happy Hump Day, Bleeps*! Today, I have a special blog candy for you! I'm giving away one of Tracy Schultz's new Sleigh Ride stamp sets!! The card is a mini, measuring 4" x 4.25" and perfect to stash in holiday gift bags or on top of those famous fruit baskets! I kept the design simple and focused on holiday colors and themes so it can be given to anyone regardless of their religious affiliation. The photo does not depict the letter press technique I used with the Spellbinders Impressabilities, but you will just have to believe me when I say it's there. What I mean by it, is the embossed patterned with the white ink overlay. This is such a neat technique and you may find a tutorial on Splitcoaststampers by Beate!
Blog Candy Details
Contest Starts :: Wednesday, October 21, 2009 at 12:30 am EST Contest Ends :: Wednesday, October 21, 2009 at 11:59 pm EST One comment per person (unspecified)
Instructions - Trim silver cardstock to 4" x 4.25" and set aside.
- Trim red cardstock to 3.5" x 3.75", then emboss (see tutorial link above).
- Mat red cardstock on silver cardstock.
- Trim silver cardstock to 1.25", then adhere a .5" strip of red cardstock on top and adhere to card front.
- Stamp image on white cardstock and color berries with marker.
- Adhere image to card front with foam adhesive.
- Adhere entire card front to a pre-cut red card base.
Supplies - Stamps :: The Petal Press - sleigh ride
- Ink :: Papertrey Ink - smokey shadow; Stampin' Up! - white, real red marker
- Paper :: Papertrey Ink - pure poppy, white, silver shimmer
- Tools :: Spellbinders - wizard, snowflake impressabilities
*Bleeps = blog peeps
 Hey there! Today, I'm sharing a card that is fairly quick to make. However, it took me forever to come up with how to embellish it. I hate when that happens. I needed a birthday card and for the life of me kept thinking the design was not good enough. Finally, I had enough and just went with it!
Enjoy your day and thanks for visiting.
The two winners from yesterday did not contact me within 24 hours, so...hopefully today's winners will!
The "NEW" winners of the two November/December issues of Paper Crafts Magazine are: - Tiff said...
what a great way to showcase the stamp set! - Winter said...
WOW, there are so many combinations you can make with that stamp set! :)
Winners, please e-mail me your mailing address within 24 hours and I will send you a brand new magazine this week! My e-mail can be found on my blog on the left sidebar. Thanks everyone for commenting and participating in the giveaway. There will always be more!
Instructions - Trim lemon tart cardstock to create an A2 card by trimming an 8.5" x 11" sheet of cardstock horizontally.
- Stamp background design.
- Trim patterned paper and round right corners.
- Trim kraft cardstock and stamp sentiment, then adhere to patterned paper.
- Tie twine and adhere to card front with foam adhesive.
- Add rhinestones.
Supplies - Stamps :: Hero Arts - floating leaf; Papertrey Ink - birthday basics
- Ink :: Stampin' Up! - river rock; Clear Snaps - chestnut
- Paper :: Papertrey Ink - lemon tart, kraft, bitty box
- Tools :: We R Memory Keepers - corner chomper
- Embellishments :: KaiserCraft - rhinestones; twine
 Hey there, Bleeps! It's just another Manic Monday...sing along! Well, I had a very productive weekend. I worked in the studio the entire time on lots of projects, concepts, and ideas. This card was inspired by CPS Sketch 138, but I have tweaked it a lot to fit my embellishments. I wanted to use a variety of of ideas here and the first is Savitri Wilder's handwriting! She posted a free download to her "happy" sentiment and I was so excited I had to use it. I opened the file in CS4 and created a brush of the sentiment. Then, I used it to create my sentiment on the tag. To print, I tested it first on regular print paper, then adhered the tag to the print paper and re-printed it! VOILA! I did a little digi-crafting! I then combined it with some stamping by stamping BABY! So, really this is my very first hybrid card! I'm so excited because I am actually learning Photoshop, which is one of my ultimate goals in life, okay maybe not in life, but I really would love to be a whiz at using it!
The winners of the two November/December issues of Paper Crafts Magazine are: I've never had a sleigh ride! I have ridden sleds, but no sleigh.
The stamp set is really great, I like the different options. Hi,
Your designs are really nice... something different from the usual seen out there. I love the sleigh ride stamp set... They sure would make the cutest Christmas cards :)
Debbie
Winners, please e-mail me your mailing address within 24 hours and I will send you a brand new magazine this week! My e-mail can be found on my blog on the left sidebar. Thanks everyone for commenting and participating in the giveaway. There will always be more!
Thanks for visiting and enjoy the day! Also, don't forget to check out Embellish Magazine's new challenge!
Instructions - Trim dark chocolate cardstock to an A2 card by trimming an 8.5" x 11" cardstock in half vertically.
- Trim patterned paper, then adhere to card front.
- Trim patterned paper (solid verse side), then cut angles and adhere to card front.
- Stamp faux stitching.
- Generate sentiment in Photoshop and print on tag.
- Stamp sentiment on tag and adhere to card front with foam adhesive.
- Add buttons.
Supplies - Stamps :: Papertrey Ink - mega mixed messages; Sassafras - stitchery
- Ink :: Papertrey Ink - vintage cream; Clear Snaps - colorbox chestnut
- Paper :: Papertrey Ink - dark chocolate; My Mind's Eye - breaking free collection
- Embellishments :: Nice Package - tag; Savitri Wilder - happy image; American Typewriter - "new" font; CS4 Photoshop; Papertrey Ink - buttons

I was interviewed on Blog Talk Radio earlier today. To listen to the clip click here or download the podcast to your mp3 player or iPhone!
Thanks for stopping by and enjoy the rest of your Sunday!
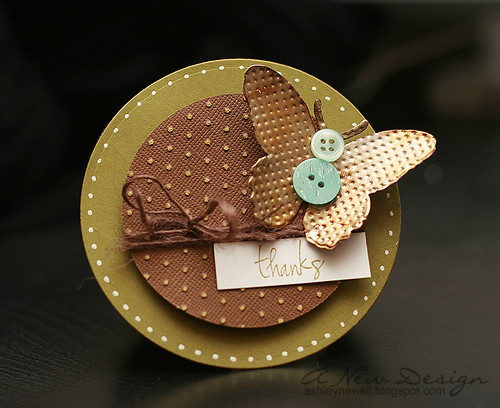
Instructions - Die cut two circles from ripe avocado cardstock.
- Die cut smaller circle from core'dinations cardstock, then emboss and sand.
- Tie twine around embossed circle and adhere to card front.
- Apply alcohol inks to metal butterfly embellishments to tint brown, then adhere to card front.
- Add buttons to butterfly.
- Stamp sentiment and adhere to card front.
- Doodle dots around card front.
Supplies
Stamps :: Verve Visual - sentiment (thanks) Ink :: Papertrey Ink - ripe avocado Paper :: Papertrey Ink - ripe avocado, white; Core'dinations - chocolate collection Embellishments :: Heather P. - metal embossed butterfly; Ranger - alcohol inks; Papertrey Ink - buttons; Craft Supply - brown twine; Provo Craft - cuttlebug, swiss dots embossing folder; Uniball - signo broad white gel pen; Spellbinders - circle nestabilities
Hey there! I'm back for my last minute Friday post! We all know how time flies, so this card depicts just that, especially during the holidays. At first, the holidays are approaching, then it's here, and all of a sudden it is over! So go pick up your Sleigh Ride stamp set by Tracy Schultz's The Petal Press line at i {heart} papers so you can make cute sleigh holiday cards!


Giveaway
I have two Paper Crafts magazines to give away to two blog readers! The magazine is the current November/December 2009 issue and features a lot of holiday cards and the Stamping Royalty winning cards too! I have two cards in this issue, so you have to check this one out! Here are the details:
How to Enter the Giveaway
Enter this giveaway by leaving one comment about the Sleigh Ride stamp set or any story about sleighs during the winter season!
Giveaway Timeline
The giveaway will be available the entire weekend from the blog post time through Sunday, October 18, 2009 at 10:00 PM EST.
Giveaway Winners
Winners will be announced on Monday's blog posting!
Enjoy your weekend and thanks for stopping by!
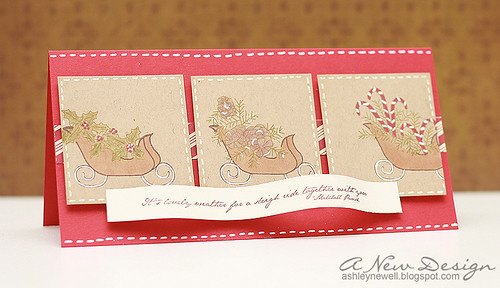
Instructions - Trim pure poppy cardstock to 7" x 3.5".
- Trim three squares and stamp images.
- Color images and add faux stitching.
- Add a strip of striped patterned paper to card front.
- Adhere squares to card front with foam adhesive.
- Stamp sentiment, then adhere with glue dots in a wave.
Supplies
Ink :: Stampin' Up! - chocolate chip
   Here are a few cards that were published in CARDS May issue. Just thought I'd share them with you today until I post my Sleigh Ride sample later tonight! Thanks so much for stopping by and leaving comments. They are encouraging and I enjoy reading each one! I'm sorry I cannot reply to all of them, but some commenters do not leave an e-mail, which makes responding impossible, but please know that I read EVERY comment and they all put a smile on my face! Thanks! "See" you later!
Well, the time has arrived! You may order The Petal Press Sleigh Ride stamp set today! Tracy has made another cute set, but this time for the Christmas holidays that features a sleigh with multiple combinations. Build your own sleigh or use the other images alone! The options are here. I'll be back later today with another sample featuring this stamp set, so make sure you come back. I just wanted to share the entire set with you and let you know you can purchase it now! It is only $10! 
 WHOA! It's Friday Eve already! Oh how I love four-day work weeks. They go by just a bit faster to make you appreciate work weeks just a tad. Today, I am sharing a card inspired by a sketch by Emma, Savitri's daughter. M loves to craft and participate in card making. She has a sketch challenge going on and I had to participate because she's too cute!
So, hi Emma! Thanks for hosting this sketch challenge. I really liked your sketch because it was easy to create something fun, especially for Christmas. Who doesn't like Christmas cards, right?! I hope you like it!
Thanks for stopping by to 'see' me and enjoy your Thursday!
Instructions - Trim smokey shadow cardstock to an A2 card.
- Adhere ribbon around card front.
- Tie ribbon into a bow.
- Stamp ornament, cut out, then adhere to card front.
- Add rhinestones.
Supplies
Stamps :: Verve Visual - ornamental christmas Ink :: Papertrey Ink - smokey shadow; Clear Snaps - colorbox chianti Paper :: Papertrey Ink - smokey shadow + vintage cream Embellishments :: Michaels - velvet ribbon; Papertrey Ink - vintage cream ribbon; KaiserCraft - rhinestones
 Embellish blog is currently experiencing technical difficulties. I am unsure when the blog will be restored, so in the interest of time and craft obsessions, I have moved the Circle Card Color Challenge here so you can view the submissions and continue to participate. I am extending the challenge through Sunday, October 18, 2009 at 10:00 pm EST. Sorry about any inconvenience, but McArthur is working on resolving it as fast as he can. I'll let everyone know when the blog is restored. Please link your circle cards to Mister Linky below! Thanks so much!
 Hey there, Bleeps! How is it going for you? It's been very busy for me, so I have a quick and easy card to share with you today as I have been working like a busy bee on Splitcoaststampers' Dirty Dozen Design Team projects. One more day and you fan club members can see what we all have been working on.
Today's card is a button tree card. I completely covered the bare tree with buttons. At first, I had some limbs exposed, then switched it up and added more buttons to get a full tree! Using Copics, I colored the tree trunk and then stamped the sentiment.
Instructions - Trim aqua mist cardstock to 3" x 5.5".
- Stamp tree.
- Add buttons.
- Color tree trunk.
- Stamp sentiment.
Supplies - Stamp :: Waltzingmouse - sewing box
- Ink :: Stampin' Up! - chocolate chip
- Paper :: Papertrey Ink - aqua mist
- Embellishments :: Papertrey Ink - raspberry fizz buttons
- Card Size :: 3" x 5.5" (a leftover scrap from a 5.5" square card cut from 8.5" x 11" cardstock)
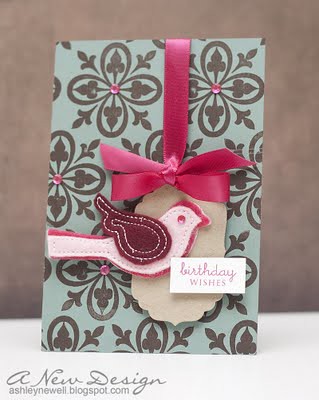 Hey Everyone! How was your weekend? We made it back from the Outer Banks, North Carolina yesterday. We had a full weekend of work photographing a destination wedding from the rehearsal, to the spa, getting ready, wedding, reception, and even a trash the dress session! Yes, you read that right, "trash the dress!" McArthur let me sleep in while he photographed the bride and groom yesterday morning. He actually did not wake me up, but I so appreciated it and drove us back! I was so tired after the weekend's festivities! We had a great time, as usual and can't wait to share a few pictures with you when they're ready!
Anyway, you want to know about this card, right?! I made this card spontaneously, like many of my cards are created and definitely how I photograph weddings (in the moment). I'll explain the process this card evolved, just in case you're interested! First, I grabbed the stamp set because it has been sitting on my desk since I picked it up last weekend and I really want to use it. Next, I selected cardstock from my 'scraps' stash. It "looked" like the right card front size, so I went with it (important to note for a later discovery). Next, I selected my ink color and started stamping my background. After I found out I liked the patterned, I decided I did not want to cut it up, so I used it as a base. I measured the width to be 4.25" and thought perfect card front size (so I thought)! I picked up the felt birdie and thought to add it to a label nestie with some ribbon to embellish and a sentiment. Now, I go to put it on the card base and it's TOO LONG! It's about 1/2" too long and I cannot trim either end! Note to self: When measuring, measure both the length and width! :) I 'thought' it looked the right length, but thinking and actually being the right length are two different concepts! So, it looks like this will be a flat-front card! Ever given one of those away? Me either, but this will be my first! I will cover the back with a coordinating cardstock color and add the greeting there! Maybe I started a new flat-front card trend? NOT!
Thanks for listening to my rambles and I hope you enjoy your day!
Instructions - Card front is an odd size due to inaccurate measuring, but for perfection, trim ocean tides cardstock to 4.25" x 5.5 (vertically).
- Stamp background.
- Die cut label and punch hole at the top.
- Punch hole in card front and tie ribbon around into a bow (adding foam adhesive to the label to adhere).
- Add felt birdie.
- Stamp sentiment and adhere.
- Add rhinestones
Supplies
Stamps :: American Crafts - majestic; Papertrey Ink - mega mixed messages Ink :: Clear Snaps - colorbox chestnut; Papertrey Ink - raspberry fizz Paper :: Papertrey Ink - ocean tides, kraft, white Embellishments :: Papertrey Ink - raspberry fizz satin ribbon; Spellbinders - labels 4 nestabilities; Provo Craft - cuttlebug; KaiserCraft - rhinestones; Basic Grey - felt sticker Card Size :: 6.25" x 4.25"
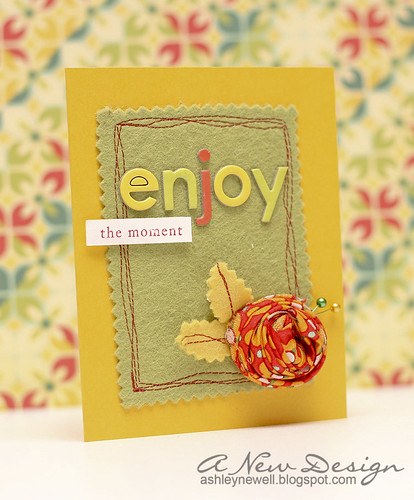 "Enjoy the Moment" This is how I feel after photographing the wedding this weekend in the Outer Banks, NC. I am truly inspired and refreshed. Photographing weddings is one of the most fulfilling parts of my life. From meeting new people to witnessing love at the most highlighted times, photographing weddings make me remember to enjoy the moment. Today's card captures that moment (or at least I tried to capture it)! Using lots of texture, I created a simple layout and design with lots of color. I hope you enjoy your holiday weekend. Instructions- Trim crushed curry cardstock into an A2 card by trimming an 8.5" x 11" cardstock in half horizontally.
- Trim felt with pinking shears to fit card front and adhere to card front using Creatopia fabric adhesive.
- Stitch around felt.
- Create a fabric rose by ripping about 1" of fabric, tying a knot at one end and wrap until the end. Adhere the end with glue.
- Adhere to card front and add stick pins.
- Cut leaves with pinking shears, stitch, then adhere.
- Add chipboard sticker letters.
- Stamp sentiment and adhere.
Supplies- Stamps :: Papertrey Ink - mega mixed messages
- Ink :: Papertrey Ink - pure poppy
- Paper :: Stampin' Up! - crushed curry + white
- Embellishments :: Heather Bailey - felt + fabric; Sassafrass :: chipboard sticker letters; Sewing Machine; Thread; Straight Pins
 Happy Saturday, Bleeps! I hope you're enjoying your weekend! We're heading to a weekend destination wedding to photograph! Yippeee!! Although I wish I was at home in my studio crafting away, it's great to get out and see something new and fresh, especially a wedding. I hope to return full of inspiration.
Today's card has a lot of STUFF! It is not my usual card design. I spent a lot of time on it. I started it, left the house and went out to dinner, then came back to it! I hope you like it. The sketch was inspired by Beate's Weekend Sketch Challenge, although I changed it up a lot there!
Instructions - Trim kraft cardstock into an A2 card by trimming an 8.5" x 11" cardstock vertically in half.
- Trim yellow cardstock to fit card front and adhere.
- On a piece of ocean tides cardstock, stamp the woodgrain background (tone-on-tone).
- Trim the corners off of the edges to create a tag.
- Take a piece of red cardstock, fold it over the top of the tag, then add an eyelet.
- Tie thick jewelry cord/twine into a bow.
- Adhere felt deer to tag and add rhinestones.
- Take a strip of fabric and sew a pleat, then adhere to the bottom of the card front.
- Adhere the tag to the card front with foam adhesive.
- Tie ribbon around card front into a knot.
- Using a word processing software, type sentiment and print on red cardstock strip. (Tip: If you have a strip of cardstock, print the sentiment on regular printer paper, then lightly adhere cardstock strip overtop area where sentiment prints, then re-print on same page on the strip of cardstock, then pull off gently to remove! No wasted paper!)
- Adhere sentiment to card front with foam adhesive.
Supplies - Stamps :: All Night Media - woodgrain (Michaels)
- Ink :: Papertrey Ink - ocean tides
- Paper :: Papertrey Ink - ocean tides + kraft + pure poppy; Stampin' Up! - crushed curry
- Embellishments :: Craft Supply - jewelry cord +eyelet; Michaels - ribbon; KaiserCraft - rhinestones; Colorbox - friendly forest felt stickies; Crop-a-dile; Heather Bailey - fabric; Janome Sew Mini; thread
 WOOH WEEEH It's Friday and boy am I am excited about it! Guess what?! Tracy has designed a new stamp set for her collection The Petal Press! Today, I am sharing a sneak peek of the new stamp set, called Sleigh Ride. It is another stamp-building set with various options and possibilities and I used just one of them here! So, what do you think? I'll be back next week with another design using this great stamp set and you will be able to buy it too!
Enjoy the holiday weekend and thanks for visiting!
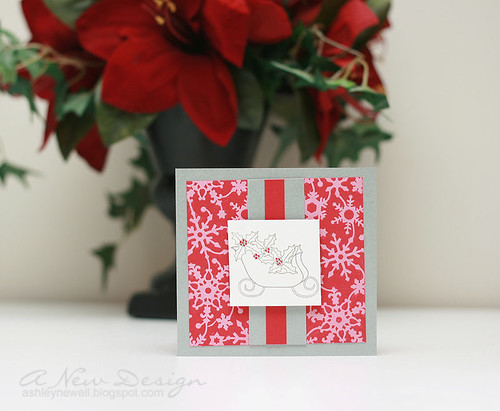
Instructions - Trim dark chocolate cardstock into an A2 card by trimming an 8.5" x 11" cardstock in half landscape.
- Trim patterned paper, ink edges, and adhere to card front.
- Add stitching.
- Stamp image on white cardstock, color and doodle, then ink the edges.
- Die cut squares on patterned paper and white cardstock, then mat using foam adhesive.
- Adhere square to card front.
- Tie ribbon around card front into a knot.
- Add dew drops.
Supplies - Stamps :: The Petal Press - sleigh ride; Papertrey Ink - mixed messages
- Ink :: Stampin' Up! - chocolate chip; Copic markers; Uniball - gold metallic gel pen; Papertrey Ink - chamomille
- Paper :: Papertrey Ink - dark chocolate + white; Basic Grey - winterberry
- Embellishments :: May Arts - burgundy ribbon; dew drops; sewing machine; thread

WOOOO WEEEEH! It's almost the weekend!! I will be so excited when it finally arrives. Today, I am sharing a card inspired by a 2 Sketches for You layout. I'm not a big fan on how it turned out, but I finished it fairly quickly and that's probably why! See, what happened was, I was planning to post something else to realize I was a day early, so I had to make something...FAST! A sketch was definitely needed for this last minute card and this is how it turned out. I used a combination of lots of things here, so bare with me!
Thanks for visiting and have a great Friday Eve!
Instructions - Trim raspberry fizz cardstock into an A2 card by trimming an 8.5" x 11" cardstock in half vertically.
- Stamp background design on patterned paper, trim to fit card front, and adhere.
- Tie ribbon into a bow.
- Punch circle, stamp sentiment, and adhere.
- Adhere white strip of cardstock to bottom of card front.
- Add chipboard decorative edge and rhinestones.
- Stamp polka dot trim on white cardstock, then adhere to card front with foam adhesive.
Supplies - Stamps :: Waltzingmouse Stamps - off beat backgrounds; The Stamps of Life - back2basics (September)
- Ink :: Papertrey Ink - raspberry fizz
- Paper :: Papertrey Ink - raspberry fizz + white + kraft
- Embellishments :: 7 Gypsies - chip tag elements; KaiserCraft - rhinestones; Stampin' Up! - certainly celery ribbon

Hey there...again! I know a second post today, but I wanted you all to jump over to Splitcoaststampers (SCS) to read all of the reviews on Xyron's new Creatopia. The Creatopia is the jack of many trades, so you need to go see what it can do, from embossing, cutting, and even applying adhesive to fabrics, there is something for every crafter for this product. So, go on over to SCS and read all of our reviews here and view all our samples here.
There is a tutorial available for the card I am sharing with you here.
Instructions - Trim aqua mist cardstock into a 5.5" square card.
- Trim patterned paper to fit card front, then use decorative scissors to create the fun edge.
- Ink patterned paper edges, then stitch onto card front.
- Cut a piece of fabric large enough to cover chipboard and run it through the Creatopia.
- Remove backing from fabric and adhere to chipboard.
- Ink chipboard legs and beak, then adhere to card front.
- Sand edges of fabric covered chipboard and ink, then adhere to card front.
- On a strip of paper, write sentiment and adhere to card front.
- Add buttons and rhinestone 'eye.'
Supplies
Ink :: Clear Snaps - ColorBox chestnut + ochre; Papertrey Ink - chamomile Paper :: Cosmo Cricket - early bird collection; Papertrey Ink - aqua mist; Core-dinations - chocolate collection Embellishments :: KaiserCraft - rhinestone; Stampin' Up! - so tweet chipboard; Craft Supply - decorative scissors + sewing machine + thread + natural muslin fabric; Papertrey Ink - buttons + twine; Tim Holtz - paper distresser
 Hey Bleeps! I thought I'd share a soup recipe I made last night. I'm a big fan of the Neely's, featured on the Food Network. I have a copy of their book, but also find many of their recipes on the Food Network. I've tried many of their recipes and every time I like them, so I like to stick with what works! I know...fried pork and a soup sounds crazy, but late one night as I was watching an episode on Tivo and my stomach growled all night until I fell asleep! I knew I had to make it, so here it is, my version! I added two additional cups of chicken stock to my version, but everything else remained the same (minus the parsley as garnish because I'm too starving and ready to dig in by the time garnishing comes around)!
The Results It tastes great and is a healthy and quick vegetable soup (even without the fried pork chop). Think of the variation you can add to this recipe, such as beef stew meat or even chicken bites! I personally added a few shakes of hot sauce into my bowl because I like to put a little 'kick' in it! I LOVE spicy foods, so when it's appropriate, I usually turn up the heat! The pork chop was actually tender and easy to bite. Yep, I just picked it up with my spoon and bit a piece! I'm no barbarian, but eating should be comfortable, especially in your own home, right?!
**Sorry about the messy bowl! I thought I cleaned it up, that is until I edited the photo! It just makes it 'real'!**
I'll be back a little later with a card and a great product review by Splitcoaststampers' Product Focus Review Team! See you later because you don't want to miss reviews and samples using this new product!
Ingredients- 3 tablespoons butter
- 2 carrots, chopped
- 2 celery
 stalks, chopped stalks, chopped - 1 onion, chopped
- 3 tablespoons all-purpose flour
- 1 tablespoon tomato paste
- 32 ounces vegetable broth
- 1 (14.5-ounce) can diced tomatoes
- 1 large white potato, cubed
- 1/2 (10-ounce) box frozen corn
- 1/2 (10-ounce) box frozen peas
- 5 ounces fresh green beans, cut into bite size pieces
- 2 tablespoons freshly chopped parsley leaves
For the pork chops:- Peanut oil, to fry
- 1 1/2 cups all-purpose flour
- 1 tablespoon seasoning salt
- 1 teaspoon ground black pepper
- 4 (1-inch thick) bone-in center cut pork chops
DirectionsIn a large pot over medium heat, melt butter and saute carrots, celery and onion until softened, about 6 minutes. Add the flour to the vegetables and blend well. Cook the flour until it achieves a slight blonde color. Next, stir in the tomato paste and allow to slightly cook, about 1 to 2 minutes. Pour in vegetable broth while stirring and bring soup to a boil. Reduce heat and add the can of diced tomatoes and the potatoes. Simmer until potatoes are cooked through, about 20 minutes. Meanwhile, preheat the peanut oil in an electric fryer or large pan fitted with deep-fry thermometer to 325 degrees F. In a large casserole dish, mix together flour, and season with salt and pepper. Dredge chops in flour mixture, patting excess off. Place chops, 2 at time, in fryer and cook until cooked through, about 6 minutes. Cool slightly and remove to a paper towel lined sheet tray. Add the cooked chops to soup and simmer another 30 minutes, or until the meat falls off the bone. During the last 10 minutes of cooking, add the corn, peas, and green beans. Ladle soup into individual bowls, top with a pork chop and sprinkle with parsley.

How's it going Bleeps? I hope your Monday went well. Today, I am sharing a card that is totally outside of my comfort zone. First, I am not a big fan of halloween. Although I love handing out candy to the neighborhood kids and seeing them in their cute costumes, I don't get into all of the entire theme. So, I usually do not make halloween anything, let alone cards because who would I even give one too?! However, I received a new stamp set by Stephanie Barnard's new stamp company called, the {stamps} of life. I thought the pumpkins were nice and I just had to try out her stamps. I also wanted to use my new QuickKutz embossing folder to see how that worked along with some Core'dinations cardstock and this is what transformed.
I used my Cuttlebug to dry emboss the dots and it worked fine using the same sandwich you would use with any other Provo Craft embossing folder. So, for those of you out there who were interested in finding out if it worked for sure...it does! I also used a bit of that raffia ribbon I picked up in the $1.99 bin at Archiver's this weekend! I liked how it looks with the pumpkin. The stamp sets are really versatile and offer faces to interchange on the pumpkin. I kept mine 'nice' and used the sentiment to overlap. Those leaves at the top of the pumpkin are actually leaf trim, which can be ordered at i {heart} papers!
Instructions - Trim spring moss cardstock into an A2 card (trim 8.5" x 11" cardstock vertically).
- Dry emboss core'dinations cardstock, then distress/sand and trim/tear bottom.
- Mat core'dinations cardstock on rust cardstock, then adhere to card front.
- Stitch around edges.
- Tie straw ribbon around card into a knot and crinkle.
- Trim strips of core'dinations cardstock and adhere to card front bottom, then sand.
- Stamp pumpkin on rust cardstock, cut out, then adhere to card front with foam adhesive.
- Stamp sentiment on strips and adhere to card front with foam adhesive.
- Add leaf trim to pumpkin.
Supplies
- Stamps :: The Stamps of Life - Thanks2Fall (October)
- Ink :: Close to My Heart - black
- Paper :: Stampin' Up! - dusty durango; Papertrey Ink - spring moss; Core'dinations - black magic collection
- Embellishments :: Paper Reflections - raffia ribbon; Tim Holtz - distresser; QuickKutz - polka dots embossing folder; Provo Craft - cuttlebug; Janome Sew Mini; thread; Creative Impressions - leaf trim
|
|


