|
|
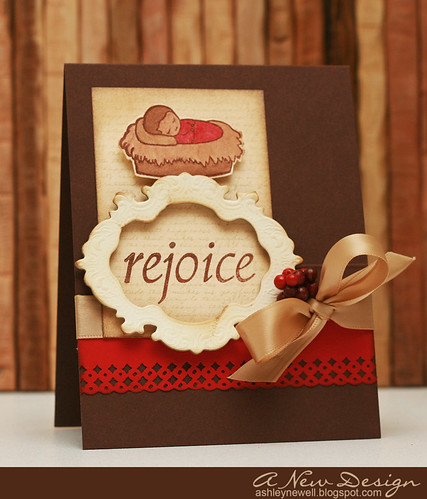 Happy Monday, Bleeps! It's hard to return to work after a four-day weekend, but also a bit easier than a typical weekend. So, I'm grateful for those additional two days off! Today, I'm sharing with you a card I made for this week's 2 Sketches 4 You layout. This week's sketch is sponsored by Starving Artistamps. These stamps are perfect for your holiday cards and to truly celebrate the reason for the season. So, join the 2S4Y DT this week and make a fun card using this week's sketch! Here's a peek at the sketch:
Thanks for stopping by and enjoy your day!
Instructions - Trim brown cardstock to create an A2 card base.
- Trim gold shimmer cardstock block, stamp background text.
- Stamp "rejoice" over background text stamped design.
- Stamp baby Jesus, color, and cut out, then pop on top part of the gold shimmer cardstock block.
- Distress frame, then adhere with foam adhesive.
- Score a line on card front.
- Add red cardstock with punched decorative edge.
- Tie ribbon around card front into a bow.
- Adhere gold cardstock block to card front.
- Add berries.
Supplies
Ink :: Clearsnaps - chestnut; Stampin' Up! - river rock; Copic - markers; Ranger - vintage photo Paper :: Papertrey Ink - dark chocolate, pure poppy; Cut Cardstock.com - gold shimmer Embellishments :: Offray - oatmeal ribbon; Pier One - berries; Tattered Angels - framed fonts Tools :: EK Success - decorative edge punch
    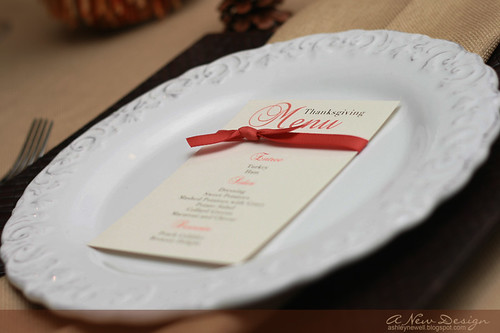 Hey there, Bleeps! I hope you all enjoyed your Thanksgiving holiday! I sure did! I got a bit stressed in the end of tying everything together. You know how you have a vision of how you want everything to look and it just doesn't quite fit, well that happened to me, but it still turned out nice. Above, are a few photos taken the day of Thanksgiving and also just a few minutes ago that I staged to showcase a sample of the place card and the menu presented at the table setting.
We hosted my mom, sister, and also our neighbors. I was very excited to use my new vintage dishes found at a local retailer. Instead of making traditional place 'cards,' I made one-layer card that fit into a small pine cone to accent the table setting. The table was kept simple with a charger and a simple 'wheat' centerpiece (picked that up from Marshall's). I created the menu in Photoshop and Mac helped by printing and cutting them. I added ribbon at the last minute and wished I had time to mat them on brown cardstock, but darn...time was up! I think that would've made a bigger impact and I still will mat one later and showcase the difference just so you all can see!
The place cards are Spellbinders Labels 4 Nestabilities die cuts and stamped with Waltzingmouse Stamps coordinating set. I added oval nestabilities die cuts, stamped a pine cone theme (Stampin' Up! - autumn days) and then added the names by stamping eat individual letter (Papertrey Ink - simple alphabet). The place cards were finished off with a few green rhinestones.
Now, this year I wanted to tackle a few new baking recipes. As background, I am NOT a baker. I rarely bake anything other than box brownies or cake mix! Although I love to cook, I am not a baker. But, I did manage to attempt the recipes. I had a few disasters! The pound cake turned out great; however, I overfilled the baking pan and it bubbled over causing it to shrivel and die! We tasted some of the over flowed bits and it as GREAT, just very UGLY! So, that was not served...DARN IT (again)! I also made a peach cobbler. The dough part is most my un-favorite thing to do EVER! Mind you, I do not own a mixer (at least not at that time), only a hand mixer, which I did not use and so it was quite daunting. The dough was not 'perfect' but turned out good enough to cover the dish (whew)! The recipe was great, but I needed to add a bit more 'juice' to it. I was so afraid of it being soupy that I did not add it all...another DARN IT! However, at least it was good enough to serve! I also tried a brownie dish that I've made before. The disaster with this dessert was I forgot to thaw the cool whip...a big "OH MY GOSH" at the last minute! My sister dashed off to the store to find some cool whip spray, but it's SO not the same as traditional cool whip, but as a good enough fix to serve! Lastly, I tried my hand at homemade yeast rolls. These actually turned out great!
I said I would not bake again, but I think I will now that I went out and picked up a Kitchen Aid mixer at Wally World in the Black Friday extravaganza! I think that will make baking just a tad easier and the fact that I've tried once, it shouldn't be as hard the next go 'round, right?! Well, at least I hope not! All of the rest of food turned out okay, but not THE BEST like I like it! When I do this again, I'm going to tackle more food the night before when I'm not under the gun!
My sister and I shopped all of the door busters. We shopped at a local outlet mall from midnight and then made a few stops and did not finish up until after 7 am Friday morning. I had 2 coffees and was so energized by the shopping that staying awake was no problem until I 'crashed' at Bath and Body Works! A lot of people think it's crazy to get out there and shop with the masses, but it's really fun! I only recommend it to those who can handle crowds, people bumping, and patience. Lines are very long at times and you have to be willing to sacrifice time for a few dollars! It's just something to do for me and to experience. I can also see why some people would rather pay the extra money not to wake up at the crack of dawn and deal with the masses; it's all up to the person! People watching is so fun to me (remember, I'm the "watcher" from my anniversary post) so I truly enjoy it!
Grateful for time with family and friends and even the food disasters! I hope you enjoyed your Thanksgiving too!
Thanks for stopping by and enjoy your Sunday!
 Hey there, Bleeps! Happy Thanksgiving! I'm still awake cooking or I should say waiting on some things in the oven so I can lay down for a bit. So far the turkey, greens, peach cobbler, and cranberry mold are prepared for tomorrow. Whew!
Today, I'm sharing a card I created for Embellish Magazine's Brad Color Challenge. I used some of my new PTI stamps and they're so great! Just thought I'd pop in and share this card on my blog even though it's on Embellishes blog.
If I am not back later today with my "Thanksgiving" post, I'll be back on Friday with it to share photos of the food and of course the table setting! I'm so excited and can't wait to taste that cobbler...it's my FIRST. I've never even made dough from scratch before so I am extremely nervous! Good thing the stores are open tomorrow for a bit for a last minute addition! But, let's hope for the best! So, if you want to hear how it all turned out, make sure you check back for the recap!
Thanks for stopping by for a bit of entertainment on this Thanksgiving! I hope you eat well and enjoy this special day! Hope to 'see' you later or tomorrow!
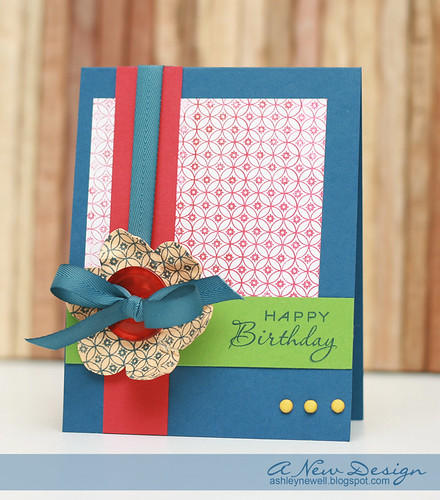
Instructions - Trim blue cardstock to create card base.
- Trim white block, stamp background and adhere to card front.
- Trim red strip and adhere to card front.
- Trim green strip and adhere to card front.
- Punch flower, stamp background.
- Wrap ribbon and funnel through button and flower.
- Stamp sentiment on green strip.
- Add brads.
Supplies
Stamps :: Papertrey Ink - background basics diamonds, communique sentiments Ink :: Papertrey Ink - pure poppy, enchanted evening Paper :: Papertrey Ink - pure poppy, enchanted evening, new leaf white; Cut Card Stock.com - yellow Embellishments :: CTMH - brads; Marvy Uchida - flower punch; Papertrey Ink - button, ribbon
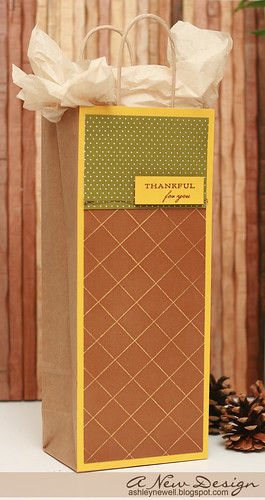 Happy Hump Day, Bleeps! Today, starts the pre-Thanksgiving festivities for us. I hope to get off of work a little early so I can nap and start cooking all night. I'm a night owl and prefer that schedule! Today, I am sharing a wine gift bag. It is super quick to make and perfect for a hostess if you going to someone's house for the holidays. Who doesn't like wine? Well, I'm sure many don't, but wine or even some sort of sparkling bubbly (alcoholic or not) is a festive way to express your gratitude.
I'd like to take today's post and express my gratitude for you, my Bleeps! I never thought people would read my blog and I'm ever so grateful for each of you. If I could, I would make this wine gift bag (with wine included) in it to give to you because I am thankful for you. There are so many things I am thankful for, but thankful for people is the most special to me. Everything else may come and go, but people should be cherished. I would love to hear what you are thankful for this holiday, so please leave a comment and share to celebrate this joyous holiday!
Enjoy your day and thanks so much for your visit!
Instructions - Cover bag front with crushed curry cardstock. (TIP: I overlapped 2 pieces, but you can't see it!)
- Trim core'dinations cardstock and add scored lines, then sand and adhere to bag front.
- Trim polka dot patterned paper.
- Add stitching to the bottom of the patterned paper, then adhere to bag front.
- Stamp sentiment on cardstock block and adhere using foam adhesive.
Supplies
Stamps :: Papertrey Ink - first fruits Ink :: Clear Snaps - chestnut Paper :: Stampin' Up! - crushed curry; Papertrey Ink - bitty dots patterned paper; Core'dinations - chocolate collection (yellow core) Embellishments :: Nashville Wraps - wine bag, tissue paper Tools :: sewing machine; thread; Scor-Pal
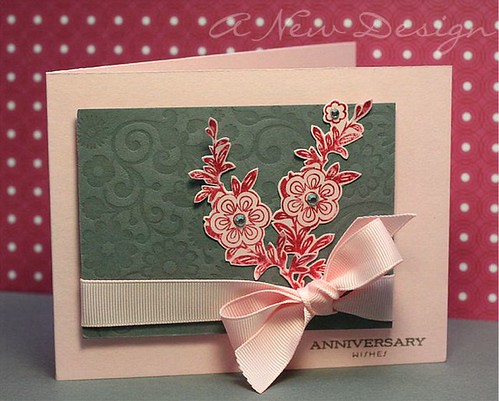
 Hey there, Bleeps! It's Tuesday and that means only one more work day for most of us who aren't taking off! I have to make one more trip to the grocery store today to pick up the perishable items, like eggs, milk, cheese, and so forth. Yesterday I made a card using Savitri's daughter, Emma's sketch combined with Dawn's color challenge. Boy, was this a doozy! Mac said he liked it, so here it is posted! I got the chance to use a few of my new Papertrey Ink stamps and boy do I like the new background stamp! WOW! The Big & Bold sentiment stamp set is loaded with the best sentiments. I chose this one to send to a family friend. I'm going to have to make an envelobox with my Ultimate Crafter's Companion to mail this one! I love that feature! Now, my 'big' cards can fit in a mini box! It allows just enough room for dimensional elements.
Instructions - Trim white cardstock to create an A2 card base.
- On aqua mist block, stamp background pattern.
- Add pink dots to the centers of background pattern.
- Adhere aqua mist block to card front.
- Tear a strip of book text and distress, then adhere to card front.
- Add a strip of raspberry fizz cardstock.
- Adhere scallop trim and add ribbon.
- On a new aqua mist block, stamp sentiment and adhere to card front.
- Add buttons and rhinestones.
Supplies
Stamps :: Papertrey Ink - big & bold wishes, diamonds background basics Ink :: Clear Snaps - chestnut; Papertrey Ink - aqua mist; Stampin' Up! - pink marker Paper :: Papertrey Ink - white, aqua mist, raspberry fizz Embellishments :: KaiserCraft - rhinestones; Book Text; Stampin' Up! - ribbon; Cosmo Cricket - scallop trim; Papertrey Ink - buttons; Twine
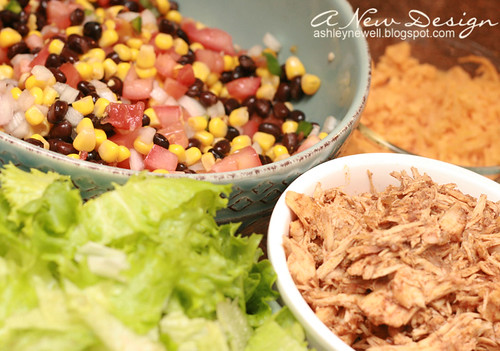
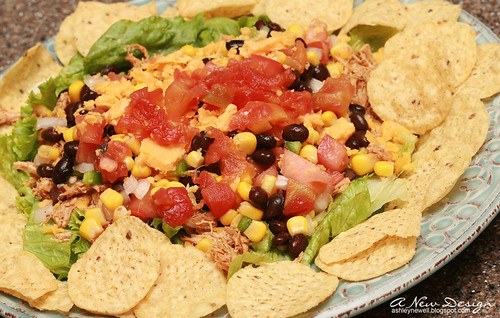
Have you all checked out Laura's new food blog? As you know, I love blogging about food, so I had to try out something on Laura's blog and I did last night. It is the Taco Salad! It was a perfect dish to make the week of Thanksgiving because it's light and not too difficult. I think I'm officially a 'foodie!' So, this post marks the start of the food posts that will follow for Thanksgiving. Last year, I blogged about the place cards and menus, but this year, I plan to take it a step further. I hope you all will enjoy it!
Food Stations
My Plate "dressed up"
The original recipe may be found here. However, I usually alter a recipe a bit to fit my personal preferences. As suggested by Laura, the taco salad can be served with chicken as opposed to ground turkey. So here is what I used and how I made it! Enjoy!
Ingredients
2 chicken breasts 1 can of corn 1 can of black beans 1 can of rotel (can be used as a complete tomato/jalapeno substitute) I like HOT 2 roma tomatoes Some lettuce Some cheese Some onions 1 jalapeno/serrano pepper salt (to taste) tortilla chips
Directions - Slow cook chicken breasts in crock pot. (I choose this step so that the chicken is ready when I return home from work.)
- Add taco seasoning overtop of chicken and set crock pot on low for about 6-8 hours.
- Remove chicken from slow cooker and pull the chicken a part.
- Add chicken to the skillet, along with 'broth' from slow cooker.
- Cook the chicken until the meat absorbs the chicken.
- Chop onions, jalpeno pepper, and tomatoes and toss in a bowl.
- Add corn, black beans, and some rotel to the bowl (Hot version will spice it up) and toss.
- Season with salt (if desired).
- Chop lettuce and shred cheese.
- Set up stations and create a taco salad or traditional tacos on soft or hard-shell tortillas.
- Serve with tortilla chips.
Thanks for stopping by and enjoy yourself today!
 Hey there, Bleeps! I hope your weekend was fab! Mine was, well partially! Saturday, on about 2 hours of sleep, took a bus trip up to Rehoboth Beach, Delaware. It was a lot of fun, but it really wore me out! I slept all day Sunday and took it way too easy!
Don't worry, because my 2S4Y card is ready to share and the sketch is too, so head on over to the blog to check out the great designers of 2S4Y to see what they drummed up. I'm sure they rocked out their designs using this sketch; it was a tough one for me! You know how I feel about my sketches sometimes; sketch challenged, but I pulled through and made something and you can too! This week's sketch challenge is sponsored by JustRite! They have a great holiday stamp collection out and you can check them out here. Up for grabs this week for the Card of the Week winner are lots of JustRite stamps! Everyone can receive 20% off on all Christmas sets and 48-hour shipping. Check out the details over at 2S4Y! 
Have a great Monday because this week will be a short one for most of us! Wednesday will be here before we know it and our tummies filled by Thursday! Black Friday will be a mad house and the weekend will be here again! YAAY Thanks for visiting!
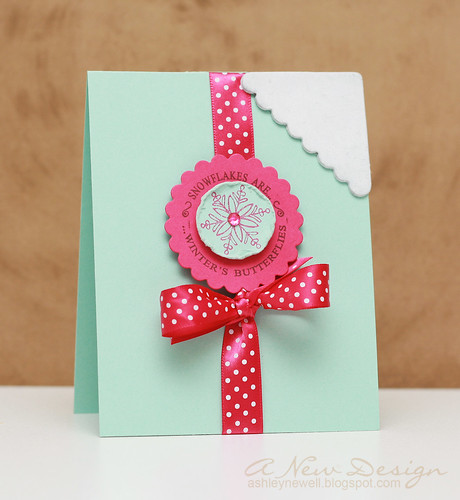
Instructions - Create card base from aqua mist cardstock.
- Stamp sentiment and die cut scallop circle.
- Stamp snowflake and cut a circle, then distress it.
- Add rhinestone to the snowflake center, then pop off scallop circle center.
- Tie ribbon into a bow around card front, then add scallop circle.
- Ink chipboard corner element, then adhere to top right corner.
Supplies
Ink :: Papertrey Ink - raspberry fizz; Stampin' Up! - white, chocolate chip Paper :: Papertrey Ink - aqua mist, raspberry fizz Embellishments :: Craft Supply - random chipboard corner pieces; KaiserCraft - rhinestone Tools :: Spellbinders - scallop circle nestabilities
 The card that McArthur MADE for me for our anniversary
 Flowers McArthur sent to my job Water spilled out on car ride home...going to refill!
 Our kitchen before the surprise (taken with an iPhone camera)
 Our kitchen after the surprise
 Larger photo after the surprise... Yes, I 'jam' listening to my iHome while cooking... Yes, I keep my counters this clean (USUALLY)... now for the story...
Hey there, Bleeps! I thought I'd do a Saturday leisure post for you all to share our anniversary tidbits since you all gave us so many well wishes, this was the least I could do! As a side note, McArthur was out of town (in Dallas) for work for the past few days. He did not return home until late on Thursday (our anniversary). He made sure he made it back, even if it was to see my face! I picked him up from the airport and we had a glorious Chick-fil-A meal in "CC" (my car)! We were very excited to see one another, having been a part for the past 6 days or so.
The Card
When we got home, he couldn't wait to share his card with me. If you've been a "Bleep" for a while, you'll know that last year he got Dawn McVey to make me an anniversary card, so I was really excited to see what he was going to do this year. Well...he made that card pictured above! When I pulled it out, I screamed, "YOU MADE THIS?" Don't get me wrong, McArthur is a great painter and artist, but card maker, never thought about it! While away, he went to Target and bought all of the paper crafting supplies he could find. I call the card a 'hybrid' card because he used some pre-made cards (the butterfly portion) and combined it with other papers. He wanted a focal point, so he cut out "TODAY" from USA TODAY newspaper that the hotel so graciously provided. This is one of the cutest cards! What do you think?!
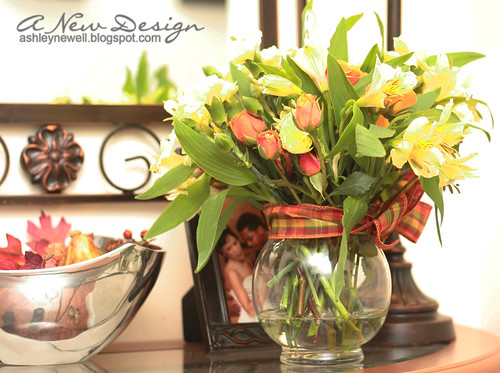
The Flowers
So, the story goes a bit like this: Thursday, McArthur calls me around lunch time to ask if I was at work. I told him no, but was on my way back because I met my high school cheerleading friend for Pho! So as the day went on, he started texting me about a 'delivery.' I told him no delivery. At that point, I knew he was getting anxious. Long story short, the florist never made the delivery. He was so upset. Fast forward to Friday, and the florist finally delivered the flowers pictured above mid-afternoon. I took a photo and sent to McArthur to express my gratitude, but only to find out that is NOT what he ordered. I felt so bad for him because ordering flowers can be a daunting task. Regardless, I thought they were pretty and it was a thoughtful gesture!
The Surprise
As I was on my way home from work on Friday, I told McArthur I was making a few stops (to the mall) to pick up some items for my Thanksgiving dinner plans. Did I mention I really like Williams Sonoma? Okay, back on track! He said it was okay and I told him I would be home shortly. Well, after an hour passed, he called again. I had to make a U-Turn from my second stop to rush home per his request. When I drove towards the house there was a what I like to call a "random" van parked in the driveway. I drove past and parked. Walking up to the door, I peered into the windows trying to figure out SOMETHING! He never gets anything past me! So, I figured he was getting our ice maker fixed (which is broken). He heard me at the door and opened it swiftly. He ushered me upstairs and VOILA into our updated kitchen. I think I was speechless; not because I did not like it, but because he REALLY SURPRISED me this time! It is so beautiful and the fact that he took a photo of the tiles I picked out at the store over a year ago, remembered that he had them, and came up with the design himself was really, really thoughtful. Since moving into this house, I wanted my backsplash tiled and now it is!
Live in the Washington DC area? Tile work was completed by Global Remodeling, Inc. - Jalal Tosi. If you're interested, I have additional contact information.
Random Tidbits
At the crack of dawn, I'll be on a bus heading up to Rehoboth Beach, Delaware on a shopping trip with my mom. Let's hope we find some good deals!
My brother-in-law just 'opened' his website, which features his music. Please note, if you do not like hip hop or rap you may not want to listen! I really like it and is proud of his talent. One of his singles is also on iTunes under his artist name, Hendrix Law. Check it out here.
Thanks so much for stopping by and reading about our anniversary and extra tidbits. I hope it was somewhat entertaining!
Enjoy your weekend, Bleeps!
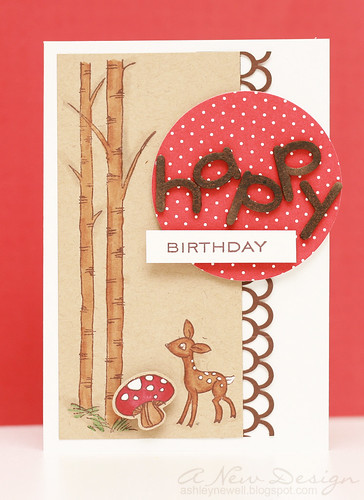 Hey there, Bleeps! TGIF and time for another Caardvarks Challenge! It's all about coloring this time! How did I do? I am a newbie at coloring and using Copics, so what do you think?! I find the shadow part the hardest for me. For instance, where do I put it and when is it too much? If you have any tips, feel free to share them with me!
Thanks also for all of the anniversary wishes. Mac was blown away and read them too! I'll share with you a card HE MADE this weekend! Challenge DetailsSponsor: My Scrapbook NookChallenge: Color a stamped image Prize: 4 copic markers from My Scrapbook Nook Reader discount: 20% off duing the challenge period, code: NWS20 Enjoy your weekend and thanks for stopping by! Instructions- Trim white cardstock to , score in half to create a card base.
- Trim kraft cardstock block.
- Stamp images and color.
- Stamp mushroom on a separate kraft scrap, color, cut out, and pop off.
- Punch decorative edge trim and adhere it to right side of kraft cardstock.
- Adhere kraft focal point to card front.
- Die cut circle from patterned paper and adhere to card front.
- "Color" chipboard letters with Maya Mist and adhere.
- Stamp sentiment, then pop off card front.
SuppliesStamps :: Papertrey Ink - birthday basics; Stampendous - birch buddies Ink :: Copic - markers; Uniball - Signo Board white gel pen; Stampin' Up! - chocolate chip Paper :: Papertrey Ink - white, kraft, bitty dots Embellishments :: Maya Road - chipboard letters Tools :: Martha Stewart - loopy edge punch; Provo Craft - Cuttlebug; Spellbinders - circle netsabilities; Maya Road - maya mist bronze
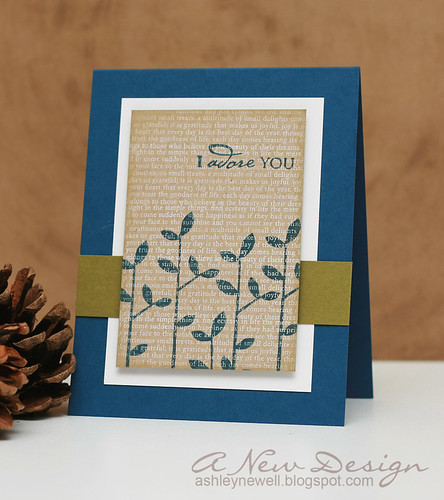         This post is dedicated to the celebration of our wedding anniversary (just a fair warning)! Four years ago today, McArthur and I decided to tie the knot. However, exactly 11 years ago when we started dating I knew we shared something special. We dated 7 years before Mac proposed and got married near our 8-year dating anniversary. So, when we celebrate our anniversary, it is not only our wedding anniversary, but our anniversary of our relationship.
I met Mac when I was 13 years old, he was 14. I traveled to North Carolina to attend a summer science and math camp for I think 1-2 months and he attended as well. We were friends, but merely that. At the end of the camp, we said our goodbyes and parted our ways, never to exchange numbers. We ran into each other twice since the camp, once in Baltimore and the other in Raleigh. Finally, in Raleigh he asked for my number and I gave him my pager number (the sign of the time)! I never returned his pages because the number was unrecognizable! HAHA One day, he saw me walking on campus (our third run-in) and he gave me a ride. I can remember that day so vividly, so clear. That was our last run-in because we never parted again.
Our journey together has been amazing. It's such a remarkable life experience to see someone, let alone your partner in life grow. Mac and I share a lot of commonalities, especially the arts; however, we also have our differences, such as he's the "talker" and I'm the "watcher." Whether we're celebrating 4 years of wedded bliss or 11 years of partnership, I'm so thankful for our time together and our relationship we have built.
Today, I say I love you to my husband, my partner, my best friend! Happy Anniversary, "Flave!" (...don't ask about the nickname, I give him a new one every so often and he does the same to me!)
The photos of us above are in chronological order from old to new. I wish I gave more time to this to dig up and scan some really old ones so you can see how young we looked, but darn it, I ran out of time.
Thanks for stopping by to share this day with us and I hope you enjoy the card, which was quite difficult to make. It is inspired by SCS Sketch SC255.
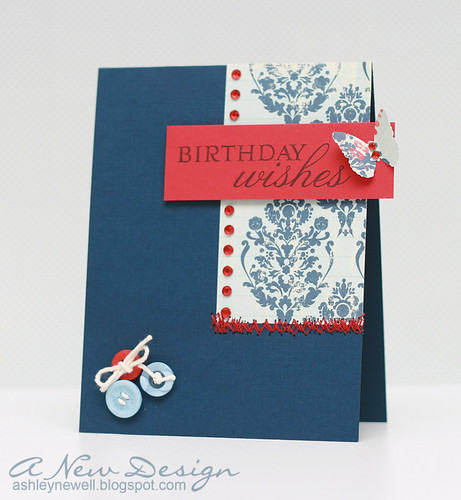
Instructions - Trim navy carstock to create an A2 card base.
- Trim white cardstock into a block and adhere to card front center.
- Trim green cardstock strip and adhere to card front.
- Trim kraft cardstock block, stamp text background, stamp leaves, stamp sentiment, and adhere with foam adhesive on card front.
Supplies
Stamps :: Papertrey Ink - text background, rustic branches; Melissa Frances (sentiment) Ink :: Papertrey Ink - enchanted evening; Stampin' Up! - white Paper :: Papertrey Ink - enchanted evening, ripe avocado, white, kraft

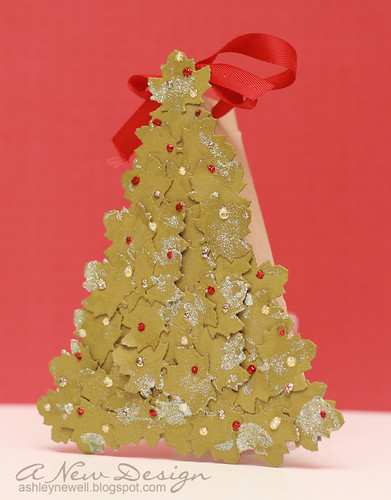
Wedge Box (decorated with leaves into a Christmas Tree) the ribbon allows you to hang it from the tree
For SCS, we just reviewed the Crafter's Companion. To read more about our reviews, see our projects, and even tutorials, hop on over to SCS. I made an ensemble for this review. I rarely do this, but this product is perfect for those who love making projects from templates. I made a card with a tag and even some berry spray! Next, I made a gift box. It was super easy to do and really effective when you need a small box. The box measures 4.5" x 7" and is 2" deep. It is a pretty decent size box, especially for a bunch of cards! Next, I made a wedge box. It is secured with ribbon. I then decorated it with maple leaves into a Christmas tree design. I'm not going to go into the instructions for all of these projects, but I will provide supplies I used for all of them!
Thanks so much for stopping by and enjoy your HUMP DAY, Bleeps!
Supplies
Stamps :: Papertrey Ink - signature christmas; o christmas tree Ink :: Papertrey Ink - pure poppy Paper :: Papertrey Ink - ripe avocado, kraft, pure poppy; October Afternoon - falling snow; Cut Card Stock - cream shimmer Embellishments :: berry spray; Paper Source - wide gold ribbon; eyelet; twine; Making Memories - vintage lace trim; Papertrey Ink - pure poppy ribbon; stickles; Palette - glitter Tools :: Spellbinders - maple leaves nestabilities; Crafter's Companion
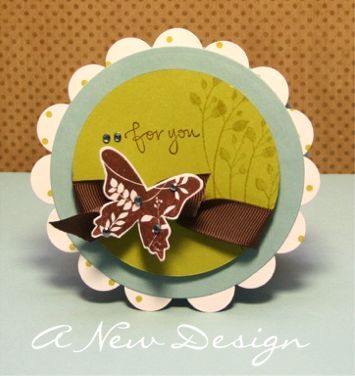
 Hey there, Bleeps! I'm back today with a card inspired by Everything But the Kitchen Sink sketch challenge. The photo of the fireplace and mantle reminded me of my own home and I wanted to incorporate that design into a card. Since I love the color combination of blue and brown in my home, I thought I should carry that over onto the card as well. Because the focal point ended up being elegant, I made it a wedding card.
Thanks for stopping by and enjoy your Tuesday!
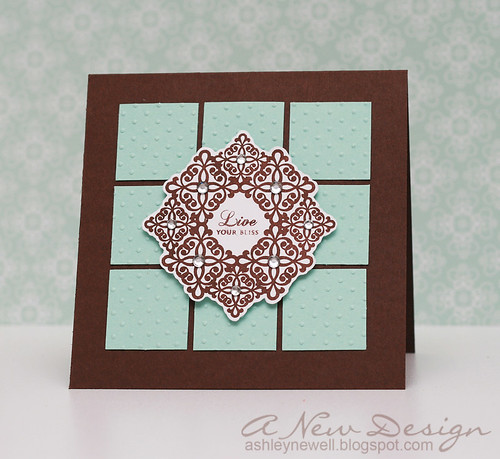
Instructions - Trim brown cardstock to 5"x5" square card base.
- Dry emboss blue cardstock.
- Punch 1-1/4" squares, then adhere to card front.
- Stamp focal point and cut out.
- Stamp sentiment.
- Add rhinestones.
- Adhere to card center with foam adhesive.
Supplies
Stamps :: American Crafts - majestic; Papertrey Ink - mixed messages Ink :: Clearsnaps - colorbox chestnut Paper :: Papertrey Ink - aqua mist, dark chocolate, white Embellishments :: KaiserCraft - rhinestones Tools :: Creative Memories - square punch; Provo Craft - swiss dots embossing folder, Cuttlebug
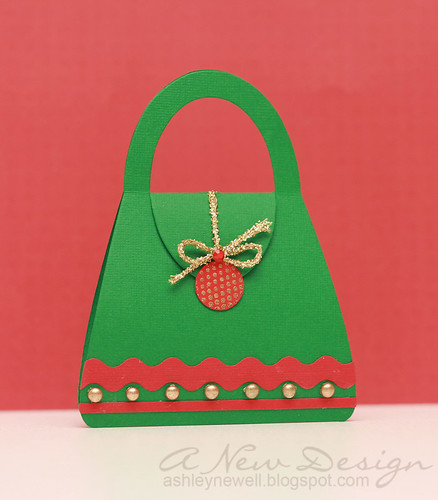 Hey there, Bleeps! Happy Monday to you! Today, I'm sharing my 2S4Y project. Creative Cuts and More has a load of various die cuts, which are perfect for the upcoming holiday season. I selected to use a purse die cut and will use it as a gift card holder. So, check out the rest of the design team's creations here and start sketching your ideas out for this week's challenge! Here's a peek at the sketch, but go on and hop on over!
Instructions - Punch circle.
- Stamp polka dots.
- Emboss with gold and heat set.
- Tie gold tinsel string around purse closure.
- Add circle "ornament" and secure with a glue dot.
- Add decorative trim and strip of cardstock.
- Add dew dots.
Supplies
Stamps :: Papertrey Ink - polka dot basics 2 Ink :: Versamark Paper :: Creative Cuts and More - Purse die cut; Bazzill - cardstock strips; Papertrey Ink - pure poppy Embellishments :: dew dots; gold string; KaiserCraft - rhinestone Tools :: Creative Memories - circle punch
I received the "Over the Top Blog Award" from Savitri and a few other Bleeps (I am really sorry I can't find each person, but I can't search my comments - just discovered that), so I thought I'd at least complete the questionnaire. I'm breaking the rules of the award, but at least I'm completing it!
1. Where is your cell phone? Plugged in the iMac to charge
2. Your hair? Short and Messy
3. Your mother? Strong
4. Your father? Missed
5. Your favorite food? Thai
6. Your dream last night? Sad
7. Your favorite drink? ice cold Pepsi, preferably from the can (at this moment)
8. Your dream/goal? Work from home
9. What room are you in? Studio/family room
10. Your hobby? Paper crafts, eating, shopping, traveling
11. Your fear? Lots of anything, especially spiders
12. Where do you want to be in 6 years? Living out of the country
13. Where were you last night? Downtown DC meeting with wedding clients
14. Something that you aren’t? Talkative
15. Muffins? Chocolate
16. Wish list item? Macbook Pro
17. Where did you grow up? Maryland
18. Last thing you did? Surfed Internet
19. What are you wearing? Old Navy active wear (jogging suit sounded like my mom)
20. Your TV? Everywhere, even the bathroom!
21. Your Pets? Ozzy the Yorkie
22. Friends? A few
23. Your life? Fun
24. Your mood? Motivated
25. Missing Someone? Hubby
26. Vehicle? CC the CR-V
27. Something your not wearing? Necklace
28. Your favorite store? Target (I can get everything I need there and actually be satisfied with that!)
29. Your favorite color? Brown
30. When was the last time you laughed? Today
31. Last time you cried? I don't know
32. Your best friend? Hubby
33. One place that I go to over and over? Dominican Republic
34. Facebook? Yes
35. Favorite place to eat? Thai Landing (Baltimore) Finding five people I’d like to give this to is IMPOSSIBLE, so I invite all of my Bleeps to join in on this fun questionnaire!
 Happy Weekend to "My Bleeps!" Oh how I love and live for the weekends! Don't get me wrong, every day matters and I am very thankful for each day, but there's some extra special about sleeping in on a Saturday that gets me excited!
Anyway, today I am sharing a quick and easy holiday card I created for Papertrey Ink's Guest Star Stamper contest. This card can be a bit more simplified by reducing the snowflake embellishment (so that it actually fits comfortably in an envelope). Tonight is the night of the release party! I pretty much always 'attend,' but for some reason this month I'm really excited! I got so excited that I made this card for the contest! I have not entered in a while and I realized that I actually missed it. So, here goes nothing! I hope to see you later tonight in the forum to say heeeeeeeey!
Enjoy your weekend!
Instructions - Trim pure poppy cardstock to create an A2 card base.
- Punch snowflakes from patterned paper and assemble together with foam adhesive (3 punched snowflakes on this card).
- Add a button to the center of the assembled snowflakes and set aside.
- Stamp stripe design at the top center of card front.
- Adhere snowflake embellishment.
- Stamp sentiment.
Supplies
Stamps :: Papertrey Ink - background basics (retro), signature Christmas Ink :: Stampin' Up! - white Paper :: Papertrey Ink - pure poppy, bitty dots Embellishments :: Papertrey Ink - button, twine, Tools :: Papertrey Ink/Marvy Uchida - giga snowflake punch
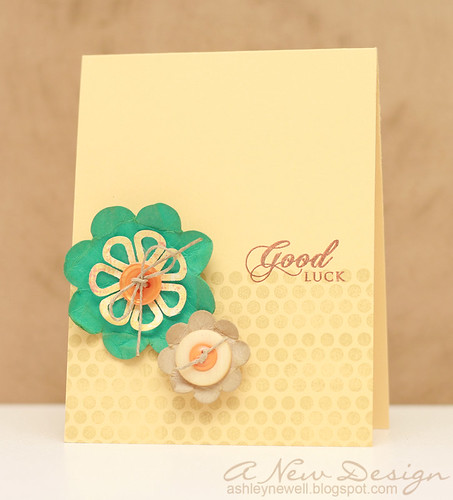 Happy Friday, Bleeps! How are you?! I hope well now that the weekend is peeking over our shoulders! Today, I have a quick card for you. The hardest part is the die cutting! I hope you enjoy your weekend and as usual, thanks so much for taking a peek over here at the blog.
On a side note, Embellish Magazine is hosting a new challenge starting today. Have you been by there recently? If not, check it out, add it to your reader/RSS feed/e-mail. Don't forget to connect with Embellish on Facebook/Twitter/Flickr too. Come join us and play along! It will be worth the challenge!
Instructions - Trim yellow cardstock to create an A2 card base.
- Die cut flowers (in various cardstocks/patterned papers).
- Stamp polka dot background on bottom portion of card front.
- Stamp sentiment in orange ink, then overlay in brown ink (a neat shadow effect).
- Distress die cut flowers, add buttons, then adhere to card front with foam adhesive.
Supplies
Stamps :: Papertrey Ink - mega mixed messages, polka dot basics 2 Ink :: Stampin' Up! - river rock; Papertrey Ink - orange zest; Clear Snaps - colorbox chestnut Paper :: Yellow cardstock (NO CLUE where I picked up this scrap, odd I know!); Stampin' Up! - bermuda bay; Papertrey Ink - kraft; My Mind's Eye - breaking free collection Embellishments :: Papertrey Ink - buttons; Craft Supply - twine Tools :: Provo Craft - cuttlebug; Quick Kutz - nesting flower dies

Hey there, Bleeps! How is your week going so far? I hope good because it's already Thursday! I've been working on a lot of DT obligations, which you will see soon, but for now, here's a card! For some reason, I'm not feeling too chatty and so this will be short-n-sweet!
Thanks for visiting me! I appreciate each of you! Enjoy!
Instructions - Trim patterned paper into a 5" square card. (Reverse of patterned paper is the solid.)
- Die cut scallop square and adhere it to the card front with foam adhesive.
- Add patterned paper strip to red cardstock strip.
- Wrap twine around strip (Don't forget the button and chipboard flower).
- Create scallop edge by die cutting red cardstock scallop square (only bottom portion needed) and adhere to the bottom of patterned paper scalloped square.
- Add the entire strip to the card front.
- On white cardstock, stamp sentiment and tuck under twine.
- Add rhinestones around scallop edge.
- Add stitching.
Supplies
Stamps :: Papertrey Ink - wishing you Ink :: Papertrey Ink - pure poppy; Stampin' Up! - white Paper :: My Mind's Eye - breaking free collection; Making Memories - Passport Collection; Papertrey Ink - pure poppy, white Embellishments :: Stampin' Up! - so tweet chipboard flower; Nice Package - twine; Papertrey Ink - buttons; Kaisercraft - rhinestones; thread Tools :: sewing machine
  Never released on my blog, but on SCS, HERE
 Hey there, Bleeps! It's November, which means I can now share my October 2009 CARDS Magazine published works! This is the first month since May that I have been published in CARDS. I had a bit of a dry spell there, but nothing to get the blues over, just more in tune and confident with my craft!
The October issue features handmade flowers, embossing, stamping, and much more! Please visit CARDS Magazine and subscribe to a paper and/or online subscription. I have both! Additionally, Sarah Martina's card is on the cover for the December issue, which is already released online! You've GOT to see Sarah's card(s). This is Sarah's first time submitting and she even made the cover!! How's that for a great time? So, you've got to submit ladies if you want to see your work in a magazine!
To start, you can hop on over to CARDS blog. This week, Paige is hosting a challenge for Thanksgiving place cards. She shared my place card that is published in the November 2009 issue. I made those place cards (others for my family not pictured) last Thanksgiving. I wanted to let you in on a little secret of mine! Sometimes, it is hard to step into the publishing world and create holiday cards/items in April and so forth. So, what I have started doing is saving my projects to wait until the call is right. Whether the call is seasonal or something as simple as 'woodgrain', you can have something to submit. Create at your heart's content, then submit what you have in your stash. I submitted 17 cards for the April 2010 issue and only about 3 cards were created within the last month for the actual call. This is just what I do and I thought I'd share that little secret with you all! The only thing is it requires a project storage area and be willing to rummage through it each month to pull related items! Once they are pulled, I keep them in a cubby until acceptance notifications are released, then I put them back where they can be given out, sold, or just there!
Anyway, I got sort of long-winded there, but I plan to create more Thanksgiving paper art for my table this year, including menus and place cards. I'll be sure to share with you, hopefully on that special day like I did last year in this post!
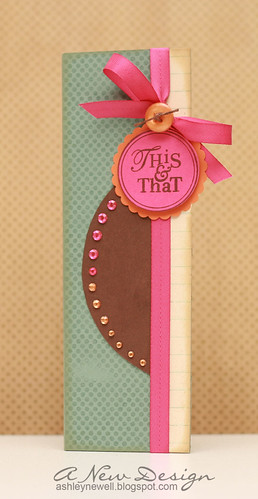  Hey there, Bleeps! Today, I'm sharing something old, but not really! I never got a chance to share the projects I submitted for 2S4Y design team. There were two sketches to use, one by Laura and the other by Kazan. For the first, I made a notepad, inspired by Mish's notepads by Papertrey Ink. The second card is just a happy-go-lucky card!
Thanks for visiting and enjoy your day!
Instructions - This & That - Trim ocean tides cardstock to fit notepad template.
- Stamp one side with polka dots.
- Trim lined patterned paper, ink edges, then adhere to right side of note pad cover.
- Trace a half circle, cut out, then adhere to notepad front.
- Tie ribbon around notepad into a bow.
- Add button and twine.
- Punch scallop circle and circle.
- Stamp circle edge and sentiment and adhere to make a tag.
- Add rhinestones.
Supplies
Stamps :: Papertrey Ink - take note Ink :: Papertrey Ink - ocean tides, chamomile; Clear Snaps - colorbox chestnut Paper :: Papertrey Ink - ocean tides, orange zest, raspberry fizz, dark chocolate; Making Memories - passport collection (lined paper) Embellishments :: Papertrey Ink - ribbon, button; Craft Supply - twine; KaiserCraft - rhinestones Tools :: Spellbinders - circle/scallop circle nestabilities; Provo Craft - cuttlebug
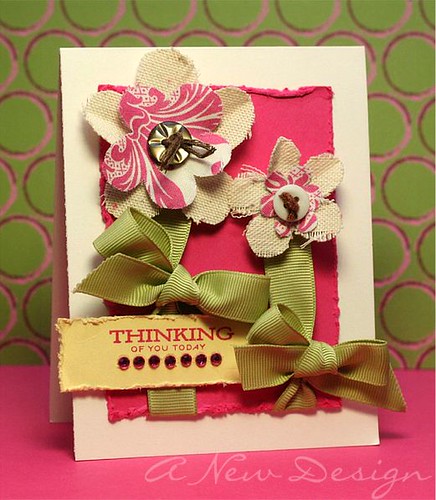
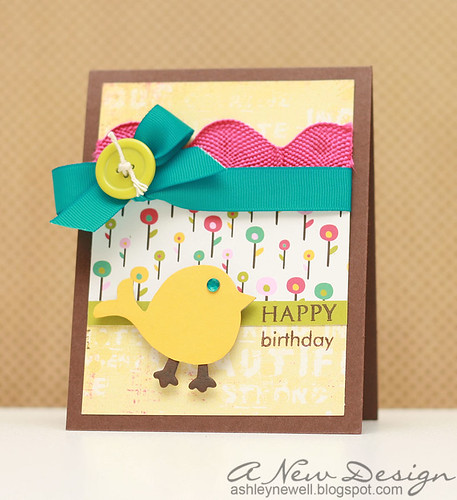
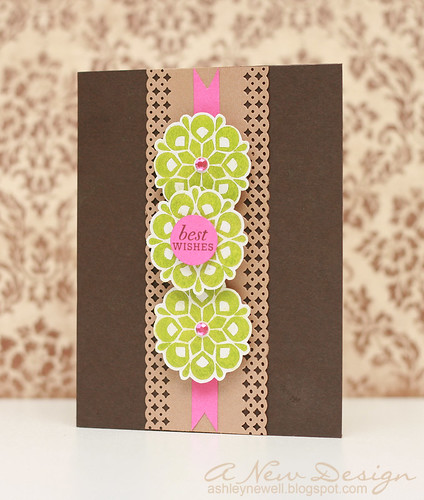
Instructions - Happy Birthday - Trim brown cardstock to create card base.
- Trim patterned papers to fit card front and mat together.
- Add ric rac trim and ribbon.
- Add cardstock trim.
- Adhere to card front.
- Ink and cover chipboard bird and add rhinestone eye, then adhere to card front.
- Stamp sentiment.
Supplies
Stamps :: Papertrey Ink - paper tray Ink :: Clear Snaps - colorbox chestnut Paper :: My Mind's Eye; American Crafts; Stampin' Up! - kiwi kiss; Papertrey Ink - dark chocolate Embellishments :: Stampin' Up! - so tweet chipboard; KaiserCraft - rhinestone; Craft Supply - ribbon, ric rac trim
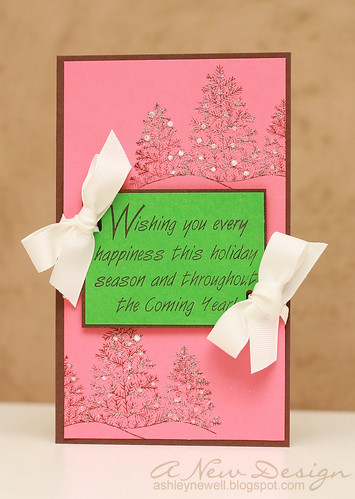
Hey there, Bleeps! I'm back with my first card using 2S4Y sketch as a design team member....WOW! The sponsor this week is DRS Designs. I used two stamps by DRS, which can be found here and here.
Please join 2S4Y this week and make a project using Kazan's sketch below. Have fun and I can't wait to see what you all make!
Thanks for stopping by today (again)!
Instructions - Trim berry sorbet cardstock to 4 x 6.75.
- Stamp tree images.
- Add glitter.
- On green cardstock, stamp sentiment, then mat on brown shimmer cardstock.
- Punch slots in green matted cardstock (to place ribbon) and also through berry sorbet cardstock.
- Tie ribbons into bows.
- Adhere to berry sorbet cardstock with foam adhesive.
- Adhere berry sorbet cardstock to a brown card front sized at 4.25" x 7".
Supplies - Stamps :: DRS Designs - winter trees, wishing you every happiness greeting
- Ink :: Clear Snaps - colorbox chestnut
- Paper :: Papertrey Ink - berry sorbet, dark chocolate; Cut Card Stock - green, shimmer brown
- Embellishments :: Palette - glitter; Papertrey Ink - ribbon
- Tools :: Stampin' Up! - slot punch
 Hey there, Bleeps! I hope you had a great weekend. Here is a card I made last week featuring Cut Card Stock papers! I LOVE their shimmer cardstock. I'm not sure if you can see it here, but I used it on the white and gold. That gold cardstock is so crisp and rich. It's a definite for holiday card/project designs! I can't wait to use more of it.
I'll be back later to share this week's 2S4Y card/sketch! I hope you will stop back by around 9:00 am and participate in this week's challenge!
Thanks for visiting and enjoy your Monday!
Instructions - Trim brown cardstock to an A2 card base.
- Trim gold cardstock into a wide strip and punch decorative edge.
- Adhere gold cardstock strip to card front.
- Stamp images on white cardstock and cut out, then pop off card front.
- Add rhinestones.
- On pink cardstock, stamp sentiment and punch circle, then adhere to center image.
- Trim pink cardstock strips and adhere to card front.
Supplies - Stamps :: Papertrey Ink - giga guidelines; mixed messages
- Ink :: Clear Snaps - colorbox moss green, chestnut
- Paper :: Cut Cardstock - gold shimmer, white shimmer, pink; Papertrey Ink - dark chocolate
- Embellishments :: KaiserCraft - rhinestones
- Tools :: EK Success - decorative punch
 Happy Friday, Bleeps!
I ran out of juice, so now video or blog candy today! I actually had a little bit of juice in me left, but McArthur needed to edit photos on the iMac, so I had to share! ;) I think I will order me a MacBook around Christmas time. My PC laptop seems like junk to me now. I know, that's a shame, but my space bar is missing on it and it's just plain SLOW!
Day 3 Blog Candy Winner is...
Madhvi, please e-mail within 24 hours with your mailing information so I can send your goodies to you! Congratulations and thanks to everyone for their support. Trust me, I have lots more to give away, but am just tired at this point...it's Friday, right?!
  Hey there, Bleeps! I'm back with a Caardvarks challenge...circle cards! This week's sponsor is Clear and Simple Stamps. I was lucky enough to get my hands on the Flight of the Bee stamp set. I really liked the honeycomb pattern and used it to create a background. I made a traditional circle card and another that featured a circle embellishment. Try your hand at some circle cards to and hop on over to Caardvarks to see what my teammates came up with! There are some cute cards out there using some awesome stamps! Have a great Friday Eve and thanks so much for visiting! Instructions :: Card 1 - Die cut circles.
- Stamp honeycomb pattern on bottom half of yellow circle die cut.
- Stamp bee flying lines and sentiment.
- Tie ribbon around yellow circle die cut.
- Stamp bee, cut out, add rhinestone, then adhere to ribbon knot.
- Assemble card base and adhere yellow circle die cut to the card front.
Instructions :: Card 2 - Trim raspberry cardstock to make an A2 card base.
- Stamp honeycomb background on bottom of the card front.
- Die cut a circle and scallop circle.
- Stamp bees on yellow circle die cut and add rhinestones.
- Adhere yellow circle die cut on scallop circle die cut.
- Trim turquoise cardstock, adhere, and add stitching.
- Add circle embellishment.
- Stamp sentiment and pop off card front.
Supplies Stamps :: Clear and Simple Stamps - flight of the bee Ink :: Close to My Heart - black Paper :: Stampin' Up! - bermuda bay, crushed curry; Papertrey Ink - raspberry fizz, black Embellishments :: KaiserCraft - rhinestones; Papertrey Ink - ribbon Tools :: Provo Craft - cuttlebug; Spellbinders - circle, scallop circle nestabilities; Janome Sew Mini (thread)
|
|


