|
|

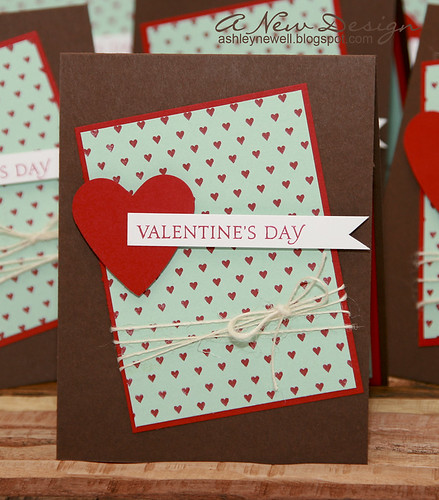
Hey Bleeps! It's Friday and time for another Embellish Color Challenge! This challenge is sponsored by May Arts! That means we get to use ribbon! Oh how I love to embellish my projects with ribbon! The colors are super fun and include, turquoise, brown, and pink. Go on over and take a peek! Up for grabs, is an assortment of great May Arts ribbon. Have fun playing along with the challenge.
Thanks for stopping by and have a great weekend!
Instructions - Make A2 card from brown cardstock.
- Trim white paper strip, stamp floral background, and embellish with brown marker.
- Tie ribbon into a bow around white strip, then adhere to card front.
- Add turquoise strip to the bottom of card front.
- Adhere pearl flourish.
- Stamp sentiment and adhere with foam adhesive.
- Punch butterfly and adhere.
- Round upper right corner of card.
Supplies
Stamps :: PTI - background basics (petal power), signature greetings Ink :: SEI - turquoise; SU! - brown marker; Clear Snap - chestnut Paper :: PTI - dark chocolate, white; Bazzill - turquoise Tools :: Martha Stewart- butterfly punch; We R Memory Keepers - corner chomper
 Hey! You all ought to know that I love to say "Hey!" So, I got this cute stamp set by T he Stamps of Life! This is a quick and fun card to make. The stitching is a bit quirky, but I liked the end result. Enjoy your Friday Eve! I'm so happy the weekend is almost here!
Thanks for taking a peek today!
Instructions - Make 4.25" square card base.
- Trim patterned paper strips, adhere to card front, and add stitching.
- Stamp "hey" on tag, then add ribbon.
- Attach tag to card front with foam adhesive.
- To create flower embellishments, stamp flower, add epoxy sticker and cut out!
Supplies
Stamps :: The Stamps of Life - hello2you Ink :: PTI - raspberry fizz Paper :: PTI - kraft, bitty box, in bloom, raspberry fizz mix (patterned paper) Embellishments :: EK Success - epoxy sticker; KaiserCraft - rhinestone; PTI - ribbon; Nice Package Shop - mini tag Tools :: thread, sewing machine

Hey there, Bleeps! I'm missing CHA, so here's a card for all of my friends I saw in California! Miss ya'll already! This card is a 'publication reject!' Sometimes, the cards I submit for publication do not get picked up. The good thing about getting rejected is that I get to still share them here with my Bleeps! Most times when I submit, I get rejections. I am okay with that because I understand that publishers are selective about the projects shown in their publications for a variety of reasons, from color combinations to design elements. It does not mean that the project is not good. Sometimes, a card presented for one publication is rejected, but accepted for another because the it fits a different publication better (this could be the same publisher). I just wanted to share a bit about my publishing experiences. It's a job. I have fun submitting every month. You just have to try.
Thanks for stopping by!
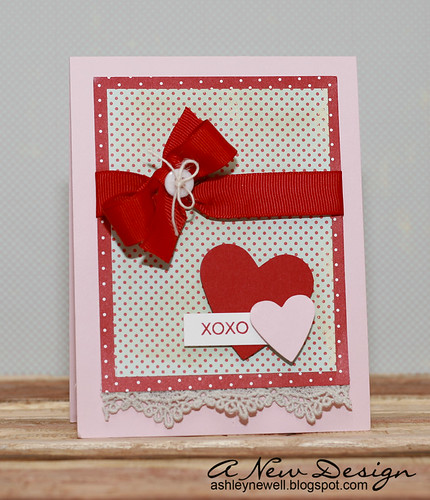
Instructions - Make an A2 card from cardstock.
- Trim polka dot patterned paper strip and adhere to card front.
- Ink leaves, then use the kissing technique and stamp polka dot stamp overtop, then stamp on cream cardstock.
- Cut out leaves and adhere to card front.
- Tie ribbon into a bow and add button embellishment.
- Die cut scallop circle from felt and add stitching.
- Adhere sticker letters to spell "miss you," then adhere scallop circle die cut to card front.
Supplies
Stamps :: Papertrey Ink- turning a new leaf; SU! - polka dot Ink :: Papertrey Ink - raspberry fizz Paper :: Papertrey Ink - vintage cream; SU! - bermuda bay; Cosmo Cricket - early bird collection (patterned paper) Embellishments :: Heather Bailey - felt; thread; Making Memories - letter stickers; Papertrey Ink - ribbon, button; straight pins; twine Tools :: sewing machine; Spellbinders - scallop circle nestabilities, wizard
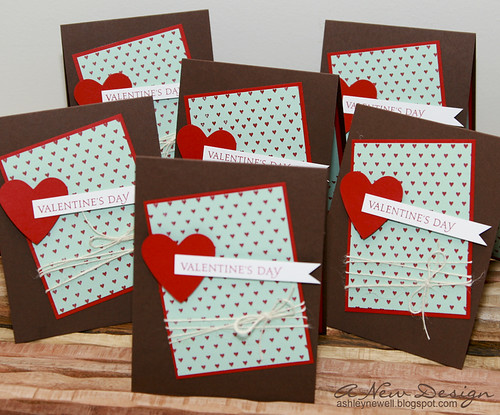
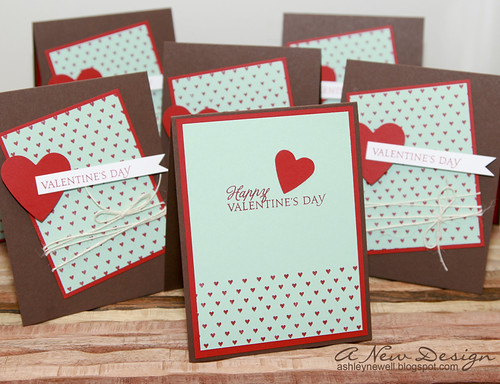
Hey there, Bleeps! I'm sure you're wondering where my photos are from CHA! They're coming! I like to post something bold and new and that takes time! But, I do have some Valentine's cards to share with you. They will be donated to St. Jude Children's Hospital. Winter is organizing a card drive as well for Texas Children's Hospital. Regardless of where my cards end up, I hope they will make a child smile and forget for a bit where they are. This time, I even finished the insides! :)
Check this out! Erin K. was inspired by my card in Stamp It! magazine and made her own version. It's super cute and I love her take on it! I still can't believe that someone would be inspired by a card that I made. Thanks, Erin for posting!
Since I'm on the topic of Stamp It!, I have a few cards in there and one is the Stamp It Three Ways column! Please check it out because this issue is a definite must-have in your craft magazine stash! You can pick it up at any bookstore with a crafts section or AC Moore!
Thanks for taking a peek and enjoy yourself!
Instructions - Outside - Make A2 card base from cardstock.
- Trim blue cardstock and stamp heart pattern, then mat on red cardstock.
- Add twine.
- Punch heart and pop off cardstock.
- Stamp sentiment and add strip to cardstock.
- Adhere cardstock to card front at an angle.
Instructions - Inside - Trim blue cardstock and stamp heart pattern.
- Stamp sentiment.
- Punch heart and adhere.
- Mat onto red cardstock and adhere to card's inside.
Supplies
Stamps :: Papertrey Ink - background basics (hearts); Heart Prints Ink :: Papertrey Ink - pure poppy Paper :: Papertrey Ink - pure poppy, aqua mist, dark chocolate, white Embellishments :: Papertrey Ink - twine Tools :: Marvy Uchida - heart punches
Hey there! I survived my trip to California and am back. I'm getting a slow start this morning and trying to readjust to the time change. I got back very early this morning, but am so grateful I got the chance to go. I have so much to share, but just not today! However, since it's Monday, I do have a card inspired by Kazan's layout over at 2S4Y. Need a head start? Go on over and check out the sketch and some cute inspiration. This week's sketch is sponsored by JustRite. I love their stamps, especially this frame one!
Thanks for stopping by and I'll be back tomorrow with more to share!
Instructions - Make card base from cardstock.
- Trim pink strip and adhere to card front center.
- Trim patterned paper and adhere to card front center.
- Add ric rac trim and staple.
- Add buttons.
- Stamp frame and die cut square.
- Mat black square and pink sentiment square, then adhere to card front center.
Supplies
Stamps :: JustRite - decorative square frames, loving thoughts Ink :: black Paper :: PTI - white, raspberry fizz, black and white basics (patterned paper) Tools :: Spellbinders - square nestabilities, wizard; Tim Holtz - mini attacher Embellishments :: PTI - buttons, twine; ric rac trim
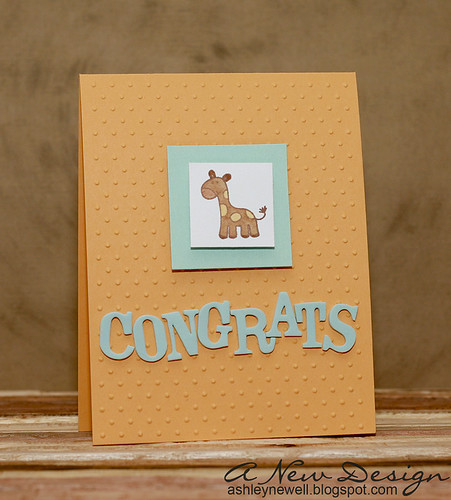
TGIF Bleeps! I have a fast card to share with you today! I even colored it a tiny bit! I wanted to share with you that I decided to go to CHA as of a few hours ago! I found a decent deal with less than 24 hours to plan and pack! As I type this, I still haven't packed, but I did take a nap to get on west coast time! I can't wait to see all of my crafty peeps! I'm super excited because I was not planning this or did not expect to go. That is until, McArthur told me to find a good deal and go! Sorry ladies, but I think I've got the best man out there! Gotta love that! I'll be hanging out with great people over the weekend and be at the trade show for a tiny bit of time on Sunday too, so I can meet some of the greats! I can't wait for the parties, giggles, gasps at how short I am, and photo opportunities! I'll be back next week with stuff to report of course, but until then, follow me on Twitter/Facebook to get a 'live feed!' The information is on my sidebar.
To some of you, I'll see you this weekend. To my other bleeps, thanks for stopping by and I hope to meet you one day!
Instructions - Trim cardstock to create an A2 card base.
- Emboss card front.
- Stamp giraffe, color and matte on blue square.
- Add square to card front center.
- Add thickers to spell CONGRATS.
Supplies
Stamps :: Hero Arts - giraffe Ink :: Stampin' Up! - chocolate chip; Copic markers Paper :: Papertrey Ink - spring rain, white, summer sunrise Embellishments :: American Crafts - lullaby thickers Tools :: Provo Craft - swiss dots embossing folder, Cuttlebug

Bleeps! Happy Friday Eve! I'm so happy to say that today and I can't wait until Friday evening when it's "my time!" Here is a 'sweet' card to give to a loved one who has done something...well...sweet for you!
It was really sweet of you to stop by! Thanks so much and enjoy!
Instructions - Trim cardstock to create an A2 card base.
- Trim green paper, stamp flourish.
- Punch flowers and circles, assemble and add brads.
- Add flowers to green paper and stamp sentiment.
- Adhere to card front.
- Add ribbon treatment.
Supplies
Stamps :: Papertrey Ink - fancy flourish, signature greetings Ink :: Stampin' Up! - black Paper :: Papertrey Ink - true black, raspberry fizz; GCD Studios - christmas sleigh collection (back of patterned paper) Embellishments :: Close to My Heart - brads, ribbon Tools :: flower punch, circle punch
 Hey there! It's already Hump Day and that calls for a celebration! So, head on over to Caardvarks! There's a new challenge hanging around and it's sponsored by Lil Lambs Boutique! You have to create a card using red hearts. Now, I used only one red heart. Why, I don't know, but imagine the pink one is red too! :)
Meet my new poofy flower hair clips! This is a part of my Project 365 I'm doing on my iPhone, so bear with me! I was blog surfing one night and was on Jessica Rosario's site. She mentioned them and I had to check them out and then the next thing I knew, they were ordered. Now, they're here! Maybe I can wear one tomorrow! I feel like now I have to make some for a card...coming soon!
Thanks so much for stopping by and show some 'heart' today!
Instructions - Trim cardstock to create an A2 card base.
- Trim patterned papers and matte together, then tie ribbon around into a bow, and adhere lace trim to the bottom.
- Adhere patterned papers to card front.
- Punch hearts and adhere with foam adhesive.
- Stamp sentiment and tuck into hearts.
Supplies
Stamps :: Hero Arts - everyday sayings Ink :: Papertrey Ink - pure poppy Paper :: Papertrey Ink - sweet blush, white, bitty dots (patterned paper); Making Memories - passport collection (blue polka dot patterned paper) Embellishments :: Papertrey Ink - ribbon, twine, button; Prima - lace trim Tools :: heart punches
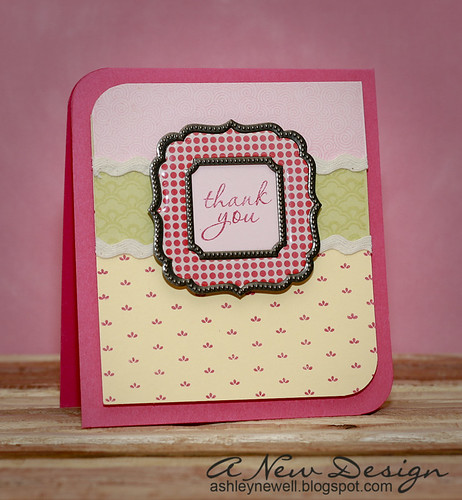
Hey there! I hope you all enjoyed your long weekend! I had a great one! We wrapped it up with homemade Bengali food! YUM! Today, I am sharing a quick thank you card I made. It is a smaller card, but similar to the A2 size.
Instructions - Trim cardstock to create a 4.25 x 4 card base.
- Trim cardstock strips and stamp patterns.
- Adhere cardstock strips and add ric rac.
- Stamp sentiment and adhere to back of metal frame, then adhere to patterned strips center.
- Corner round edges, then adhere to card front center.
Supplies
Stamps :: Clear and Simple Stamps - wallpaper; Papertrey Ink - communique curves sentiments Ink :: Papertrey Ink - spring moss, raspberry fizz, sweet blush Paper :: Papertrey Ink - spring moss, raspberry fizz, sweet blush, lemon tart Embellishments :: ric rac; Making Memories - metal frame Tools :: We R Memory Keepers - corner chomper
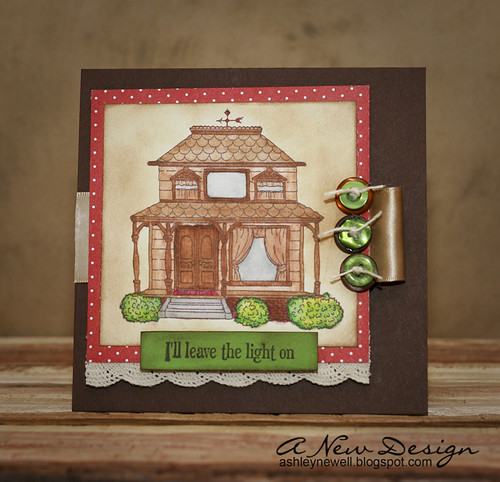
Happy MLK Day, Bleeps! It's such a great day to be off from work! We got the chance to spend the weekend with friends, some old, some new! The photograph session went well and I mostly was the 'entertainer' when the middle of the day arrived! I did wear a few hats, but the entertainer fit the best!
Today, I am sharing a card inspired by this week's 2S4Y sketch. This week's sponsor is Starving Artistamps. I am using a house stamp from this collection. Although I am not much of a colorer, I actually enjoyed coloring this image. However, I do wish I had a few more Copics in my collection! Sometimes, you have to work with what you have though and that is what I did here.
Thanks so much for stopping by and go take a peek at the sketch here.!
Instructions - Trim brown cardstock to create a 5.5" square card base.
- Stamp house on white cardstock and color with Copics.
- Add inking to white cardstock.
- Matte white cardstock on polka dot patterned paper.
- Add lace trim to bottom
- Add ribbon strip and create a loop.
- Adhere matted focal point to card front.
- Add buttons (double them up and add twine).
- Stamp sentiment and adhere to focal image center.
Supplies
Ink :: Stampin' Up! - chocolate chip; Copic markers; Ranger - antique linen, vintage photo Paper :: Papertrey Ink - dark chocolate, white, new leaf, bitty dots (patterned paper) Embellishments :: Paper Source - gold ribbon; Papertrey Ink - buttons, twine; Michaels - lace trim

Just popping in on a Saturday! I don't usually post on weekends, but sometimes I just can't stay away! We have a fun weekend planned. I'm helping McArthur with a photography session that will pretty much last all day long. I'm going to play photographer, model, stylist, and assistant! We'll see how good of a job I do at wearing so many different hats! I'm looking forward to spending the day doing something fun and creative that is not necessarily card making. Now, don't get me wrong, I love making cards, but I've made about 12 cards in the past 24 hours, all for DT requirements, so I just need to step away for a tiny bit. I'm sure I'll be back at my usual spot on Sunday night!
Enjoy your long weekend! Thanks for your visit.
Instructions - Trim cardstock to create an A2 card base.
- Trim patterned paper to fit card front, adhere, and ink edges.
- Trim ocean tides cardstock and stamp images and sentiment.
- Adhere melon berry cardstock strip to the bottom of ocean tides cardstock.
- Tie twill tape around cardstock and secure with twine.
- Adhere focal image to card front at an angle.
- Embellish with buttons.
Supplies
Stamps :: Papertrey Ink - life, communique curves sentiments Ink :: Papertrey Ink - ocean tides; Ranger - antique linen Paper :: Papertrey Ink - bitty dots (patterned paper), ocean tides, melon berry Embellishments :: twill tape; Papertrey Ink - melon berry buttons, twine
 TGIF, Bleeps! Whew! This is a late night or should I say early morning! I was able to finish all of my tasks by the deadline. Take a peek over at Splitcoaststampers today to see all of the projects and my last gallery upload to the fan club as a design team member. The time went by so fast and it was a great ride!
Today, I'm sharing a card I made for our friend whose grandmother passed away. She already has it, so just in case she sees it on Facebook she won't be surprised! YaY for a long weekend!
Enjoy yourself and thanks for visiting!
Instructions - Trim cardstock to create an A2 card base.
- Trim cream cardstock and stamp polka dot pattern.
- Overlay with floral images and add ribbon.
- Matte on purple cardstock, then adhere to card front.
Supplies
Stamps :: Gina K Designs - comfort and peace; Papertrey Ink - background basics (polka dot) Ink :: Papertrey Ink - ripe avocado; Clear Snap - chestnut Paper :: Papertrey Ink - ripe avocado, vintage cream; Cut Cardstock - purple Embellishments :: Papertrey Ink - ripe avocado ribbon
 Hey Bleeps! It's Friday Eve and that's reason to start celebrating! I've got a card to share with you today to celebrate a birthday! Oh boy do I have a lot to do tomorrow. My final gallery upload of SCS DD DT - YIKES! Why do I wait until the last minute! I tried last night, but barely got one project finished. I have a lot more to do. How did this happen during my last month? :) I hope I can pull through! You've got to check out the gallery on Friday just to see what I come up with. This is going to be a long day ahead!
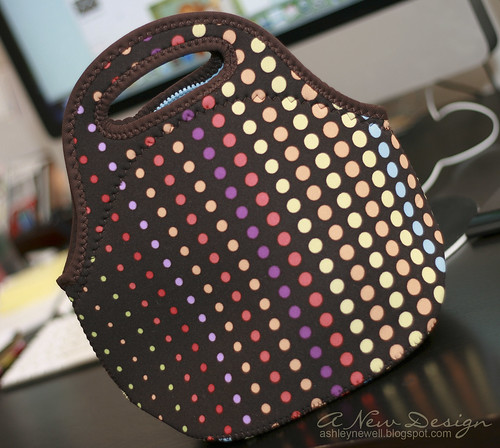
Here is a photo from my Project 365 app (yesterday). Meet my new, trendy lunch tote! I learned about it from watching the Food Network. It's by Built NY and it's made from wet suit material! It's insulated and machine washable. They have a lot of cute designs and styles. They even make laptop sleeves and all sorts of neat finds. I purchased mine on Macys.com because they were having an online sale when I made my purchase. It's soft and folds flat when it's empty! I really like it so much better than my mini lunch BOX! Just thought I'd share since the Project 365 app doesn't load my journaling portion...UGH! I think an update is on its way!
Alrighty, Bleeps...pray for me! Thanks so much and enjoy your day!
Instructions - Trim cardstock to create an A2 card base.
- Stamp images and punch circles.
- Adhere circles to card front.
- Stamp sentiment and adhere to card front.
Supplies
Stamps :: The Stamps of Life - ;Papertrey ink - paper tray Ink :: Clear Snap - chestnut Paper :: Stampin' Up! - soft suede, crushed curry, bermuda bay, kiwi kiss; Papertrey Ink - plum pudding, raspberry fizz, lemon tart
Happy Hump Day! We've made it through the middle of the week and there are only two days left until our long holiday weekend! YAAAAAY! I forgot to share with you my November and December items published in CARDS magazine, so I thought today would be a good day! I added a link to the original post where you can find the information on each project. The first card was published in December and the last three items were published in November. Have you seen January's CARDS issue yet? Don't forget to check it out. Remember, I'm the designer of the month, so I only have a few more weeks in that spot! I also have 7 cards in there and many of them have never been posted on this blog, so I hope you pick up a copy or view it online! Thanks for stopping by today! I'll be back tomorrow with something bold, something new! Enjoy!

Hey there, Bleeps! Today, I have an anniversary card to share with you. It's pretty simple and not feeling too chatty as I type this. I did make some banana nut bread and it turned out great. I'm now doing Project 365 on my iPhone, which is the easiest way for me, so I'll probably tweet my photos every day or so. I'll share my banana nut bread photo later. The recipe is by Laura and it's super easy and fast. Well, that's about all I have to share, so I'll just 'see' ya'll tomorrow!
Have a great day and thanks for stopping by again!
Supplies
Stamps: Papertrey Ink - background basics (polka dots 2), rustic branches, mega mixed messages Ink: Papertrey Ink - scarlet jewel; Versamark; Ranger - antique linen Paper: Papertrey Ink - rustic white, kraft; GCD Studios - christmas sleigh collection Embellishments: Papertrey Ink - ribbon
Instructions - Trim white cardstock to create an A2 card base.
- Trim patterned paper, ink edges, and adhere to card front.
- Trim kraft cardstock, stamp polka dot background, flowers, and sentiment, then adhere to card front.
- Tie ribbon around card front and ink card edges.
 Happy Monday, Bleeps! I hope you had a great weekend, even though it flew by! I got a chance to visit some great stores yesterday, including the Paper Source and Anthropologie. I forgot how much I really liked both stores, but Anthropologie blew me away. They were having a sale, which was really exciting and I picked up a few items, which put a HUGE dent in my wallet (*gulp*)! I guess I'll be wearing those pieces over and over and over again to make sure I get my monies worth! :) Here is a photo of one of the tops I found (not on sale UGH!) that I had to have. My style is a bit funky. I like traditional with something that pops. This shirt is SUPER comfortable. The necklace was much more flattering on than on the hanger. My favorite part is the embroidered colorful flowers of course! I love bright colors added to my wardrobe. I would share my other two finds, but they weren't on the site. If you have a store near you, check them out. If you don't like their clothes, you'll love their home decor!

Anyway, about the card! Today, I'm sharing a Valentine's card inspired by Laura's sketch over at 2S4Y! This week's sponsor is The Cutting Cafe and I got the chance to make an entire card from digital stamps! I had a lot of fun!
Here's a peek at the sketch! It's a great one, so I hope you all get a chance to create something inspired by it!
Thanks for visiting and enjoy your day!
Instructions - Trim raspberry fizz cardstock to create an A2 card base.
- In Photoshop CS4, add color to heart pattern and print on matte presentation paper.
- In Photoshop, size frame labels, add hearts, and print on cardstock. Cut out frame labels and hearts and assemble.
- Matte heart digital patterned paper on black cardstock, then adhere to card front.
- Add ribbon treatment.
- Adhere frame label to card front.
Supplies
Stamps :: The Cutting Cafe - All About Valentine's Day Paper :: Office Depot - matte presentation paper; Papertrey Ink - raspberry fizz, sweet blush Embellishments :: Papertrey Ink - true black ribbon
 Hey there! I hope you all are enjoying your weekend! I have had a very low-key Saturday. I've taken my time, gotten side tracked, and created at my leisure. During one of my side tracks, I was surfing online (one of my favorite past times) and came across Verve's Viva La Verve's sketch/inspiration challenge. This is my first time participating, but I could not resist after taking a peek at Amber's sketch and the inspirational photos. I had a lot of fun with this one too!
Enjoy the rest of your weekend and thanks for taking a peek!
Instructions - Create an A2 card from brown cardstock.
- Trim yellow cardstock and stamp flowers, then matte on cream cardstock.
- Tie ribbon around yellow cardstock into a bow and set aside.
- Stamp sentiment on cream cardstock.
- Trim polka dot patterned paper and adhere to card front.
- Adhere yellow cardstock with foam adhesive.
- Add cream cardstock with foam adhesive.
Supplies
Stamps :: Verve Stamps - serenity, wonderful wishes Paper :: Papertrey Ink - vintage cream, dark chocolate, bitty dots (patterned paper) Ink :: Clear Snaps - chestnut Embellishments :: Papertrey Ink - ocean tides ribbon
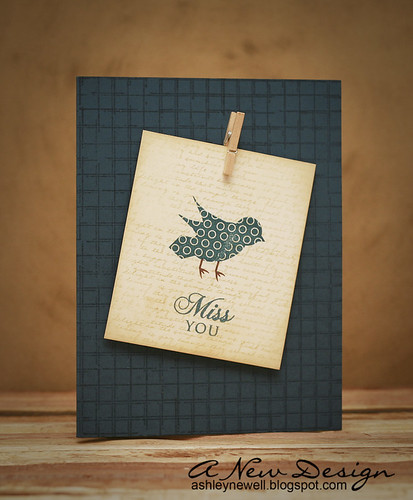 TEE GEE EYE EFF! I am looking forward to tomorrow morning when I can sleep in! Saturday sleep-ins are the best! Anyway, today I have a fast card to share with you. Although there is lots of background stamping to create patterns, it is a clean and simple layout and a quick card to pull together in a jiffy. So, thank ya'll (I have a southern accent from my time living in NC) for stopping by and enjoy your weekend! Now, here's how you can make one too...in a jiffy, that is!
Instructions - Trim navy cardstock to create an A2 card base.
- Stamp grid pattern on card front.
- On cream cardstock, stamp text background pattern.
- Ink the edges of cream cardstock.
- Stamp bird and sentiment.
- Adhere cardstock to card center at an angle.
- Add mini clothespin.
Supplies
Stamps :: Papertrey Ink - background basics (text), bird watching additions, mega mixed messages; Cornish Heritage Farms - distressed grid Paper :: Papertrey Ink - enchanted evening, vintage cream Ink :: Papertrey Ink - enchanted evening; Stampin' Up! - chocolate chip; Ranger - antique linen
 Here is a card I made all from my scraps
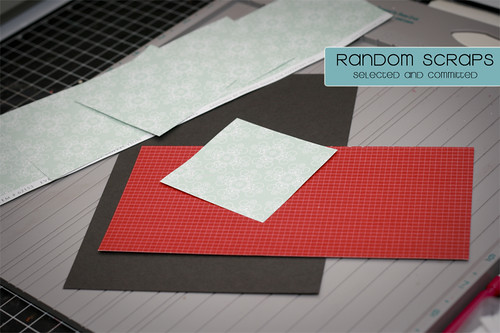 Here are the selected scraps I worked with to create the card
 I have a file cabinet where I store all of my scraps, organized by color
 A scrap pile where I dump immediately after trimming
Here there, Bleeps! Happy Friday Eve! I was inspired by Mariana to participate in Nichole's Scrap-tastic challenge! I've always been an advocate for using scraps. I usually reach for them first on a regular basis, but never to make an entire card. This card was made entirely from scraps! I've shared with you a more detailed peek of my studio and how I organize my scraps. I have a file cabinet that I store my scraps by color. Three colors are assigned for each file to conserve filing space. I really like this method of organization, but needed a secondary area near my trimmer. So, this spice rack caddy from IKEA ended up on my countertop and paper just started appearing in there. Well, I ended up liking it and kept it that way! After I trim cardstock or patterned paper, I stick it in this caddy. It keeps my countertop clutter-free and when it gets too full or if the paper is too large, I file the paper away.
To make this card, I breezed through the scrap pile and picked out the papers pictured above. After I selected them, I did not like them, but committed to the challenge and started creating, plus I was wasting time. This card took me longer than my usual cards, mostly because of my unhappiness with my paper selection. In the end, the card did not turn out as bad as I thought, but I would have never designed a card like this on my own accord.
On another chatting note, have you heard about the upcoming CAARDVARKS challenge? You will have the opportunity to get published in CARDS magazine! How fun is that?! So, make sure you stay on top of the Caardvarks blog so you can get all the details on this fun challenge!
Thanks so much for stopping by and enjoy your Thursday.
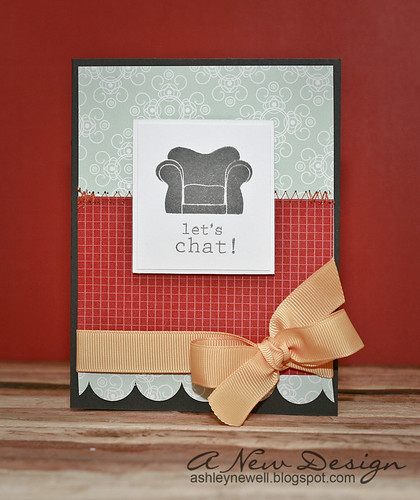
Instructions - Trim smokey shadow cardstock to create an A2 card base.
- Trim red patterned paper to fit card front and adhere to blue patterned paper.
- Add stitching.
- Punch circles from blue patterned paper and adhere to create a scallop edge border.
- Add ribbon
- On white cardstock, stamp image and sentiment, then matte on white cardstock.
- Adhere white cardstock to card center with foam adhesive.
Supplies
Stamps :: Papertrey Ink - on my couch Ink :: Papertrey Ink - smokey shadow Paper :: Papertrey Ink - smokey shadow, bitty box, everyday blessings Embellishments :: Papertrey Ink - summer sunrise ribbon Tool :: sewing machine, thread

Happy Hump Day Everybody! We're almost at the end...I can see it! The first week back from a vacation is always so very hard. My mind is so focused on getting to the next holiday, which is less than two weeks away...YAAAAY! Alrighty, now that I've gotten the vacation topic off of my chest, here is a card I made "last year"...really just last month! It's a wedding card for the Mister and Misses! It's traditional, but that pop of yellow makes it hip. Why do I envision giving this to one of the Ace of Cakes employees? I like that show. Do you watch it? I wish I had my own wedding cake made by them. I really could have too since they are located in Baltimore and I got married only about 45 minutes away...SHUX! OK - I went off again on a tangent! Just a tad bit chatty while typing this! Anyway, I have lots of designer deadlines fast approaching, but I have a few cards up my sleeve to share with you in the meantime!
Have a fun day and as always, I'm so grateful for your visit!
Instructions - Trim yellow cardstock to create an A2 card base.
- Trim patterned paper and adhere to card front.
- Trim white strip and stamp polka dot pattern.
- Stamp sentiment, then adhere to card front.
- Add ribbon.
Supplies
Stamps :: Papertrey Ink - background basics (polka dot II), big and bold wishes Ink :: Stampin' Up! - black Paper :: Papertrey Ink - white; Stampin' Up! - crushed curry; Hambly - brocade black patterned paper Embellishments :: Papertrey Ink - black ribbon
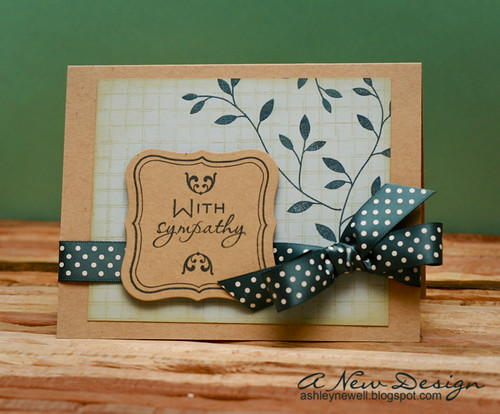 Hey There! I'm back today with a card I unfortunately 'had' to make. I needed a masculine sympathy card, if that makes any sense. I know it has a ribbon, but I couldn't resist. Anyway, it's for a family friend who lost his mom near the holidays. His mom was my mom's friend for a very long time (before we were thought of). Losing loved ones during the holidays is very difficult. I know this because right before I started blogging, my father passed away two days after Christmas. You just never know if someone will be here tomorrow, so remember to show you care.
This card was inspired by CPS Sketch 148. I cheated a bit and placed the center focal point off the left so it fit my card design. Hey...I couldn't be called a designer if I did not go off and make it my own, right?!
Thanks so much for stopping by. I also wanted to say thanks for all of the comments on yesterday's card. Whenever I think a card is not up to par, you all show me much love to change my mind! I appreciate that so much! Have a great Tuesday and do something for yourself!
Instructions - Trim kraft cardstock into an A2 card base.
- Trim spring rain cardstock to fit card front, stamp background design, and ink edges.
- Stamp leaf pattern and adhere to card front.
- Tie ribbon around card front into a bow.
- Die cut label, stamp sentiment and images, then pop off card front.
Supplies
Stamps :: Papertrey Ink - turning a new leaf, communique curves sentiments, vintage labels; Cornish Heritage Farms - distressed grid Ink :: Papertrey Ink - enchanted evening; Ranger - antique linen; Stampin' Up! - river rock Paper :: Papertrey Ink - kraft, spring rain Embellishments :: Papertrey Ink - enchanted evening polka dot ribbon Tools :: Spellbinders - labels 4 nestabilities
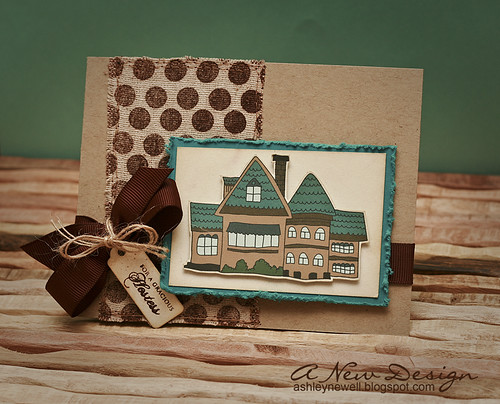 Hey there, Bleeps! The holidays are all wrapped up and now it is time to start something new! I'm back to share a new card inspired by Kazan's sketch over at 2S4Y. It's a great sketch that can be flipped vertically for a great outcome. For my card, I applied the layout as presented, in a horizontal format. The house is a digital image by In Style Stamps. In Photoshop CS4, I applied color, printed, cut out, and popped off cardstock. During this time of year, a lot of thank you notes are perfect for those gifts received and also for the special hostesses who invited us over, cooked, and entertained. Here's a peek at the sketch, so give it a try!
Thanks for stopping by and enjoy your Monday!
Instructions - Trim kraft cardstock into an A2 card base.
- Edit image in Photoshop, print, cut, and adhere to cardstock with foam adhesive.
- Ink around the cardstock edges and matte on turquoise cardstock.
- Distress edges of turquoise cardstock and set aside.
- Trim muslin fabric and stamp polka dot background.
- Adhere fabric to card front and add stitching.
- Tie ribbon into a bow.
- Die cut tag, stamp sentiment, and tie to ribbon with twine.
- Add focal point cardstock with foam adhesive.
Supplies
Stamps :: Papertrey Ink - mixed message; background basics (polka dot II) Digital Images :: In Style Stamps - house Ink :: Clear Snaps - chestnut; Ranger - antique linen Paper :: Papertrey Ink - kraft, white; Stampin' Up! - taken with teal Embellishments :: muslin fabric; ribbon; twine; thread Tools :: Spellbinders - tag die; sewing machine
   Happy New Year! Caardvarks is back with a great sponsor, JustRite Stampers! Head on over to Caardvarks to see what's going on! I made a few cards using JustRite's new stamps. These are super fun. I'm going to provide supplies for each card, but no instructions since there are so many. If you have any questions about how I made any of them, please ask!
Thanks for visiting! :) Enjoy your holiday!
Supplies - Thinking of You
Ink :: Stampin' Up! - black; Ranger - antique linen Paper :: Papertrey Ink - sweet blush, white, ripe avocado; GCD Studios - Paris Nights (patterned paper) Embellishments :: Close to My Heart - Autumn Garden Organdy ribbon rounds (Z807) Tools :: thread, sewing machine
Supplies - Make a Wish
Ink :: Papertrey Ink - pure poppy Paper :: Papertrey Ink - kraft, pure poppy, enchanted evening; Stampin' Up! - so saffron Embellishments :: KaiserCraft - rhinestones; Nice Package - tag; Papertrey Ink - button Tools :: Spellbinders - scallop and circle nestabilities; Fiskars - star punch
Supplies - Miss You
Ink :: Clear Snaps - chestnut Paper :: Papertrey Ink - aqua mist, dark chocolate Embellishments :: Fancy Pants - lace trim; Papertrey Ink - sweet blush ribbon; Heide Swapp - rhinestone frame
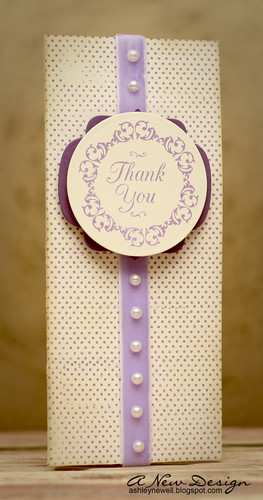
Supplies - Thank You
Ink :: Papertrey Ink - plum pudding; Ranger - antique linen Paper :: Papertrey Ink - cream, plum pudding Embellishments :: KaiserCraft - pearls; Making Memories - velvet trim Tools :: Spellbinders - labels 9, circle nestabilities
 Happy New Year! Embellish Magazine has some great news to share, so hop on over! Here is my card I made using The Cutting Cafe's printable stamps. Have you ever used digital images before to make any projects? Well, it's super easy and extremely versatile to use. Embellish has a new color challenge that you can participate in too! It features a heart theme and of course these Valentine's colors! The other news includes a new design team and a chance to win prizes, so check it out!
I'll be back later to share lots of more cards I've been busy making for Caardvarks new challenge!
Thanks for stopping by and Happy New Year!
Instructions - Trim black cardstock into an A2 card base.
- Using an editing software program, arrange frames and words, then print. I added color to the hearts and printed that image twice to cut some hearts and pop them off the card front.
- Trim around frame on white cardstock, add ribbon.
- Cut hearts and pop them off and set aside.
- Trim other frame and adhere to card front.
- Adhere other frame image on top with foam adhesive.
Supplies
Paper :: Papertrey Ink - true black, sweet blush, white Embellishments :: Papertrey Ink - pure poppy ribbon Tools :: Photoshop - CS4; Epson - 1400 printer
|
|


