Hey there, Bleeps! TGIF and time for another Caardvarks Challenge! It's all about coloring this time! How did I do? I am a newbie at coloring and using Copics, so what do you think?! I find the shadow part the hardest for me. For instance, where do I put it and when is it too much? If you have any tips, feel free to share them with me!
Thanks also for all of the anniversary wishes. Mac was blown away and read them too! I'll share with you a card HE MADE this weekend!
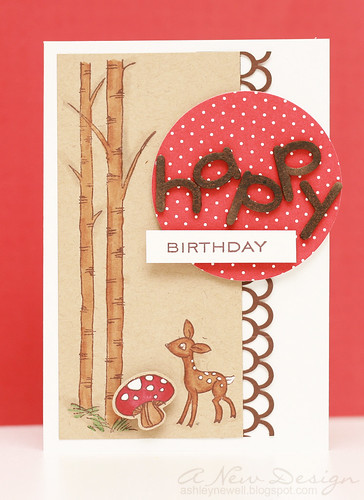
Challenge Details
Sponsor: My Scrapbook Nook
Challenge: Color a stamped image
Prize: 4 copic markers from My Scrapbook Nook
Reader discount: 20% off duing the challenge period, code: NWS20
Enjoy your weekend and thanks for stopping by!
Instructions
Supplies
Stamps :: Papertrey Ink - birthday basics; Stampendous - birch buddies
Ink :: Copic - markers; Uniball - Signo Board white gel pen; Stampin' Up! - chocolate chip
Paper :: Papertrey Ink - white, kraft, bitty dots
Embellishments :: Maya Road - chipboard letters
Tools :: Martha Stewart - loopy edge punch; Provo Craft - Cuttlebug; Spellbinders - circle netsabilities; Maya Road - maya mist bronze
Challenge Details
Sponsor: My Scrapbook Nook
Challenge: Color a stamped image
Prize: 4 copic markers from My Scrapbook Nook
Reader discount: 20% off duing the challenge period, code: NWS20
Enjoy your weekend and thanks for stopping by!
Instructions
- Trim white cardstock to , score in half to create a card base.
- Trim kraft cardstock block.
- Stamp images and color.
- Stamp mushroom on a separate kraft scrap, color, cut out, and pop off.
- Punch decorative edge trim and adhere it to right side of kraft cardstock.
- Adhere kraft focal point to card front.
- Die cut circle from patterned paper and adhere to card front.
- "Color" chipboard letters with Maya Mist and adhere.
- Stamp sentiment, then pop off card front.
Supplies
Stamps :: Papertrey Ink - birthday basics; Stampendous - birch buddies
Ink :: Copic - markers; Uniball - Signo Board white gel pen; Stampin' Up! - chocolate chip
Paper :: Papertrey Ink - white, kraft, bitty dots
Embellishments :: Maya Road - chipboard letters
Tools :: Martha Stewart - loopy edge punch; Provo Craft - Cuttlebug; Spellbinders - circle netsabilities; Maya Road - maya mist bronze
Ashley,
ReplyDeleteThis is adorable love the tree trunks and fawn!
Brandi
Oh I think you did a great job. The trees look really realistic too! Shadows are really hard! Let us know if you find out the secret to making it perfect!
ReplyDeleteWhat an adorable card, Ashley!! Love the color scheme and of courses design. As far as your co,oring skills I think you did awesome. I think the shadow part is also the hardest for me. Your work is always inspiring. TFS Oh and I can't wait to see the card your husband made.
ReplyDeleteLovely card, Ashley...
ReplyDeleteThough I do not know any coloring at all but I do recommend Beth Norman's tutorial on the shadow part that she recently covered in her coloring tutorial:
http://www.sunflowers-dragonflies.ca/blog/3194/how-to-use-coloured-pencil-a-free-online-course/
Love,
Smita
I heart this, Ashley!
ReplyDeleteThis is super CA-UTE! I think you did a great job with the coloring! :)
ReplyDeleteoh how cute! I love this! Did you guys have a good anniversary? Oh, and I think you are a natural at coloring!
ReplyDeleteI think you did an AWESOME coloring job! Your layout and everything is just spectacular!
ReplyDeleteAdorable card!!! Great job on the coloring. Can't wait to see Mac's card, how sweet of him to make you one too.
ReplyDeleteAhhhh, Ashley! This is just darling! Hugs to you,
ReplyDeleteGreat card! I think your coloring is way better than mine. That's why I don't color much cause I'm not good with shadows. Funny thing is that I use to win coloring contests back in elementary school... shadows and all that. But I quit after I moved back to Indonesia.
ReplyDeleteI love this card! It is so cute! And your coloring is fantastic!
ReplyDelete