


Happy Hump Day! I can't believe Wednesday is already here. This week is going by really fast (well, for me it is)! Tomorrow we'll be heading to New Orleans, so I'll try to post some cards for you all to view while I'm away. In the meantime, please check my tweets (which updates my Facebook) because I will be keeping it updated. Note to self: I have LOTS to do by tomorrow night!
Anyway, I wanted to play around with my new Sizzix flower die. I got it last week at Michaels. A lady was nice enough to share her Joann's 40% coupon with me, which made it worth it! Thanks "lady!" If you have a Cuttlebug, the Sizzix die works. I own a Wizard (which cuts just about any die), but prefer my 'old' Cuttlebug, so when I can use it, I pull it out first. I just think the Cuttlebug is user friendly with the handle to roll the die through. But to be honest, as long as the machine can get the job done, I'm happy.
The sandwich for Sizzix dies using the Cuttlebug is as follows:
(1) B Plate
(2) Sizzix die (face up)
(3) Cardstock (or fabric!)
(4) B plate
(5) Run it through the machine....EASY!
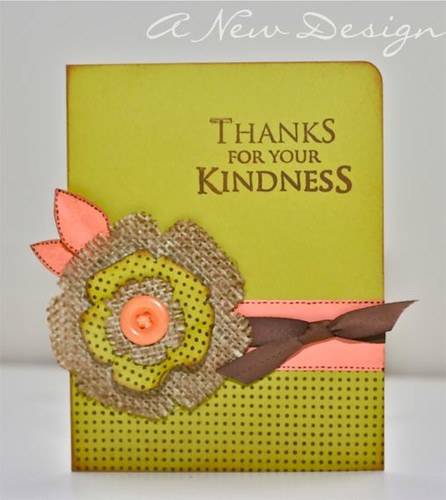
I completed the die cut process twice, once for the burlap, then second for the cardstock. You end up with alternating flowers that can be used at the same time or on another project later (which is what I will do with mine). I like adding fabric to my projects because it adds texture. Burlap adds lots of texture and I think it's a great summer type of fabric because it reminds me of linen, but heavier.
How do you like my new photo? I tried shooting on my new workspace (I will show you later) and the setup is much easier for me. What about the photo editing? Is it too much, just right, not enough? I used iPhoto mostly and like it, but had to revert to my Microsoft photo editing software to add my watermark and adjust the size how I like it. I'll add Photoshop to the iMac soon! I'll be glad when I do because switching computers is definitely a pain!
Thanks for stopping by and have a great Wednesday!
Card Instructions
Stamps: Art Warehouse - journal; Melissa Frances
Ink: Stampin' Up! - chocolate chip + marker; ColorBox - chestnut; Quick Quotes - amaretto powder puff
Cardstock: Papertrey Ink - melon berry; Stampin' Up! - kiwi kiss
Accessories: Provo Craft - cuttlebug; Sizzix - flower layers; Bazzill - floss; Craft Supply - button + burlap; Papertrey Ink - dark chocolate ribbon; EK Success - corner rounder
Card Size: 4.25" x 5.5"
- Trim kiwi kiss cardstock into an A2 card.
- Die cut flowers in burlap and cardstock.
- Stamp flowers, ink, and adhere with button.
- Stamp polka dotted pattern on bottom portion of card base.
- Trim melon berry cardstock and adhere to card front.
- Add ribbon.
- Adhere flower to card.
- Stamp sentiment.
- Ink edges + corner round.
Stamps: Art Warehouse - journal; Melissa Frances
Ink: Stampin' Up! - chocolate chip + marker; ColorBox - chestnut; Quick Quotes - amaretto powder puff
Cardstock: Papertrey Ink - melon berry; Stampin' Up! - kiwi kiss
Accessories: Provo Craft - cuttlebug; Sizzix - flower layers; Bazzill - floss; Craft Supply - button + burlap; Papertrey Ink - dark chocolate ribbon; EK Success - corner rounder
Card Size: 4.25" x 5.5"
7 comments:
Ok so this card inspired me to finally create something last night at 1:30am. hahaha!! love this card and love what you did with the flowers. I just had to make one using that die cut. I have it but have never used it till last night.
I think your new photo spot works out great. Pic looks good!
Card is yummy as usual. Love the layered flowers and texture.
Your card is super cute! Eventually I am going to have to buy an embossing/die cut machine. Maybe when we are in the States next year!
You card is adorable... the photo & editing are just right! I really love the burlap! I can't wait until I can invest into a die cutting machine. I am way too overwhelmed with all of the options, no idea where to start.
Oh wow, this is fabulous! Love all the texture. :)
This is beautiful Ashley!
Die-cut burlap? Wow! I love it. I don't think I've even seen anyone do that. Good job, my dear.
Post a Comment