header.gif (12,818 bytes)
Showing posts with label new year. Show all posts

11.10.2010

Watch Me Wednesday :: Holiday Gift Card Sachet


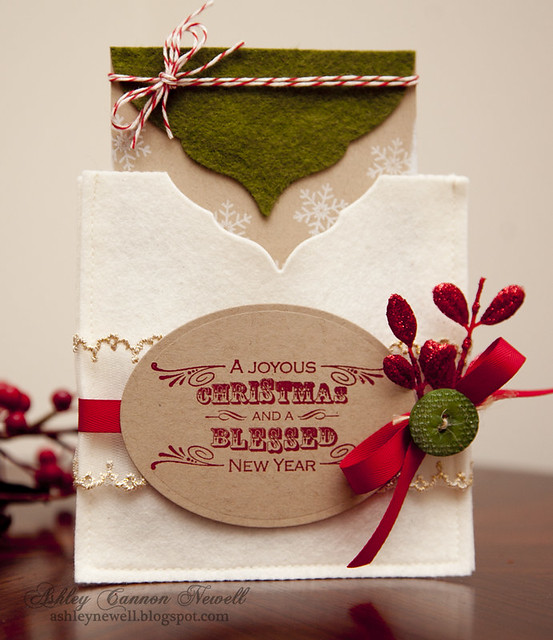
Hey There! I hope you're having a great week! I'm so happy today is Hump Day because it's the end of my work week! YAAAY! But, I'm even more excited to start sharing holiday projects for the WMW video series. Instead of creating a card, I was inspired by a felt pocket I've been holding on to for about two years! I couldn't quite use it, so I thought to create my own version.


I stitched together two 5" x 5" felt squares around the border using my sewing machine. I embellished the front with a few of my favorite current elements.


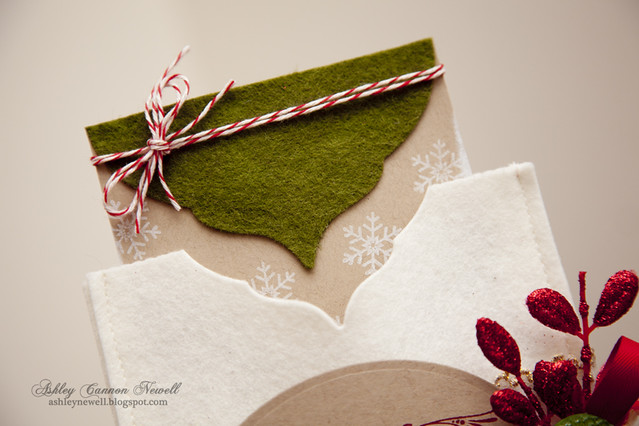
Using Spellbinders' ornament die template, I created a unique decorative edge.

Here is the simple gift card holder insert. Customize the card with a handwritten sentiment.

Here's how I made it!


Click here to view the video on YouTube.

Supplies

Stamps :: Gina K. Stamps - winter mittens, heirloom ornaments
Ink :: Clearsnap - ColorBox chianti; Stampin' Up! - white
Cardstock :: Papertrey Ink - kraft
Embellishments :: Papertrey Ink - white felt, pure poppy twill tape, new leaf button; Heather Bailey - green felt; Craft Supply - bakers twine; Webster's Pages - gold netting trim; May Arts - twine; MWooderson etsy shop - red sparkly sprigs
Tools :: Spellbinders - S4-110 classic ovals large, S4-283 2010 heirloom ornaments, GC-001 grand calibur; Janome - sewing machine; Stampin' Up! - slot punch

Thanks for taking a peek today! Have a good one!

12.28.2009

2S4Y :: Best Year Yet


Hey there, Bleeps! I hope you all had a very merry Christmas! This week will be another short one to bring in 2010! How exciting! So, today I am sharing a New Year's card and treat inspired by 2S4Y layout and featuring a treat bag by Creative Cuts and More filled with caramel and chocolate popcorn! If you did not get a chance to send out holiday cards, you still have time to send out New Year's cards! *Clearing Throat* That's me who fits in that category! How is it that I can make a gazillion cards, but can't send them out? I believe that will be in at the top of my crafty New Year's resolutions!

Thanks for visiting and I hope you enjoy your week and have a grew New Year's celebration!

Instructions - Card

  1. Trim black cardstock to create an A2 card base.
  2. Stamp flourishes with black ink.
  3. Trim silver cardstock and punch scallop borders, then adhere to card front.
  4. Trim red cardstock, stamp polka dot background, sentiment, then adhere to card front.
  5. Add ribbon and tie into a bow.
Supplies

Stamps :: Papertrey Ink- background basics (polka dot II), signature greetings, flourish
Ink :: Papertrey Ink - pure poppy; Stampin' Up! - black
Paper :: Papertrey Ink - pure poppy, silver, true black
Embellishments :: Papertrey Ink - true black ribbon
Tools :: Stampin' Up! - scallop edge punch

Instructions - Puff Box

  1. Assemble puff box with glue dots.
  2. Add contents.
  3. Trim red cardstock strip, stamp polka dot background, then adhere around puff box.
  4. Add ribbon and tie into a bow.
Supplies

Stamps :: Papertrey Ink - background basics (polka dots II)
Ink :: Papertrey Ink - pure poppy
Paper :: Papertrey Ink - pure poppy
Embellishments :: Papertrey Ink - true black ribbon; Creative Cuts and More - puff box

9.25.2009

Happy "Newell" Year


Alright Bleeps, it's Friday! Oh how I missed you Friday! I'm always happy to greet you in the morning! I have been working on a few projects, so I did not get a chance to make a card for the blog specifically, but I can share this New Years card I made for SCS Product Review using JustRite stamps (holiday collection). I chose to customize the stamps using a play off of our last name "Newell" for the new year. They have a great collection of holiday stamps using wood blocks that are super easy to use and you can add your own personalization.

I hope you enjoy your Friday and hopefully I'll be back tomorrow with a sketch challenge (I need more practice)! Thanks for visiting today!

Card Instructions
  1. Trim aqua mist cardstock to an A2 card.
  2. Stamp border and image, color, then cut out.
  3. Trim black cardstock, dry emboss, tear, and corner round edges.
  4. Stamp polka dot background.
  5. Adhere to card front, adding lace trim and buttons.
  6. Stamp personalized sentiment and adhere.
  7. Add eyelets and corner round edges
:: My Goodies {Happy Newell Year} ::
Stamps: JustRite - Christmas Joy + Font; Papertrey Ink - polka dot basics 2
Cardstock: PTI - aqua mist + true black; Stampin' Up! - rose red
Ink: Stampin' Up! - black
Accessories: Copics; We R Memory Keepers - eyelets + Crop-a-dile + corner chomper; Making Memories - passport collection lace trim; PTI - buttons; Provo Craft - cuttlebug + swiss dots embossing folder
Card Size: 4.25" x 5.5"
Blog Design: Girly by Design