


Hey Everyone! How was your weekend? We made it back from the Outer Banks, North Carolina yesterday. We had a full weekend of work photographing a destination wedding from the rehearsal, to the spa, getting ready, wedding, reception, and even a trash the dress session! Yes, you read that right, "trash the dress!" McArthur let me sleep in while he photographed the bride and groom yesterday morning. He actually did not wake me up, but I so appreciated it and drove us back! I was so tired after the weekend's festivities! We had a great time, as usual and can't wait to share a few pictures with you when they're ready!
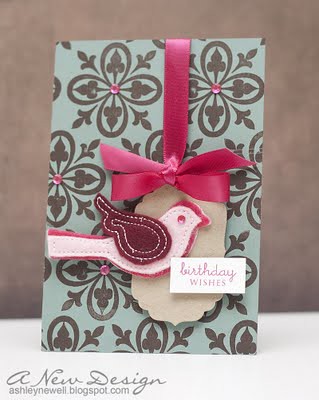
Anyway, you want to know about this card, right?! I made this card spontaneously, like many of my cards are created and definitely how I photograph weddings (in the moment). I'll explain the process this card evolved, just in case you're interested! First, I grabbed the stamp set because it has been sitting on my desk since I picked it up last weekend and I really want to use it. Next, I selected cardstock from my 'scraps' stash. It "looked" like the right card front size, so I went with it (important to note for a later discovery). Next, I selected my ink color and started stamping my background. After I found out I liked the patterned, I decided I did not want to cut it up, so I used it as a base. I measured the width to be 4.25" and thought perfect card front size (so I thought)! I picked up the felt birdie and thought to add it to a label nestie with some ribbon to embellish and a sentiment. Now, I go to put it on the card base and it's TOO LONG! It's about 1/2" too long and I cannot trim either end! Note to self: When measuring, measure both the length and width! :) I 'thought' it looked the right length, but thinking and actually being the right length are two different concepts! So, it looks like this will be a flat-front card! Ever given one of those away? Me either, but this will be my first! I will cover the back with a coordinating cardstock color and add the greeting there! Maybe I started a new flat-front card trend? NOT!
Thanks for listening to my rambles and I hope you enjoy your day!
Instructions
- Card front is an odd size due to inaccurate measuring, but for perfection, trim ocean tides cardstock to 4.25" x 5.5 (vertically).
- Stamp background.
- Die cut label and punch hole at the top.
- Punch hole in card front and tie ribbon around into a bow (adding foam adhesive to the label to adhere).
- Add felt birdie.
- Stamp sentiment and adhere.
- Add rhinestones
Supplies
Stamps :: American Crafts - majestic; Papertrey Ink - mega mixed messages
Ink :: Clear Snaps - colorbox chestnut; Papertrey Ink - raspberry fizz
Paper :: Papertrey Ink - ocean tides, kraft, white
Embellishments :: Papertrey Ink - raspberry fizz satin ribbon; Spellbinders - labels 4 nestabilities; Provo Craft - cuttlebug; KaiserCraft - rhinestones; Basic Grey - felt sticker
Card Size :: 6.25" x 4.25"
12 comments:
LOL, I'm willing to bet that you could make them catch on like wildfire without even trying! :)
Turned out gorgeous!
Awesome color combo! Fun stuff! I love making flat front cards! Great for popping into gifts! :-)
Ashley, this card is great! Love the color combo! TFS
This is gorgeous, looks so much like the new giga guide lines set coming out this month from PTI, don't ya think? I love it, love it, love it!!!
This is so pretty!!! You are awesome with clusters!
Hey Love Love this card. This bird is too cute. Great job
very pretty card!
What a gorgeous card and a fabulous way to save paper!
oh my!!! i love how you have the label hangin from the ribbon!!!!! and the ac stamp is so pretty. great card...its so original :)
Too stinkin' CUTE!!!! LOVE LOVE LOVE! The colors are just FAB!
So beautiful, Ashley! I love felt and never use it--must change that!
Cute!!! Did I miss the deets on the felt bird??? I don't see where you got it...
Post a Comment