


Hey Everyone! Today, I'm sharing a few projects featuring some of the new items forPapertrey Ink's May Release. I hope you enjoyed the projects. Thanks for taking time to stop by to see what I created. I'm truly grateful to have worked with the design team this month on the release. Have a wonderful Friday and weekend!
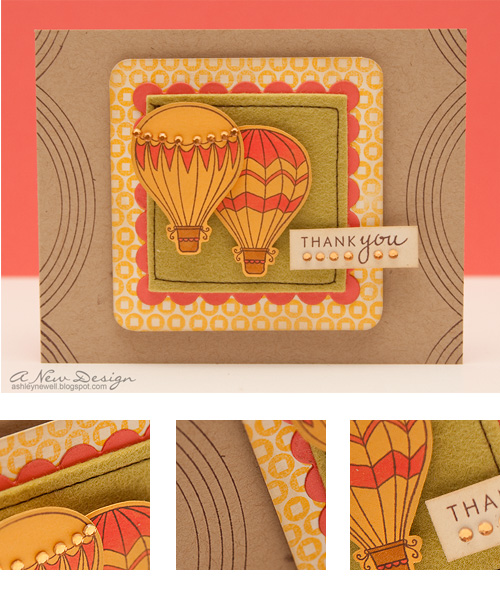
- Trim kraft cardstock to create an A2 card base.
- Stamp background pattern on cream cardstock, cut into a square, corner round the edges, and ink.
- Die cut square from felt and stitch around the border, then mat on scalloped square die cut.
- Stamp balloons on summer sunrise cardstock, color, cut out, and pop off felt square.
- Adhere focal point to stamped patterned paper.
- Stamp sentiment and add rhinestones.
- Pop focal point off card front center. Add sentiment strip.
- Stamp 'rainbow' on card sides to create a scalloped design.
Supplies
Stamps :: Year of Flowers: Lily of the Valley (sentiment), Up, Up & Away (balloons), Background Basics: Geometrics (pattern)
Ink :: summer sunrise; Copic - RV04, E35; Ranger - old paper; SU! - chocolate chip
Cardstock :: kraft, vintage cream, berry sorbet, summer sunrise
Embellishments :: simply chartreuse felt, KaiserCraft - rhinestones
Tools :: Spellbinders™ - classic squares small nestabilities, classic scalloped squares large nestabilities (S4-128 , S4-127 ), wizard; We R Memory Keepers - corner chomper

Instructions
- Trim rustic cream cardstock and stamp 'post cards' in various inks to create your own patterned paper. Ink the paper and adhere on a hawaiian shores A2 card base.
- Trim kraft cardstock strip.
- Stamp 'surfboard' on kraft cardstock, then again on hawaiian shores, then again on berry sorbet cardstocks.
- Trim surfboard from hawaiian shores cardstock and add foam adhesive only to the middle and top of the board. Add regular adhesive to the bottom of the board and align with 'sand.' This makes the board look realistic.
- Trim flower from surfboard stamped on berry sorbet cardstock and pop off hawaiian shores surfboard. Add rhinestone.
- Stamp sentiment.
- Stamp flower on berry sorbet cardstock, cut out, add rhinestone.
- Pop kraft cardstock off stamped background paper, then pop flower off lower left corner.
Supplies
Stamps :: Aloha
Ink :: spring moss, berry sorbet, hawaiian shores, summer sunrise; Ranger - old paper
Cardstock :: hawaiian shores, rustic cream, kraft, berry sorbet
Embellishments :: KaiserCraft - rhinestones
Instructions
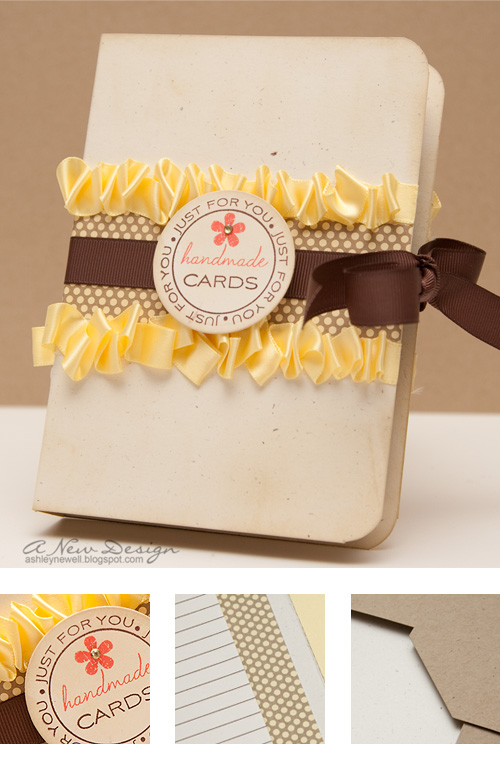
- Assemble box. See Click Simple template.
- Trim dotty biscotti patterned paper strip and adhere.
- Add ruffled ribbon using lemon tart satin ribbon.
- Add brown grosgrain ribbon.
- Stamp sentiment on circle die cut and ink. Add rhinestone.
- On inside, trim patterned paper, then add notebook. I cut the notebook down with a trimmer and sanded the edge.
- Inside the envelope are handmade notecards for the recipient.
- Ink the entire project.
Supplies
Stamps :: just for you (sentiment), up,up & away (flower)
Ink :: berry sorbet; SU! - chocolate chip; Ranger - old paper
Cardstock :: rustic cream, lemon tart, kraft
Patterned Paper :: dotty biscotti
Embellishments :: dark chocolate grosgrain ribbon, lemon tart satin ribbon; KaiserCraft - rhinestone; notebook
Tools :: My Timeless Templates (PTI) - All Boxed Up; Spellbinders - standard circle large nestabilities (S4-114)
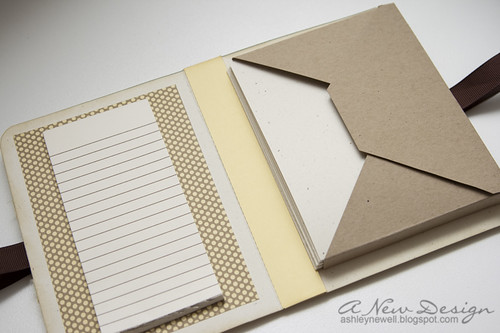
Inside View

Instructions
- Trim rustic cream cardstock to create an A2 card base.
- Stamp images and heat emboss with brown embossing powder.
- Stamp sentiment in berry sorbet ink.
- Repeat with various images and sentiments.
Supplies
Stamps :: take three: summer
Ink :: Versamark; berry sorbet
Cardstock :: rustic cream
Embellishments :: American Crafts - chestnut embossing powder
Tools :: heat gun

Notecards in Project
26 comments:
Love it all! You're not helping my budget this month, missy!
Ashley, these are all amazing!!! I will miss you as a Guest Designer.
All so wonderful Ashley, love the Aloha card so much, that background you created is too fun! It was so great to see everything you have created over the last two months!
Gorgeous projects. Thanks for sharing! :)
Just adorable!! I love how you used the rainbow image as a border!
Wow, they are all so gorgeous!
OK, all of these projects are fabulous, but that first card is flippin AMAZING!!! You really ROCKED these new release stamps!!
These are all very pretty! Lovely job with all the new stamp sets!
♥♥♥Lea
All of these are GORGEOUS! I really like the jewels on your hot air balloon! :)
WOWSA! Amazing projects...love each and every one of your cards :o)
These are all simply gorgeous, Ashley!!! Love the color combo of your "Just for You handmade cards". And the hot air balloons are just so pretty. TFS! I'm sure you will be missed as a guest designer :)
Fabulous projects Ashley! You really did an amazing job showcasing all these products! PTI was sure fortunate to have you as their Guest!
Every one of the projects posted are wonderful. I appreciate you doing clean and simple as I have a hard time keeping to that style.
Great projects! Love how you used the rainbow as a background and the postcard background is awesome too!
Kara
OH my goodness, all these cards are just amazing. Your work is so beautiful. I sure hope one day you join that team of designers! I do love your videos, too. You're so sweet!
Your creations are always wonderful, but what I really appreciate about your work is that there is usually one special something that causes me to linger. With the first card, it was your use of the rainbow as scallops. With the second card, it was the multicolored background paper. I love how that looks. And with the third project, it was your subtle use of lemon tart against the vintage cream. Thank you for sharing, Ashley.
Wow! What a bunch of great projects. Your stationary box is very cool and I love the post card background on the Aloha card. Very cute card.
Ashley all of your work with the PTI release is great. I especially love the post card background. I have been a follower of yours for years and you never disappoint.
super cards! thanks for sharing!
Oh I love to give gift sets of cards too...I mean I would...but you have to make them flat like that. Did it bother you at all because your cards usually have so much stuff on them. The embossing does really make them. That's an adorable little set. The ruffles on the card box is fantastic.
That postcard background is delicious...I am just wowed every time I see one of your cards!
Awesome cards, Ash! LOOOOOVE how you used the rainbow image to make scallops! :)
Hey Ashley,
I absolutely LOVE your designs!! I have used your ribbon ruffle on several cards and love it every time! I have loved all your designs for PTI and will miss all your contributions! But I will just follow your blog anyway since you have such a fresh style! Love it! I will look forward to your inspirations in the future!
All of these cards just exude your signature style Ashley, I just love them all! My favourite is the Up, Up & Away one though, just love those bright colours!
I'm so sad that your time as PTI Guest Designer is over already. It really seems to have flown by! Of all the Guest DT that there've been I have to say that you've been my favourite without doubt. I know you'll still be buying PTI goodies though so I look forward to seeing what you create in the future!
ooooh, those notecards are so simple and pretty. A set of them would make a great, quick and easy gift!
These cards are fantastic! That yellow ribbon is wow!
Post a Comment