|
|
 
Happy Hump Day! Today, I am sharing my last review as a member of SCS Product Focus Review Team. It has been so great to be a part of the SCS team reviewing so many projects over the last nine months. To read our product review of Martha Stewart's Punch Around the Page, please click here. To view all of our projects using the new punches, click here. Martha Stewart's new punches are great because you can use them separately and together to create a variety of looks for your projects.
Thanks for visiting today and and enjoy!
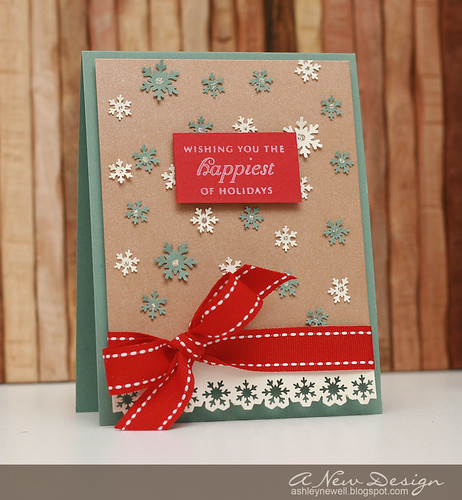
Happiest of Holidays
Instructions - Create an A2 card base with ocean tides cardstock.
- Trim vintage cream cardstock to about 2.5" x 4", then punch the snowflake border.
- Trim gold shimmer cardstock to about 4.25" x 4" and adhere to vintage cream border.
- Adhere punched snowflakes.
- Add ribbon and tie in a bow.
- Stamp sentiment on red cardstock block and adhere to center with foam adhesive.
- Adhere focal block to card front with foam adhesive.
- Add stickles to snowflake centers.
Supplies
Stamps :: Papertrey Ink - holiday wishes Ink :: Papertrey Ink - vintage cream Paper :: Papertrey Ink - ocean tides, vintage cream, pure poppy; Cut Cardstock.com - gold shimmer Embellishments :: Papertrey Ink - ribbon; Ranger - stickles Tools :: Martha Stewart - snowflake punch
Warm Winter Wishes
Instructions - Make an A2 card base with vintage cream cardstock.
- On a 3.25" x 5" ocean tides cardstock, punch snowflakes around the page.
- Tie twine around card front into a bow.
- Stamp sentiment on punch around the page block and add snowflake die cuts.
- Adhere block to card front with foam adhesive.
- Stamp mittens and heat emboss.
- Add mittens to card by tying twine around twine bow.
- Add stickles to snowflake centers.
Supplies
Stamps :: Papertrey Ink - snowfall Ink :: Clearsnaps - chestnut; Versamark Paper :: Papertrey Ink - vintage cream, ocean tides, kraft Embellishments :: Ranger - stickles; Wal-Mart - hemp twine Tools :: Michaels - white embossing powder; Martha Stewart - snowflake punch around the page

Wedge Box (decorated with leaves into a Christmas Tree) the ribbon allows you to hang it from the tree
For SCS, we just reviewed the Crafter's Companion. To read more about our reviews, see our projects, and even tutorials, hop on over to SCS. I made an ensemble for this review. I rarely do this, but this product is perfect for those who love making projects from templates. I made a card with a tag and even some berry spray! Next, I made a gift box. It was super easy to do and really effective when you need a small box. The box measures 4.5" x 7" and is 2" deep. It is a pretty decent size box, especially for a bunch of cards! Next, I made a wedge box. It is secured with ribbon. I then decorated it with maple leaves into a Christmas tree design. I'm not going to go into the instructions for all of these projects, but I will provide supplies I used for all of them!
Thanks so much for stopping by and enjoy your HUMP DAY, Bleeps!
Supplies
Stamps :: Papertrey Ink - signature christmas; o christmas tree Ink :: Papertrey Ink - pure poppy Paper :: Papertrey Ink - ripe avocado, kraft, pure poppy; October Afternoon - falling snow; Cut Card Stock - cream shimmer Embellishments :: berry spray; Paper Source - wide gold ribbon; eyelet; twine; Making Memories - vintage lace trim; Papertrey Ink - pure poppy ribbon; stickles; Palette - glitter Tools :: Spellbinders - maple leaves nestabilities; Crafter's Companion

Hey there...again! I know a second post today, but I wanted you all to jump over to Splitcoaststampers (SCS) to read all of the reviews on Xyron's new Creatopia. The Creatopia is the jack of many trades, so you need to go see what it can do, from embossing, cutting, and even applying adhesive to fabrics, there is something for every crafter for this product. So, go on over to SCS and read all of our reviews here and view all our samples here.
There is a tutorial available for the card I am sharing with you here.
Instructions - Trim aqua mist cardstock into a 5.5" square card.
- Trim patterned paper to fit card front, then use decorative scissors to create the fun edge.
- Ink patterned paper edges, then stitch onto card front.
- Cut a piece of fabric large enough to cover chipboard and run it through the Creatopia.
- Remove backing from fabric and adhere to chipboard.
- Ink chipboard legs and beak, then adhere to card front.
- Sand edges of fabric covered chipboard and ink, then adhere to card front.
- On a strip of paper, write sentiment and adhere to card front.
- Add buttons and rhinestone 'eye.'
Supplies
Ink :: Clear Snaps - ColorBox chestnut + ochre; Papertrey Ink - chamomile Paper :: Cosmo Cricket - early bird collection; Papertrey Ink - aqua mist; Core-dinations - chocolate collection Embellishments :: KaiserCraft - rhinestone; Stampin' Up! - so tweet chipboard; Craft Supply - decorative scissors + sewing machine + thread + natural muslin fabric; Papertrey Ink - buttons + twine; Tim Holtz - paper distresser
  Hey there...again! I know a second post today, but I wanted you all to jump over to Splitcoaststampers (SCS) to read all of the review on the Clip it Up! Ribbon Organizer. So, you all know I just moved my studio about 3 weeks ago. Well, right before the move, I found out that we were reviewing the ribbon organizer and how excited I was!! I definitely needed a ribbon organizer in my new space and it was perfect timing because I was able to place it on an empty wall first before adding other shelving or organizers. This organizer is a dream come true! So, go on over to SCS and read all of our reviews here. The second picture shows how I installed my ribbon organizer. I used Hercules Hooks, which can be purchased at Bed, Bath, and Beyond (BBB). I suggest BBB because you can use a 20% coupon off of each item you purchase in the store! It's not hard to install ladies! I did it in about 15 minutes all by myself! :) The only hurdle you need to cross is making sure where you place the hook is not a stud - it only works through the drywall, which is what makes it an easy install. --I also wanted to share some sneak peeks of my new studio space! I'm going to make every effort to finish it this weekend, photograph (and maybe video it) to share with you next week! Enjoy the rest of your day!
 Today, SCS Product Focus Review Team has released another review. Core'dinations is a cardstock with colored cores that you can distress, sand, tear, or retain in its original state. We have a lot of samples you can view here. You can read the review here. I also completed my first tutorial for SCS on crinkling the cardstock. You may see it here. Tell me what you think about it! The card I am sharing today is the card used for the tutorial, so you can read more about it there. :: My Goodies {You Make Me Smile Everyday}:: Stamps: Papertrey Ink - handwritten notes
Ink: Papertrey Ink - plum pudding Cardstocks: Papertrey Ink - white; Core'dinations - vintage collection Accessories: Papertrey Ink - lavender moon ribbon; Craft Supply - buttons; Bazzill - floss + nail file; Tim Holtz - paper distresser
 Hey there! I'm still not back to my 100% creative mode, so I'm not sharing a video this week. So, I decided to share this card I made a few weeks ago for SCS Product Focus Review of Spellbinders Impressabilities. If you haven't heard of them, they are metal embossing, stencil templates to use in your Wizard, Cuttlebug, Big Shot, etc. I have added a link to all of my reviews (and my teammates) on the left sidebar. Please feel free to take a peek and review each of them. For this card, I inked my impressabilites with ColorBox chestnut pigment ink, then ran it through my Wizard. It gives a great focal point for any card. I decided not to add a sentiment here, but one can easily be added with a tag around the button. Thanks so much for stopping by! Have a great Wednesday. Card Instructions- Trim dark chocolate cardstock to an A2 card.
- Trim aqua mist cardstock into a rectangle.
- Ink Impressabilities and emboss on aqua mist cardstock.
- Distress edges of aqua mist cardstock with chalk.
- Tie ribbon into a bow and add button.
- Adhere to card front and add buttons.
:: My Goodies {Make an Impression}::Ink: ColorBox-chestnut + chestnut roan Cardstocks: Papertrey Ink - dark chocolate + aqua mist Accessories: Spellbinders-butterfly impressabilities; Papertrey Ink-melon berry ribbon + buttons; Creative Imaginations-button
 Card Instructions Card Instructions- Trim pattern paper into a square and distress the edges.
- Paper pierce the pattern paper and faux stitch.
- Trim raspberry fizz cardstock into a square and add flower soft on the edges.
- Hand-cut flower from pattern paper and distress and ink the edges.
- Draw stem and adhere flower with button on raspberry fizz cardstock.
- Tie ribbon around pattern paper.
- Adhere raspberry fizz cardstock to pattern paper.
- Stamp sentiment and add button, then adhere to ribbon/cardstock.
- Adhere pattern paper square to square card base.
:: My Goodies {with gratitude}:: Stamps: Papertrey Ink-beautiful blooms
Ink: Close to My Heart-Topiary Cardstocks: Papertrey Ink-raspberry fizz + white; Joann-pre-scored square card Pattern Paper: Papertrey Ink-bitty dots; American Crafts-Metropolitan Accessories: Papertrey Ink-raspberry fizzs ribbon; Craft Supply-button; Flower Soft-sunshine yellow; KaiserCraft-rhinestones; Uniball-white gel pen  Card Instructions Card Instructions- Trim cardstock to an A2 size card.
- Trim pattern paper to fit the width of card base.
- Trim yellow cardstock into a square and stamp sentiment.
- Stamp flowers on kraft cardstock and cut out.
- Add flower soft to stamped flower buds.
- Tie ribbon around card base.
- Add hardware and sentiment.
- Adhere flower stamped square and add brads.
:: My Goodies {Sweet Wonderful You}:: Stamps: Papertrey Ink-Out of the Box + Handwritten Notes
Ink: Stampin' Up!-white; Close to My Heart-topiary Cardstocks: Papertrey Ink-lemon tart + kraft + new leaf Pattern Paper: Papertrey Ink-bitty dots Accessories: Papertrey Ink-white ribbon; Stampin' Up!-hodgepodge hardware  Card Instructions Card Instructions- Trim cardstock to an A2 size card.
- Trim pattern paper to fit the width of card base.
- Paper pierce the bottom portion of pattern paper, add faux stitching, and adhere to card base.
- Stamp bunny, cut out, and add flower soft.
- Tie ribbon around card base.
- Adhere bunny to top of bow.
- Stamp sentiment and add buttons.
:: My Goodies {Welcome Little One}:: Stamps: Papertrey Ink-Bitty Baby Blessings
Ink: Close to My Heart-black Cardstocks: Papertrey Ink-white Pattern Paper: Papertrey Ink-bitty dots Accessories: Papertrey Ink-white ribbon; Craft Supply-buttons; Uniball-white gel pen It's that time again! Splitcoaststampers is at it again...reviewing another craft product for you! This month, we reviewed Flower Soft, a material to add texture to any project. It's somewhere between fun flock and glitter. I made the cards above using Flower Soft in different ways. The first card uses Flower Soft by creating a border around cardstock. It adds texture and bold color. The second card subtly uses Flower Soft as the buds of stamped flowers. The last card warms up a stamped bunny. Take a look at the reviews and projects here. So, what do you think of Flower Soft? Wanna play?! Thanks for stopping by today! I'll be back later this evening for Papertrey Ink's Blog Hop! Come back by around 6pm EST for a new card! The challenge is to create a background with stamps. Somehow, I didn't use all Papertrey Ink this time, but I couldn't help it! So silly of me not to use all PTI on Blog Hop night! DUH! I'll offer some PTI options for the stamp set I use. See ya later!
Today, I'm sharing some great news! A few weeks ago, I was asked to join Splitcoast's Product Review Team! After receiving products from vendors, we use them, and write a review on what we think about the products. The reviews are posted in Splitcoast's Weekly Inkling and can be found here or here online. You may subscribe to the Weekly Inkling, by clicking here and entering your e-mail in the blue box on the top right. Of course I accepted, so first I am reviewing Scor-Pal's line of products. Check out all of our reviews here and also the samples we made using the product here! Splitcoaststampers = SCS Here are some samples I've made using Scor-Pal, Scor-Bug, Scor-Tape, and Scor-Mat! I use the Scor-Pal for every card I make (to score the fold) and the Scor-Mat as my working surface.  Scor-Bug used to make lattice design
 Scor-Pal + Scor-Tape used for custom envelopes  Scor-Pal + Scor-Tape used for custom envelopes    Scor-Pal + Scor-Tape used for custom envelopes :: My Goodies {thanks chickie}:: Stamps: Papertrey Ink-handwritten notes; Stampin' Up!-frames with a flourish
Ink: Stampin' Up!-chocolate chip Cardstocks: Papertrey Ink-dark chocolate + melon berry + ripe avocado Accessories: Craft Supply-button; dimensionals; Close to My Heart-twine; Michaels-brown satin ribbon; Scor-Bug; Scor-Pal Instructions- Trim melon berry cardstock to 4.25"x 5.5"
- Scor lattice design by angling cardstock on Scor-Pal and running Scor-Bug along the lines.
- Stamp frame and sentiment and cut out.
- Adhere card front to an A2 card base.
- Tie ribbon around card base.
- Add button and frame.
:: My Goodies {just because}:: Stamps: Papertrey Ink-damask designs
Ink: Papertrey Ink-ocean tides Cardstocks: Papertrey Ink-dark chocolate + ocean tides + vintage vanilla Pattern Paper: SEI Windsor Accessories: dimensionals; Prima-vintage lace trim + flowers; Papertrey Ink-melon berry ribbon; Scor-Pal; Scor-Tape
Card Instructions- Trim A2 card base with brown cardstock.
- Trim ocean tides and vintage vanilla cardstock into matting rectangles.
- Stamp damask designs and sentiment on vanilla cardstock.
- Adhere lace trim, ribbon, and flowers.
- Adhere to ocean tides cardstock.
- Adhere to card base with dimensionals.
Envelope Instructions ( Lauren Meader tutorial) - Trim cardstock to 6.75" x 10.75"
- On the 6.75" side, score each side at 11.5".
- On the 9.5" sice, score at 3" and 7.5".
- Cut off four of the .25" scored pieces (on all corners, leaving two in the center.
- Adhere 1/8" Scor-Tape to the bottom flap and fold together.
:: My Goodies {happy anniversary}:: Stamps: Papertrey Ink-damask designs
Ink: Stampin' Up!-black Cardstocks: Papertrey Ink-black; Stampin' Up!-kiwi kiss Accessories: KaiserCraft-brads; Papertrey Ink-raspberry fizz ribbon; dimensionals; Scor-Pal; Scor-Tape Card Instructions- Trim kiwi kiss cardstock to an A2 card base.
- Trim black cardstock to 3.25" x 4.75"
- Trim kiwi kiss cardstock to to 2.25" x 4.75" and stamp damask design.
- Adhere kiwi kiss cardstock to black cardstock.
- Tie ribbon into a bow.
- Adhere to card base with dimensionals.
- Add brads and sentiment.
Envelope Instructions (Measurements slightly tweaked from version above to create a short foldover flap) - Trim cardstock to 6.75" x 9.5"
- On the 6.75" side, score each side at 11.5".
- On the 9.5" sice, score at 3" and 7.5".
- Cut off four of the .25" scored pieces (on all corners, leaving two in the center.
- Adhere 1/8" Scor-Tape to the bottom flap and fold together.
|
|


