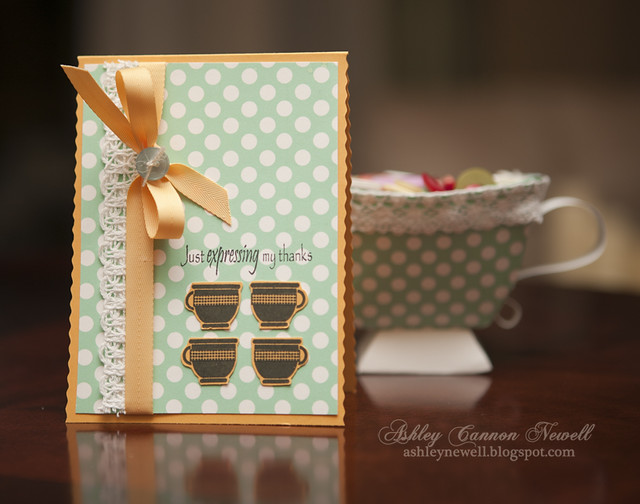
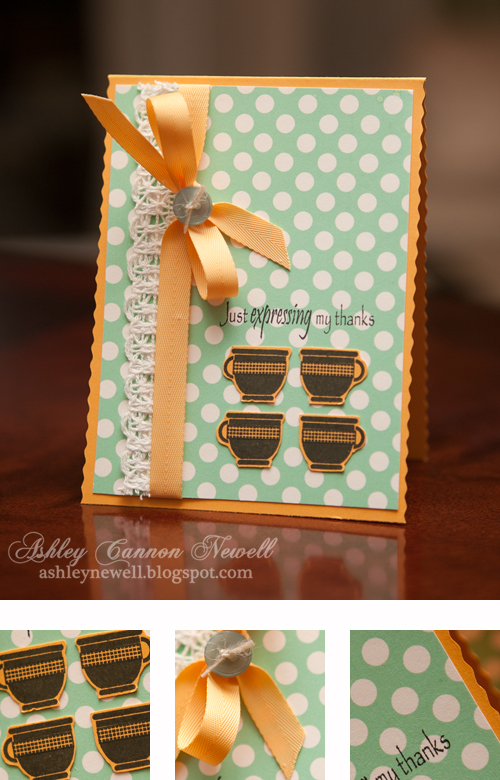
Hey Everyone! I hope you had a great weekend! I spent most of it creating to my little heart's desire! Here is one card I made.
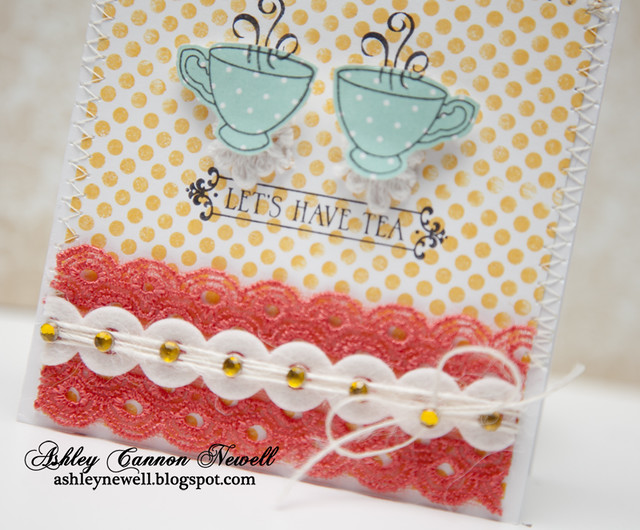
I really like using a technique I like to call stamping overlay! I stamp the sentiment over another stamped pattern, similar to stamping on patterned paper! I even used patterned paper here - that aqua mist polka dot goodness on the tea cups! To represent doilies under the tea cups, I trimmed some Hero Arts lace into two flowers and adhered them first, then popped the cups off with foam adhesive! I also layered the trim, felt, and twine to come up with a decorative element.
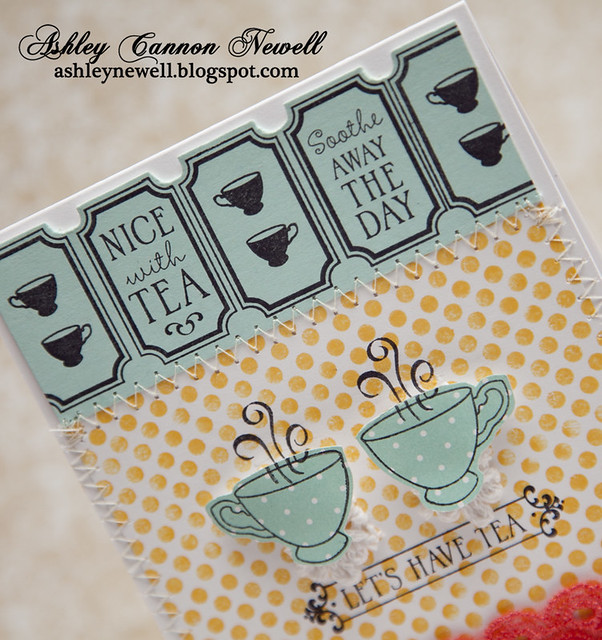
At the top of the card, I created another pattern using stamps. I alternated the sentiment and even included tea cups in one of the 'ticket' border stamped images. I really like that pattern and can envision it as a complete piece of patterned paper!
Here's some more information:
Instructions
- Stamp polka dot background on white cardstock.
- Stamp cups on patterned paper, cut out, then stamp smoke on cups and polka dot stamped cardstock.
- Adhere crochet trim and pop tea cups off with foam adhesive.
- Stamp sentiment.
- Add red trim. Die cut eyelet border from white felt and adhere, then wrap twine into a bow. Add rhinestones.
- On aqua mist cardstock, stamp ticket border pattern, trim then adhere to cardstock. Trim around tickets.
- Add stitching after adhereing to card base.
Stamps :: Waltzingmouse Stamps - afternoon tea, off beat backgrounds
Ink :: Papertrey Ink - summer sunrise; Stampin' Up! - basic black
Patterned Paper :: Papertrey Ink - bitty dots
Cardstock :: Papertrey Ink - white, aqua mist
Embellishments :: May Arts - twine; Webster's Pages - coral eyelet trim; Papertrey Ink - white felt; Kaisercraft - rhinestones
Tools :: Papertrey Ink - eyelet border die; Janome - sewing machine
Now, about that giveaway!
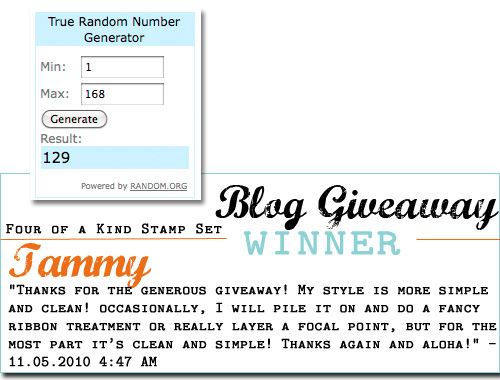
Thanks so much for participating in the Blog Giveaway last week! I appreciate all of your kind words.
Laura asked the question about my crafting style and whether I have always leaned towards classy/elegant.
--In response, I'm not quite sure what my style is. I appreciate them all. However, I usually create a hybrid style of clean and elegant. I enjoy challenging myself to try other styles too like vintage or cutesy too. This is a good question because when I think of my style overall, I wouldn't say I am an elegant dresser or that my house is elegant, but perhaps others would describe it that way. I really fit the category of "unsure of ones style!" I like color, whether it's a lot of just a pop of it. I also appreciate embellishments and buttons that are incorporated into a clean design. I don't like too many layers, BUT sometimes, I like layering certain things, like buttons on ribbon knots or layered die cuts. I think my style has probably leaned toward the elegant side to answer your question directly, but I like some other styles too that I don't want to say that's my only style!
I know that was a little long winded. Sorry about that! Onto the winner! Tammy, please e-mail me your address so I can ship this new set off to you this week! Congratulations and I hope you get great use out of it!
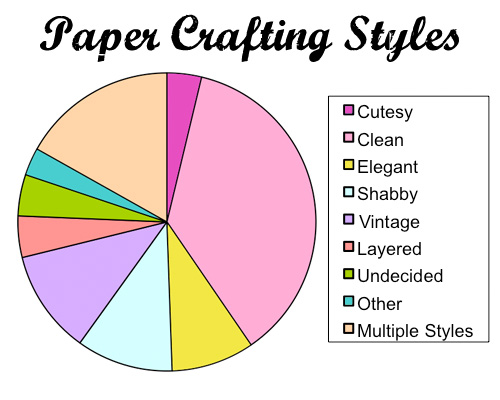
I really enjoyed reading about your styles and what works best for you and what doesn't! So, I decided to share the results. I'm not surprised that clean and graphic style is favored because it is a design style that usually can be created the fastest. There are not a lot of layers and embellishments usually added, and you can create more in a short amount of time. That's not to say the clean and graphic style is 'easy,' it just doesn't have a lot of elements.
I was happy to see that many designers use multiple styles, like me! I read that a lot of you design based on your mood, which is how I create as well. I'm an emotional artist, so being able to force creativity in one direction when your heart is set to design in another can be very difficult. For the multi-style creators, design to your heart's content!
The other styles were really close in popularity, like vintage, layering, and shabby. Oh yeah, so the "other" category included styles like eclectic, grunge, and retro-chic! Perhaps the clean style is a current trend and will change one day. Who is to say, right?! I just thought this would be an interesting perspective to share about YOU...my readers! Thanks for your participation!
 I'm still feeling grateful this month. Could there be another giveaway? Hmmmm
Take care, ya'll!