


Hey there! I hope everyone enjoyed your weekend! Today, is a Caardvarks day! We are doing a blog hop along with Clear and Simple Stamps! So, feel free to jump right in and start hopping along! Check out Caardvarks blog (linked below) for full blog hop details!
Caardvarks
Clear & Simple Stamps Blog
Jenyfur Pohl
Lori Tecler
Heidi VanLaar
Beth Matson
Tanis Giesbrecht
Sarah Martina
Kim Howard
Ashley Newell *you are here*
Savitri Wilder
Kelly Rasmussen
Sue-Ann Tibly
Amy Crockett
Sue Berker
Michelle Giraud
Robyn Weatherspoon
Lucy Abrams
Jen Tapler
Eva Doblias
Simone Pursiful
Peet Roeven
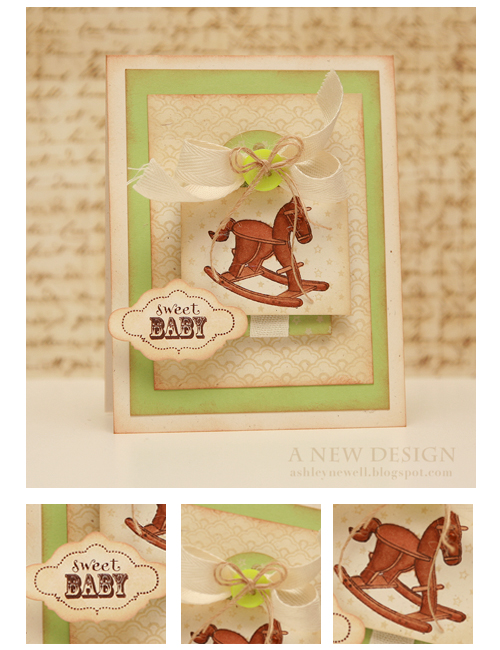
Thanks to those who gave me some great feedback yesterday regarding my new photo. I really do appreciate it all! Your recommendations were well received. Some of the elements you would like to see highlighted more, I felt could deserve more explanation in my instructions, rather than depicted in a photo. It's hard to photograph how something is adhered, but easier to say it is adhere with tacky glue. Regarding the sentiment, the cardstock is crumpled, then inked with a blending tool using dye inks. As far as the sizes of the thumbnails, I personally do not like a lot of pictures of one project, unless it's a detailed altered item, so I was trying to minimize the sizes of them. Again, this is just my opinion of how I want my blog to look, not to say that others who take multiple detailed photographs is 'wrong.' I just like to keep my blog postings as clean and simple and possible. But, to address the thumbnail sizing issues, I'll try to zoom a little better in the future to highlight some of the design elements used, which was my initial reasoning for trying this new photo showcase with you all. I plan to enhance my "Instructions" section a bit more. I think I was assuming some of you all knew how to do certain things, so I'm glad that was pointed out! I'm also adding a "Tips and Tricks" section if I have something extra to share about how to do something in the project showcased. Thanks again for your feedback. It was really helpful! :) So, here's how I created today's card...in more detail!
Instructions
- Trim rustic cream cardstock to create an A2 card base and ink.
- Trim green with envy cardstock to 3.75" x 5" and ink, then adhere to card front.
- Trim rustic cream cardstock to about 3" x 4," then stamp background pattern, ink and adhere to card front.
- Punch tag from green with envy cardstock, stamp stars background with cream ink, then ink edges.
- Add twill tape ribbon treatment through tag hole and add button with twine (using tacky glue).
- Pop tag off card front center.
- Stamp horse rocker on rustic cream cardstock, then color with Copic markers. Stamp star background with antique linen ink.
- Stamp star background with antique linen ink, then ink edges and pop off tag.
- Add rhinestone to horse rocker eye.
- Stamp label border and sentiment on curly die cut.
- Ink the die cut and pop off card front.
- Using Distress Inks - Use a light inks, such as Ranger brands or other light dye inks and apply with a foam tool or even cosmetic wedge applicators. Rub on edges and blend throughout the cardstock as desired. Start with a little because you can always add more, but never take away!
- Foam Adhesive - Sometimes, one layer is not enough. Double, triple, or even quadruple the foam layers to get the desired height.
Stamps :: Clear and Simple Stamps - rock-a-bye, wall flower
Ink :: Ranger - antique linen, tea dye; SU! - chocolate chip; Copic markers
Cardstock :: Clear and Simple Stamps - green with envy; PTI - rustic cream
Embellishments :: Clear and Simple Stamps - green with envy button, curly label die cut; PTI - twine; Technique Tuesday - twill tape
Tools :: Ranger - blending tool with foam applicator
49 comments:
I love how you've used the tag in your project - not as the main focus but as a prop. Super cute card!
This is fabulous Ashley! And I like the new photo layout - equally fab too :)
Oh this is just too cute! Love the softness of the card.
So sweet and lovely!! LOVE this!!
Adorable. Sweet. Perfect. I love all of your work.
Your blog is amazing and this card is simple stunning!
So sweet and delicate -- love it!
I found your blog thru SCS and I'm so glad that I did. Your creations are so AMAZING! You are a very talented lady - I'm going to be a subscriber for life. You are very inspiring!!
Hugs,
Joani
Lovely card--I love the vintage feel you've created.
I also like the detail shots but my favorite part of your blog is the instruction section. I'm a very new card maker (started off digital scrapping--now I make hybrid cards too) so I need all the detailed step-by-step help I can get.
Wow, Ashley, this card so pretty. Love the soft color.
Love the sweet colors! Super cute...
Oh I love your creations and this another I love.. Love how sweet the colors make this card.
Awww, such a pretty card!
That comment was mean. I have been following your blog for awhile now and I have really enjoyed your style and color combos. Once again, I really like the look of this card. It's very soft and I love the ribbon.
Sweet card! I like that you includes the instructions to create one too.
Thanks for giving directions to make the card. It is lovely!
So adorable! Love this rocking horse image, so sweet!
wow this is soooooo beautiful
very pretty! love how you colored the image!
Lovely card and thank you so much for the inspiration you are to me!
This card is AMAZING!!!!
Such a sweet card! Love those soft colors!
Your coloring on that horse is divine! What a beautiful card.
Great colors and love the 3D effects! great card...
I love the dimension of this card...really nice touch!
OMG I love your card..the 3D the color the ribbon all all...Love this...
Fabulous card.
What a beautiful card. I love the colors on the edges. Your instructions and tips are fabulous!
Lovely card. Thanks for the directions.
phenomenal card!!! Gorgeous!
Love that green...what a springy color!!!
Adorably sweet card...
Adorable, love the colors! Your cards are always fabulous!
great colors and darling card. all your cards are great and inspirational.
What a special treat. To be "blown away" twice by a card design. I adore the vintage "flavor" this card has. But I'm a sucker for anything distressed, aged, vintage...
I'm enjoying perussing thru your blog too. You're an incredibley talented woman.
LOVE the pop of color on your card with the neutral colors!
Wow! Amazing card Ashley! Love it!
So sweet!
I am really astonished about all these great cards made with the same stamp... it is soooo exciting to see how different designers work with one theme!
I love this card: especially the vintage look (I think that`s not what you expect for a baby-card... and I do not mean that as a negative fact!!)
Thank you so much for sharing!
Btw: what a great tip to layer the foam adhesive... I`ll try that out in any case.
Way cute! Beautifully done. Again, I love the vintage style.
~Pam L.
Fantastic card - thank you for sharing the instructions and your tips!
I discovered your blog thru this hop - I love your card - but I also love your style as exemplified by your other projects as well! I spent time exploring your blog and love how you've laid out your tutorials as well! I signed up to follow you and am looking forward to seeing more of your work in the future!
Hugs
Ramona
http://create-with-joy.blogspot.com
Lovely card!
Hugs
Kim
x
Beautiful card. I love your site as well expecially with the instructions on how to....wonderful!!
so pretty- love the boldness of the rocking horse against the soft background!
Great colours! Great design! Thanks for the inspiration:)
Darling card! Love the instruction and tips for making the card too. Great idea.
Hi Ashley. Your card is gorgeous. I love the vintage feel of it and the layering. It is just too sweet.
What a darling card! Love that green, so fresh and pretty!
Post a Comment