


I may be 'absent' from the blog during the next few weeks as I work on some special projects, but please, know that I'm designing my little heart out! Anyway, here are the projects!
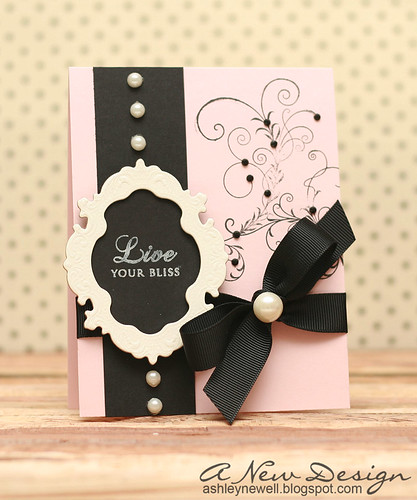
Instructions
- Trim pink cardstock to create an A2 card base.
- Stamp flourish design in black ink on pink cardstock.
- Add black cardstock strip to card front.
- Tie black ribbon into a bow and add pearl treatment.
- Add black cardstock to chipboard frame, then pop off card front.
- Add pearl + rhinestone embellishments.
Stamps :: Papertrey Ink - mega mixed messages, silent night
Ink :: Stampin' Up! - black; Papertrey Ink - vintage cream
Paper :: Papertrey Ink - sweet blush, true black
Embellishments :: Papertrey Ink - ribbon; Stampin' Up! - pretties kit pearls; Tattered Angels - chipboard frame; KaiserCraft - rhinestones
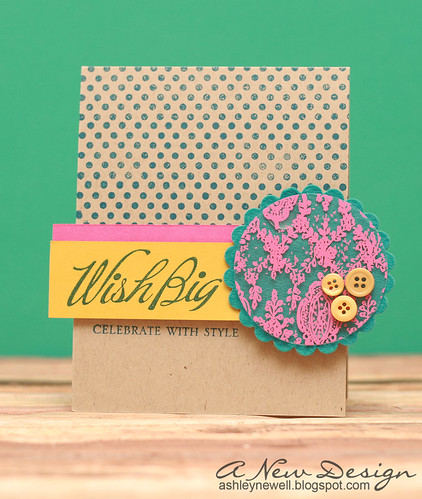
Instructions
- Trim kraft cardstock to create an A2 card base.
- Stamp polka dotted pattern on the top half.
- Stamp sentiment on yellow cardstock strip. Add pink trim, then pop off card front.
- Stamp sentiment on card front.
- Die cut circle from acetate, then mat on felt scallop circle die cut.
- Add buttons to die cut, then adhere to card front.
- Die cutting with Felt - With thicker materials, such as felt, you may have to run your sandwich through your die cutting machine more than once to get a clean cut. Test out on your machine the amount of times you need to run it through because every machine varies.
- Adhering Acetate - Clear materials are fun to work with, but how do you adhere them? It depends on the material, for instance, here, the acetate paper had a pattern, so I was able to 'hide' the adhesive behind some of the pattern. Glue dots or clear liquid adhesive works well if this is the case. If you see the entire acetate or want full coverage, try gel medium as an adhesive. It dries clear! Helmar also carries specialty adhesives for vellum and clear materials. Another tip would be to add embellishments on top of the clear material to disguise the area where adhesive is placed underneath, such as here with the buttons.
Stamps :: Papertrey Ink - wish big, polka dot background
Ink :: Stampin' Up! - pacific point
Paper :: Papertrey Ink - kraft, raspberry fizz; Stampin' Up! - crushed curry
Embellishments: Hambly Screen Prints - lace transparency; Craft Supply - buttons; Heather Bailey - teal felt
Tools :: Spellbinders - standard circles large nestabilities (S4-114); wizard

Instructions
- Trim new leaf cardstock to about 3.5" x 5.5".
- Trim white cardstock strip and stamp lines at an angle, then adhere to card front.
- Add yellow cardstock strip and punched circles to create a scalloped border.
- On cream cardstock, stamp polka dotted pattern, add distress ink, then stamp sentiment and adhere to card front.
- Add ribbon treatment.
- Punch circles, distress, then add rhinestones and doodling to the entire card front.
- Pop flowers off card front.
Stamps :: Papertrey Ink - signature greetings; background basics (retro)
Ink :: Papertrey Ink - new leaf, raspberry fizz; Uniball - signo gel pen
Paper :: Papertrey Ink - raspberry fizz, vintage cream, kraft; Stampin' Up! - so saffron, green grass
Embellishments :: Papertrey Ink - raspberry fizz ribbon; KaiserCraft - rhinestones;
Tools :: Marvy Uchida - flower punches; Creative Memories - circle punch

Instructions
- Trim cream cardstock to about 3.75" x 4", stamp polka dotted pattern and sentiment, and add distress ink.
- Stamp leaves.
- Punch flowers from old book text, then pop off paper.
- Add buttons.
- Trim felt with pinking shears, then add to bottom of polka dotted stamped paper.
- Pop off card front.
Stamps :: Papertrey Ink - signature greetings; polka dot background, new leaf
Ink :: Stampin' Up! - black; Papertrey Ink - ripe avocado
Paper :: Papertrey Ink - true black, vintage cream; old text print
Embellishments :: Heather Bailey - green felt; Papertrey Ink - pure poppy ribbon, twine; GCD Studios - buttons
Tools :: pinking shears; Marvy Uchida - flower punches
Thanks so much for your visit! Take care, Bleeps!
6 comments:
oh my goodness, Ashley! these are all amazing!
I can't wait to see what you have in store. it sounds exciting! :)
OMG!!! Gorgeous cards all... and lovely tips!! You have made me crazy about Polka dots too :-)
Do drop by:
http://kreativityandme.blogspot.com/2010/06/card-patterns-69.html
I made the polka dot pattern myself for the stamp (around 6 lines of dots I think!)...
Hugs,
Smita
All these card are gorgeous Ashley. I always enjoy seeing your work in the cards mag. Only wish this mag was a bit cheaper here in Sydney, money wise haven't been able to get it this month as yet.
wow!!!! what a gorgeous collection!!! Love them all! Hugs Juls
beautiful cards, Ashley!
Love them all, Ash! The last is my fave. Awesome colors and flowers!!
Post a Comment