


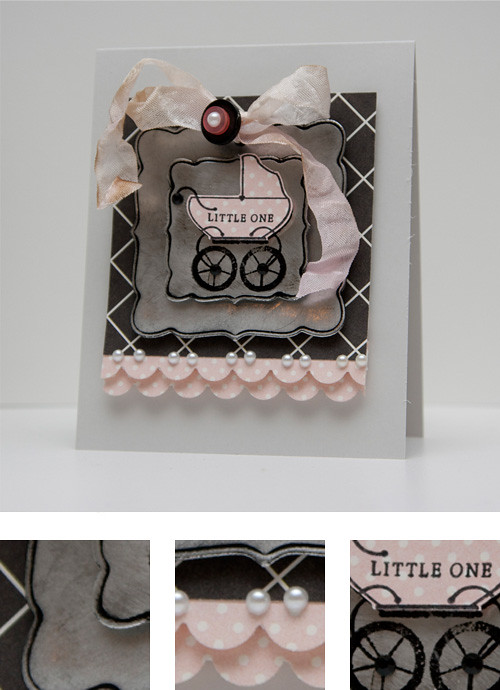
 Hey there! Thank you so much for visiting for the Spellbinders Blog Frenzy Event! Today, I'm sharing additional information about the baby card I presented using the new Labels Fifteen (S4-291). Stacking labels is a great way to create a focal point on your projects to highlight other embellishments or stamps. Stacking labels can also be used a long to create a fun or elegant tag. I love mixing styles, so this card is a bit vintage/antique with a clean and graphic design.
Today is the last day for the event, so make sure you stop by for more sneak-a-peeks!
I'm in the process of working on a series of posts focusing on photography to share with you all. Look for more information early next week!
Instructions
- Die cut square from black diamond patterned paper using die #7 (largest die).
- Die cut scalloped border from polka dotted patterned paper.
- Trim scalloped die cuts to 3.5" long and adhere one strip behind black patterned paper.
- Pop the second strip off slightly below the first scalloped border.
- Add pearls.
- Die cut two labels from silver blank board, then sand/distress.
- Punch a hole and set eyelet in large label die cut. Add ribbon/button treatment.
- On smaller label die cut, stamp baby carriage.
- Stamp baby carriage on polka dotted patterned paper, cut out, then pop off small label die cut.
- Pop small label die cut off large label die cut.
- Add black rhinestones.
- Pop focal point off an A2 soft stone card front.
- Engraving Art Blank Board - using blank board in various metal shades can allow you to create metal-like embellishments with vintage/distressed details.
Stamps :: W plus 9 – kisses & cuddles (baby carriage + little one)
Ink :: StazOn – jet black
Cardstock :: Papertrey Ink – soft stone
Patterned Paper :: My Mind’s Eye – lush collection (pink houndstooth + black
checkers)
Embellishments :: Creative Impressions – white pearls; KaiserCraft – black rhinestones;
MemrieMare – pink ribbon; Papertrey Ink – buttons; Royal & Langnickel – Engraving Art blank board (silver foil)
Tools :: Spellbinders – labels fifteen (S4-291), classic squares large nestabilities
(S4-126), classic scalloped border petites borderabilities (S4-239), wizard, (W-001)
Thanks so much for stopping by!
8 comments:
Oh my cuteness! This is stunning, Ashley! I might have a baby, just so you can send me this card! hee! hee!
This is really a pretty card!
Darling! :)
Cute, cute, cuteeee!
I love the pearls and the scallop borders that you added to the bottom. So pretty! :)
Too dang cute for words - fabulous card creation!
Super cute Ashley! I love the way you paper pieced the baby buggy! Thanks for the Tips & Tricks! Your new facebook pic looks so mysteriously beautiful :)
What a sweet card!
Awww isn't that the sweetest card.
Hugs & Blessings
Bernie
Post a Comment