


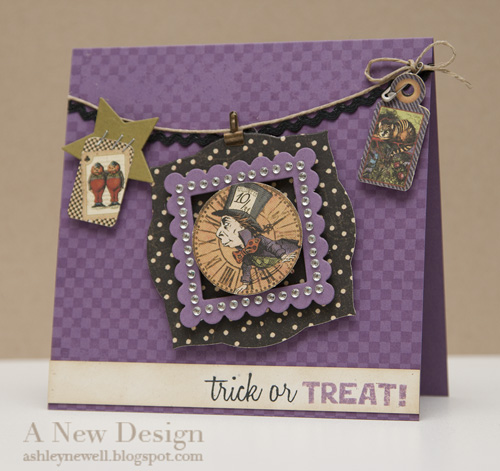
Hi Bleeps! I hope you all are having a great week! Last night, I was inspired by some new patterned paper I've been eyeing since it's reveal, Graphic 45's Hallowe'en in Wonderland collection. I usually do not create any Halloween projects, but this collection helps out...a lot!
I'm getting really excited about our upcoming trip. We're headed to CHA! I hope to see some Bleeps and meet new ones too!
Instructions
- Trim purple cardstock to create a 5.5" square card base.
- Stamp checkered background pattern with purple ink.
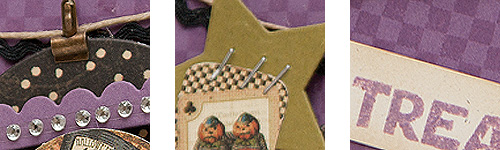
- Adhere ric rac trim and twine to the card front.
- Die cut label from patterned paper.
- Die cut scalloped square frame purple cardstock, then add rhinestone frame.
- Pop scalloped square frame die cut off label die cut.
- Pop patterned paper circle die cut off center of frame embellishment.
- Add mini library clip to frame embellishment and pop off card front.
- Add tag with mini safety pin to card front.
- Die cut star and staple die cut, then pop off card front.
- On rustic cardstock, stamp sentiment, add distress ink, then adhere to card front.
- DIY Die Cut Framed Embellishments - Yes, you can do-it-yourself! Simply use your die templates to create your own custom framed embellishments now being sold in the markets. Combine shapes, patterns, and textures for fun embellishments.
- Stamping with Distress - Want an uneven stamped image? Try adding uneven ink coverage!
Stamps :: Waltzingmouse Stamps - off beat backgrounds (checkered pattern); The Stamps of Life - thanks2fall (sentiment)
Ink :: Papertrey Ink - plum pudding; Ranger - antique linen; Tsukineko - memento tuxedo black
Cardstock :: Papertrey Ink - plum pudding, ripe avocado, rustic cream
Patterned Paper :: Graphic 45 - wonderland classifieds, tags (hallowe'en in wonderland collection)
Embellishments :: Heidi Swapp - bling frame; Craft Supply - twine, black ric rac trim; Stampin' Up! - mini library clip; Creative Impressions - safety pin
Tools :: Spellbinders - classic scalloped squares LG (S4-127), classic squares LG (S4-126), stars five (S4-092), labels three (s4-189), wizard; Ranger - blending tool, mini stapler
Thanks for stopping by! Take care!!
11 comments:
Ashley, this card is awesome and ooh, so spooky, hehe. I really like the layout of the card and the pennant style. The checkered background rocks, looked like PP to me at first! Have fun in CHA, I am hopping to make it next yr, I really want to meet you! seriously :) Or perhaps if I get to DC first :)
Hugs
C
Oh heavenly days, what a beautiful card! Those papers are too yummy! I wonder what they smell like...ha! ha!
That is simply FANTABULOUS!! You never cease to amaze me Ashley!! Constant inspiration =) Thank you!!
Crafty Hugs!
Meredith
Now I see why you had to have that paper. Delightful! Okay, now I'm going to give in and make a banner. Love it, girlfriend!
Too too cute!!! Love everything you've done on this card. Great job!
it's adorable Ashley- i love the details!!
I got this collection a couple weeks ago too - it's the best!! So different...so fun...and who doesn't love Alice in Wonderland! Love your little clothesline bannter and the way you've got the tags cliped on there - fun!
Oh wow! This is so stunning Ashley! I love that paper :)
Stunning card. I admire your work.
fabulous!! so beautiful!
Beautiful Vintage Halloween card Ashley! Love the blingy frame :)
Post a Comment