header.gif (12,818 bytes)
Showing posts with label fabric. Show all posts

10.12.2009

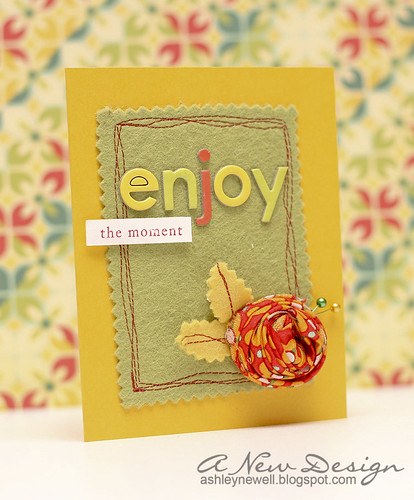
enjoy the moment


"Enjoy the Moment"

This is how I feel after photographing the wedding this weekend in the Outer Banks, NC. I am truly inspired and refreshed. Photographing weddings is one of the most fulfilling parts of my life. From meeting new people to witnessing love at the most highlighted times, photographing weddings make me remember to enjoy the moment.

Today's card captures that moment (or at least I tried to capture it)! Using lots of texture, I created a simple layout and design with lots of color. I hope you enjoy your holiday weekend.

Instructions
  1. Trim crushed curry cardstock into an A2 card by trimming an 8.5" x 11" cardstock in half horizontally.
  2. Trim felt with pinking shears to fit card front and adhere to card front using Creatopia fabric adhesive.
  3. Stitch around felt.
  4. Create a fabric rose by ripping about 1" of fabric, tying a knot at one end and wrap until the end. Adhere the end with glue.
  5. Adhere to card front and add stick pins.
  6. Cut leaves with pinking shears, stitch, then adhere.
  7. Add chipboard sticker letters.
  8. Stamp sentiment and adhere.
Supplies
  • Stamps :: Papertrey Ink - mega mixed messages
  • Ink :: Papertrey Ink - pure poppy
  • Paper :: Stampin' Up! - crushed curry + white
  • Embellishments :: Heather Bailey - felt + fabric; Sassafrass :: chipboard sticker letters; Sewing Machine; Thread; Straight Pins

4.10.2009

Fast Friday Card :: You're My Favorite


Hey out there! Thanks for stopping by on this great Friday. Today's Fast Friday Card may not seem as fast as some of the others, but believe me it is. It is a basic one-layer card with embellishments. The cool new thing to do is create your own hand-crafted embellishments. I really love fabric, so I thought of a way to make a fabric flower (I'm sure others have done this before me). I did this before on the baby layout here and also on a baby frame that I'll share with you soon. To make the fabric flower, simply follow the steps below. I may add a video tutorial in a couple of weeks if it's needed, so let me know if you want to 'see' me create one.

The card is very simple, but the added embellishments make it seem like you worked all night on it! This card took me about 25 minutes to complete and most of that time was used thinking of what I wanted to add next! So, if you were to follow the steps, I'm sure it could be done in about 15 minutes, if not less. As you can see in the close-up photo, I leave the fabric rough on the edges. This adds lots of texture and I like the added frayed edges.

Have a great day!

Card Instructions
  1. Trim dark chocolate cardstock into an A2 pre-scored card.
  2. Trim patterned paper to about 4.25" x 3.5" and adhere to card front.
  3. Add ric rac trim.
  4. Cut a 1" thick strip of fabric.
  5. Hold one end of fabric with your thumb, continue to gather fabric into a circle until complete, add a brad to the center, and adhere to card front.
  6. Fold new leaf cardstock and hand-cut leaves, then adhere around fabric flower.
  7. Stamp sentiment and add rhinestone.
  8. Corner round the card base.
:: My Goodies {You're My Favorite}::
Stamps: Papertrey Ink - Everyday Classics
Ink: Papertrey Ink - Vintage Cream
Cardstocks: Papertrey Ink - dark chocolate + new leaf
Patterned Paper: Papertrey Ink - raspberry fizz bitty dots
Accessories: Amy Butler - pink damask fabric; corner rounder; Chatterbox - brad; JoAnn's - ric rac; Hero Arts - rhinestone

2.13.2009

Happiness...Always :: Fabric Frame


Happy Friday Everyone!

Here is a fabric covered chipboard frame I made last month. It is a sentiment-featured card. I popped some of the important words out using coordinating cardstock. The card is actually really simple to make. The most time consuming component is applying the fabric to the chipboard frame, but very similar to applying paper to chipboard, except it is not as stiff, so you have to work fast to get it adhered right where you want it!

Tomorrow is Valentine's Day and I hope you all enjoy it! Have a great weekend!

Instructions
  1. Create A7 card base (5" x 7")
  2. Take chipboard frame and trace shape onto fabric and cut out.
  3. Adhere fabric to chipboard and distress edges.
  4. Trim brown cardstock to fit behind chipboard frame.
  5. Stamp sentiment on brown cardstock + words on green cardstock and adhere together.
  6. Tie ribbons around frame and adhere frame to card base using dimensionals.
  7. Apply brads to card base.
:: My Goodies {Happiness...Always :: Fabric Frame} ::
Stamps: Papertrey Ink-Heartfelt Sentiments
Ink: Papertrey Ink-vintage cream; SU!-chocolate chip
Cardstocks: Papertrey Ink-dark chocolate; SU!-kiwi kiss
Accessories: Maya Road-chipboard frame; dimensionals; Papertrey Ink-raspberry fizz topnotch twill ribbon; Chatterbox-brads; Amy Butler-fabric
Card Size: 4-1/4 x 5-1/2
Blog Design: Girly by Design