|
|
 Edited to Add: This image was removed by request by a publisher.
You may find this card published in CARDS magazine April 2011.
The image will be replaced after May 2011. Thanks
Hey Everyone! I hope you've had a great week. It's finally Friday and the weekend is right here for us all to enjoy. Do you all have any plans? I'll be working on a few projects and of course some include stamping, recording videos, and photography too! I decided to use some new stamps I purchased from W Plus 9 Design Studio. I really liked the peacock stamps and just had to have them. It's a form of a bird and you all should know how I feel about birds on my projects...I just gotta have 'em! So...here's the card I made. It's pretty simply, but that's a 'beautiful thing', right?! Here are some extra details on the card... Instructions- Trim rustic cream cardstock to about 4" x 5.25", then stamp background pattern.
- Adhere doily to the left side and wrap the remaining part around the rustic cream cardstock (or cut it off to save the other end).
- Stamp peacock on kraft cardstock with blue and green inks.
- Cut peacock out, adhere swarovski crystals, then pop off doily.
- Stamp sentiment on white cardstock and pop off cardstock.
- Adhere altogether on ocean tides A2 card base.
SuppliesStamps :: W Plus 9 Design Studio - magical moments Ink :: Ranger - broken china, peeled paint; Papertrey Ink - summer sunrise Cardstock :: Papertrey Ink - rustic cream, white, ocean tides; Worldwin - kraft Embellishments :: My Favorite Things - swarovski crystals; Craft Supply - doily Thanks so much for popping by today. Ya'll have a great weekend!

Hey there! Thanks so much for all of your very nice comments on my card yesterday! Your words of encouragement mean so much. So, I have one more card to share with you today to "cheer you up!" Instructions- Trim patterned paper into a 5.5” square and adhere on a 5.5” card base.
- Add ribbon treatment.
- Distress die cut with inks, then add rhinestones.
- Die cut ovals.
- Adhere black oval to die cut.
- Stamp sentiment on cream die cut, add distress ink, then pop off black die cut.
- Pop die cut off card front center.
SuppliesStamps :: JustRite – tiny words Ink :: Ranger – antique linen, tea dye; Tsukineko – tuxedo black Cardstock :: PTI – terracotta tile, true black, rustic cream Patterned Paper :: Graphic 45 – Le’Romantique collection (well groomed) Embellishments :: Me & My Big Ideas – die cut, rhinestones; Michaels – ribbon Spellbinders :: classic ovals large, small nestabilities (S4-110, S4-112), wizard Miss my cooking posts? I'll try to post a recipe this weekend that's a simple salad to share with your family and friends! Also, I'll be sure to share my Maryland roots with how I eat crabs. This could be a video too! I just ordered a bushel for our little shindig this weekend! Thanks so much for stopping by today! Have a great Friday Eve and take care of yourselves, Bleeps!
 Hey Bleeps! I hope you had a great weekend! I'm back today with a card to share...finally! I've been in a travel mood lately, so this vintage card is what I created. There are so many fun elements and techniques used in this project and I so enjoyed this creative process. I'll take you on that journey: Instructions- Trim vellum to about a 4.75" square, then stamp text background with black ink.
- Adhere vellum to black 5" card base with adhesive in the corners.
- Add distress ink to envelope, then pop it off card front at an angle.
- Tie ribbon treatment with button and twine around card base.
- Mat vintage photo on black cardstock. Using pinking decorative scissors, trim the black mat cardstock edges, then adhere to card front.
- Stamp sentiment on cream cardstock, add distress ink, then adhere to card front.
- Add buttons to card corners to hide adhesive under vellum.
SuppliesStamps :: PTI – background basics (text style); Waltzingmouse Stamps – say it with style Cardstock :: PTI – vellum, true black, vintage cream Ink :: Tsukineko – tuxedo black; Ranger – antique linen, tea dye Embellishments :: Me & My Big Ideas – envelope, vintage photo; May Arts – twine; Memrie Marie – ribbon; PTI – true black buttons Tools :: Fiskars – decorative scissors So, what have I been up to? I've been learning the new features of the iPhone 4. We were one of the few hundreds of thousands of new iPhone owners last Thursday. Our story: We reserved the phones online, but had to pick them up in the store. We wanted the delivery option; however, got stuck on their site, so we were grateful to still get a couple reserved. I complained, but now am happy we got the chance to experience the Apple fan frenzy! We woke up early, went to the mall, our closest Apple store, and saw the line wrapped around the bottom floor. McArthur and I made the decision to leave and return after work. Great idea! The line was A LOT shorter, but HE still waited 3 hours. I said "HE!" I love that our local Apple store is in a mall. First, it was very comfortable and had a lot of stuff to do, including shopping! I shopped around and returned to check on Mac while in line. He was very patient. He held my bags and I continued to shop. I did give him a break. I waited in the line for about maybe 20 minutes while he went to the Cheesecake Factory to get a beer! :) Perfect! There were lots of funny memories in that line, including the man behind us. Another guy walked up to him and asked, "What's this line for?" And the guy behind us responded, "We're waiting in line for Fog Hat tickets." The guy mumbled, "You didn't have to be a smart ass" and walked off. I giggled really hard (you know the kind to yourself). I thought it was super funny. Well, the interesting part is, the guy returned and told the man behind us in line "You should've pre-ordered" and held out his phone to show his new iPhone 4. Weird, right?! So, I think the random guy knew what the line was for and wanted to be a jerk to show his phone. He had no bags, so why was he even in the mall? I guess to harass the folks in line. It kind of served him right to get the 'smart ass' comment that the guy blurted out. A 'real' random guy might have really thought we were waiting in line for tickets. Regardless, it gave us a good laugh in line! I hope you got a kick out of that one story! Thanks so much for visiting! Enjoy your day and take care.
 Hey there, Bleeps! I hope you're enjoying your week. I'm really glad to see that Friday is right around the corner, finally! Today, I have a card to share with you featuring *no stamping*! That's right, I didn't use any stamps on this card, but I used lots of ink! I made a card using some fun elements and techniques I've been indulging lately. Take a peek at how I did it: Instructions- Trim cardstock to 5.5" x 4.25".
- Trim .5" cardstock strips from a 8.5" x 11" rustic cream cardstock.
- Ink the edges of the cream cardstock with tea dye distress ink.
- Adhere the strips at a diagonal on the A2 card front. Trim the excess from the edges of the card front.
- Ink the remaining of the cardstock strips with antique linen distress ink and blend the tea dye ink.
- Adhere brown lace trim.
- Add ruffled cabbage rose ribbon.
- Ink mini shipping tag and clothes pin and add twine then attach.
- Adhere flower die cut to tag.
- Ink sentiment strip and adhere to card front.
SuppliesInk :: Ranger - tea dye, antique linen Cardstock :: PTI - rustic cream, vintage cream Embellishments :: Craft Supply - mini clothes pin, mini shipping tag, twine; Donna Downey - fabric scrapbook kit (sentiment); K&Co - flower die cut; MemrieMare - cabbage rose ribbon; Websters Pages - brown lace trim Tools :: Ranger - blending tool Thanks so much for commenting on my card and recipes yesterday! :) I enjoyed sharing it and hopefully there will be more. Last night, we had the baked ziti leftovers. Another secret I have is that I really dislike leftovers. I like the idea of them, especially for lunch, but after that I'm pretty much done with it and want something 'bold and new!' Most of the ziti is gone now (yes, just two of us eat in this house)! So, tomorrow I have another meal planned...pulled pork sandwiches with cole slaw and french fries. I have a pork loin that I am going to slow cook all night. If it turns out right and I don't forget, I'll be sure to share that with you Friday. By the way, I don't discriminate against food! I like and eat just about everything! :) Yesterday, Mac's college roommate and friend sent us some Belgian chocolates. He travels the world with his job and told us he was going to send us some chocolates when he last visited us. I had completely forgotten, until now that is! To sum these chocolates up...WOW! They are absolutely amazing. I am not a chocolate connoisseur, but the truffles, not photographed, but in that box look like large Hershey kisses and are extremely rich. I let them melt in my mouth and about two minutes after it was gone is when that satisfaction hit. WOW! I might look into a Belgium vacation sooner than later! The chocolate seashells are just so intricate in detail. I'm really glad I had the chance to try these out! I created this card after I indulged in the chocolates, not realizing the sentiment I picked! I guess I discovered another everyday delight...Belgian chocolates! I have many daily delights, but now Belgian chocolates have been added to the list. 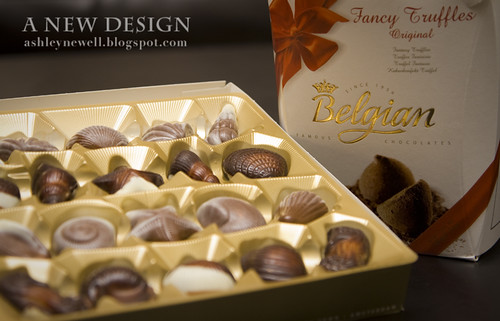 Thanks so much for stopping by again today!
 Hey Everyone! This week, I'm a guest designer for The Play Date Cafe. They host weekly color challenges on their blog. You should go check them out. Lots of inspiration and fun! This week's colors are pink, white, black, and gray. In the color challenge inspiration image, I focused on the colors as they were presented. So, since there was a lot of black, I used a black card base and so forth. You can be inspired to create on so many levels and this is just the one I used this time. Although I've never tried that method before, it worked here and I thought I'd share just in case you all wanted to try that out too! That's why there's only a hint of pink in this card. By the way, the pearls were Mac's idea! Hey...who is really designing the cards, right?! :) Thanks so much for having me "Play Date!" Take care and thanks for your visit. Instructions- Trim black cardstock to create an A2 card base.
- Adhere frame element to card front center.
- Adhere ribbon loop to metal quote and then adhere to frame element.
- Add pearls.
SuppliesCardstock :: PTI - true black Embellishments :: Pink Paislee - artisan elements frame; KaiserCraft - pearls; PTI - sweet blush twill tape; Making Memories - metal quote
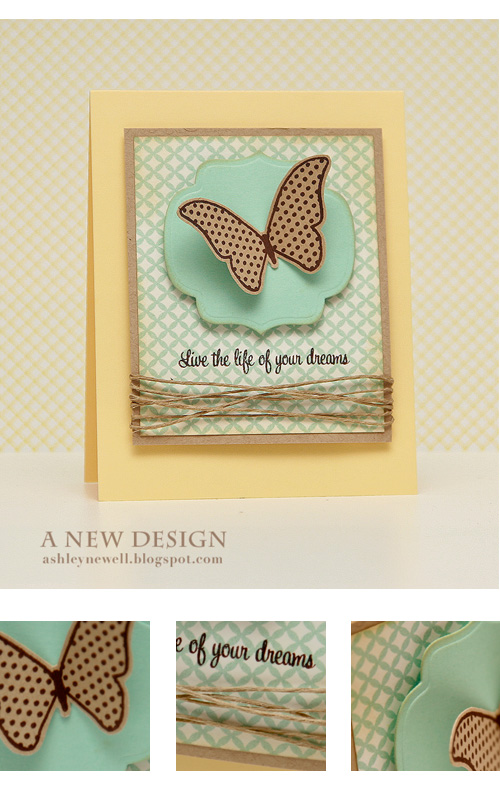 Hey Everyone! I promised you a card today and like magic, here it is! :) Today's card is inspired by a Skipping Stones Design sketch. It is my last card posted as a guest designer with the team. It has been wonderful working with Skipping Stones and their products. As you can see, I can't get enough of the butterflies. They're always just so much fun! The Healing Wings set is so great. I love the sentiments (and pretty font) and the large butterflies in different styles. This set really makes me happy and I can't stop reaching for it! Seriously, I'm not trying to 'sell' the set, I'm just sharing how much I like it! There are many more I like in the store too, I just have to narrow down my selection and make a choice! So, make sure you stop over to the blog today to check out what all of the other designers created using this great sketch, created by Kimberly Crawford. Thanks so much for checking me out today! Instructions- Create an A2 card base from lemon tart cardstock.
- Trim patterned paper block, ink, and mat on kraft cardstock.
- Tie twine around multiple times and secure in the back.
- Die cut and emboss the label, ink, and pop off patterned paper.
- Stamp butterfly, cut out, and adhere to label die cut.
- Stamp sentiment below label.
- Pop focal point off card front.
SuppliesStamps :: Skipping Stones Design - healing wingsInk :: SU! - chocolate chip; Ranger - old photo Cardstock :: PTI - lemon tart, kraft Patterned Paper :: My Mind's Eye - lush collection Embellishments :: Craft Supply - twine Tools :: Spellbinders - wizard, labels nine die template ( S4-233)
 Hey Everyone! I hope you are enjoying your week! It's Friday Eve, so I am super excited about that. Today, I'm sharing a card inspired by The Shabby Tea Room's challenge. Basically, you have to create a white card with a touch of color. This is no 'congrats on your expecting bundle of joy' either. So, I'm going to try to make another card that fits! When I create, I just let it happen. It's really difficult to create some cards on demand and the momma/poppa-to-be is one of those! Maybe I'll have a bit more luck this weekend. Have a great day and thanks for your visit! Instructions- Trim white cardstock to create an A2 card base.
- Stamp pattern on doilies and ink with blending tool and dye inks, then adhere to the corners, removing the excess.
- Punch 1.25" white squares and ink edges.
- Pop 'inchies' off white squares.
- Adhere flowers and ink flowers.
- Adhere squares to card front center.
- Stamp sentiment and ink the card edges.
- Stamp sentiment on spring moss cardstock and ink, then pop off doily.
SuppliesStamps :: Technique Tuesday - loving words, rococo Ink :: Ranger - vintage photo, antique linen Cardstock :: PTI - white, spring moss Embellishments :: Craft Supply - doilies; Prima - flowers; Inchie Arts - 1" squares Tools :: Creative Memories - large square punch
 Hey there, Bleeps! I'm back with a fun card to share featuring Practicing Creativity Design's stamps. They're designed and sold by my super duper sweet friend, Courtney Baker. I decided to use this great stamp set for The Shabby Tea Room challenge this week. This week's challenge was a spring card that used stitching! I see a new trend lately...stitching and spring colors! There are lots of challenges and even publication calls that highlights one or both of these elements, so you must make something...FAST! Here, I used a lot of pastels in the pennant flags and stitched with twine (again...see my last posting). I love stitching with twine because it creates much more texture than with floss or thread. It's just something a little different and stays neutral, which I like, especially for this card. I hope you all enjoyed your weekend. Thanks so much for stopping by! I always appreciate your visit. Thanks to those who blog hopped during the JustRite Mega Blog Hop! It was so much fun and great to 'see' so many visits. Thanks a bunch! Instructions(1) Trim white cardstock to about 4" x 5.25" and stamp pennant twice. (Tip: With clear stamps, you can bend them to create curves) (2) Stamp the insides of the pennant flags. (3) Stamp hot air balloon twice; once on the white cardstock, then on yellow patterned paper. (4) Cut balloon from patterned paper and pop off white cardstock - allowing the balloon basket to show. (5) Stamp sentiment, border and birds. (6) Add stitching to pennant. (7) Add inking and pop off yellow A2 card base. SuppliesStamps :: Practicing Creativity Designs - Look Up Ink :: PTI - sweet blush, aqua mist, spring moss, berry sorbet; Ranger - tea dye, antique linen; Hero Arts - latte Cardstock :: PTI - lemon tart; Gina K. Designs - white Patterned Paper :: My Mind's Eye - breaking free collection Embellishments :: PTI - twine
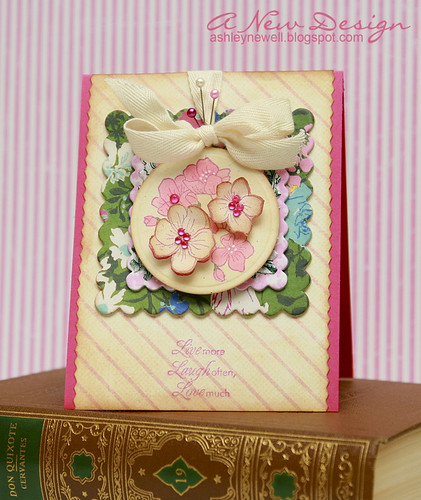 Hey there, Bleeps! It's JustRite's 3rd and final day in their Mega March Blog Hop and I'm so happy to be a part of it! They have some great new releases this year that I've been stamping with and I'm glad to share another card today. There have been lots of designers participating and even more today, so check everyone's blogs out! Thanks so much and enjoy your day! Keep on reading...there's more!
Card Details
Instructions
(1) Trim raspberry fizz cardstock to create an A2 card base. (2) Trim patterned paper to about 4" x 5.5", then cut sides using pinking scissors. (3) Ink around patterned paper. (4) Adhere layered frame to patterned paper. (5) Using a craft knife, cut a slit through patterned paper and feed twill tape through and tie into a bow. (6) Add pins in the knot. (7) Stamp flowers and die cut circle and emboss. (8) Color flowers with Copic markers and ink. (9) Stamp flowers again and cut out two, ink, then pop off circle die cut. (10) Embellish flowers with rhinestones and white gel pen. (11) Adhere circle die cut on top of layered frame with foam adhesive. (12) Stamp sentiment. (13) Adhere to card front.
Supplies
Ink :: PTI - raspberry fizz; Ranger - tea dye + antique linen; Copic Markers - RV21 + G07 Paper :: PTI - raspberry fizz + rustic cream Patterned Paper :: My Mind's Eye - Ooh La La (all dressed up) Embellishments :: KaiserCraft - rhinestones; Technique Tuesday - twill tape; GCD Studios - layered frame; pins Tools :: Spellbinders - standard circle nestabilities; Provo Craft - cuttlebug; pinking scissors
Blog Hop Details
30 designers, FIVE shopping sprees each day. No one knows where the prizes will be! Each day of the hop JustRite will have five Mystery Blog Candy Prizes hidden along the hop with a total retail value of $600. JustRite will randomly select five mystery blogs each day of the hop and randomly allocate each of the shopping sprees. For your chance to win, simply leave a little love (a comment) on each designer’s blog including the JustRite blog. The more designers you leave comments with, the better your chances of winning. Each day’s comments will remain open for three days. A winner from each of the mystery blogs’ comments will be randomly chosen using Random.org. Consult the listing of designers at the JustRite blog each day (each day’s designers will be different) and start out on your way! Beginning Friday, March 26, summaries of all the winners will be posted on the JustRite blog. Good luck to everyone and enjoy all the JustRite eye candy along the hop! Today during the JustRite Mega March Blog Hop (Day Three) JustRite and its sponsors will be giving away the following five prizes: · $200 JustRite Shopping Spree
· $100 Spellbinders Shopping Spree
· $100 Copic Prize Package, and
· Two additional $100 JustRite Shopping Sprees! Blog comments for Day Three will be open until Saturday at 6pm EST. On Sunday, JustRite will announce on their blog which five blogs have the mystery candy for Day Three. You will need to go to the JustRite blog to determine where you need to go to find out if you are one of the five lucky winners.
  Hey Bleeps! Just posting today to share a shabby card with you inspired by The Shabby Tea Room! I had fun making this card yesterday morning. I am really liking twill tape as my ribbon of choice. I'm heading back from Raleigh today and I hope to stop by Archivers and my not so LSS to pick up a few items. I hope you are enjoying your weekend! Thanks for your visit. Instructions (1) Make an A2 card from kraft cardstock. (2) Trim green cardstock strip and adhere to card front, then ink around the edges. (3) Trim white cardstock block, stamp background and ink. (4) Add yellow cardstock strip and ruffle scrunchy trim. (5) Add ribbon treatment and ink. (6) Ink scalloped circle chipboard tile and stamp. (7) Pop circle off block an add leaves. (8) Adhere block to card front with foam adhesive. Supplies Stamps :: PTI - background basics, mixed messages Ink :: PTI - pure poppy; Ranger - antique linen, vintage photo Paper :: PTI - spring moss, kraft, white, lemon tart Embellishments :: Technique Tuesday - twill tape, scalloped circle chipboard tile; Bazzill - trim

Hey Everyone! I hope you had a great weekend. I had a great time. I survived the kiddie birthday party and was pooped afterwards. I napped for about 3 hours! HA! I'll share a few of the photos when they're all processed.
Today, I'm sharing a vintage card. I used many elements I do not typically use, such as patterned paper. AAAACK! I survived and barely stamped! Since there was not as much to do, I inked it up! The card is a larger than my usual A2 cards, measuring 4.5" x 6".
Thanks for visiting and I hope you enjoy your day!
Instructions - Trim blue damask patterned paper to 4.5" x 6", ink and set aside.
- Trim olive cardstock block, ink and set aside.
- Trim patterned paper, then stamp text background, and ink edges.
- Adhere patterned paper to olive cardstock.
- Add ribbon treatment.
- Stamp sentiment in blue and pink ink for a shadow effect.
- Punch flowers from book print, ink, adhere together, and crumple.
- Add rhinestones to flower centers.
- Adhere cardstock block to blue patterned paper.
- Add to a 4.5" x 6" card base.
Supplies
Stamps :: Waltzingmouse Stamps - blessed by you; Hero Arts - old letter writing Ink :: Hero Arts - latte; Ranger - vintage photo + antique linen; PTI - raspberry fizz + enchanted evening Paper :: PTI - ripe avocado; Craft Supply - book print Patterned Paper :: Creative Imaginations - china blue damask + notes ledger Embellishments :: KaiserCraft - rhinestones; PTI - raspberry fizz satin ribbon Tools :: Marvy Uchida - flower punches
  Lawn Fawn Stamps...sneak peek everyone! It's almost grand opening time! Are you excited? I am! This set, called How Delightful, is great to cheer up anyone's day and features some cool handwritten sentiments as well. I jazzed up the chandelier to make it sparkle with some bling. I made the card pretty clean and graphic for your off-the-shelf card effect. Make sure to stop back by tomorrow for another card I have to share and to visit the new online store and pick up your stamps!
Don't forget to drop by the Lawn Fawn blog to check out what the other fabby design team created using this set!
I did not mention the DT member before, but they are:
Thanks so much for stopping by! I'll share a few pictures from our Thailand vacation when they're finished soon. Enjoy your day!
Instructions - Make an A2 card base.
- Trim white cardstock block and stamp chandelier and sentiment.
- Add rhinestones and mat on black cardstock block.
- Adhere to card front with foam adhesive.
Supplies
Stamps :: Lawn Fawn - how delightful Ink :: Versa Color - opera pink Paper :: PTI - raspberry fizz, true black, white Embellishments :: KaiserCraft - rhinestones
 Hey Everyone! Here's a card to give someone who is embarking on a new endeavor, perhaps someone into music too. I really like music backgrounds. There are plenty of patterned papers on the market to choose; however, I realize I am a stamper at heart. I rarely reach for my patterned papers and usually hoard them. I try to use them more often now, but stamping my patterns seems to come easier. I realize that the outcome is the same and I am adding an extra step to my creative process, but it's just the way I create. We all have our own individual ways, which makes it paper "art." That leads me into another topic...The Cookie Cutter Crafter. Now, there is nothing wrong with knowing your style. I admire those who do, but for me I do not know my style. Some people can identify a few styles, but there doesn't seem to be just one. This is the story of my life. I was the type of student who could not decide where to attend college or what to major in because I had interests in a lot of subjects and career fields. I sometimes hate being forced into a box, especially when it comes to the arts. So, here on my blog you see a lot of different styles from clean and graphic to a bit shabby to an elegant style. I create to my heart's content based on what I feel and like at that moment and that's what I call art. The beauty is that art is in the eye of the beholder, so it's up for you to decide that as well for yourself!
Now that is finished, here's more information on the card! Thanks for (listening) reading and have a great day!
Instructions - Make an A2 card base.
- Trim white cardstock block, tear bottom, and ink edges.
- Trim kraft cardstock block, tear bottom, and stamp background pattern.
- Ink edges to kraft cardstock and mat on white cardstock.
- Add ribbon and rhinestone swirls.
- Adhere cardstock to card front.
- Stamp sentiment, distress and adhere to card front.
Supplies
Stamps :: Verve Stamps - great expectations (sentiment); Glitz Design - music background Ink :: SU! - black; Ranger - antique linen, vintage photo Paper :: PTI - true black, rustic white, kraft, lemon tart Embellishments :: PTI - black ribbon; Zva - rhinestone flourish
  TGIF, Bleeps! It's almost time for the weekend and so that means there is an other Embellish Magazine challenge ready for you to start. This challenge incorporates the use of borders. That means, border punches specifically, but if you don't have border punches, then be creative! Use stamps, scissors, or die cuts from patterned paper kits. The sponsor is Verve Stamps and their stamps embellish so well with border punches. Here is how I created mine for the challenge.
Instructions - Make an A2 card base.
- Trim yellow cardstock block and stamp flowers into a background pattern.
- Die cut and emboss labels.
- Stamp sentiment on yellow label, assemble, then pop off yellow card front center.
- Trim yellow cardstock strip and border punch it, then adhere it to the bottom of other cardstock.
- Add ribbon and adhere the entire focal point to card front center.
- Add pink rhinestones to flower centers.
Supplies
Ink :: PTI - melon berry Paper :: PTI - melon berry, lemon tart Embellishments :: Kaiser Craft - rhinestones; SU! - ribbon Tools :: Martha Stewart - border punch; Spellbinders - labels 9 nestabilities; cuttlebug
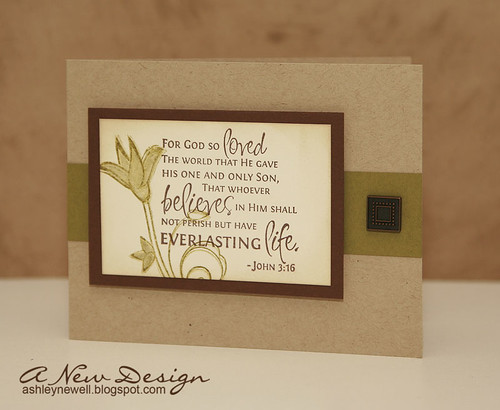 These stamps are so great, that I thought I'd make one to share today. This card exudes masculinity I think. Perfect for your pastor, right?! Aren't those card always hard to select? Well, here is one for you!
Instructions - Make an A2 card base.
- Trim green cardstock strip and adhere to card front center.
- Trim cream cardstock block, then mat on brown cardstock.
- Stamp sentiment and flower.
- Color flower, then re-stamp border.
- Ink edges and adhere to card front.
- Add brad.
Supplies
Ink :: SU! - chocolate chip; PTI - ripe avocado; Ranger - antique linen Paper :: PTI - kraft, dark chocolate, cream, ripe avocado Embellishments :: Making Memories - antique brad
Thanks for stopping by today! I hope you enjoy the challenge. Have a great weekend!

Hey Everyone! Happy Friday Eve!! I'm back today with a card using some new Waltzingmouse Stamps that were delivered yesterday. I could not wait to get them inky and made a couple of cards. Here is one of them. I used heat embossing technique to emphasize the elegance that these stamps exude.
I'd also like to add that the color choices were inspired by Melissa Phillips' post here. and Sarah Martina's post here. Thanks for the inspiration!
Thanks so much for stopping by and as always enjoy yourself!
Instructions - Make an A2 card base.
- Stamp lace border twice with watermark ink, cover with embossing powder, and heat set.
- Tie ribbon into a bow.
- Add pearls and hat pins. {Tip: Hat pins too long? I use a wire cutter to trim excess metal.}
- Die cut label.
- Stamp label border with watermark ink, cover with embossing powder, and heat set.
- Stamp sentiment on label. {Tip: If an ink is fairly light, use a stamp-a-majig and re-stamp multiple times to get a darker ink appearance.}
- Trim blue paper and adhere to card front.
- Adhere label with foam adhesive.
- Add pearls
Supplies
Stamps :: Waltzingmouse Stamps - very vintage labels no. 5; Melissa Frances (sentiment) Ink :: SU! - river rock; Versamark Paper :: American Crafts - craft fair (blue); PTI - rustic cream + spring moss Embellishment :: Midori - green ribbon; Maya Road - hat pins; KaiserCraft - pearls; American Crafts - turquoise embossing powder Tools :: Spellbinders - labels 5 nestabilities; Provo Craft - cuttlebug
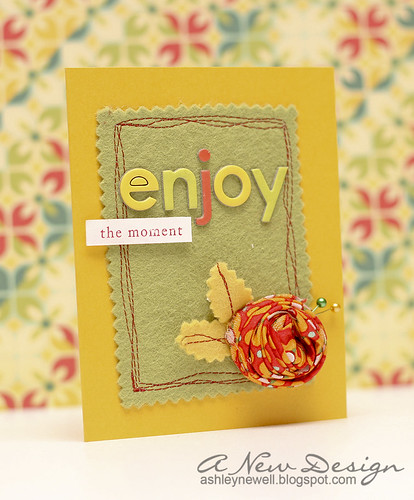 "Enjoy the Moment" This is how I feel after photographing the wedding this weekend in the Outer Banks, NC. I am truly inspired and refreshed. Photographing weddings is one of the most fulfilling parts of my life. From meeting new people to witnessing love at the most highlighted times, photographing weddings make me remember to enjoy the moment. Today's card captures that moment (or at least I tried to capture it)! Using lots of texture, I created a simple layout and design with lots of color. I hope you enjoy your holiday weekend. Instructions- Trim crushed curry cardstock into an A2 card by trimming an 8.5" x 11" cardstock in half horizontally.
- Trim felt with pinking shears to fit card front and adhere to card front using Creatopia fabric adhesive.
- Stitch around felt.
- Create a fabric rose by ripping about 1" of fabric, tying a knot at one end and wrap until the end. Adhere the end with glue.
- Adhere to card front and add stick pins.
- Cut leaves with pinking shears, stitch, then adhere.
- Add chipboard sticker letters.
- Stamp sentiment and adhere.
Supplies- Stamps :: Papertrey Ink - mega mixed messages
- Ink :: Papertrey Ink - pure poppy
- Paper :: Stampin' Up! - crushed curry + white
- Embellishments :: Heather Bailey - felt + fabric; Sassafrass :: chipboard sticker letters; Sewing Machine; Thread; Straight Pins
  Hey there! Happy World Card Making Day! How are you spending your day today? I'll be traveling back home this afternoon and then plan to make a few cards this evening through the night! Today, I have a bright and cheery card to inspire you. The sentiment is perfect for today because it is all about you and your enjoyment of card making, so "Celebrate You!"
Now, make sure you check out the rest of the fabulous ladies on the Blog Tour. Don't forget, you have until October 12 to use a 25% coupon at Paper Crafts/CK Store! Coupon Code: 4YGP-G8SP-GUMX
Thanks for stopping by and enjoy your day!
Card Instructions - Trim bermuda bay cardstock to an A2 card.
- Dry emboss card front.
- Stamp frame on rustic white cardstock and cut out.
- Add rub-ons onto frame front, then add white dots.
- Adhere frame to card front with foam adhesive.
- Add butterfly with rhinestones.
- Stamp sentiment.
- Corner round.
:: My Goodies ::Stamps: Unity Stamp Co - This is the Time (frame); Technique Tuesday - Ali Edwards collection (sentiment) Ink: Clear Snaps ColorBox - chestnut Paper: Papertrey Ink - rustic white; Stampin' Up! - bermuda bay Accessories: Provo Craft - cuttlebug + swiss dots embossing folder; Creative Cafe - felt butterfly; KaiserCraft - rhinestones; 7Gypsies - rub-on; Uniball - signo broad white gel pen; We R Memory Keepers - corner chomper Card Size: 4.25" x 5.5"
 Edited to Add: My photo was terrible and you couldn't see the spring moss, so I took another photo and it's a lot better! My settings were a bit off, so I adjusted my shutter speed and aperture to get a better photo. I hope this is better, ladies!!
Hey there! How was your weekend? I relaxed most of the weekend. That scrapbook I was supposed to start, well didn't quite get started! I did take the packaging off the album! We talked and printed pictures instead of scrapped! I think that is why I cannot go to crops because I spend too much time talking and looking than actually creating!
The color palette on today's card is inspired by Dawn's color challenge. I used some new (to me) Gina K. Designs stamps! Love those flowers because they remind me of those weeds you can pull then blow to make a wish. Did anyone else do that as a child? I added a ribbon charm that I have been hoarding in my stash for quite some time. I thought it would go good with the glitter that I added to the flowers. Can you see it? Well, it's there and sparkly in person. The spring moss ink is so light, you can barely see it in the photo, but again, it's there! I need to exchange my ink pads out for the new pigment inks soon!
Well, thanks for visiting today and enjoy your Monday (as much as you can)!
Card Instructions - Trim spring moss cardstock to an A2 card.
- Trim cream cardstock and stamp flowers and sentiment.
- Mat cream cardstock on hibiscus burst cardstock.
- Tie ribbon around cardstock and add ribbon charm.
- Using foam adhesive, pop cardstock off card front.
- Add a little glue, then sprinkle glitter on flowers.
:: My Goodies {wishing you success} ::Stamps: Gina K - many wishes Ink: Papertrey Ink - hibiscus burst + spring moss + melon berry Cardstock: Papertrey Ink - cream + spring moss + hibiscus burst Accessories: Papertrey Ink - stamp and stick glitter + hibiscus burst ribbon; Craft Supply - rhinestone buckle (Hobby Lobby)
Card Size: 4.25" x 5.5"
|
|


