After December 4, 2010, all future posts are on a new site. Please subscribe to my NEW feed at www.ashleynewell.com or click below to subscribe to the NEW feed.
Hi Bleeps! Did you all enjoy your weekend? I got a few things done, but didn't quite do as much as I anticipated, but I did get some rest in, which is always welcome in my neck of the woods! I did create this card on Friday night after my much needed nap.
My inspiration for this card came from Webster's Page petite papers that I have. I flipped through the patterned papers and selected a couple that I thought were complimentary. I saved a strip from this card I made and coupled it with the other pattern. I really achieved two goals that I usually don't do: (1) used a scrap and (2) used patterned paper.
While at the CHA SuperShow, I picked up those Tim Holtz metal ornate plates. I really like these, so you'll probably see a few of them here on the blog until they're all gone! Another new thing I'm digging is this card size. It's sort of new to me, but 4.25" x 6" is becoming my favorite card size. I can fit more stuff on it! :) It still can fit in an A6 or A7 envelope, so perfect for shipping! That leads me to answer a question I've gotten before...shipping my cards. Well, I'm really a card designer, not a card sender, so I usually forget. But, when I'm on my game, I usually mail them in a regular envelope. If they're bulky and fragile, I'll use of my bubble mailers and slip them in a glassine bag. I love using the glassine bags as envelopes because the recipient can see the card before opening it; plus, you can embellish the bag a bit too!
Instructions
Trim patterned papers to 6" tall. The lighter purple piece is 1.5" wide and the darker purple piece is 3" wide.
Adhere both to a 4.25" x 6" rustic cream card base, slightly off of the scored edge.
Corner round the top right corner.
Add ripe avocado satin ribbon and tie into a bow.
Stamp sentiment on patterned paper. Trim then adhere to card front center.
Align metal frame and pierce holes where to add brads, then add metal frame and secure with brads.
Supplies
Stamps :: Waltzingmouse Stamps - say it with style Ink :: Tsukineko - VersaFine vintage sepia Cardstock :: Papertrey Ink - rustic cream Patterned Paper :: Webster's Pages - seaside retreat collection (new discoveries - dark purple) Embellishments :: Tim Holtz - ornate plates; Papertrey Ink - ripe avocado satin ribbon
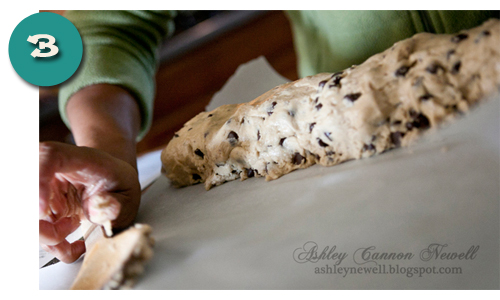
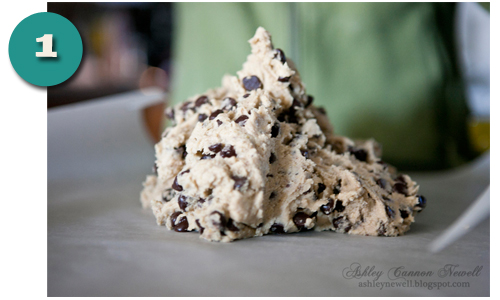
McArthur and I have always loved baking chocolate chip cookies together. It's something that he has done with his family for years and we continue to do it in our home. We've been known to buy that big tube of Pillsbury cookie dough from Sam's Club in our college days and the typical roll from our local grocer. But, why oh why haven't I learned to bake my own cookie dough? Well, I did yesterday and they turned out pretty good. I didn't do too much research on cookie recipes, just did a quick search on the Food Network and found this one here. I was watching Barefoot Contessa on Saturday afternoon and her show on Double Chocolate Chip Almond Cookies got me all geared up to make some myself. See, I watch Food Network...A LOT! So, the Neely's (one of my favorites) came on too and they shared how to store your cookie dough, similar to that Pillsbury dough roll we're so used to buying at our local grocer so you can easily, "slice and bake." This really caught my attention because it made it ever so clear that I didn't have to bake all of the cookies at once (something we usually don't do). We like to bake about 5-10 cookies max for the night and then have a fresh batch on another day. McArthur was sooooo excited about this little fun time in the kitchen that he photographed me baking. Here's how I 'saved' the cookie dough to make it easy to "slice and bake."
This method also allowed me to alter the dough and add extra ingredients to my cookies. I like pecans in my chocolate chip cookies, but Mac prefers his plain. So, after slicing I add a couple of pecan halves into the cookie dough, pushing down into the dough as much as possible. This turned out great! You could add M&Ms, other nuts, or who knows what! This was really fun! I foresee little chocolate chip treat goodie bags on the blog here soon!
Spoon cookie dough onto parchment paper.
Shape cookie dough into a log shape.
Keep rolling to get that pretty shape!
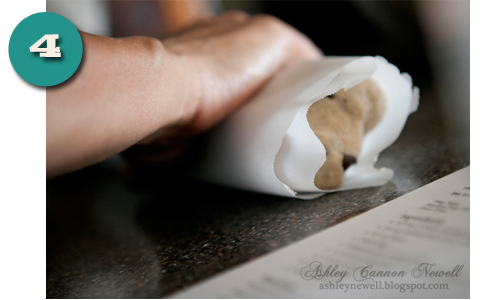
Roll the dough in the parchment paper. Freeze or refrigerate for a little while. Remove from freezer/refrigerator and "slice and bake." Keep stored in the log shape with cling wrap & parchment paper.
Enjoy your cookies fresh every day!
Do you have any cookie recipes to share with me? Please do! I'm slightly more confident now! Thanks so much for stopping by and seeing what I was up to this weekend! Ya'll have a great Monday!
Hi there! Thanks so much for stopping by! I was in a cooking mood yesterday, so that's what I did...cook! I tried to make something crafty, but only got about a third finished, so that will have to wait. So, for today, I'm sharing my collard greens recipe! I grew up eating turnip greens, but I love collards. I actually learned how to make collard greens by watching Martha Steward one day! I know, really funny! Once, I saw how to prepare them, I used a part of my mom's seasoning secrets and combined them with mine to come up with my own. I love eating my greens with spring/green onions. Didn't I mention how I really like onions? To me, the onion flavor pairs very well with greens. Plus, I get to feel like I'm one healthy something eating "grass!" Bare with me!
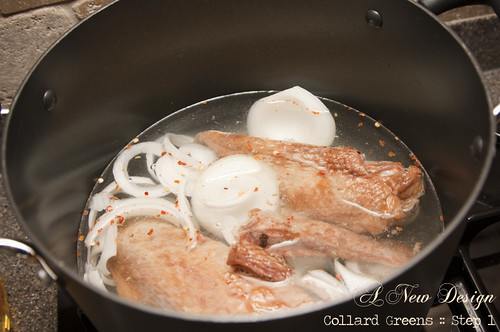
First, fill a large pot with water. Slice an onion and add it the water. Add smoked turkey meat to the pot. I used smoked turkey wings, but any other 'part' will also work. Smoked turkey meat is a healthier option to season your greens. I also added salt and crushed red peppers and boiled.
While the water is boiling, I use this time to clean my greens. These are what collards look like, if you haven't seen them before. I fill the large part of my sink with hot water and dump the greens in. Swish the greens around and re-do the process until the water looks 'clean.'
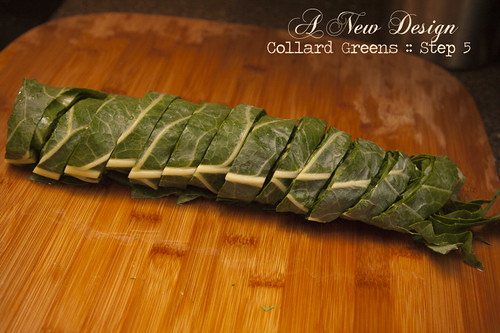
Take a few collards from the sink and layer them together, keeping the stems together at the end. At this time, I break the long stems from each leaf.
Now, I roll the layered collards tightly.
Slice the collards. You can cut down the middle again for more bite size greens. I like to leave the stems on the main part of the greens in tact. I like to think that a lot of nutrients are in the stems.
Place the cut greens in the pot to boil. I cook on gas, so it doesn't take long for the greens to get done...about 45 minutes. On an electric range, it could take about 1.5 hours, I think!
Here is the finished product...all wilted down! ha
So, do you eat any fresh veggies? Picking up greens at the farmer's market is a great choice in the summer, but the great thing is, I can find them at my local grocer throughout the year. They also have 'shortcut' bags that are pre-cut, similar to those salad bags. I recommend still going through the cleaning process if you use that shortcut option. The good thing is, they're still fresh!
Interested in the macaroni and cheese and the oven fried chicken tenders recipes? I'll share them tomorrow. Thanks for stopping by and taking a peek!
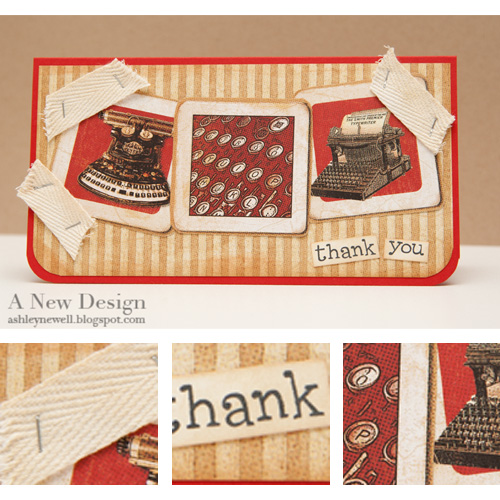
Hi Everyone! In case you didn't get the memo, it's FRIDAY! Today, I have a fast card to share with you and some food (below)!
Instructions
Trim patterned paper to about 3.5" x 6.75", round bottom corners, then adhere to a 3.75" x 7" pure poppy card base. Round card base bottom corners too!
Trim "typography" images from patterned paper and adhere to card front.
Trim twill tape, fray ends, then staple to corners.
Stamp sentiment, add distress ink, and adhere to card front.
Tips & Tricks
Tape Technique :: Tapes are becoming a new 'hot' trend in paper crafting. I remember seeing Making Memories tapes years ago and wondered, "What would I use that for?" Well, now we all know! Although I do own a few rolls of tapes, I thought it would be cool to share how to create your own "tapes!"
Use twill tape to create a tape look. Here, I cut it like tape could appear and used staples to adhere it. You could also use ribbon to get this effect.
Another option for tapes, could be to trim a thin strip of patterned paper, then tear the ends. Cool, right?
Want some fabric tape? Trim fabric strips = fabric tape! You can run it through an adhesive runner or just use glue, such as Helmar liquid fabric adhesive!
Want to customize your own fabric tape? On sticky-back canvas, stamp your own pattern and trim a strip and voila, your own custom fabric tape!
Supplies
Stamps :: Lawn Fawn - just my type too Ink :: Memento - tuxedo black; Ranger - tea dye, old paper Cardstock :: PTI - pure poppy, vintage cream Patterned Paper :: Graphic 45 - communique collection {typography, on the dot} Embellishments :: Craft Supply - twill tape Tools :: We R Memory Keepers - corner chomper; Ranger - mini attacher
Are You Hungry?
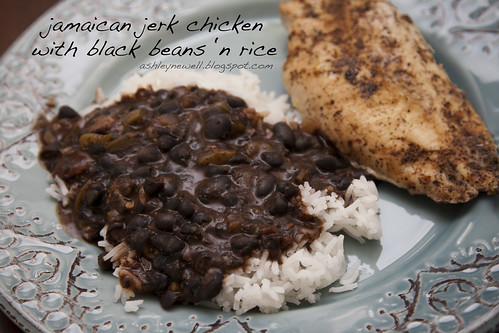
Last night, it was Caribbean night at our house. We made some jerk chicken with black beans and rice. We've made this plenty of times, but never together. Actually, the last time I made the black bean soup was about four years ago, right after we got married. Mac loves the jerk chicken. We discovered "Walkerswood Jerk Seasoning" during one of our travels to the Caribbean. Now, I can't recall the country we were in, but usually when I travel, one of the items I shop for are seasonings, hot sauces, and such! If we run out, I find them online and buy them! I found the jerk seasoning at our World Market, so I didn't have to order this one! But, they've closed our store, so I'll have to see if another World Market still exist or if they've closed them all? I still get the e-mails, so I'm unsure about this one. Does anyone know?
Anyway, the black bean soup is a recipe from Bahama Breeze, a restaurant I used to visit quite frequently during my Raleigh, NC days in law school. I loved their black bean soup and was surprised that they posted their recipe right on their site (here). So, usually I take short cuts, but this time I took a longer route. Instead of using canned black beans as suggested by the recipe, I cooked dry black beans in my slow cooker all day and night. When I got home from work, the beans were done! I picked right back up at the recipe after it says dump the beans in the pot! Dry beans are much better than canned beans, well anything canned is not as good as fresh, right? Anyway, I'm no health nut, I just like to cook and eat well!
Now, I know black beans look yucky in the photo, but believe me, they were good! I'm going to freeze the rest because I'm sure I will not want them this weekend. Remember, I don't do well with leftovers! :)
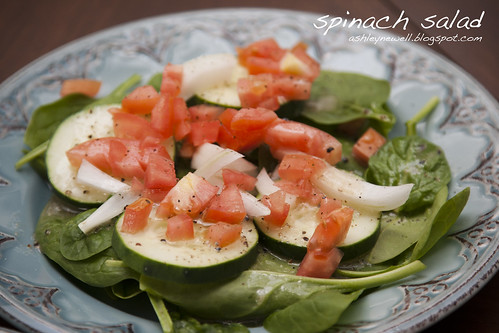
We also had a spinach side salad with our meal. I didn't put it on my plate (pictured above) because some foods just can't touch! My salad is one of them! So, it gets its own special plate/bowl usually! One more thing to note, Mac dumped some of his jerk chicken into his salad and said it was great! Just as an added thing to do with the leftovers or another dish altogether!
We usually eat spinach salads because someone has an allergy in the house to lots of stuff, including lettuce (no names mentioned, but it's not me)! :) Anyway, I just sliced some cucumbers, tomatoes, and of course onions because I LOVE ONIONS! I use vingarette dressing usually on my salads, but sometimes I venture out to ranch (only at Outback it seems) or a sun dried tomato dressing.
Thanks so much for stopping by! I hope you all have a fantastic weekend!
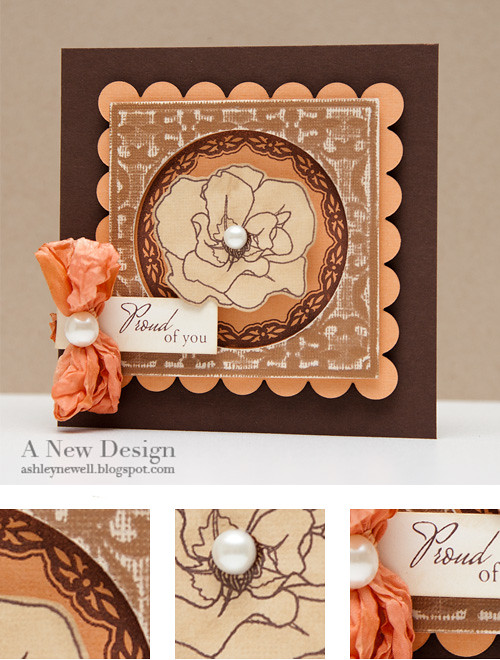
Hey Everyone! Well, at least we can say it's Tuesday! Today, I have a card inspired by Waltzingmouse's Sketch Challenge! They are sponsoring the current Embellish challenge, so check out both! If you haven't already, please become a fan of Embellish! We have almost reached 600 fans; our goal for the week!
Check out how I made it!
Instructions
Die cut scalloped square nestability and stamp circle border in the center.
Die cut square nestability with circle nestability insert to create a frame, then emboss with impressability and sand it.
Pop square die cut frame off scalloped square die cut.
Stamp rose, ink, and cut out. Pop rose off circle center.
Stamp sentiment, ink, then pop off bottom left corner.
Add ribbon treatment and pearls.
Adhere to 5" square card front with foam adhesive.
Tips & Tricks
When working on sketches, I like to assemble the card in sections before adhering it all together. This allows me the chance to review several design options, such as flipping the sketch or using other embellishments/shapes to incorporate into the sketch.
Supplies
Stamps :: Waltzingmouse Stamps - blessed by you (sentiment), vintage circles small (circle border), roses in bloom (flower) Ink :: ClearSnaps - chestnut; Ranger - old paper; SU! - chocolate chip Cardstock :: Core'dinations - chocolate box collection; PTI - vintage cream, dark chocolate Embellishments :: Craft Supply - crinkly stained ribbon; SU! - pearls Tools :: Spellbinders - standard circles large nestability (S4-114), classic scalloped squares small nestability (S4-120), class squares nestability small (S4-128); fleur de lis pattern impressability (I2-1014), wizard, sanding tool
So, last night I also got back into the kitchen. I tried an Orange Chicken recipe that I've cooked before. When you're like me and use recipes to build up your cooking skills, you have to cook some recipes at least twice before they're really 'introduced' into my kitchen. So, this time around, I discovered that I personally make more chicken than the recipe calls, which means I need to make more 'sauce.' The sauce is easy to whip up as I did after I made the plate pictured below. Although I did not have another orange on hand, simple soy sauce, brown sugar, and red pepper flakes on the stove was all I needed to 'juice' it up! :) Give it a go! It's super fast! I do have a huge rice cooker that I ordered from Dillards online using some wedding gift cards I had. If you don't own one and you eat rice like me...get it!
McArthur came into the kitchen and said, "It looks real. Did you cut the chicken yourself?" What he meant was, he thought I ordered it and put it in the skillet and/or that the chicken was pre-cut. I did take a short cut! You know I LOVE kitchen short cuts because I have to eat and get in that studio! I buy my chicken usually from Costco. I get the boneless skinless chicken breasts. This time, I got the chicken tenders, which cuts my cutting time in half! Anyway, I love those pre-packaged chicken packs because cooking for two can be difficult, but not with those packages! I also discovered Perdue's flat chicken breasts! They're great for stuff like that Panini I made on Thursday, grilled chicken breasts in general, or chicken parmesan...no more mallets!
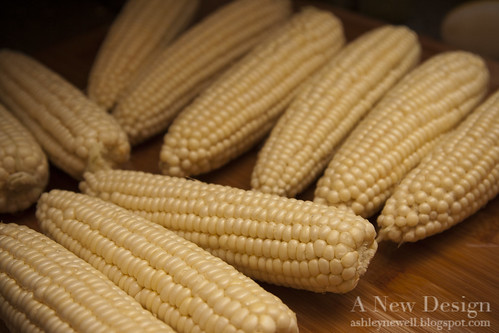
Hi there! I hope you're having a great week! I decided to not post a project today, but I did want to share some food! :) You all know I appreciate my "feedings!" The summer time to me means fresh fruits and vegetables that you cannot always get year-round. we have a local farmer's market that I like to visit on Saturday mornings, but unfortunately I haven't gotten the chance just yet. But, that doesn't mean I can't get any fresh foods! I picked up some fresh white corn from my local grocery and green beans from Costco (ha)!
Fried corn is a staple in our family. My grandmother made it and boy could she throw down in the kitchen. I like to think that I got some skills from her, although deep down I know she was much better! Whenever we have a good 'down home meal,' fried corn is on the menu. To clear up any confusion with the term, "fried," it's basically stir fried in oil, but not deep battered fried!
I picked up a dozen ears of corn. A great tip is to shuck the corn before you leave the grocery store. Many stores now have huge trash cans stationed next to the corn to allow customers this 'shucking convenience!' This will save you prep time in the kitchen and also a lot of clean up too! You can select white, yellow, or mixed corn. I like mixing fried corn with white and yellow, but this time I forgot! The look of it is so cute!
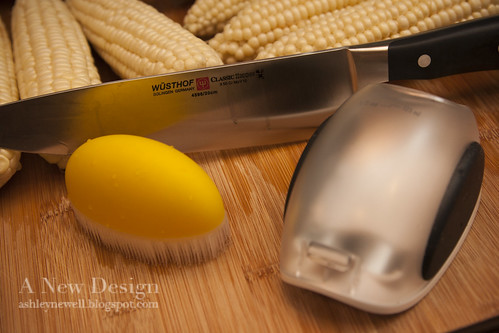
Regarding the photo of the tools. Last year, I found that little yellow tool. It has plastic 'fingers' and I use it to clean the corn. It is a very soft brush and removes most of the silk. The other tool is by Oxo and I found it at Williams-Sonoma I believe. It is supposed to be used to cut the corn from the cob. I used it this time and did not really like it. I think because there is a learning curve to it, so for now I went back to my trusty knife (also from Williams-Sonoma, which is where that little yellow tool was probably purchased too)!
Anyway, here's how I make my version (not my Nanny's by the way, but close I add an extra kick if you can guess which ingredient that is). The hardest part of making fried corn is cutting it from the cobs! If you watch TV and do it, you'll feel better! I have a iHome in my kitchen and usually sing really loud and dance hard too! :)
By the way, I made a little plate for my sister. She LOVES fried corn and her birthday is coming up, so I'm going to head over to DC and drop some off to her for lunch today!
Instructions
Shuck corn.
Clean corn and remove silk.
Cut kernels from cob using knife or tool. Be careful not to cut all the way to the core.
Using the back side of the knife, scrape each cob to get the milk or 'juice' from the cob.
Add oil to pan and heat.
Add corn.
Season corn with salt, pepper, and cayenne pepper.
Stir constantly. Corn will stick if you leave it there - NOT GOOD - trust me! :)
Depending on size of corn ears, makes 4-6 good helpings.
Supplies
12 ears of fresh corn (white, yellow, or mixed) 2-3 Tbsp corn oil Pinches of salt, pepper, and cayenne pepper
**Alternative recipe: Add some heavy cream and flour to the recipe and create a more cream-style fried corn. Use butter instead of oil, but either would really work!
Thanks for visiting today! I hope you will try some fried corn one day!
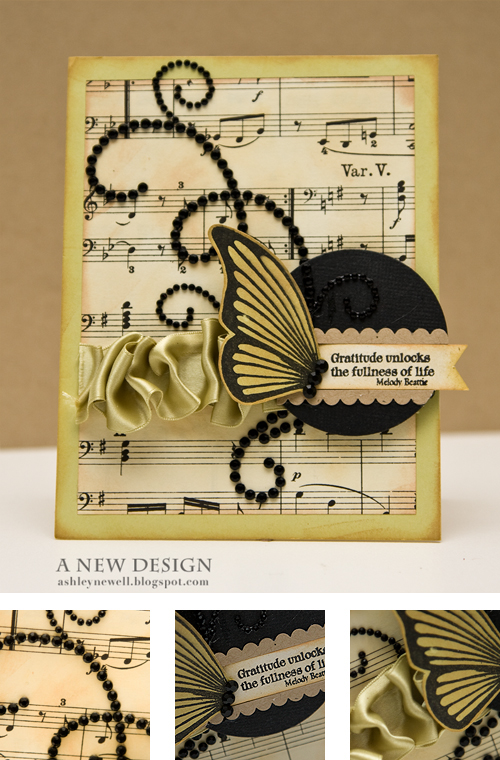
Hey there! This Friday starts off a new challenge over at Embellish Magazine. The challenge is to use butterflies and a color combination of kraft, black, and green! If you get a chance, go check it out and create something too! There are a few stamp sets up for grabs!
Instructions
Trim vintage music paper to about 4" x 5.25" and add distress ink.
Add ruffled ribbon.
Die cut circle.
Trim cream cardstock strip, add distress ink, and stamp sentiment, then adhere on circle die cut.
Using decorative scissors, trim kraft cardstock and adhere above and below sentiment strip.
Pop circle die cut off music sheet.
Add black rhinestone flourish, cutting some pieces to create dimension.
Stamp butterfly with black ink on green cardstock and add distress ink.
Cut out butterfly and pop off circle die cut near sentiment strip. Add three black rhinestones to butterfly body.
Adhere focal point to spring moss A2 card front.
Supplies
Stamps :: Skipping Stones Design - healing wings Ink :: SU! - black; Ranger - tea dye, antique linen Cardstock :: PTI - spring moss, kraft, rustic cream; American Crafts - black Patterned Paper :: Craft Supply - vintage Mozart music sheet paper Embellishments :: Midori - green satin ribbon; Zva - black flourish jewel; KaiserCraft - black rhinestones Tools :: Craft Supply - scalloped decorative scissors; Spellbinders - standard circles nestabilities (S4-114), wizard
So, last night I made my pulled pork sandwich with french fries. I usually make my own fries from potatoes, but I got home a lot later than usual and the frozen bag won! Cole slaw is on my pulled pork sandwich because it's good! I lived in North Carolina over a non-consecutive seven years. While there, I drank sweet tea and ate barbecue. North Carolina pulled pork sandwiches are often served with cole slaw, but many eat it on the sandwich. The first time I saw this, I screamed a big "EWAH!" McArthur had me to try it, along with a hot dog "Cook Out" style, which is with chili and cole slaw. Needless to say, I liked it! It's the only way I like barbecue sandwiches now. Look at it like a dressing on a sandwich, similar to mustard or mayonnaise (even though I secretly hate mayonnaise, which is why I can't use it in my slaw). I hope you give it a try, if you haven't already!
Instructions
Place pork loin in slow cooker and season. Cook on low for about 7 hours.
Pull pork apart using two forks, until stringy.
Add barbecue sauce and heat.
Cut up about 1/3 of an onion and place into a bowl with angel haired cole slaw mix.
Add celery seed and Marzetti's cole slaw dressing.
Cook french fries as desired.
Toast kaiser roll bun and prepare sandwich. Add a bit more barbecue sauce on top of pork and some slaw.
Supplies
Pork Loin (Chicken is a great substitute) Barbecue Sauce (a little over a bottle was needed) Marzetti's Cole Slaw dressing Angel Haired Cole Slaw mix Onion French Fries Kaiser Roll buns
Thanks for your visit, comments, support. Enjoy your weekend!
Hey there, Bleeps! I hope you're enjoying your week. I'm really glad to see that Friday is right around the corner, finally! Today, I have a card to share with you featuring *no stamping*! That's right, I didn't use any stamps on this card, but I used lots of ink! I made a card using some fun elements and techniques I've been indulging lately. Take a peek at how I did it:
Instructions
Trim cardstock to 5.5" x 4.25".
Trim .5" cardstock strips from a 8.5" x 11" rustic cream cardstock.
Ink the edges of the cream cardstock with tea dye distress ink.
Adhere the strips at a diagonal on the A2 card front. Trim the excess from the edges of the card front.
Ink the remaining of the cardstock strips with antique linen distress ink and blend the tea dye ink.
Adhere brown lace trim.
Add ruffled cabbage rose ribbon.
Ink mini shipping tag and clothes pin and add twine then attach.
Adhere flower die cut to tag.
Ink sentiment strip and adhere to card front.
Supplies
Ink :: Ranger - tea dye, antique linen Cardstock :: PTI - rustic cream, vintage cream Embellishments :: Craft Supply - mini clothes pin, mini shipping tag, twine; Donna Downey - fabric scrapbook kit (sentiment); K&Co - flower die cut; MemrieMare - cabbage rose ribbon; Websters Pages - brown lace trim Tools :: Ranger - blending tool
Thanks so much for commenting on my card and recipes yesterday! :) I enjoyed sharing it and hopefully there will be more. Last night, we had the baked ziti leftovers. Another secret I have is that I really dislike leftovers. I like the idea of them, especially for lunch, but after that I'm pretty much done with it and want something 'bold and new!' Most of the ziti is gone now (yes, just two of us eat in this house)!
So, tomorrow I have another meal planned...pulled pork sandwiches with cole slaw and french fries. I have a pork loin that I am going to slow cook all night. If it turns out right and I don't forget, I'll be sure to share that with you Friday. By the way, I don't discriminate against food! I like and eat just about everything! :)
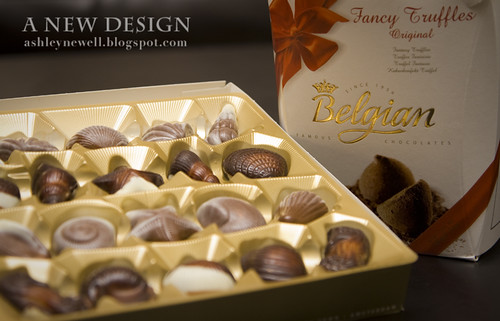
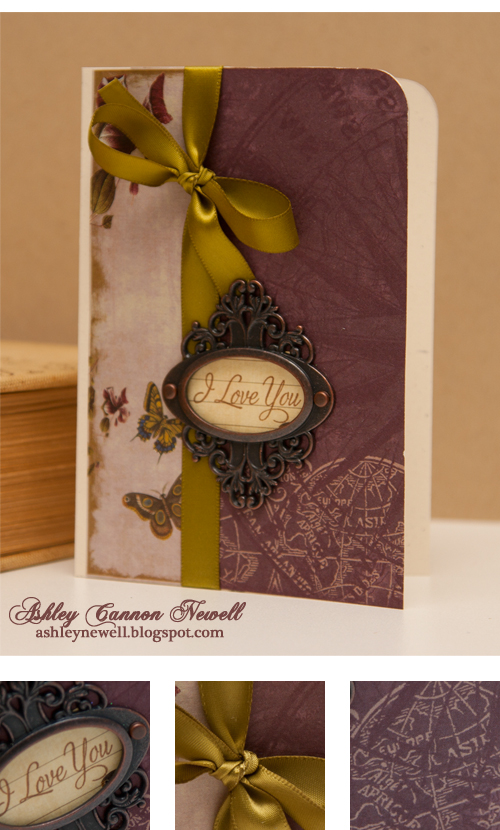
Yesterday, Mac's college roommate and friend sent us some Belgian chocolates. He travels the world with his job and told us he was going to send us some chocolates when he last visited us. I had completely forgotten, until now that is! To sum these chocolates up...WOW! They are absolutely amazing. I am not a chocolate connoisseur, but the truffles, not photographed, but in that box look like large Hershey kisses and are extremely rich. I let them melt in my mouth and about two minutes after it was gone is when that satisfaction hit. WOW! I might look into a Belgium vacation sooner than later! The chocolate seashells are just so intricate in detail. I'm really glad I had the chance to try these out!
I created this card after I indulged in the chocolates, not realizing the sentiment I picked! I guess I discovered another everyday delight...Belgian chocolates! I have many daily delights, but now Belgian chocolates have been added to the list.
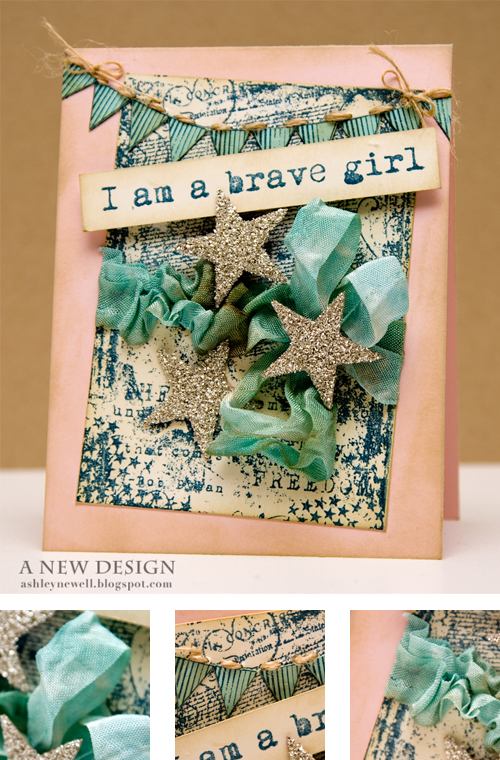
Well, not really me, but that's what this card is all about! Last week, I told you all that I'm working on sending a couple of boxes to soldiers in Afghanistan via a family friend who is currently deployed there. Well, she is soon to return and this card is for her.
She is a brave girl!
I'm not sure if I could have ever been deployed, but she did and I am grateful that she served for me, you, and the rest of our country. We both grew up as military brats and are all too familiar with the military lifestyle, but during times of war it all becomes surreal.
Instead of making a red, white, and blue card, I "pinked" up the blue to make it 'pretty!' I was inspired by The Shabby Tea Room's challenge for the week, which provides that we use stars and stripes. So, here's my card!
Instructions
Trim cream cardstock and stamp background pattern in navy ink.
Add distress ink to the edges.
Ruffle cabbage rose ribbon and tie into a bow.
Adhere at an angle to pink A2 card base.
Stamp banner and flags and paper piece.
Add twine hand stitching.
Stamp sentiment on cream cardstock strip, ink, and pop off card front.
Adhere glitter stars.
Tuts, Tips & Tricks
How to add distress inks to your project to 'age' your projects
Stamps :: Unity - brave girl (sentiment), declare freedom (background); Practicing Creativity Designs - look up Ink :: PTI - enchanted evening; Ranger - old paper Cardstock :: PTI - vintage cream, sweet blush, aqua mist Embellishments :: MemrieMare - cabbage rose ribbon, glitter stars; PTI - twine
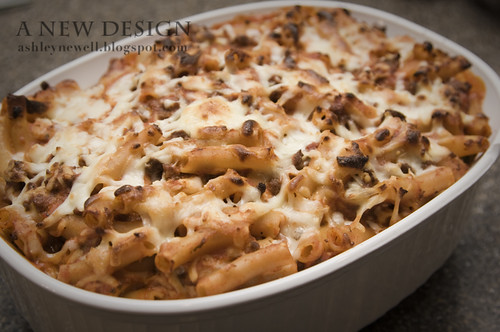
But wait, there's more today!
Last night, I made some baked ziti and talked it up on Twitter/Facebook so much that I think some people wanted to see it, so I grabbed my camera and shot a photo! Now, it may look a little dry on top from the melted cheese, but believe me it wasn't in the inside (giggling)! Laura's recipe inspired me to make this meal. However, I cut some corners because I did not feel like stopping by the grocery on my way home from work. I had the bulk of the ingredients and took out the ricotta cheese and replaced sausage with ground beef. I have a small basil plant (LOVE THAT), so I was able to pop a little green in there! So, even with those adjustments, the dish turned out great, plus I have lunch tomorrow! Enjoy and stop by Laura's blog for some fun recipes to try out in your kitchen.
But wait...there is even more!
So, I have a little secret to tell. I really do not eat sweets. I LOVE food, but I usually pass on desserts. I have nothing against them, but when it's dessert time, I usually grab another plate of non-sweet food! However, there are a few desserts I like, such as cheesecake, mango and sticky rice, and strawberry shortcake (with a biscuit).
Now, remember I like to cut corners. I work every day and *need* lots of time to create, so cutting corners is my thing to do, especially during the week. So, I grab some of those Pillsbury individually frozen biscuits to have fresh ones baked within 25 minutes! Now, if I were a true cook/baker, I'd make some on the weekends and freeze my own, but I'm too busy paper crafting and lounging on my sofa...oh yeah and working on Embellish Magazine! I like to pre-make my strawberries, so they are prepared for the week (or however few days it takes to eat 'em). Anyway, here's how I make it:
Ingredients
biscuit(s) 2 scoops (or more) french vanilla ice cream pint of strawberries (cut) 2 cups sugar
Instructions
Cut strawberries and store in a container with LOTS of sugar and place in refrigerator for a few hours. Shake it up here and there while you're getting excited.
Bake biscuits.
Cut biscuit in half, place bottom biscuit in serving dish.
Add ice cream.
Add sugared-down strawberries.
Add biscuit top and more strawberries (and juice).
EAT FAST!
Thanks so much for stopping by today and indulging in one of my favorite blogging moments!
This card is cased by a Kristina Werner design. This is my first time trying the ribbon weave technique. I liked the way Kristina used Lisa Bearnson's kit as a window for the woven ribbon square. Since I did not have the kit, I created my own using square nestabilities. I used double-sided patterned paper. The square window and woven ribbon square are popped off the card with dimensionals. I placed a prima paper flower in the center of the woven ribbon square. The bud is a Making Memories green velvet brad. Red and green are common Christmas colors, but I like to 'break the rules' and use this wonderful color combination in the spring!
Ingredients Paper: My Mind's Eye wild asparagus sweet dots/red paper, white CTMH cardstock Accessories: Making Memories velvet brad; Papertrey Ink spring moss grosgrain ribbon; Techniques: Woven Ribbon; Die cut w/ cuttlebug & square nestabilities
To water your appetite today, here is an "Ashley Fruit Arrangement" I made over the weekend for my party. To make the fruit arrangement, place a head of lettuce into your bowl or serving dish. Place fruit on skewers in alternating order. Place grapes on skewers last so no skewer will show. Place skewers in the head of lettuce starting on the lower outside, working your way inside, filling in all spaces! This was so fun and delightful! This fruit arrangement is great for your spring and summer gatherings and is economical to make! I added green satin ribbon and tied it into a bow around my white Crate and Barrel bowl for a finished look.
Ingredients Fruit: Strawberries; Pineapple - cut into cubes; Grapes (or any other fruit you love) Bamboo/Wooden Skewers Head of lettuce Technique: 30 minutes of patience


 Shape cookie dough into a log shape.