|
|
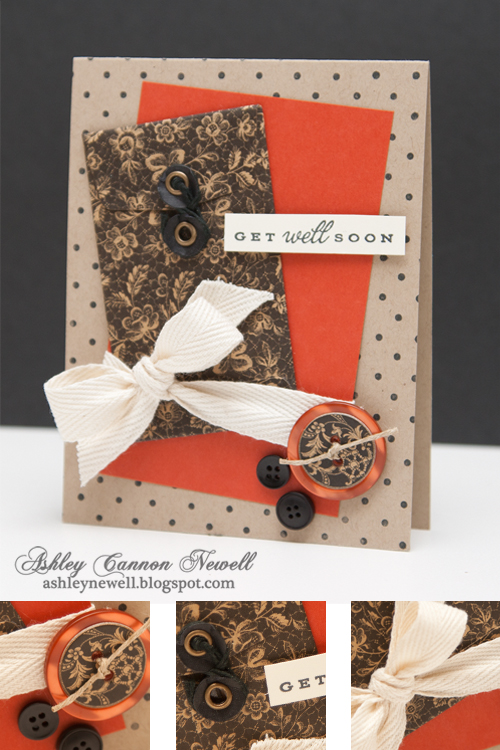
 Hey Bleeps! How was your Monday? Mine was very exhausting. I was so tired. So, I did what I thought best, napped! :) I feel a lot better now, but will make sure tomorrow morning when I arrive to work that I do not miss my morning green tea. Obviously, that one cup of tea mattered more to me than I knew. Today, I created a card featuring some fun Graphic 45 embellishments. In honor of my tea mishap, I decided to use the envelope as a tea bag holder, perfect for friends or loved ones who are a bit under the weather. I'll try to be back tomorrow with another video. Any suggestions on projects, techniques or products you'd like to see? I haven't decided just yet, so I thought I'd ask you all if you are interested in seeing something in particular. If I can't do it for tomorrow's video, then I'll make sure to add it to the list for next week! Instructions- Stamp polka dotted background on kraft A2 card base with black ink.
- Adhere envelope at an angle on rust cardstock block.
- Tie twine around block, then adhere to card front.
- Add button treatments.
- Stamp sentiment on cream cardstock strip, then adhere to card front.
SuppliesStamps :: DeNami Design - polka dot background; Papertrey Ink - tea for two Ink :: Tsukineko - memento tuxedo black Cardstock :: Papertrey Ink - kraft, vintage cream, terracotta tile Embellishments :: Graphic 45 - envelope tags, chipboard buttons; Papertrey Ink - terracotta tile, true black buttons; Craft Supply - twill tape Have a good day! Thanks for stopping by!
 Hey there! Sorry this is posted a little later than usual, but I'm in full vacation mode! :) So, I'm checking in with you all and posting a card to share. First, I'd like to answer a few questions from this post. Some of you were interested in the stamp I used on the first card. It is by Waltzingmouse Stamps - faux fun circles. I die cut the circle, then stamped the circle label, then added the sticker for the sentiment. If you haven't checked out Claire's stamps yet, I highly recommend them, especially the nestie-friendly stamps if you're not sure where to start!
Yesterday, some of you answered correctly! Now, onto today's vacation hint!
Vacation Hint #2: The vacation location is in another continent where the climate is currently hot and sunny!
Thanks for visiting!
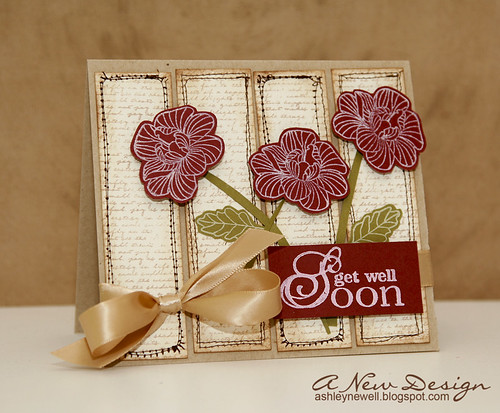
Instructions - Make 5" square card base.
- Stamp text background pattern on cream cardstock, then cut into strips, add stitching and ink.
- Adhere strips to card front with foam adhesive.
- Stamp flowers, cut out, and adhere to card front.
- Hand-cut stems and adhere, then add stamped leaves.
- Add ribbon.
- Stamp sentiment and adhere.
Supplies
Stamps :: PTI - background basics (text) + in bloom; Melissa Frances (sentiment) Ink :: PTI - vintage cream; SU! - river rock; Ranger - antique linen Paper :: PTI - scarlet jewel + vintage cream + kraft + ripe avocado Embellishments :: Michaels - ribbon

Just popping in on a Saturday! I don't usually post on weekends, but sometimes I just can't stay away! We have a fun weekend planned. I'm helping McArthur with a photography session that will pretty much last all day long. I'm going to play photographer, model, stylist, and assistant! We'll see how good of a job I do at wearing so many different hats! I'm looking forward to spending the day doing something fun and creative that is not necessarily card making. Now, don't get me wrong, I love making cards, but I've made about 12 cards in the past 24 hours, all for DT requirements, so I just need to step away for a tiny bit. I'm sure I'll be back at my usual spot on Sunday night!
Enjoy your long weekend! Thanks for your visit.
Instructions - Trim cardstock to create an A2 card base.
- Trim patterned paper to fit card front, adhere, and ink edges.
- Trim ocean tides cardstock and stamp images and sentiment.
- Adhere melon berry cardstock strip to the bottom of ocean tides cardstock.
- Tie twill tape around cardstock and secure with twine.
- Adhere focal image to card front at an angle.
- Embellish with buttons.
Supplies
Stamps :: Papertrey Ink - life, communique curves sentiments Ink :: Papertrey Ink - ocean tides; Ranger - antique linen Paper :: Papertrey Ink - bitty dots (patterned paper), ocean tides, melon berry Embellishments :: twill tape; Papertrey Ink - melon berry buttons, twine
 Hey there, Bleeps! It's Tuesday and that means only one more work day for most of us who aren't taking off! I have to make one more trip to the grocery store today to pick up the perishable items, like eggs, milk, cheese, and so forth. Yesterday I made a card using Savitri's daughter, Emma's sketch combined with Dawn's color challenge. Boy, was this a doozy! Mac said he liked it, so here it is posted! I got the chance to use a few of my new Papertrey Ink stamps and boy do I like the new background stamp! WOW! The Big & Bold sentiment stamp set is loaded with the best sentiments. I chose this one to send to a family friend. I'm going to have to make an envelobox with my Ultimate Crafter's Companion to mail this one! I love that feature! Now, my 'big' cards can fit in a mini box! It allows just enough room for dimensional elements.
Instructions - Trim white cardstock to create an A2 card base.
- On aqua mist block, stamp background pattern.
- Add pink dots to the centers of background pattern.
- Adhere aqua mist block to card front.
- Tear a strip of book text and distress, then adhere to card front.
- Add a strip of raspberry fizz cardstock.
- Adhere scallop trim and add ribbon.
- On a new aqua mist block, stamp sentiment and adhere to card front.
- Add buttons and rhinestones.
Supplies
Stamps :: Papertrey Ink - big & bold wishes, diamonds background basics Ink :: Clear Snaps - chestnut; Papertrey Ink - aqua mist; Stampin' Up! - pink marker Paper :: Papertrey Ink - white, aqua mist, raspberry fizz Embellishments :: KaiserCraft - rhinestones; Book Text; Stampin' Up! - ribbon; Cosmo Cricket - scallop trim; Papertrey Ink - buttons; Twine
Have you all checked out Laura's new food blog? As you know, I love blogging about food, so I had to try out something on Laura's blog and I did last night. It is the Taco Salad! It was a perfect dish to make the week of Thanksgiving because it's light and not too difficult. I think I'm officially a 'foodie!' So, this post marks the start of the food posts that will follow for Thanksgiving. Last year, I blogged about the place cards and menus, but this year, I plan to take it a step further. I hope you all will enjoy it!
Food Stations
My Plate "dressed up"
The original recipe may be found here. However, I usually alter a recipe a bit to fit my personal preferences. As suggested by Laura, the taco salad can be served with chicken as opposed to ground turkey. So here is what I used and how I made it! Enjoy!
Ingredients
2 chicken breasts 1 can of corn 1 can of black beans 1 can of rotel (can be used as a complete tomato/jalapeno substitute) I like HOT 2 roma tomatoes Some lettuce Some cheese Some onions 1 jalapeno/serrano pepper salt (to taste) tortilla chips
Directions - Slow cook chicken breasts in crock pot. (I choose this step so that the chicken is ready when I return home from work.)
- Add taco seasoning overtop of chicken and set crock pot on low for about 6-8 hours.
- Remove chicken from slow cooker and pull the chicken a part.
- Add chicken to the skillet, along with 'broth' from slow cooker.
- Cook the chicken until the meat absorbs the chicken.
- Chop onions, jalpeno pepper, and tomatoes and toss in a bowl.
- Add corn, black beans, and some rotel to the bowl (Hot version will spice it up) and toss.
- Season with salt (if desired).
- Chop lettuce and shred cheese.
- Set up stations and create a taco salad or traditional tacos on soft or hard-shell tortillas.
- Serve with tortilla chips.
Thanks for stopping by and enjoy yourself today!
 How is it going everyone? I hope all is well. I really do not have that much to share. I have done a little shopping. I was in Raleigh over the weekend and made a pit stop into Archiver's. I only picked up a handful of stuff, so I did not do too much damage. The only 'new' item I got was an American Crafts stamp set. I also purchased a few items for my studio to try to complete the room so I can finally show it. It basically is finished, but I would hate to show it, then add an element here or there that I would like to share, so I am going to hold out on the reveal until I feel it is complete.
Today's card is inspired by PTI's Everyday Button Bits stamp set. Although I really did not use it, I got the idea from it. I used the topiary stamp, but added an abstract flower pot and elongated the stem by placing the pot as far down as possible. I used a large new leaf button for the topiary plant. Nothing fancy, but it is like a plant to give someone under the weather or not doing so great.
Enjoy your day and thanks for visiting!
Card Instructions - Trim kraft cardstock to an A2 card.
- Stamp card front background.
- Trim raspberry fizz cardstock and mat on cream cardstock.
- Stamp topiary stem and add button.
- Stamp woodgrain background, then cut abstract pot (this was a scrap piece for me).
- Adhere to card front and tie ribbon.
- Stamp sentiment on cardstock strip then adhere to card front.
:: My Goodies {topiary get well} :: Stamps: Papertrey Ink - everyday button bits; All Night Media - woodgrain; Cornish Heritage Farm - distressed circles Ink: Stampin' Up! - white + chocolate chip Cardstock: Papertrey Ink - vintage cream + kraft + raspberry fizz Accessories: Papertrey Ink - new leaf button + ribbon + twine; foam adhesive
Card Size: 4.25" x 5.5"
 Hey Everyone! How is it going? Here is a card using patterned {paper} that I have had for a few months. It is KI Memories Elsie collection and is really fabric that is backed on self-adhesive paper. When I removed a corner, it didn't seem to have adhesive on the fabric, so not sure about that! I kept the backing on to maintain the fabric's stiffness and used foam adhesive for dimension. I also used some ribbon in my stash I rarely pull out and I was so happy to use 'old' stuff! Another oldie, but newbie to me is my Stampin' Up! Autumn Days set. I think that is a quail, but anyway, I stamped it on Bermuda Bay to make it a little different. I love all kinds of birds on my cards (owls too)!! (ETA: Correction - it's a pheasant! Thanks ladies! I knew it was something else, but couldn't recall the name of it) The ironic thing is that I am not a bird watcher or anything! I used some Kaiser rhinestones and really like this color. I hope PTI carries this blue hue soon! HINT HINT!
Thanks for stopping by and have a great Friday EVE!! Hey, I gotta look on the bright side!
Card Instructions
- Trim kraft cardstock into an A2 card.
- Dry emboss card front.
- Trim pattern paper and corner round some edges.
- Tie ribbon and add button, then adhere to card front.
- Stamp sentiment and pheasant and cut out.
- Adhere quail to card front and add rhinestones.
:: My Goodies {take care} ::
Stamps: Papertrey Ink - paper tray; Stampin' Up! = autumn days
Ink: Stampin' Up! - chocolate chip
Cardstock: Papertrey Ink - kraft; Stampin' Up! - bermuda bay Patterned Paper: KI Memories - Elsie Jack+Abby apron dot self-adhesive fabric paper
Accessories: We R Memory Keepers - corner chomper; KaiserCraft - rhinestones; Offray - ribbon; Papertrey Ink - button + twine; Provo Craft - cuttlebug + swiss dots embossing folder
Card Size: 5.5" x 4.25"

Hi there! Thanks for all of your comments on my card yesterday. Today, I am sharing a card inspired by the Loonie Stampers Challenge. I used the design and color palette in the pillow for my inspiration. I did not use to be a fan of a 'tearing tool' thinking you can tear without it. However, I have discovered now that I appreciate the 'perfect' tear and use my tearing tool much more now when I want that effect. It all depends on you. The tool is relatively inexpensive, but not something to run out to purchase.
Last night, I accomplished lots! I was able to get my watermark back! I am so afraid of CS4 that I just stopped using one, as you all may have noticed. Mac helped me create them and gave me great step-by-step tutorial on editing my photos (quickly) and applying a (watermark) brush to the photo. I breezed through lots of photos tonight and now enjoy working in CS4, especially on this huge 24" monitor. I can see every detail in the photo. So, I hope my photos will be enhanced now that I am able to edit them better.
Thanks for stopping by and have a great day.
Card Instructions - Trim ripe avocado cardstock to an A2 card.
- Trim vintage cream cardstock and stamp design.
- Adhere cream cardstock to scarlet jewel cardstock.
- Using a tearing tool, tear the right side.
- Add ribbon, button, and trinket pins.
- Punch scallop circle, stamp sentiment, and adhere under button with a glue dot.
:: My Goodies {thank you} :: Stamps: Papertrey Ink - with sympathy + mega mixed messages Ink: Papertrey Ink - scarlet jewel + ripe avocado + summer sunrise Cardstock: Papertrey Ink - vintage cream + ripe avocado + scarlet jewel + summer sunrise Accessories: Papertrey Ink - scarlet jewel button + ripe avocado ribbon + twine; May Road - leaf trinket pins; Marvy Uchida - scallop circle punch; Creative Memories - tearing tool
Card Size: 4.25" x 5.5"

Hey Everyone! Today is the BIG DAY! Well not really, but I'll be heading down to Orlando this evening! I've started packing, but needed to post a few things on the blog before I called it a night! Tomorrow, there will be special posting, so be sure to check for it!
While I'm at CHA Super Show, follow my tweets HERE, which are automatically feeded to my Facebook status, so if you are my friend on Facebook you can read them there as well. I am going to make every effort to provide detailed tweets and maybe even twitpics depending on whether I am 'allowed' to photograph! I am taking a camera that has video capability, so I may be able to upload a YouTube video on Friday or Saturday night. If I don't, there still may be a chance for an upload on Sunday upon my return.
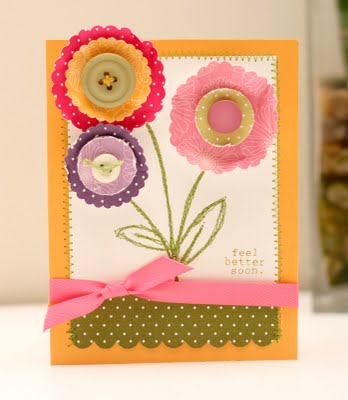
For today's card, I focused on my sewing machine to create a stitched flower. I wanted dimension, color, and pattern, so I created large flowers instead of using pre-made ones. From the photo, it looks like a sketched stem and leaves, but it is stitched repeatedly. I freehand drew the leaves and stems lightly with a pencil, then started stitching. After I finished, I erased any remaining pencil marks (which was not very many). I used a get well sentiment since it was like a bouquet of flowers. I PTI's On My Couch stamp set and separated the 'feel better soon.' sentiment by inking each word separately to create a different layout than in the stamp set.
I think that's all I wanted to say! Sometimes, I have more to say, then I forget. Here's a tip that I've been meaning to tell you all, when using baby wipes to clean your stamps, don't throw it away after using it if it's still kind of clean and damp. If you have a baby wipe storage container, then put the used wipe back in there to retain the dampness. So, the next time, you won't have to use a brand new one! I hope I am not the only one who kept using a new one after leaving it out on my workspace for 20 minutes! This is a great way to save on those wipes!
Sewing Tip: I'm not the first at this one I know! But, it occurred to me that when I was switching threads a few weeks ago, that I did not need to switch the bobbin thread, unless I cared how it appeared on the reverse side. So, I usually have a few white bobbins and keep it loaded, making it so that I only have to switch the needle thread during projects!! I was so excited when I got that AAAAHAAAA moment (which I'm sure others have already had)! But, just in case you have not, I thought to share with you all!
Thanks so much for stopping by! I'm so grateful for each of you who read my postings. Enjoy your day and catch me on Twitter!
Card Instructions - Trim summer sunrise cardstock to an A2 card.
- Trim white cardstock and draw stem and leaves in pencil.
- Using sewing machine, stitch stem and leaves repeatedly.
- Adhere white cardstock to card front and stitch around edges.
- Trim green polka dot patterned paper, then scallope edge punch, and adhere to the bottom of white cardstock.
- Punch circles and scallop circles from various patterned papers and adhere to card front to create flowers.
- Add buttons.
- Tie ribbon (cut a slit on the scored fold side).
- Stamp sentiment (inking each word separately to create layout).
:: My Goodies {feel better soon} :: Stamps: Papertrey Ink - on my couch Ink: Papertrey Ink - ripe avocado Cardstock: Papertrey Ink - white + summer sunrise Patterned Paper: Papertrey Ink - in bloom + friends til the end + bitty dots Accessories: Papertery Ink - hibiscus burst twill tape ribbon + button; Craft Supply - thread + buttons; Scallop Circle Punch; Creative Memories - circle punch; Janome Sew Mini; Stampin' Up! - scallop edge punch Card Size: 4.25" x 5.5"
 Before Before
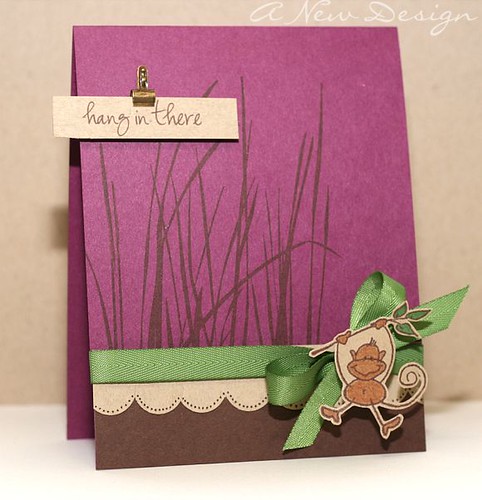
 After AfterHey there! Aren't you glad it's the weekend? I know I am! Today, I'm participating in Lisa's Scribble This challenge. It involves sharpening your image. I was able to sharpen my image slightly, so I am pleased with the outcome. This was a super easy tutorial to follow. Thanks, Lisa! Don't forget about the Paper Crafts Card Creations 7 Blog Tour. You have until midnight Sunday (MST) to enter the contest! Also, check out my card at Jen del Muro's blog for a Sketch for You to Try! It is my last card as this month's guest designer. Boy, did June FLY BY! I had lots of fun participating and so happy Jen asked me to be the guest designer!! Go check out her card and the design team's cards too! Thanks for stopping by! Today, I'm off to do a tid bit of craft shopping at the Great American Scrapbook Convention in Chantilly, VA at the Dulles Expo. We're also planning to pick up something special! Follow my tweets to find out what! Card Instructions- Trim rich razzleberry cardstock into an A2 card.
- Stamped grass on card front.
- Trim dark chocolate cardstock and adhere to card front.
- Trim kraft cardstock and scallop edge punch with slot punch.
- Draw dotted lines around scalloped edge and adhere to card front.
- Tie ribbon into a bow.
- On kraft cardstock, stamp monkey, color, cut out, then adhere to ribbon bow.
- Using a word processer, type sentiment, print, cut out, then adhere to card front.
- Add mini library clip.
:: My Goodies {Hang in There} ::Stamps: Stampin' Up! - inspired by nature; Stampendous - monkey Ink: Stampin' Up! - creamy caramel + chocolate chip (marker); ColorBox - chestnut; Copic - nike green (marker) Cardstock: Papertrey Ink - dark chocolate + kraft; Stampin' Up! - rich razzleberry Accessories: Papertrey Ink - new leaf ribbon; Stampin' Up! - slot punch + mini library clip; foam adhesive Card Size: 4.25" x 5.5"
 TGIF! Here's a fast card for you. If you have ever made a 5.5"square card, then you will have a piece of paper this size leftover. Don't waste it...make it a card. It measures about 3" x 5.5" and fits in an A2 envelope. It may not fill the envelope, but it fits in there! Have you all read Paper Crafts magazine new issue for July/August? It's full of great ideas. You have to read the section on how to make cards in $5 and use what you have to make cards. Although we love to buy new supplies, given this day and time, that is not always possible. The great thing about this issue is that it encourages you to continue to create with what you already have or purchase limited supplies for $5 and create something from that. I plan to do a post in the near future featuring limited supplies that I already have in my stash. Oh yeah, in the magazine, there is an advertisement for Card Creations 7 and one of my cards is highlighted in the ad!!! How cool is that?! I recognized my card and wondered how they got it until I remembered it will be published there! HA Can you guess which card is mine? Go check it out! Thanks for visiting me today. I hope you enjoy your weekend! Card Instructions- Make an 3" x5.5" card with dark chocolate cardstock.
- Trim patterned paper to fit the center.
- Stamp floral spray.
- Punch scallop edge on lemon tart cardstock, then adhere to patterned paper.
- Tie ribbon into a bow and adhere to card front.
- Stamp sentiment and add to card front.
:: My Goodies {Wishing You Well}:: Stamps: Papertrey Ink - everyday classics + with sympathy
Ink: Stampin' Up!-chocolate chip Cardstocks: Papertrey Ink - lemon tart + dark chocolate Patterned Paper: Papertrey Ink - bitty dot basics Accessories: Papertrey Ink - lemon tart ribbon; Stampin' Up! - scallop edge punch
 Finally, I made my way back into the studio. I was ready, but sluggish. My studio is a mess and I think that is probably a big part of the problem. I wish I could be Jeannie from I Dream of Jeannie and wiggle my noise, then voila, a clean studio! Another SCS Product Focus Review was revealed yesterday. Did you get your Weekly Inkling or check SCS web site? If not, I have linked the Stamp !t Kit Review on the left sidebar. Take a peek so you can find out whether you want a kit to make your own stamps!! Have a great Thursday and thanks for stopping by. Card Instructions- Make an A2 card with berry sorbet cardstock.
- Trim core'dinations cardstock into a rectangle, emboss, sand, and tear it.
- Tie ribbon around brown cardstock and adhere it to card front.
- Stamp flower on berry sorbet and brown cardstock, cut out, wrinkle, and adhere to card front.
- Stamp sentiment.
:: My Goodies {Wishing You Well}:: Stamps: Papertrey Ink - everyday classics; Lizzie Anne Designs - le jardin
Ink: Stampin' Up!-chocolate chip Cardstocks: Papertrey Ink - berry sorbet; Core'dinations - Chocolate Box (dewberry) Accessories: Papertrey Ink- berry sorbet ribbon; Provo Craft - cuttlebug + swiss dots embossing folder; Stampin' Up! - sanding block
 Hey Everyone! How is your weekend going? Notice I said "going" because there are a few hours left! :) Today, I got a chance to spend some time in the studio making a few cards and filmed my video. I still need to edit it, so don't hold your breath! This card is inspired by Loonie Stamper's Challenge for the week. I needed a get well card and thought the colors were filled a perfect soothing void. Thanks so much for stopping by! I'll 'see' you all in the morning with another card! Card Instructions- Trimmed ocean tides cardstock to 4.25" x 5.5".
- Trimmed spring moss cardstock to 2.75" x 4.5", then stamped floral background.
- Added pom pom trim and ribbon.
- Stamped sentiment on white cardstock, cut out, added bling, and adhered to floral background.
- Adhere green cardstock to card front using dimensionals.
:: My Goodies {feel better soon}:: Stamps: Papertrey Ink-beautiful blooms; Close to My Heart-say it in style
Ink: Stampin' Up-white; Papertrey Ink-ocean tides Cardstocks: Papertrey Ink-white pre-scored A2 card + ocean tides + spring moss Accessories: Papertrey Ink-ocean tides ribbon; Joanns-pom pom trim; Hero Arts-rhinestones
 Hey there! How's your Saturday? I've been stuck in the studio making last minute cards that I forgot I had to make...whoops! I'm just now finishing up and thought I'd share a card I made last weekend. It's a simple get well card using Papertrey's new With Sympathy stamp set. I'm off to get ready for some food and movies to celebrate my mom's birthday with her. I'll share the card I made for her on Monday! It uses this week's Loonie colors!! Have a great weekend! Thanks so much for stopping by. I really appreciate everyone and their special comments they leave for me!! Instructions- Make card base by trimming cardstock to 4.25" x 11" then score at 5.5"
- Die cut label and dry emboss.
- Stamp image on label die.
- Stamp sentiment.
- Punch butterflies and add stickles, then adhere to label die.
- Tie two ribbons around card base into a bow.
- Adhere label die to card front using dimensionals.
:: My Goodies {get well soon} :: Stamps: Papertrey Ink-With Sympathy + Garden of Life Ink: Close to My Heart-Bamboo, Desert Sand Cardstocks: Papertrey Ink-vanilla, kraft Accessories: Spellbinders-label 1 nestabilities, cuttlebug; Paper Studio-rhinestones; Martha Stewart-butterfly punch; Papertrey Ink-ocean tide topnotch twill ribbon; Ranger-cinnamon stickles Card Size: 4-1/4 x 5-1/2
 Anyone watch American Idol last night? I think they're showing too many bad acts. I'd like to enjoy some serious auditions. After a while, the bad acts just frustrate me because people aren't taking it seriously. I think it's because they're not finding as much talent as they usually do. Anyway, I made a few cards while tuning in. Here is a card that could be a get well card or an encouragement card. I read the sentiment either way. I used ColorBox chestnut ink and LOVE it! The coverage is amazing! I usually use the chalks to distress the edges, but recently purchased a mini ink to try it out. It has such a rich color. You have to let it dry because it can smudge easily. It's very similar to Stampin' Up's Craft inks. Stay warm (if you live in a cold area)! Instructions - Trim ocean tide cardstock to 4.25" x 11" then score at 5.5" and set aside.
- Trim cream cardstock to about 4" x 5.25"
- Stamp grass background.
- Stamp bird and cut out and add greenish pearls.
- Die cut and emboss scalloped oval and regular oval.
- Stamp sentiment on cream oval and add greenish pearls.
- Adhere the oval to the scalloped oval using dimensionals.
- Tie ribbon around cream cardstock.
- Adhere oval to cream cardstock.
- Adhere bird to cream cardstock.
- Adhere cream cardstock to card base.
:: My Goodies {Wishing You Well}::
Stamps: Stampin' Up!- Inspired by Nature; Verve Visual-Well Wishes, Anniversary Birds
Ink: Colorbox-Chestnut
Cardstock: Papertrey Ink-vintage cream, ocean tide
Accessories: dimensionals; Queen&Co-green pearls; Recollections green pre-scored card; spellbinders-oval + scalloped oval nestabilities; cuttlebug; brown satin ribbon (Michaels)
Card Size: 4.25 x 5.5
      It's the day after Christmas and time for some shopping. The LSS in Greensboro is having a sale and I'm also going to check out a new store and crop with a new scrapbooking friend! Today, I'm sharing my gift to most this year. It included a gift box (from Archiver's) and 5 cards with various sentiments and vanilla envelopes (all from Archiver's). I used Papertrey Ink's Ripe Avocado cardstock and embossed it with Swiss Dots Cuttlebug embossing folder, then corner-rounded the edges. Papertrey Ink's Piece of Cake stamp set has a curly label stamp that I used and cut out to include the sentiments. The sentiments were from various stamp sets by Papertrey Ink, Close to My Heart, and Verve Visual. I wrapped brown ribbon around the green cardstock and popped the curly label off of the center. These sets were a big hit this Christmas! Oh yeah, that nice green ribbon on the outer box is by Paper Source, but Archiver's now carries it too! :: My Goodies {Greeting Cards}::Stamps: Papertrey Ink-Piece of Cake (curly label); Sentiments by Papertrey Ink, Verve Visual, Cloe to My Heart
Ink: SU!-Chocolate Chip
Cardstock: Papertrey Ink-ripe avocado, dark chocolate, vanilla
Accessories: swiss dots embossing folder; cuttlebug; dimensionals; corner rounder; SU!-chocolate chip ribbon; Paper Source-green satin ribbon; Creative Memories-tag punch; A7 pre-scored cards + card box by Archiver's
Card Size: 4.25 x 5.5
 Busy, busy, busy is how I feel this time of the year. From making holiday cards for others, not to mention our own cards, plus any additional gifts, and holiday shopping. How do I fit it in? I'm trying to finish my card orders this week, so next week I can work on mine. We'll see how this goes because I want to add some non-holiday items to my blog, but somehow, I see that not happening! Bare with me because I feel it may get a little hectic around here! In spite of, it's a great feeling and the holidays are very special, so I'm grateful to work hard for it. Oh, I wanted to share one place with you that I've discovered. It's called Peachy Cheap and boy how it just may be addicting. They feature an item(s) of the day (scrapbook-related) that can be up to 99% off retail price and it is only available for that day. You cannot purchase it later and I've seen that they have sold out before noon on some occasions. I've already placed an order for some holiday felt embellishments that I could not resist (when it's almost over-tell me about it). I hope you don't get addicted, but I think it's hard not to at least check once a day! To create this card: - Trim cardstock to 11" x 4.25", then score at 5.5".
- Trim pattern paper to about 2.5" x 4.25".
- Stamp flowers on card base.
- Stamp sentiment on card base.
- Adhere pattern paper to bottom portion of card base.
- Tie ribbon in a knot around card base.
- Add liquid pearls to flowers.
:: My Goodies {get well soon}::
Stamps: PTI-Garden of Life (sentiment); Remember (flowers)
Ink: Vintage Cream
Paper: Cardstocks: PTI-Berry Sorbet, Pattern Paper: My Mind's Eye-Darling Dots
Accessories: liquid pearls; vintage cream grosgrain ribbon
Technique: Stamped
Card Size: 4.25 x 5.5
 Did anyone have to retake their picture in school? Well, I did in the 7th grade and the retake was bad! Well, this picture needs to be retaken! I did not feel like going downstairs to the photo center, so I just took it in my MESSY, NASTY studio. I know you can see where I stamped-off, but it's the weekend, so I'll let it slide and I hope you do too! This card is for Loonie Stamper's Challenge using Beate's Weekend Sketch Challenge. I kind of cheated on both. For the Loonie Challenge, I did not use a yellow/orange. I could have squeezed it in there somehow, but it just didn't 'go.' For Beate's Challenge, I did not place a strip across the square, but I did put a partial strip as the sentiment, so I thought that was enough! I'm going to try to remember to take another picture and post it later, because I keep looking at it and it's dark and you really can't see the card well. I'm not listing directions on how I created this card right now, but if you want to know, please just ask! I hope everyone has a great weekend! :: My Goodies ::
Stamp: SU! Say it With Scallops; VV - Wishes
Ink: Brown
Cardstock: PTI-Spring Moss; PTI-Olive; Brown; Vellum
Accessories: dimensionals; white grosgrain ribbon; sewing machine, thread, Making Memories flower brads, dew dots
Technique: Stamped
Card Size: 4.25 x 5.5
 It's Wednesday, and time for my submission for Beate's Inspiration Challenge. I was severely stumped when I saw the inspiration for the week! I had no idea what to do! I am not too keen of abstract art, so this canvas was truly a challenge. However, it did include some natural elements that I really like, such as colors, trees, and flowers. So, yesterday, I jotted down some ideas of stamps to use and went from there. Later, I stamped the tree image but once that part was complete was not inspired to complete the abstract look. So, I made it go "my" way! I felt that this canvas was kind of solemn, so I made my card feel "comfort." Here is what I came up with! 
:: My Goodies ::Stamps: Verve Visual-Wonderful Wishes (sentiment); Papertrey Ink-Out on a Limb (tree); Stampin' Up-Artfully Asian (flower stem) Ink: PTI-Plum Pudding, Berry Sorbet, Sweet Blush; SU!-Chocolate Chip, White Paper: Cardstocks: PTI-White, Kraft, Sweet Blush; SU!-Chocolate Chip Accessories: PTI-sweet blush grosgrain ribbon; dimensionals Technique: Stamped
Card Size: 4-1/4 x 5-1/2
 The weekend is over already. How quickly it passes. Today, I decided to share a few cards I made a couple of weeks ago. I really like Bazzill Basics Navel cardstock. The color is so true to fall.
:: My Goodies ::Stamps: October Afternoon-Night Owl; Savvy Stamps-Thank You Ink: SU!-Chocolate Chip Paper: Cardstocks: Bazzill Navel; PTI-White; Pattern Paper: PTI-Father Knows Best Accessories: dimensionals; AC felt flowers; dew dots; PTI-top notch twill ribbon Technique: Stamped
Card Size: 4-1/4 x 5-1/2  I really like Indian styles, colors and designs. I've always wanted a room full of pillows and saris, but never have decorated one like it yet. So for now, this card will have to suffice.
:: My Goodies ::Stamps: My Sentiments Exactly; PaperSource Ink: SU!-Chocolate Chip Paper: Cardstocks: Bazzill Navel; Chocolate Chip Accessories: dimensionals; rhinestones; markers Technique: Stamped
Card Size: 4-1/4 x 5-1/2 Have a great day and do something crafty!
 Created with all scraps, this card is sure to make the sick feel better. I actually water colored the monkey and leaves! I'm proud of my newly discovered technique, although it's not my design style. I found scraps sitting around my newly organized studio and picked them up and started designing. Don't forget to sign up for the holiday blog candy...today is the last day! Happy Thursday! :: My Goodies ::Stamps: Stampendous - (monkey), (sentiment) Ink: SU! Chocolate Chip Paper: Cardstocks: SU! Chocolate Chip; PTI-Spring Moss; Pattern Paper: Quick Quotes Sweet Inspiration Accessories: PTI topnotch twill chocolate ribbon; dimensionals; Tim Holtz distresser Technique: Stamped
Card Size: 4-1/4 x 5-1/2
|
|


