|
|
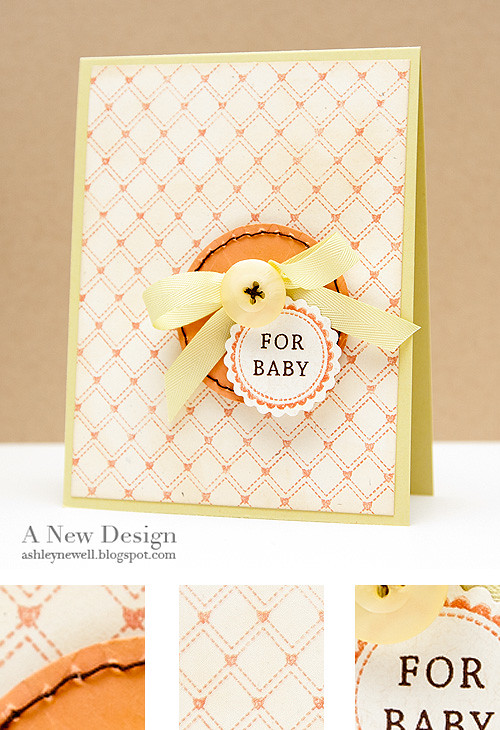
 Hi there! Happy Friday to you! Today, Embellish Magazine has a new challenge that started, centered around babies. So, head on over to the blog to see what the design team created, then get started on the challenge. This challenge is sponsored by Wplus9 Design Studio with a great prize. Instructions- Trim cream cardstock to about 4" x 5.25", then stamp background pattern.
- Add distress ink to stamped background, then adhere to spring moss A2 card base.
- Die cut circle, then hand stitch border.
- Stamp circle border and sentiment, then die cut scalloped circle.
- Pop scalloped circle off melon berry circle die cut.
- Pop circle treatment off card front.
- Add ribbon treatment with button.
SuppliesStamps :: Kisses & Cuddles, Design Basics (backgrounds 1) Ink :: PTI - melon berry; SU! - chocolate chip; Ranger - antique linen Cardstock :: PTI - rustic cream, spring moss, melon berry Embellishments :: PTI - spring moss twill tape, lemon tart button Tools :: Spellbinders - standard circles small nestability (S4- 116), classic scalloped circle small nestability (S4-125), wizard; thread + needle Thanks for your visit! Have a great weekend!
  Hey there! I just wanted to pop in and share the new Embellish Magazine Color Challenge. This time, you have to use stitching and the soft colors shown above. The challenge is sponsored by Your Next Stamp, who sells great rubber stamps. You have to stop on over and check it out. In my card, I chose to hand stitch twine around the border of aqua mist cardstock. This idea is from by sweet blog friend, Amy Sheffer. Her designs are amazing and when I saw her stitching with twine, I had to try this out! I finally did and love the texture it adds to projects. I also made my 'cocktail' into a frozen one by adding some glitter! These colors work great for the spring season and even Easter, so I hope you get the chance to stop by, check out the entries and DT projects and of course time to make your own. I hope to post a shabby inspired card later...that is if I get to making one today! Thanks so much for your visit! I hope you're enjoying your weekend. Instructions(1) Trim kraft cardstock into a 4.25" square card base. (2) Trim aqua mist cardstock into a 4" square and hand stitch border. (3) Stamp drink; once on aqua mist cardstock, another on white cardstock. (4) Color umbrella stamped on white cardstock, cut out, then pop off aqua mist cardstock image. (5) Color 'cherry' and add glitter. (6) Stamp sentiment. (7) Add ribbon treatment. (8) Adhere aqua mist cardstock to card front with foam adhesive. SuppliesStamps :: Your Next Stamp - cheersInk :: SU! - black; Copic markers Cardstock :: PTI - aqua mist, kraft, white Embellishments :: PTI - sweet blush satin ribbon, twine Tools :: needle, paper piercer

Hey Bleeps! It's Friday and time for another Embellish Color Challenge! This challenge is sponsored by May Arts! That means we get to use ribbon! Oh how I love to embellish my projects with ribbon! The colors are super fun and include, turquoise, brown, and pink. Go on over and take a peek! Up for grabs, is an assortment of great May Arts ribbon. Have fun playing along with the challenge.
Thanks for stopping by and have a great weekend!
Instructions - Make A2 card from brown cardstock.
- Trim white paper strip, stamp floral background, and embellish with brown marker.
- Tie ribbon into a bow around white strip, then adhere to card front.
- Add turquoise strip to the bottom of card front.
- Adhere pearl flourish.
- Stamp sentiment and adhere with foam adhesive.
- Punch butterfly and adhere.
- Round upper right corner of card.
Supplies
Stamps :: PTI - background basics (petal power), signature greetings Ink :: SEI - turquoise; SU! - brown marker; Clear Snap - chestnut Paper :: PTI - dark chocolate, white; Bazzill - turquoise Tools :: Martha Stewart- butterfly punch; We R Memory Keepers - corner chomper
 Happy New Year! Embellish Magazine has some great news to share, so hop on over! Here is my card I made using The Cutting Cafe's printable stamps. Have you ever used digital images before to make any projects? Well, it's super easy and extremely versatile to use. Embellish has a new color challenge that you can participate in too! It features a heart theme and of course these Valentine's colors! The other news includes a new design team and a chance to win prizes, so check it out!
I'll be back later to share lots of more cards I've been busy making for Caardvarks new challenge!
Thanks for stopping by and Happy New Year!
Instructions - Trim black cardstock into an A2 card base.
- Using an editing software program, arrange frames and words, then print. I added color to the hearts and printed that image twice to cut some hearts and pop them off the card front.
- Trim around frame on white cardstock, add ribbon.
- Cut hearts and pop them off and set aside.
- Trim other frame and adhere to card front.
- Adhere other frame image on top with foam adhesive.
Supplies
Paper :: Papertrey Ink - true black, sweet blush, white Embellishments :: Papertrey Ink - pure poppy ribbon Tools :: Photoshop - CS4; Epson - 1400 printer
 Hey there, Bleeps! It's Tuesday and that means only one more work day for most of us who aren't taking off! I have to make one more trip to the grocery store today to pick up the perishable items, like eggs, milk, cheese, and so forth. Yesterday I made a card using Savitri's daughter, Emma's sketch combined with Dawn's color challenge. Boy, was this a doozy! Mac said he liked it, so here it is posted! I got the chance to use a few of my new Papertrey Ink stamps and boy do I like the new background stamp! WOW! The Big & Bold sentiment stamp set is loaded with the best sentiments. I chose this one to send to a family friend. I'm going to have to make an envelobox with my Ultimate Crafter's Companion to mail this one! I love that feature! Now, my 'big' cards can fit in a mini box! It allows just enough room for dimensional elements.
Instructions - Trim white cardstock to create an A2 card base.
- On aqua mist block, stamp background pattern.
- Add pink dots to the centers of background pattern.
- Adhere aqua mist block to card front.
- Tear a strip of book text and distress, then adhere to card front.
- Add a strip of raspberry fizz cardstock.
- Adhere scallop trim and add ribbon.
- On a new aqua mist block, stamp sentiment and adhere to card front.
- Add buttons and rhinestones.
Supplies
Stamps :: Papertrey Ink - big & bold wishes, diamonds background basics Ink :: Clear Snaps - chestnut; Papertrey Ink - aqua mist; Stampin' Up! - pink marker Paper :: Papertrey Ink - white, aqua mist, raspberry fizz Embellishments :: KaiserCraft - rhinestones; Book Text; Stampin' Up! - ribbon; Cosmo Cricket - scallop trim; Papertrey Ink - buttons; Twine
Have you all checked out Laura's new food blog? As you know, I love blogging about food, so I had to try out something on Laura's blog and I did last night. It is the Taco Salad! It was a perfect dish to make the week of Thanksgiving because it's light and not too difficult. I think I'm officially a 'foodie!' So, this post marks the start of the food posts that will follow for Thanksgiving. Last year, I blogged about the place cards and menus, but this year, I plan to take it a step further. I hope you all will enjoy it!
Food Stations
My Plate "dressed up"
The original recipe may be found here. However, I usually alter a recipe a bit to fit my personal preferences. As suggested by Laura, the taco salad can be served with chicken as opposed to ground turkey. So here is what I used and how I made it! Enjoy!
Ingredients
2 chicken breasts 1 can of corn 1 can of black beans 1 can of rotel (can be used as a complete tomato/jalapeno substitute) I like HOT 2 roma tomatoes Some lettuce Some cheese Some onions 1 jalapeno/serrano pepper salt (to taste) tortilla chips
Directions - Slow cook chicken breasts in crock pot. (I choose this step so that the chicken is ready when I return home from work.)
- Add taco seasoning overtop of chicken and set crock pot on low for about 6-8 hours.
- Remove chicken from slow cooker and pull the chicken a part.
- Add chicken to the skillet, along with 'broth' from slow cooker.
- Cook the chicken until the meat absorbs the chicken.
- Chop onions, jalpeno pepper, and tomatoes and toss in a bowl.
- Add corn, black beans, and some rotel to the bowl (Hot version will spice it up) and toss.
- Season with salt (if desired).
- Chop lettuce and shred cheese.
- Set up stations and create a taco salad or traditional tacos on soft or hard-shell tortillas.
- Serve with tortilla chips.
Thanks for stopping by and enjoy yourself today!

Hey Bleeps! Happy Saturday to you! It finally stopped raining here so I guess I can come out of shelter and get some things done. Tomorrow I'm taking Donna Downey's new fabric scrapbooking class at my LSS and I need MAD SUPPLIES! So, here is a quickie post inspired by Dawn McVey's Raspberry Suite Color Challenge! These colors are so great together and are perfect holiday colors (in my opinion at least)! I made a mini card with a leftover card base. I've been dying to try out Claire's new stamp set to create a plaid design. Well, I chickened out and only did a partial plaid featuring one color!
Have a great weekend everyone and I appreciate your visit!
Instructions - Trim cardstock to 3" x 11", then score at 5.5".
- Trim kraft cardstock strip.
- Stamp background on new leaf cardstock strip, then mat on kraft cardstock.
- Tie ribbon into a bow around strip, then adhere to card front.
- Punch circle from raspberry fizz cardstock.
- Stamp circle border and sentiment on circle punch.
- Die cut scallop circle, then adhere circle die on top with foam adhesive.
- Adhere scalloped circle focal point to card center using LOTS of foam adhesive. (I doubled it up here.)
- Add button with twine.
Supplies - Stamps :: Papertrey Ink - take note, signature christmas; Waltzingmouse - off beat backgrounds
- Ink :: Clear Snaps - colorbox chestnut
- Paper :: Papertrey Ink - rustic cream, new leaf, kraft, raspberry fizz, dark chocolate
- Embellishments :: Papertrey Ink - raspberry fizz ribbon, new leaf button; jewelry twine cord
- Tools :: Spellbinders - scallop circle nestabilities; McGill Craftivity - 2-1/8" circle punch; Provo Craft - cuttlebug
 Hi Everyone! Yesterday, we got the opportunity to visit the White House! These tickets are not easy to come by, so it was a real treat. We got to see the rooms open to the public, which are limited, but still treasured. Some rooms include the red, blue, green and yellow rooms, China room, and the room they entertain in! The house is so amazing and has so much detail in the trims and decor. No photos were allowed and I kept my cell phone off, so I do not have any pictures to share, just memories! If you ever plan a visit to Washington DC, try to plan ahead and get tickets to tour the White House.
Onto today's card...it is inspired by Scrapmaster's Paradise color challenge. I cheated and used cream as a base, but I already had the card started (which was ditched in another project), so I chose to salvage it for this color challenge. I used some AC Zing embossing powder and it's great. I love that color and the rest of the colors they have available. Yesterday, Peachy Cheap had a set of AC embossing powders on sale for under $9. I jumped on that deal!!
Thanks for stopping by and have a happy HUMP DAY!
Card Instructions - Trim cream cardstock to an A2 card.
- Stamp retro background pattern on bottom half of card.
- Color in dots using markers.
- Tie ribbon in a bow.
- Stamp flower, emboss, and cut out, then adhere to bow and add rhinestone.
- Stamp sentiment on card front.
:: My Goodies {thinking of you today} ::Stamps: Papertrey Ink - retro background basics + everyday classics Ink: Stampin' Up! markers - bermuda bay + melon mambo + only orange; Papertrey Ink - hibiscus burst; Versamark Cardstock: Papertrey Ink - cream Accessories: Michaels - ribbon; American Crafts - embossing powder; heat gun; Papertrey Ink - orange rhinestone
Card Size: 5.5" x 4.25"
 Edited to Add: My photo was terrible and you couldn't see the spring moss, so I took another photo and it's a lot better! My settings were a bit off, so I adjusted my shutter speed and aperture to get a better photo. I hope this is better, ladies!!
Hey there! How was your weekend? I relaxed most of the weekend. That scrapbook I was supposed to start, well didn't quite get started! I did take the packaging off the album! We talked and printed pictures instead of scrapped! I think that is why I cannot go to crops because I spend too much time talking and looking than actually creating!
The color palette on today's card is inspired by Dawn's color challenge. I used some new (to me) Gina K. Designs stamps! Love those flowers because they remind me of those weeds you can pull then blow to make a wish. Did anyone else do that as a child? I added a ribbon charm that I have been hoarding in my stash for quite some time. I thought it would go good with the glitter that I added to the flowers. Can you see it? Well, it's there and sparkly in person. The spring moss ink is so light, you can barely see it in the photo, but again, it's there! I need to exchange my ink pads out for the new pigment inks soon!
Well, thanks for visiting today and enjoy your Monday (as much as you can)!
Card Instructions - Trim spring moss cardstock to an A2 card.
- Trim cream cardstock and stamp flowers and sentiment.
- Mat cream cardstock on hibiscus burst cardstock.
- Tie ribbon around cardstock and add ribbon charm.
- Using foam adhesive, pop cardstock off card front.
- Add a little glue, then sprinkle glitter on flowers.
:: My Goodies {wishing you success} ::Stamps: Gina K - many wishes Ink: Papertrey Ink - hibiscus burst + spring moss + melon berry Cardstock: Papertrey Ink - cream + spring moss + hibiscus burst Accessories: Papertrey Ink - stamp and stick glitter + hibiscus burst ribbon; Craft Supply - rhinestone buckle (Hobby Lobby)
Card Size: 4.25" x 5.5"
 Hi there! Last night, we went to Cheesecake Factory. Needless to say, I have lunch and dessert for today! :) They serve so much food. I also went to bed really early as opposed to my usual nap, then up until 3 am routine. I hope that habit is gone now! Anyway, before dinner, I got a chance to make this quick card. My friend, Sarah, told me about the Scrapmaster's Paradise color challenges. I love color challenges, so I was eager to give it a try. I dug out one of my CHF Scrapblock background stamps! This time it's a distressed grid. I think I may like this one better than the distressed polka dots! I used my SU! marker to apply the ink since I did not have soft suede ink pad. It worked fine on that huge rubber stamp, but came out a little darker than I thought. I thought soft suede would be obviously lighter than chocolate chip, but maybe not! Thanks for stopping by and enjoy your Friday Eve! :)
Card Instructions - Trim soft suede cardstock to an A2 card.
- Stamp background (using marker as ink).
- Stamp flowers and sentiment and heat emboss.
- Stamp froggy, cut out, and adhere.
- Add rhinestones.
- Corner round edges.
:: My Goodies {just because} ::Stamps: Cornish Heritage Farms - distressed grid; Colorbok - friendly forest; American Crafts - sentiments Ink: Versamark; ColorBox - moss green Cardstock: Stampin' Up! - soft suede Accessories: Hero Arts - rhinestones; corner chomper; white embossing powder; heat gun; Stampin' Up! - soft suede marker
Card Size: 4.25" x 5.5"
 How's it going? I'm getting all excited about sunny Orlando! So, in response to Dawn's color challenge, I made this quick card. One thing I did by accident (which I've done before), but actually works well with this set was stamped on the 'wrong' side of the rug stamp. It stamps a solid rug image as opposed to the decorative one in the set! That's kind of neat huh!? I used a rectangle nestability to create the frame (and it got a little of shape on that one part UGH)!
Thanks so much to each of you who read my blog. I truly appreciate it and am in awe by the support I receive. THANK YOU! So, I sat on my couch (literally) last night thinking about each of you and how I never thought I would 'meet' so many people online!
Have a great day!
Card Instructions - Trim spring moss cardstock to an A2 card.
- Stamp couch on white cardstock then cut out.
- Stamp sentiment on card front.
- Stamp rug on card front (on 'wrong' side of stamp).
- Using a rectangle nestability (adhered to the card with removable adhesive) trace around it to create a frame.
- Adhere couch to card front with foam adhesive.
- Stamp pillows, cut out, then adhere to couch. Add rhinestone.
:: My Goodies {thinkin' of you} :: Stamps: Papertrey Ink - on my couch (+additions) Ink: Papertrey Ink - berry sorbet + pure poppy + spring moss Cardstock: Papertrey Ink - spring moss + white Accessories: Spellbinders - rectangle nestability; Stampin' Up - marker; KaiserCraft - red rhinestone Card Size: 5.5" x 4.25"

Hey there! Here's a fun card for you. It's inspired by Dawn's color challenge. I added some glitz and glam to the card by using glitter. How did I get those glitter polka dots? I stamped polka dot pattern, then added glue dots over the pattern. Next, adhere the glitter to the dots.
Enjoy your day and thanks for stopping by!
Card Instructions
- Trim raspberry fizz cardstock into an A2 card.
- Trim vintage cream cardstock, add glue dots to make polka dot pattern, the adhere glitter to the dots.
- Trim raspberry fizz cardstock and stamp background. Adhere to card front.
- Stitch around cardstock and add buttons.
- Add ribbon and button.
- Stamp sentiment on cardstocks and add under button as a tag.
:: My Goodies {Happy Birthday to You} ::
Stamps: Papertrey Ink - garden of life
Ink: ColorBox - chianti
Cardstock: Papertrey Ink - vintage cream + raspberry fizz + spring moss Accessories: Papertrey Ink - spring moss ribbon; Craft Supply - buttons + thread + glitter; Janome Sew Mini;
Card Size: 4.25" x 5.5"
 TGIF! It's time for a Fast Friday card! This card's colors were inspired by K. Werner's color challenge. I have not used my Cricut in a while and I was determined to use it. I decided to use my brand new Home Accents cartridge. Although it's really not brand new, I have yet to use it until I made this card. Now, I feel better!
It's a super simple card and once the die cuts are made, the card pretty much falls into place.
Today, we also find out the Top 10 Gallery Idol finalists. Can you feel the butterflies in my stomach? I can't wait until later this morning until the finalists are revealed! These past few weeks have been so exciting for me. I really am enjoying creating a card each week for the contest, but really viewing all the cards on Monday mornings to see how each finalist interprets the theme. It's really amazing to see people's styles shine through a card.
What's in store for your weekend? Mine is blank! By that, I mean we have nothing planned. We went a few weekends with photography sessions back-to-back, so I'm happy not to do anything. I'll be watching Mac process all those photos! Then, I'll make a photo album for the happy couple! :) Can't wait to select the top pictures and show you all too! Of course, I'll get crafty here and there too. Next week is another Girl's Night Out event! I'll be there along with many other vendors selling handmade jewelry, handbags, clothes, and body creams. There will also be pampering services such as make-up, massages, manis + pedis, and eyelashes. Lots to do for a lady on a Friday evening! Come join us in on the fun at Washington DC's National Harbor. Here are the details:  Thanks for stopping by and enjoy your weekend!
Card Instructions
- Trim white cardstock into an A2 card.
- Trim blue cardstock and stamp wood grain background and adhere to card front.
- Die cut LOVE (twice (1) rose red, (2) so saffron )
- Cut red heart and adhere to yellow die cut.
- Adhere die cut to card front.
- Die cut heart and adhere to card front.
- Stitch around blue cardstock.
:: My Goodies {LOVE} ::
Stamps: All Night Media - wood grain background rubber stamp (Michaels)
Ink: Stampin' Up! - white
Cardstock: Papertrey Ink - stamper's select white; Stampin' Up! - ballet blue + so saffron + rose red + certainly celery Accessories: Provo Craft - Cricut + Home Accents cartridge; Janome Sew Mini; Thread
Card Size: 4.25" x 5.5"

Hey there! How is everyone out there? I am feeling much better and glad my medications are starting to work. This card is inspired by Travelingmama's Challenge. I was inspired by the colors in the photo. The main colors were hues of blue and a shade similar to sand (i.e., kraft). I also saw some cream and a bit of red popped in there.
I made this tag for another card, but it did not work out, so I incorporated it into this card. This card is super busy, but I rarely get a chance to embellish cards like this, so I like how it turned out. It almost could be framed art! So, what reason could you send this card? Whatever! That's why I like including a sentiment like Memories because it can be used for birthdays, mother's day, love, missing you, whatever you wish that has a memory behind it.
Don't forget to vote for your favorite card in the Gallery Idol Contest. You have until today at 12pm - MT or 2pm EST! Go cast your vote for this session!
Thanks for stopping by and enjoy your Friday Eve! :)
Card Instructions
- Trim kraft cardstock into an A2 card.
- Stamp polka dot background on card front.
- Die cut tag in Cricut and trace onto canvas.
- Cut canvas tag and adhere to cardstock tag.
- Stitch around canvas tag and add cardstock and eyelet, then tie a ribbon.
- Adhere canvas tag to card front with foam adhesive.
- Paint chipboard branch (previously done) and ahdere to card front.
- Add paper flower buds.
- Cover bird chipboard with cardstock and patterned paper (wing). and adhere to card front.
- Stamp sentiment, mat on cardstock, then adhere to card front.
- Add mini library clip.
:: My Goodies {Memories} ::
Stamps: Papertrey Ink - polka dot basics; 7 Gypsies - nottinghill
Ink: Stampin' Up! - chocolate chip; Papertrey Ink - vintage cream; ColorBox-chestnut roan
Cardstock: Papertrey Ink - kraft; Stampin' Up! - rose red + taken with teal + bordering blue
Patterned Paper: Quick Quotes
Accessories: Stampin' Up! - mini library clip; Craft Supply - grosgrain ribbon + Canvas Fabric; + Eyelet Maya Road - chipboard bird + tree limb; Prima - flower buds; Hero Arts - rhinestone; Crop-a-Dile; Janome Sew Mini; Thread; Provo Craft - Cricut + Plantin Schoolbook cartridge
Card Size: 4.25" x 5.5"
 Inspired by Dawn's color challenge, so I created this card. At first, it seemed impossible. I decided to use the colors in minimal ways as opposed to bold versions. I did not have soft stone, so I used SU! going gray, which is almost the same color. Looking at the card, you may think that the pink and green are not raspberry fizz and new leaf, but they are. I colored the stamp in using those inks and my blender pen, which is how I achieved a softer hue of those shades.
Thanks for stopping by! Don't forget to vote in the Gallery Idol contest today! Enjoy!
Card Instructions
- Trim going gray cardstock into an A2 card.
- Stamp flower on card front (stamp a portion of the stamp again).
- Using a blender pen and ink, color in flower stamp.
- Stamp sentiment.
- Trim raspberry fizz cardstock and adhere.
- Add ribbon.
:: My Goodies {New Days Ease Sorrow} ::
Stamps: Stampin' Up! - flower fancy; Papertrey Ink - with sympathy
Ink: Close to My Heart - black; Papertrey Ink - new leaf + raspberry fizz
Cardstock: Papertrey Ink - raspberry fizz; Stampin' Up! - going gray
Accessories: Stampin' Up!-blender pen; Papertrey Ink - true black ribbon
Card Size: 4.25" x 5.5"

 We're making great progress! Today is Thursday and the weekend will be here before we know it. I'm happy to share with you today a card that I sketched yesterday in preparation for Dawn's color challenge. Sometimes my sketches do not quite work, but this sketch was used to the tee. When I got to my studio, it was so easy and fast to make it knowing exactly what supplies to pull out and what to do. It came together just how I envisioned it and very fast too! If only I could do that for every project! I was on a roll, so I even finished the inside! Finishing the insides of cards is something that I would like to do more of, even if there is no greeting, I'd like to carry the design to the inside to 'finish' it off. What do you think? Let me know and thanks for stopping by today! Have a great day and I'll be back later with a PTI Blog Hop post around 6:00 EST this evening. Hope to see you there! It's easy...just a summer-themed card! ETA: Did you see Paper Crafts' Moxie Fab World posting today? Well, one of my cards is featured over there. It's one of the few that are published in Card Creations 7 magazine. So, hop on over and take a peek so you can see it! This is my first time being published in any Paper Crafts publication and I'm so happy it is a Card Creations specialty publication because it is one of my favorite issues they produce. I'm so excited they listed me as well as the other first timers, like my friend Char! Card Instructions- Trim berry sorbet cardstock into an A2 card.
- Trim dark chocolate cardstock into a rectange and stamp design at the top, then heat emboss.
- Scallop edge punch the bottom edge of the dark chocolate cardstock.
- Trim melon berry cardstock into a rectangle and stamp tree image and sentiment.
- Adhere melon berry cardstock to the dark chocolate cardstock.
- Tie ribbon around the cardstock.
- Adhere to card front with foam adhesive.
- Stamp sentiment and tree limb on the inside of card.
:: My Goodies {I Love You...} ::Stamps: Papertrey Ink - Men of Life + Out on a Limb Ink: Stampin' Up! - chocolate chip; Papertrey Ink - vintage cream + berry sorbet + melon berry; Versamark Cardstock: Papertrey Ink - dark chocolate + berry sorbet + melon berry Accessories: Papertrey Ink - vintage cream ribbon; Stampin' Up! - scallop edge punch; heat gun; clear embossing powder Card Size: 5.5" x 4.25"
Hey everyone! How's it going? Well, today is the BIG day! Paper Crafts' Card Creations 7 has been released. You can pick it up at your local bookstore, like Borders or Barnes and Noble or click HERE to get at 10% off the list price! I got my copy on Saturday and haven't put it down since. There are so many great cards in there I do not know what to do with myself. I am truly inspired by each design. I have a handful of cards in there as well, so go pick up your copy and tell me what you think! Today's card was inspired by K. Werner's color challenge. It's a very simple design that can be used for any occasion by altering the sentiment. As a side note, I plan to start recording new videos after returning from my trip to New Orleans (next month). I just wanted everyone to know that I have not stopped doing them completely. I'm waiting on some new technology we're getting soon! Hopefully, the new technology will make editing the videos much easier. Have a great day and thanks for visiting! Card Instructions- Trim really rust cardstock into an A2 card.
- Stamp label design on cream cardstock, then cut out.
- Trim gray cardstock strip and adhere to card front.
- Adhere label to card front with foam adhesive.
- Stamp sentiment on more mustard cardstock, then adhere to card front.
- Add buttons and draw dots above and below the gray cardstock.
:: My Goodies {On Your Birthday...} ::Stamps: Stampin' Up! - great friends + birthday greetings Ink: Stampin' Up! - really rust (marker) Cardstock: Stampin' Up! - really rust + more mustard + vanilla + basic gray Accessories: Craft Supply - buttons Card Size: 4.25" x 5.5"
 How's your Sunday going? Mine has been very full, yet relaxing. I even put on my wedding dress today and took pictures. You read that right! I squeeeeeezed into my wedding dress (could barely breathe) and took some bridal shots for Mac's portfolio. We went to a weed infested area and it was a bit scary, but I did it! I'll share some pictures with you when he's finished. I also got a chance to finish this card for K. Werner's color challenge. I thought about a baby boy when I saw the colors. I actually forgot about the green. Then remembered suddenly. So, I added a strip below the ribbon and no one knew I forgot, right?! Well, now you do because I spilled the beans! I hope to make a couple of cards tonight for the Loonie Stampers Challenge that I did not do last week and the one for this week. Let's hope I get done becaus I am also in the processing of making dinner. Thanks for visiting and enjoy the rest of your weekend! I'll be at the Papertrey Ink release party tonight in the forum if you want to chat too! To purchase this card, click here. Card Instructions- Trim white cardstock into an A2 card.
- Stamp background stars onto teal cardstock, heat emboss with white embossing powder.
- Adhere orange, green, and blue cardstocks to the teal cardstock and corner round edges.
- Tie ribbon into a bow.
- Stamp sentiment.
- Adhere to card front with foam adhesive.
- Corner round edge.
:: My Goodies {Ahoy Sailor} ::Stamps: Papertrey Ink - background basics (stars) + bitty baby blessing Ink: Stampin' Up! - pumpkin pie (marker); Versamark Cardstock: Papertrey Ink - white + spring rain; Stampin' Up! - taken with teal + kiwi kiss + pumpkin pie Accessories: Papertrey Ink - white ribbon; white embossing powder; heat gun; EK Success - corner rounder Card Size: 5.5" x 4.25"
 Hey there! It's the weekend and boy am I glad! Do you have any neat plans? I'm a photography assistant again and this morning we are photographing the Race for the Cure on the National Mall! Really neat, right?! Last night, I got a chance to make this card for Dawn's color challenge! I really liked the color choice and even postponed my studio move to complete it! Well, maybe I was a bit lazy! We also watched Twilight. I did not think I would like it because I thought it was a tween movie. BUT, I really enjoyed it...okay, loved it! I cannot wait for the sequel! I cannot believe that now I am one of those "Twilight" fans too! Anyway, about the card...it was really quick and easy to do. I enjoy doodling on my cards now and sometimes freehand, but other times, I use a ruler. I think the frame goes well with the label stamp because it could look like I drew both...NOT (only the frame)! I hope to move most of my supplies tomorrow evening. Don't forget to check for tweet pics and progress. I already have an idea on how I plan to arrange it. Thanks so much for stopping by...I truly appreciate your visits, comments, and kind words. I hope you have a great weekend. Make sure you stop back by because I am posting a BLOG CANDY later today to celebrate 50,000 hits!!! I'm giving away one item, but it's an item you cannot buy, but only earn and I have one go give (hint, hint)! Card Instructions- Trim raspberry fizz cardstock to an A2 card.
- Draw frame on card front.
- Stamp label on kraft cardstock and cut out.
- Stamp sentiment and floral sprays, then adhere to card front.
- Add buttons.
:: My Goodies {friend}:: Stamps: Stampin' Up! - great friend; Daisy Bucket desings - label
Ink: Papertrey Ink - vintage cream + raspberry fizz; Stampin' Up!-marker; ColorBox-chestnut Cardstocks: Papertrey Ink-raspberry fizz + kraft Accessories: Creative Imaginations-flower buttons; Craft Supply-cream buttons; Bazzill-french vanilla floss
 Tuesday is better than Monday, but boy do I wish it were Friday already! I think the warm weather does that to you. Anyway, today I'm sharing a card inspired by Moxie Fab's Color Challenge. I chose to use Papertrey Ink's spring moss + lemon tart + ripe avocado. I also found a way to use a new stamp set I won by Basic Grey and some clear charms by Tim Holtz. I added the sentiment to the back of the clear charm to make it appear like some sort of finished embellishment. To adhere it without showing adhesive, I used a glue stick that dries clear (for the most part). I think I would have colored in some of the stamp if it were not for this challenge, but that stamp is just cute! Here's what we did for a couple of hours this weekend. Check out a few of the pictures! Well, I hope you enjoy your day and thanks so much for visiting my blog! :) Card Instructions1. Make an A2 card with spring moss cardstock. 2. On a piece of lemon tart cardstock, stamp bird image, and adhere to card front. 3. Stamp polka dot background on the bottom portion of card front. 4. Add a strip of ripe avocado cardstock to the center. 5. Tie ribbon around card base into a bow. 6. Trace clear charm on lemon tart cardstock, cut out, stamp sentiment, and adhere to clear charm. 7. Tie charm around ribbon with waxy flax. 8. Corner round bottom edges. :: My Goodies {Love}::Clear Stamps: Basic Grey-wild flowers; Papertrey Ink-mixed messages + polka dot basics Ink: Papertrey Ink-ripe avocado Cardstocks: Papertrey Ink-ripe avocado + lemon tart + spring moss Accessories: Papertrey Ink-lemon tart ribbon; Tim Holtz-charm; Close to My Heart-waxy flax; EK Success-corner rounder
 It's Wednesday already! You have to love four-day work weeks. This card was inspired by K. Werner's Color Challenge for the week. These are unique color choices that I would never put together, but in the end liked the combo. Have you completed your color challenge yet? Thanks for stopping by and have a great day! Card Instructions- Make an A2 card with lemon tart cardstock.
- Stamp frame on white cardstock and cut out.
- Stamp flowers on the bottom of frame (use mat from cut out as a mask).
- Stamp sentiment.
- Stamp hearts, cut out, and adhere to frame.
- Using markers, color in flowers (TIP: use blender pen + ink to serve as a marker you may not have in your collection, but own the ink color).
- Tie ribbon around card base into a bow.
- Adhere frame with foam adhesive.
- Using a marker, draw a dotted line around the card base edge.
:: My Goodies {U + ME = LOVE}:: Stamps: Daisy Bucket Designs - label; Studio G clear stamps (Joanns)
Ink: Stampin' Up! - pacific point; Close to My Heart - black Cardstocks: Papertrey Ink - lemon tart + white; Stampin Up! - pacific point Accessories: Papertrey Ink - pure poppy ribbon; EK Success - corner rounder; Stampin' Up! - markers
|
|


