


Instructions
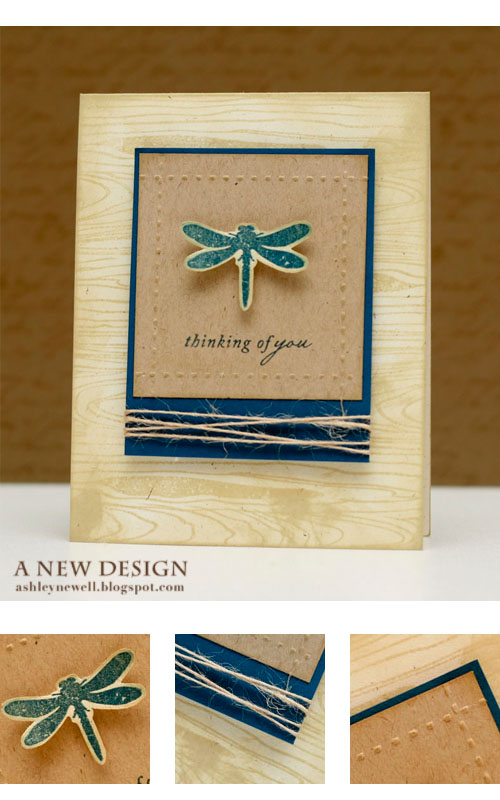
- Trim rustic cream cardstock to create an A2 card base.
- Stamp wood grain background on card front.
- Using tea dyes ink, distress the edges with the ink.
- Trim kraft cardstock block (3" x 2.75") and emboss with scor-bug to create a frame.
- Stamp sentiment, then adhere to enchanted evening cardstock (3" x 3.75").
- Add twine to the bottom of enchanted evening cardstock.
- Stamp dragon fly on rustic cream cardstock, cut out, ink with tea dye, and pop off kraft cardstock.
- Pop focal pop off card front.
Tips & Tricks
- When using the scor-bug to emboss dotted lines, use the scor-pal to score an even line.
Stamps :: masculine motifs, background basics (woodgrain)
Ink :: chai, enchanted evening
Cardstock :: rustic cream, kraft, enchanted evening
Embellishment :: twine
Tool :: scor-bug

Instructions
- Trim dark chocolate cardstock to create an A2 card base.
- Trim white cardstock to 3.25" x 4.25" and stamp argyle pattern (first in brown, then in pink).
- Mat argyle stamped paper on raspberry fizz cardstock, then adhere to card front center.
- Trim raspberry fizz cardstock strip to about 1" x 4.25" and stamp sentiment, the pop off card front.
- Stamp graduation cap on white cardstock, cut out, then pop off card front.
- Add rhinestone to cap.
Supplies
Stamps :: a little argyle, for the graduate
Ink :: raspberry fizz; Clear Snaps - colorbox chestnut
Cardstock :: white, raspberry fizz, dark chocolate
Embellishments :: raspberry rhinestone

Instructions
- Trim new leaf cardstock to create an A2 card base.
- Trim rustic cream cardstock to 3.75" x 5" and stamp flower.
- Color flower with Copic markers.
- Ink entire cream cardstock with blending tool.
- Stamp sentiment.
- Add glitter to flowers.
- Tie ribbon and add button/twine treatment.
- Mat cardstock on sweet blush cardstock, then on raspberry fizz, then adhere to card base.
- When applying glitter, I use some tacky glue, place some on my fingertip, then rub on the area I want covered, then shake glitter over project. I dump the excess onto scrap paper and start over on any other areas to be glittered.
Stamps :: year of flowers (sweet peas), masculine motifs (sentiment)
Ink :: CTMH - black; Copic Markers (RV13, RV21, Y21, Y06, G07, V0000); Ranger - old paper
Cardstock :: raspberry fizz, new leaf, rustic cream, sweet blush
Embellishments :: sweet blush twill tape, twine, new leaf button, glitter
This was so much fun! I'm so happy to be a part of this release. Thank you all so much for stopping by! Enjoy your day!!
*Bleeps = Blog Peeps :)
21 comments:
Your cards are so fun and FRESH! I LOVE the cream on cream wood grain! And your glittered flowers are gorgeous. I would be afraid of that image, but you rocked it!
oh my. LOVE that sweet pea card...colors are uber awesome!! congrats on the fun again...you rocked it friend!!
I'm loving the woodgrain and flowers. Great work!!
These are all soooooo pretty, and the colors are totally FAB! :)
So funny cards. I love them all, but the first one is my favorite. Thanks for sharing your wonderful ideas.
Such beautiful cards, I like the first one the most, so masculine, love your work Ashely!
I love your cards - simple, yet stunning. Thanks for sharing!
Your samples are INCREDIBLE Ashley, so glad to have you as guest designer at PTI and can't WAIT to see what else you have up your sleeve :)
*gasp* Beautiful projects all Ashley, but that graduation card made me catch my breath. So eye-catching! Love the details.
Lovely cards! My favorite though is the first one with the dragonfly. I really like the wood grain background used.
Beautiful cards - congrats on your guest spot!! :)
Great cards! I'm loving this month's PTI release. Thanks for the inspiration!
You are super creative, Ashley!!! Love how you showcased this months PTI's sets. They are all lovely. I think the woodgrain and the argyle are my favorite of this months release :)
Great cards Ashely! I especially like the dragonfly one.
Fabulous work! I LOVE the way you list the instructions, supplies, and give us tips. TFS.
I LOVE all three, Ashley. Love the wood grain with the dragonfly image and the Sweet Peas are just stunning!
oh, I love each of these. I have been trying to figure out a way of using my wood grain paper I bought a while back (they are just so neat and just blew me away when I saw them, so I had to pick up a few sheets) and these are awesome !!! Thanks for sharing them with us Ashley.
Gorgeous color combo on this card, beautiful flower images!
great cards showcasing those stamps! lovely!
I'm glad your with PTI now. That's how I found you. Your cards are wonderful.
Ashley, you did a FAB-ulous job on these!
Post a Comment