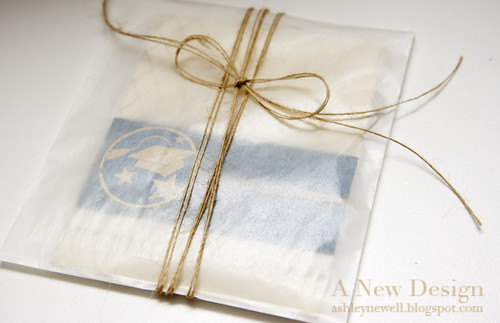
header.gif (12,818 bytes)
Showing posts with label graduation. Show all posts

6.07.2010

Class of 2010 :: Graduation


{inside}

{envie}


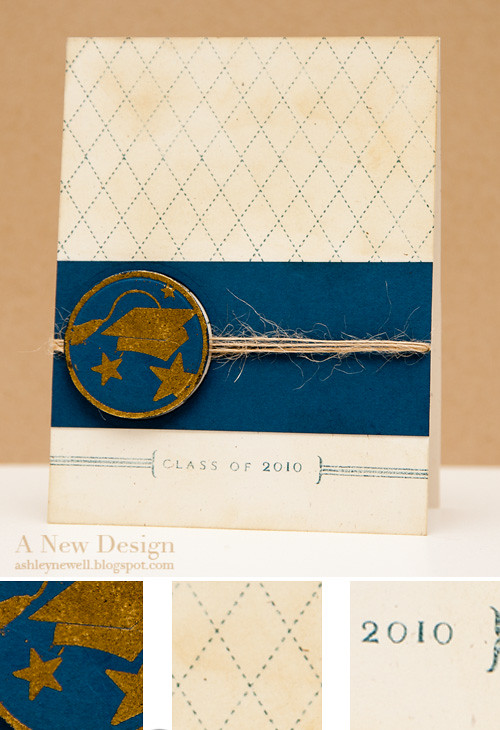
Hey Bleeps! I hope you had a fabulous weekend! I ventured down to North Carolina for our nephew's graduation. I whipped up this card right before we jetted out of town. It was super easy to make and matched the graduation invitation/high school colors (I think)! :) I'm also sharing how I usually finish the inside of my cards and one option I use to package them for hand delivery. I package the card in a glassine bag, then simply tie twine around it. You could do more, but since this card was for a young man, simple was best!

Instructions
  1. Create an A2 size card base from rustic cream cardstock.
  2. Stamp "Class of 2010" at the bottom.
  3. Stamp argyle pattern at the top.
  4. Stamp circle image and heat emboss with gold embossing powder, then die cut the circle.
  5. Adhere navy strip, then add twine.
  6. Then, pop circle die cut.
Tips & Tricks
  • When stamping, I personally do not have to have a dark complete impression. Take a look how the navy looks here, like a denim effect. Some people think it's not a good impression, but I like the way the stamp does not completely saturate the ink for a more rustic effect.
  • Punch tiny half holes on the sides of the card where the twine will be to hold it in place. Learned from PTI @ CHA! :)

Supplies

Stamps :: PTI - for the graduate, a little argyle
Ink :: Versamark; PTI - enchanted evening; Ranger - old paper
Cardstock :: PTI - enchanted evening, rustic cream
Embellishments :: May Arts - twine
Tools :: Spellbinders - standard circles small nestabilities (S4-116), wizard; Filigree - gold embossing powder; heat tool


Thanks for your visit! Enjoy your Monday too!

4.30.2010

Ribbon Favorites

Hey there! It's the weekend, but better yet I have a great ribbon favorite to share with you all. Nichole asked some of the DT and myself to share our favorite ribbon technique. Well, I was stumped for a few days, but finally decided on sharing how I like to layer my ribbons. Sometimes, I double ribbons and have two bows, while other times I may have a flat ribbon and a ruffled ribbon. Here, I decided to share double ruffled ribbon so you can see how I bunch the ribbon and create a wider ribbon effect. I even made a quick video on my ribbon ruffling technique.

Don't forget to check out the rest of the team's ribbon favorites:

Betsy Veldman

Dawn McVey
Heather Nichols
Michelle Wooderson
Lisa Johnson

Thanks so much for stopping by and watching the video. Have a great weekend!

Instructions
  1. Trim white cardstock and stamp argyle pattern.
  2. Add two layers of ruffled ribbon.
  3. Stamp sentiment; once in berry sorbet ink, then again slightly off in brown ink.
  4. Adhere argyle stamped paper to summer sunrise cardstock.
  5. Add to a dark chocolate A2 card base.
Tips & Tricks


View video from YouTube here.

Supplies

*All supplies may be purchased at Papertrey Ink, unless otherwise noted.

Stamps
:: a little argyle, for the graduate
Ink :: berry sorbet, summer sunrise; Stampin' Up! - brown (PTI - dark chocolate ink may be used instead)
Cardstock :: stamper's select white, dark chocolate, summer sunrise
Embellishments :: berry sorbet satin ribbon
Tools :: scor-tape

4.13.2010

April Papertrey Ink Release Projects

Hey Bleeps*! Happy Hump Day to you! We're almost there, through the week that is! So, to help you out, I've got a few projects to share with you using some of Papertrey Ink's April release products!! Every release is so much fun, so I hope you enjoy my cards! This time, I was feeling a bit clean and simple, so here goes...


Instructions

  1. Trim rustic cream cardstock to create an A2 card base.
  2. Stamp wood grain background on card front.
  3. Using tea dyes ink, distress the edges with the ink.
  4. Trim kraft cardstock block (3" x 2.75") and emboss with scor-bug to create a frame.
  5. Stamp sentiment, then adhere to enchanted evening cardstock (3" x 3.75").
  6. Add twine to the bottom of enchanted evening cardstock.
  7. Stamp dragon fly on rustic cream cardstock, cut out, ink with tea dye, and pop off kraft cardstock.
  8. Pop focal pop off card front.

Tips & Tricks
  • When using the scor-bug to emboss dotted lines, use the scor-pal to score an even line.
Supplies

Stamps :: masculine motifs, background basics (woodgrain)
Ink :: chai, enchanted evening
Cardstock :: rustic cream, kraft, enchanted evening
Embellishment :: twine
Tool :: scor-bug

Instructions
  1. Trim dark chocolate cardstock to create an A2 card base.
  2. Trim white cardstock to 3.25" x 4.25" and stamp argyle pattern (first in brown, then in pink).
  3. Mat argyle stamped paper on raspberry fizz cardstock, then adhere to card front center.
  4. Trim raspberry fizz cardstock strip to about 1" x 4.25" and stamp sentiment, the pop off card front.
  5. Stamp graduation cap on white cardstock, cut out, then pop off card front.
  6. Add rhinestone to cap.

Supplies

Stamps :: a little argyle, for the graduate
Ink :: raspberry fizz; Clear Snaps - colorbox chestnut
Cardstock :: white, raspberry fizz, dark chocolate
Embellishments :: raspberry rhinestone


Instructions
  1. Trim new leaf cardstock to create an A2 card base.
  2. Trim rustic cream cardstock to 3.75" x 5" and stamp flower.
  3. Color flower with Copic markers.
  4. Ink entire cream cardstock with blending tool.
  5. Stamp sentiment.
  6. Add glitter to flowers.
  7. Tie ribbon and add button/twine treatment.
  8. Mat cardstock on sweet blush cardstock, then on raspberry fizz, then adhere to card base.
Tips & Tricks
  • When applying glitter, I use some tacky glue, place some on my fingertip, then rub on the area I want covered, then shake glitter over project. I dump the excess onto scrap paper and start over on any other areas to be glittered.
Supplies

Stamps :: year of flowers (sweet peas), masculine motifs (sentiment)
Ink :: CTMH - black; Copic Markers (RV13, RV21, Y21, Y06, G07, V0000); Ranger - old paper
Cardstock :: raspberry fizz, new leaf, rustic cream, sweet blush
Embellishments :: sweet blush twill tape, twine, new leaf button, glitter

This was so much fun! I'm so happy to be a part of this release. Thank you all so much for stopping by! Enjoy your day!!

*Bleeps = Blog Peeps :)

6.14.2009

Loonie Stampers Challenges

Happy Monday, everyone! How was your weekend? Mine was very refreshing! I got to spend time in my studio, adding some items (not purchased - just organizing) and even made a few cards. I went to my friend's dinner party at Maggiano's and that was very delicious and fun. Yesterday seemed quite long, but I didn't mind that at all! I enjoyed a hot cup of coffee while some electrical contractors completed a few jobs around the house. I did lots and lots of laundry. I finished the second family room (which is located off of the studio). We were able to enjoy it for most of the day and are loving the new spaces. Mac can watch TV/play video games, while I'm crafting away! I'm glad I'm not in a room all alone anymore! Anyway, here are two cards inspired by the last couple of Loonie Stampers challenges. The colors was very challenging for me, but I finished them (WHEW)!

Oh yeah, those bridal pictures I 'modeled' for McArthur are posted here. It may not look like it, but I honestly could barely breathe! Yeah, I got in my wedding dress, but it's nothing like when I wore it on the wedding day. He is a great photographer. I just tried to help him out since he wanted to take some pictures of a wedding gown in a creative way.


Card Instructions
  1. Trim lavender moon cardstock into an A2 card.
  2. Stamp background text on aqua mist cardstock and adhere to card front.
  3. Punch spirals on white cardstock, stamp lines + sentiment, then corner round the edges.
  4. Tie a ribbon around the white cardstock.
  5. Stamp "G" and die cut into a circle.
  6. Die cut a star and adhere to white cardstock.
  7. Add "G" circle die cut with foam adhesive.
  8. Adhere white cardstock to card front using foam adhesive.
:: My Goodies {Congratulations G} ::
Stamps: Stampin' Up! - great grads; Rusty Pickle - journal stamp
Ink: Papertrey Ink - aqua mist + lavender moon
Cardstock: Papertrey Ink - white + lavender moon + lemon tart
Accessories: Papertrey Ink - lemon tart ribbon; Provo Craft - cuttlebug + concentric star die EK Success - corner rounder; Stampin' Up! - spiral punch; Spellbinders - circle nestabilities
Card Size: 4.25" x 5.5"


Click Here to Buy This Card

Card Instructions

  1. Trim smokey shadow cardstock into an A2 card. Trim about 1/4" off the card front.
  2. Stamp background retro designs on hibiscus burst and lemon tart cardstocks.
  3. Add smokey shadow strip and adhere altogether.
  4. Stamp flowers and sentiment.
  5. Add ribbon.
  6. Adhere to card front.
  7. Add cardstock to side of the card front and inside of card (hisbiscus and lemon tart).
:: My Goodies {Wishing you a Happy Birthday} ::
Stamps: Papertrey Ink - background basics (retro) + wishing you; Stampin' Up! - pocket silhouettes
Ink: Papertrey Ink - smokey shadow
Cardstock: Papertrey Ink - hisbiscus burst + lemon tart + smokey shadow
Accessories: Papertrey Ink - white ribbon
Card Size: 4.25" x 5.5"

6.09.2009

Hawaiian Graduation


Hey Everyone! How are you?! We tackled the IKEA furniture and it was so easy in the beginning. I did one entire piece by myself. Then, I helped Mac put together the larger pieces. We were doing so well until the end. Why is it that the easiest tasks are so daunting? We ran out of steam and left one final step to complete tomorrow. So, I'm going to start hauling stuff to the new space tomorrow night!!! I did not want to start before the furniture was in place because I thought I might have to keep moving it around other stuff. I'll keep you posted on the progress!

Of course I did not make a card yesterday, so here is one that I made a few weeks ago. It is a Hawaiian-themed graduation card! This was a special request to match a graduation gift someone is giving to a graduate.

Thanks for visiting today!

Take a peek at the Susan B. Komen Race for the Cure pictures from last weekend. I even took a couple! I even saw VP Joe Biden and his family (very close) and photographed Lalah Hathaway. VP Biden was really funny and introduced his wife, Dr. Jill Biden who sort of participated in the race (see pictures). Lalah was a really cool person and sang at the event. I have a picture with her too and will share when Mac 'releases' it!

Card Instructions
  1. Trim white cardstock into an A2 card.
  2. Stamp hula ladies on white cardstock and color.
  3. Stamp sentiment.
  4. Trim kraft cardstock to fit card width, then create grass skirt with scissors, and adhere to card front.
  5. Add ribbon and flowers.
:: My Goodies {Congratulations to the Graduate} ::
Stamps: Verve Visual - great expectations; Inkadinkado - hula ladies
Ink: Close to My Heart - black; Copic Markers
Cardstock: Papertrey Ink - white + kraft
Accessories: Making Memories - flowers; Ranger - stickles; Papertrey Ink - hibiscus burst ribbon

5.04.2009

Congrats Grad


Hey there! I hope you all had a great weekend. My weekend was very lazy, but at the same time busy running errands and finishing a few projects before the deadline. YIKES! I made this graduation card last week. Pink and black color combination is perfect for the female college grad. Well, I hope you enjoy this card and thanks so much for stopping by.


Card Instructions
  1. Trim sweet blush cardstock to an A2 card.
  2. Trim patterned paper to fit top half of card front and adhere.
  3. Trim black cardstock strip and adhere to patterned paper.
  4. Tie ribbon + button + rhinestones around metal frame and adhere.
  5. Apply sticker letters.
  6. Apply thickers.
:: My Goodies {congrats grad}::
Cardstocks: Papertrey Ink - sweet blush + true black
Patterned Paper: Papertrey Ink - black and white basics
Accessories: Papertrey Ink - black ribbon; Hobby Lobby -metal circle tag + rhinetsones; Making Memories - letter stickers + button; American Crafts - thickers

4.30.2009

CONGRATS!


OMG...it's already Thursday! YAAAY - It's almost time for the weekend!! The other night, I made this card for K. Werner's 50th Color Challenge. I really liked the color combo and had an idea driving me crazy in my head. Has that every happened to you? It is happening to me more and more and it seems like I'm breathing card designs! HEE Anyway, I sketched out the layout, then while creating it, I selected what parts of the sketch would be certain colors. Now, this is not a technique that I use all the time. I remember a time when I could not even sketch my ideas. It's neat how we evolve over time. Since I purchased my wood-grained background stamp from Michaels earlier this month, I've been thinking of different ways to use it. When I saw this challenge, that stamp was embedded in my brain to use, so I did! The part that took the longest was deciding the sentiment. I sketched something different, but decided to use thickers. Then, I realized after adhering some of the thickers that I didn't have all of the letters in red to spell the sentiment. UH OH! SHOOT! What should I do? OOOH! Use some coordinating color thickers and alternate!! There's always a solution in paper crafting and that's why I love it. It is like problem solving to me. Since it's graduation season, 'CONGRATS!' fits perfect!

Oh yeah, I forgot to photograph the back, but there are cute red polka dots stamped on the back!!! I was going to use it on the front, but thought it was too busy. I just discovered that decorating a coordinating pattern on the back is so NEAT! Maybe I should photograph it (later)! I hope you all like how it turned out.

I hope to be back tomorrow with a fast card, but if not, you still got one on Monday this week! I will share a card regardless! There's always something laying around here to share.

One of the engagement session pictures are up!! These are just a select few of the shots taken. Enjoy them HERE! They're awesome!

Thanks for coming by today and I'll catch you tomorrow!

Card Instructions
  1. Trim turquoise cardstock to an A2 card.
  2. Trim brown cardstock into a rectangle and stamp wood grain pattern, then heat emboss.
  3. Corner round brown cardstock bottom edges.
  4. Take a strip of red cardstock and create scallops using slot punch (deeper effect).
  5. Adhere scallop edge cardstock to top center of card base.
  6. Tie ribbon around wood grain cardstock and adhere to card front with foam adhesive.
  7. Add thickers and rhinestones.
  8. Corner round the edges of card front.
:: My Goodies {CONGRATS!}::
Stamps: All Night Media - wood grain background rubber stamp (Michaels)
Ink: Versamark
Cardstocks: Papertrey Ink - dark chocolate + pure poppy; Close to My Heart-turquoise
Accessories: Heat Gun; White Embossing Powder; American Crafts-thickers; Kaiser Craft-rhinestones; Stampin' Up!-so saffron ribbon + slot punch; Corner Rounder

4.21.2009

Eco-Friendly Congratulations


What's going on out there? Since this week is Earth Week, I thought I'd make an eco-friendly card. I used recycled paper and reused a recylced tag. The tag was originally wrapped around a hand towel I picked up at West Elm a couple weeks ago. The towels are made from organic cotton and they marketed it with recylced papers and fibers. I liked the tags so much that I saved them! I have one more! I covered the West Elm logo with the sentiment and lightly stamped over the 'green' label with a sentiment. I left the tree that was already centered on the tag.

Since we use so much paper in our craft, try to reuse some materials this week or see if you can find some recycled paper or anything green! I know a really good way to use embellishments we already have and that's those extra buttons that come with our clothes we buy. I save all of mine in a jewelry box and then use them as needed. It's just my own way I think I contribute to conserving and saving instead of throwing them out.

GO GREEN! Thanks for stopping by and have a great Tuesday. I'll be back tomorrow with my video. I recorded it last night! I hope you like the card I made.

Card Instructions
  1. Trim kraft cardstock to 5.5" x 4.25" (cut 8.5"x11" cardstock in half at 5.5", then score at 4.25")
  2. Stamp sanded background on card front.
  3. Trim patterned paper into a rectangle.
  4. Trim slightly larger new leaf cardstock and scallop edge the right side.
  5. Adhere patterned paper to new leaf cardstock.
  6. Add cording and tag; doodle around tag.
  7. Stamp sentiment and adhere.
  8. Adhere to card front with foam adhesive.
:: My Goodies {Congratulations}::
Stamps: Stampin' Up! - sanded + great grads + congrats
Ink: ColorBox-chestnut; Stampin' Up! - chocolate chip marker
Cardstocks: Papertrey Ink - new leaf + kraft
Patterned Paper: DCWV - The Green Stack recycled paper
Accessories: Michaels - jewelry cord; Stampin' Up! - scallop edge punch; West Elm-tag

4.09.2009

Congratulations


Hey there! So glad it's Friday EVE! Thanks so much for stopping by yesterday and watching my very first video! I appreciate all of your generous comments!! I hope to improve over time! :)

Today's card was inspired by SCS Color Challenge. I really liked the color combo, but didn't know what I was going to make! I started with Great Friends and stamped the frame using my new SU! markers because I do not own all of the stamp ink pad colors. I thought this was the most effective way (other than investing in the ink spots) to get most of the colors quickly! I used the technique where you color onto the rubber stamp. It works GREAT! Just as if I stamped it. So, I'm very pleased. Also, I used Great Grads for the sentiment and if you have it, you know that there are three congratulations sentiments on one stamp, so the marker worked wonders to stamp the one I wanted. I will be needing another graduation card, so I made it "congratulations."

I practiced using my SU! slot punch to make larger scalloped edges and love the technique. I have no idea why I haven't been using it, but I will now...watch for it soon!

By the way, I am uploading my cards on Flickr and many times before I post them here, so if you want to see cards and projects I've completed before a blog posting view them here. I've also added a Flickr badge on the left side of the blog that features the most recent uploaded card!

Speaking of photos, did you notice a slight change in my pictures? I started using Mac's camera, an Digital SLR (is that right?!), and it works wonders! Now that I have identified the correct settings to use, I feel comfortable using it. Boy, did I make his day when I said, "I love your camera!" I know he thinks I'm going to start photography now, but naaaah, only for my projects and I'll leave the rest for him! I enjoy directing the sessions just fine. Oh yeah, we will photographing a TWINS infant session this weekend....HOW FUN! I'll share with you the maternity session from a couple weekends ago soon, along with a couple of my personal projects used!

Thanks for coming by and have a wonderful day!

Card Instructions
  1. Trim bashful blue cardstock into an A2 pre-scored card.
  2. Trim close to cocoa cardstock into a rectangle/square, dry emboss it, scallop edge one end, and corner round the opposing two ends.
  3. Stamp frame on baskful blue cardstock, cut out and adhere to close to cocoa cardstock with foam adhesive.
  4. Stamp flowers on so saffron cardstock, cut out and adhere to frame.
  5. Stamp sentiment, cut strip, add button + rhinestone, and adhere to frame/cardstock.
  6. Tie ribbon into a bow.
  7. Adhere close to cocoa cardstock with foam adhesive to card front.
  8. Corner round the card base.
:: My Goodies {congratulations}::
Stamps: Stampin' Up!-great grads + great friend
Ink: Stampin' Up!-close to cocoa (marker only)
Cardstocks: Stampin' Up!-bashful blue + so saffron + close to cocoa
Accessories: Stampin' Up!-chocolate chip corduroy button + scallop edge punch + so saffron ribbon; KaiserCraft-rhinestone; Provo Craft-cuttlebug + swiss dots embossing folder; corner rounder

2.19.2009

Congratulations grad


Happy Thursday! Short weeks go by so fast! I'm not feeling as lazy tonight, so I am going to post all details and instructions! This card is inspired by K. Werner's Color Challenge and is ALL STAMPIN' UP!. I haven't participated in a few weeks (well, last week I made a Valentine's card for Mac, but never posted that). This year, I have 3 graduations and all are graduate school, post-graduate school, or some other professional study. So, I thought I'd start now on making some graduation cards because before I know it, May will be here.

As a random side note, I purchased Make it Tonight by FineCooking.com at Whole Foods last week. I've cooked 3 dishes so far and all were FABULOUS. I like to cook, but get bored easily when I run out of new dishes. This magazine and website have re-sparked my cooking motivation. Mac has enjoyed all of the dishes too. The website features countless recipes. Grab the magazine or just check out the website, both are great starts to a happy stomach! Most times, I add my own twist to each recipe to make it my own (similar to card making), but they give you such great ideas for new meals. Enjoy!

Have a good one and thanks for stopping by!

Instructions
  1. Trim kiwi kiss cardstock to 4.25" x 11", then score at 5.5".
  2. Trim really rust cardstock to about 5.25" x 4.25" and stamp polka dot background.
  3. Trim more mustard cardstock to about 4.25" x 1.25" and adhere on rust cardstock.
  4. Tie ribbon around mustard cardstock into a bow.
  5. Stamp 'grad' on white cardstock and cut out.
  6. Stamp 'congratulations' on mustard cardstock and cut out.
  7. Adhere sentiments to rust cardstock.
  8. Adhere rust cardstock to kiwi kiss card base.

:: My Goodies {Congratulations Grad}::
Stamps: SU-Great Grads + Polka Dot
Ink: SU-Kiwi Kiss
Cardstocks: Stampin' Up!-Kiwi Kiss + Really Rust + More Mustard; PaperSource-White
Accessories: SU!-kiwi kiss stripe ribbon
Card Size: 4-1/4 x 5-1/2

1.08.2009

Congrats!


OMG - it's Thursday already! YAAAAY! I really do not have anything special to share today. Oh yeah, I purchased a Making Memories embellishment organizer from Michaels and love it! It has a top that opens and two drawers with lots of storage space. I have seen it many times and thought that's just a bunch of 'cubbies' not knowing that I would eventually buy one. It holds so much little stuff. It was on sale, so I decided to try it as organization is high on my priority list. It has organized many of my small embellishments, such as brads, letters, clips, chipboard, metal effects, tags and even scraps that did not make a project. I have put a lot of stuff in it, but still have a lot of space left. I have not been using some supplies because I forget about them tucked away in a storage box...INEFFECTIVE STORAGE METHOD! Now, I have a specific place to go for those tiny items where I can easily find them. I also jotted down the maker/name of the supply and dropped it in the bottom of each cubby so I would know how to get it again if I ever were to run out! That's a way to overcome "what is this" when you take items out of the original packaging.

Well, I hope you all enjoy your day and thanks so much for dropping by to 'see' me!

Instructions:
  1. Trim brown cardstock to 4.25" x 5.5" and set aside.
  2. Die cut squares and scallop square out of cardstocks.
  3. Stamp sentiment on green cardstock.
  4. Using dimensionals, adhere the squares to the scallop square.
  5. Trim 1/2" patter paper and adhere to card base.
  6. Trim 3.5" ribbon and adhere on top of pattern paper.
  7. Add decorative brad to ribbon.
  8. Adhere scallop square over ribbon and pattern paper.
  9. Adhere card base to pre-scored A2 card.
:: My Goodies {congrats}::
Stamps: Stampin' Up!-Say it With Scallops
Ink: SU!-Chocolate Chip
Cardstock:
Papertrey Ink-sweet blush; dark chocolate; spring moss
Patter Paper: K&Co-Amy Butler Sola Lounge Stripes
Accessories: Chatterbox-brad; Papertrey Ink-spring moss grosgrain ribbon; Spellbinders-square + scallop square nestabilities; cuttlebug; Papertrey Ink-pre-scored A2 card
Card Size: 4.25 x 5.5

11.18.2008

Best of Luck Graduate


Good evening everyone! I'm in for a quick post to participate in K.Werner's Color Challenge. Not feeling too chatty tonight, but that's probably because I'm working on tomorrow's post. Tomorrow is our wedding annivesary, so please be sure to stop back through for a special posting full of pictures, stories, and even a video!

To make this card:
  1. Make card base by trimming cardstock to 4.25" x 11", then score at 5.5".
  2. Trim patter paper to fit inside of the card base.
  3. Trim orange cardstock the same width as pattern paper and about 2.5" then punch with scallop edge punch.
  4. Adhere orange cardstock to patter paper and ink around the edges.
  5. Stitch around the edges of the pattern paper.
  6. Tie yellow ribbon around focal point.
  7. Die cut start out of felt using cuttlebug. Ink around the edges.
  8. Stamp sentiment on purple cardstock, then apply clear embossing powder and heat.
  9. Die cut the sentiment using circle nestabilities.
  10. Adhere star on top of ribbon, then pop sentiment off of it.
  11. Stamp sentiment above ribbon knot.
  12. Adhere buttons.
:: My Goodies {Best of Luck Graduate}::
Stamps: SU!-Great Grads; Verve Visual-Great Expectations
Ink: Chocolate; Chestnut Roan; Versamark
Cardstock: CTMH-Orange; SU!-Elegant Eggplant
Pattern Paper: SU!-Designer Series
Accessories: dimensionals; thread; sewing machine; circle nestabilities; cuttlebug star dies; cuttlebug; buttons; twine; felt; clear embossing powder; heat gun; scallop edge punch; PTI-stitched lemon tart ribbon
Technique: Stamped
Card Size: 4.25 x 5.5

6.12.2008

Southwest Color Inspiration

Most of my paper art creations are one-of-a-kind. I can never get them to quite look alike because I find something I want to do different. Here is a 'series', so-to-speak, of cards with the same color inspiration! These colors remind me of the southwest. Ever been to New Mexico? Well this screams Albuquerque! They have different messages, but some elements are the same, such as the flower, button, and layout.

My Goodies
Stamp: PTI Women of Life (sentiment); Art Warehouse Limited Edition Journaling Stamp set
Ink: Chocolate Chip; VersaMark
Paper: Chocolate Chip; Kraft-PTI; blue-DCWV; apricot-Bazzil Basics coolcanteloupe
Accessories: Cricut Accent Essentials; button; hemp
Technique: Stamped


My Goodies
Stamp: CTMH precious alphabet (congrats); Art Warehouse Limited Edition Journal Stamp
Ink: Chocolate Chip; VersaMark
Paper: Chocolate Chip; blue-DCWV; apricot-Bazzil Basics coolcanteloupe
Accessories: Cricut accent essentials; button; hemp
Technique: Stamped

6.10.2008

End of School

This post looks like "Back to School," but actually it marks the end of school! The card pictured right is a thank you card for a school (personalized in bottom right portion of the card) given by a parent. I made a set of 10 boxed thank you cards for the occasion. The tab at the top is for personalization with a name or date.

My Goodies
Stamp: Fiskars Baby Stamp (thank you); Art Warehouse Limited Edition journaling backgrounds (three hole punches)
Ink: CTMH Cranberry; Black; Chestnut Roan ColorBox Chalk
Paper: SU! Very Vanilla; Red; Green, Taupe; K&Co Wild Saffron (pattern paper); Very Vanilla; PTI Kraft card stock (AMAZING!)
Accessories: Cricut; Plaintin Schoolbook cartridge; Tab punch
Technique: Stamped; Paper Pierced


The card pictured left is for a kindergarten graduate! She is a superstar, so I stamped the background of stars on the K&Co pattern "notebook" paper. I matted it on blue cardstock and a red card base. For the sentiment, I stamped it on the "notebook" pattern paper, then matted it on red cardstock. Since I do not have a window punch, I cut a curve!

My Goodies
Stamp: Verve Visual Great Expectations (superstar); Seeing Stars (stars)
Ink: CTMH Cranberry; Twilight; Bubblegum; Topiary; Cranberry ColorBox Chalk
Paper: K&Co Wild Saffron; Blue; Red
Accessories: Brads
Technique: Stamped

6.04.2008

Myla & Taty Graduation Cards

I designed this card last night after receiving the request that my client needed it for the weekend. Sometimes, I can accommodate rush jobs! I had just enough time to squeeze these two cards in for twins!!

To create this card, I started with polka dot pattern paper. I used Heide Swapp star chipboard and paper pierced the polka dot paper and the reverse red paper on the stars. I sanded the edges of the chipboard after applying the paper to smooth out any unfinished edges. Then, I inked the edges with cranberry ColorBox cat's eye. I applied the red paper-pierced chipboard stars on the polka dot paper-pierced stars with a glue dot. I applied the stars on a dry embossed white card stock. I stamped "superstar" on the bottom right corner. To personalize it, I used foam stickers from The Stamping and Scrapbooking Room! I used my SU! ticket corner punch to punch the corners of the white card stock. Then, I applied dew dots to each corder!

My Goodies
Stamp: Verve Visual Great Expectations (Superstar)
Ink: Cranberry ColorBox Cat's Eye; CTMH Cranberry
Paper: Pattern Paper (polka dot/red) Let's Get Together; White card stock - PTI; Red card stock - Michaels
Accessories: Small thickers-Stamping and Scrapbooking Room; Dew Dots; Cuttlebug; Swiss Dots Embossing Folder
Technique: Stamped; Paper-Pierced
Card Size: 4.25" x 5.5"


I designed this card by first selecting my pattern paper. I just received it from the UPS guy yesterday, so I HAD to use it! It is from CTMH (Let's Get Together Paper Packet). It is a kit of pattern paper and coordinating solid card stock. I used the yellow card stock as my base and scored it using my new Scor-Pal! I layered the pattern paper on blue and red card stock (that did not come in my paper kit). I found a remnant of the stitched grosgrain ribbon and thought YES, I can use a scrap! It wasn't large enough to tie a bow, so I trimmed it at an angle and added cute yellow brads! I stamped the sentiment, "I'm so proud of you" with Cranberry ink on white card stock and layered it on the blue and red card stock, then popped it off of the ribbon.

I thought I was done, but remembered I must add Taty's name! So, I punched circles with my Creative Memories circle punch, then added the small thickers for her name! It looks like I had this all thought out, but most of the time, my cards just "fall" into place! Lastly, I added green waxy flax from CTMH and tied in a bow. In the picture it moved, but it is supposed to be to the right of the sentiment!

My Goodies
Stamp: Verve Visual Great Expectations
Ink: CTMH Cranberry
Paper: Pattern Paper - CTMH; White card stock - PTI; Red card stock - Michaels; Blue card stock - CTMH; Green Card stock - CTMH; Yellow Card stock - CTMH
Accessories: American Crafts Thickers; Brads
Technique: Stamped
Card Size: 4.25" x 5.5"

5.20.2008

Beyond Your Wildest Expectations

This card is a special request for a special person! This card is for a college graduate who is pursuing a medical career! I customized it to fit her future by stamping a stethoscope and some syringes. I also included her name on the card! The sentiment is popped of of the card for added dimension.

Web Site Update
If you have not checked already, the first step of my new web site is now published. You may view it by clicking here! Please leave a comment and let me know what you think! The About and Shop links are not yet active, but will be once the full web site is launched. However, you can access my blog via www.anewdesignonline.com.

My Goodies
Stamp: Madison Avenue Stamps - Doctor Doctor; Verve Visual Great Expectations
Ink: CTMH Black
Paper: white card stock; Bazzill Basics black card stock; Archiver's pre-scored card
Accessories: MM 5th Avenue blossoms; K&Co adhesive pearls; rhinestones; JoAnn ScrapEssentials circle alphabet clips; black thread; Janome Sew Mini
Technique: Stamped; Stiched
Card Size: 5" x 5"

5.14.2008

Something BOld...Something New

congrats

I made this card to wish someone congratulations on 'something!' It can be for school or any other accomplishment or good news! I used my corner punch (removed the guard) to create the scalloped edge at the top of the card! It was my first time using this technique and I like it! I left the scalloped edge kind of popped off for a three-dimensional effect. The American Craft Thickers are amazing! However, I suggest using some glue dots to make sure they are securely affixed to your paper. Although they are self-adhesive, I find that they are easily removed, so to set them in place, I add a few glue small glue dots on the back of each letter!

My Goodies

Paper: MM 5th Avenue pattern paper; Archiver's Pre-scored card
Accessories: Red grosgrain ribbon; SU! Corner Punch' American Crafts Thickers; MM 5th Avenue Flower/Button
Card Size: 5" x 5"

a scrappy recovery

I used all scraps (minus the pre-scored card) to create this card! I am so proud of it! I have so many scraps, so I feel a sense of accomplishment when I use some of my scraps to create a new card! I stitched around the edges of the green card stock with a straight stitch, going over it a few times for added elements! I added an embossed neutral card stock on top and popped it off of the green card stock. I also distressed the edges. The ribbon is simply tied around the green card stock. The sentiment is added for a friend of ours who is recovering from a stroke. We wish him a speedy recovery! To finish it off, I inked the edges of the card with my cat's eye.

My Goodies
Stamp: Verve Visual Wishes
Ink: SU! Chocolate Chip
Paper: White card stock; CTMH neutral card stock; Michaels army green; Joann Fabric Pre-Scored Card
Accessories: Stitched ribbon; Janome Sew Mini, Brown Thread; Cuttlebug; Swiss Dots Embossing Folder; Chestnut Roan ColorBox Cat's Eye; Distresser
Technique: Stamped; Dry Embossed; Distressed; Sewed
Card Size: 5.5" x 5.5"


My Birthday Celebration!

Here are a few pictures from my birthday celebration this weekend! I did not get any pictures of me playing my new wii! That is so much fun if you do not already have one...GET ONE! It is so interactive and not only for children, but for the entire family! Stay fit with the wii!


5.13.2008

Star-Studded Graduation


This graduation card was customized for the school colors (blue and gold). Various stars are stamped in blue and gold ink on white card stock. I also stamped some stars in gold on blue card stock, then popped them off the paper for added dimension. I layered it on blue card stock then used a ticket punch for the corners of the white card stock. I added gold brads to the corners. The sentiment is stamped in blue at the bottom of the kraft pre-scored card from Michaels. The inside featured white card stock with a graduation sentiment by Ralph Waldo Emerson and more blue stars. There was a matching envelope with blue stars as well!


My Goodies

Stamp: Verve Visual Seeing Stars
Ink: Blue ColorBox Chalk, Gold
Paper: White card stock; Kraft card stock; CTMH Navy Blue
Accessories: Gold brads; SU! Ticket Punch
Technique: Stamped
Card Size: 5" x 7"

5.04.2008

Congratulations to the Graduates


Mother's Day is not the only major event most people need cards for; there are also graduations. Whether high school or college, I can customize a special card for any graduate. Here are a couple of cards I designed for a college graduate.

I used the cuttlebug embossing technique on this card where I inked the negative side of my spots and dots embossing folder in black, then embossed on the green paper, which creates a different kind of distressed effect. Make sure you immediately clean your embossing folder to remove all of the ink. I use quick and easy baby wipes; they do the trick! Next, I stamped the "G-Graduate" stamp with Versamark, then applied black embossing powder and dried. I popped it off of the card and added black buttons.


My Goodies
Stamp: SU! Great Grads
Ink: Versamark; Black ink dot
Paper: Army green & Black card stock (Michael's)
Accessories: Black buttons - MM 5th Avenue; Spots and Dots emboss folder; Cuttlebug
Technique: Stamped; Embossed (dry and heat)
Card Size: 4.25" x 5.5"


The "Congrats" sentiment is stamped into a design on white card stock in various colors. Brads are added for dimension and more color. Polka dot pattern paper is applied to the top half of the card. To divide the two card sections, two satin ribbons are added with the stamped "grad" sentiment popped off the ribbons.

My Goodies
Stamps: SU! Great Grads; K&Co AB Lotus Greeting
Ink: CTHM Autumn Terracotta, Twilight, Topiary, Desert Sand
Paper: PTI white card stock; Bo Bunny Decaf Dot pattern/reversible paper; CTMH Rust card stock
Accessories: Brown satin ribbon - Paper Source; Rust ribbon - Michael's; Brads
Technique: Stamped; Sewed
Card Size: 5" x 7"

3.22.2008

Congratulations Army Grad

Is it time for graduations already? No, you have about a month to prepare; unless, you know someone who's graduating from the U.S. Armed Forces Basic Training! This card is for an Army Basic Training graduate!

This blog post is dedicated to members of all U.S. Armed Forces. Thank you for fighting for our country and protecting our freedom. Without you, America would not be what is is today.

Have a great weekend and a Happy Easter!

Blog Design: Girly by Design