|
|
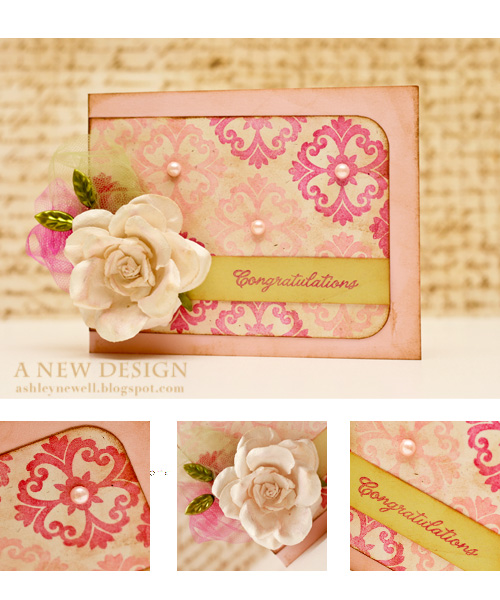
 Hey there! I hope you all are enjoying your week so far! We're at that halfway point, until another "Wonderful Weekend" begins! Today, I'm sharing a card inspired by Lucy Abram's wedding flowers photograph. She hosts challenges over on her blog and this time, we were to be inspired by beautiful flowers her mom arranged for her wedding. I was inspired by the vintage teapot and assortment of colors. I am in need of a card for my friend who is expecting. I'm going to make cards over the next few days until I can decide on one. I think this one screams wedding, not 'mom-to-be!' I'll try again tomorrow! Last year, McArthur and I photographed Susan G. Komen's Circle of Promise's presence at the Race for the Cure on the National Mall in Washington D.C. There, we met Lalah Hathaway and I took a photo with her. Lalah is an ambassador for Circle of Promise and performed before the race began. That day, we also saw Vice President Joe Biden and his wife...really close! Anyway, we found this image on their site recently, so I thought I'd share it with you all. The photos on their front page alternate based on reload, but when I happened to visit, I saw myself on the first click and I nearly fell out of my chair. I just was so surprised. So, join the 'circle' and support finding a cure for breast cancer while you're taking a peek!  Thanks for stopping by today! Instructions- Trim sweet blush cardstock to create an A2 card base (4.25" x 5.5") and ink the edges towards the center with a blending tool and dye inks.
- Trim rustic cream cardstock to about 3.5" x 5" and stamp background pattern.
- Ink the entire rustic cream cardstock with dye inks and blending tool and round one end's corners.
- Trim spring moss cardstock strip, ink, and stamp sentiment, then adhere to cardstock.
- Add tulle with double-sided tape and flower with tacky glue. I inked my flower and sprayed it with glimmer mist for some shine.
- Add hat pins, then adhere cardstock to card base.
- Adhere pearls to background pattern.
Tips & Tricks- When stamping a background pattern where you want something centered, stamp the center image first, then stamp the pattern around it. This technique creates an evenly stamped pattern.
SuppliesStamps :: Hero Arts - everyday sayings; PTI - giga guidelines Ink :: Ranger - antique linen, vintage photo, tea dye; PTI - sweet blush, raspberry fizz Cardstock :: PTI - sweet blush, rustic cream, spring moss Embellishments :: Prima - flower; Maya Road - leaf trinket pins; Craft Supply - tulle fabric; KaiserCraft - pearls; Tattered Angels - dazzling diamonds glimmer mist Tools :: We R Memory Keepers - corner chomper; Ranger - blending tool
 Hey there, Bleeps! I'm happy to report that it's Friday Eve. This week has gone a little faster than last week for me, but I'll be glad when it's back to its usual pace. I'm still tired - going to bed WAY before my usual early morning bedtimes. That's probably the usual time for most.
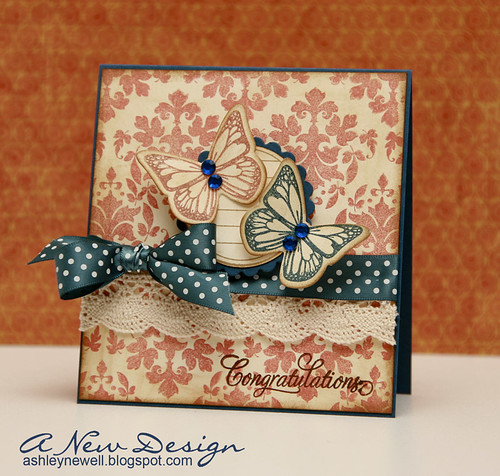
Today, I'm sharing a card that uses a new favorite color combination of mine, navy and melon. I'm really into inking up everything now because it just makes it look finished to me. So, here's how I did it!
Thanks for taking a peek and enjoy your day!
Instructions - Make a 4.25" x 4.5" card base from navy cardstock.
- Trim cream cardstock block, stamp damask pattern, and ink. (TIP: When stamping a background pattern, cut cardstock first, then stamp image in the center and stamp your way to finish the paper to get an evenly stamped pattern!)
- Add ribbon and lace treatment.
- Die cut circle and scallop circle.
- Stamp circle lined pattern and mat on scallop circle.
- Adhere scallop circle to card front center with foam adhesive.
- Die cut two butterflies.
- Stamp one in melon and the other in navy.
- Embellish butterflies with rhinestones and adhere to circle.
- Stamp sentiment and adhere cream cardstock to card front.
Supplies
Stamps :: Papertrey Ink - damask designs + take note (circle journal) + butterfly dreams; Waltzingmouse Stamps - say it with style (sentiment) Ink :: Papertrey Ink - melon berry + enchanted evening; Ranger - antique linen + vintage photo; Clear Snaps - Colorbox chestnut Embellishments :: KaiserCraft - rhinestones; Papertrey Ink - enchanted evening polka dot ribbon; Offray - lace trim Tools :: Spellbinders - scallop circle + circle nestabilities; Provo Craft - cuttlebug; Papertrey Ink - butterfly die
TGIF Bleeps! I have a fast card to share with you today! I even colored it a tiny bit! I wanted to share with you that I decided to go to CHA as of a few hours ago! I found a decent deal with less than 24 hours to plan and pack! As I type this, I still haven't packed, but I did take a nap to get on west coast time! I can't wait to see all of my crafty peeps! I'm super excited because I was not planning this or did not expect to go. That is until, McArthur told me to find a good deal and go! Sorry ladies, but I think I've got the best man out there! Gotta love that! I'll be hanging out with great people over the weekend and be at the trade show for a tiny bit of time on Sunday too, so I can meet some of the greats! I can't wait for the parties, giggles, gasps at how short I am, and photo opportunities! I'll be back next week with stuff to report of course, but until then, follow me on Twitter/Facebook to get a 'live feed!' The information is on my sidebar.
To some of you, I'll see you this weekend. To my other bleeps, thanks for stopping by and I hope to meet you one day!
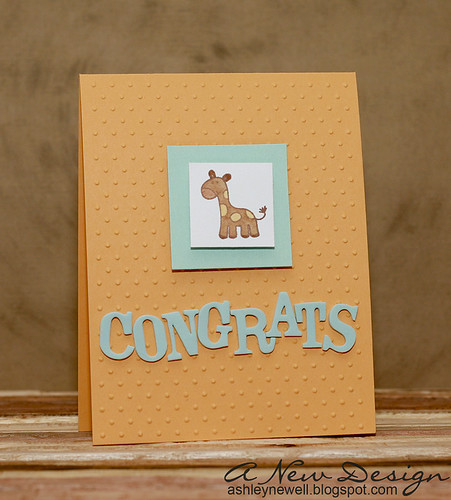
Instructions - Trim cardstock to create an A2 card base.
- Emboss card front.
- Stamp giraffe, color and matte on blue square.
- Add square to card front center.
- Add thickers to spell CONGRATS.
Supplies
Stamps :: Hero Arts - giraffe Ink :: Stampin' Up! - chocolate chip; Copic markers Paper :: Papertrey Ink - spring rain, white, summer sunrise Embellishments :: American Crafts - lullaby thickers Tools :: Provo Craft - swiss dots embossing folder, Cuttlebug
 To Buy this card, click hereHey there! How is it going? Everything is going great around my way. Last night, I had to run to Georgetown (Ritz Carlton) to help McArthur photograph a music release party. A few local celebrities like TV anchors, Leon Harris, Jim Vance, and Andrea Roane were there. Ginuwine and his wife Sole also made an appearance and were very cordial. They loved taking pictures and here is one that I took of them! Neat, huh?! His new album is to be released next month I believe. He is a DC Metro native and grew up not too far from my Maryland hometown. I saw him in concert while I was in undergrad, so it was so fun to see him again! He's a really nice person, along with his wife as well.  Anyway, I made today's card last night after returning from Georgetown and needed to make something quick because I was tired. So, I pulled out the SEI Bridgeport collection. I won the collection from Cath's Moxie Fab World blog from the Citrus Color challenge a few weeks ago. When I received my package, I was so happy to see that she sent an SEI collection because I really like SEI and this collection is beautiful. The textures and colors are by far my favortie parts to this collection. I can't wait to use it again. Thanks for stopping by and enjoy your day! Card Instructions- Trim smokey shadow cardstock into an A2 card.
- Trim patterned papers to 4" x 5.25" and adhere together.
- Tie ribbons around (first grey ribbon, then purple ribbon into a bow).
- Adhere to card front.
- Stamp sentiment on cardstock sticker and adhere to card front with foam adhesive.
:: My Goodies {Best Wishes} ::Stamps: Papertrey Ink - mixed messages Ink: Papertrey Ink - smokey shadow Cardstock: Papertrey Ink -smokey shadow Patterned Paper: SEI Bridgeport collection Accessories: SEI- ribbon + cardstock sticker (Bridgeport collection) Card Size: 4.25" x 5.5"
Happy Monday, everyone! How was your weekend? Mine was very refreshing! I got to spend time in my studio, adding some items (not purchased - just organizing) and even made a few cards. I went to my friend's dinner party at Maggiano's and that was very delicious and fun. Yesterday seemed quite long, but I didn't mind that at all! I enjoyed a hot cup of coffee while some electrical contractors completed a few jobs around the house. I did lots and lots of laundry. I finished the second family room (which is located off of the studio). We were able to enjoy it for most of the day and are loving the new spaces. Mac can watch TV/play video games, while I'm crafting away! I'm glad I'm not in a room all alone anymore! Anyway, here are two cards inspired by the last couple of Loonie Stampers challenges. The colors was very challenging for me, but I finished them (WHEW)! Oh yeah, those bridal pictures I 'modeled' for McArthur are posted here. It may not look like it, but I honestly could barely breathe! Yeah, I got in my wedding dress, but it's nothing like when I wore it on the wedding day. He is a great photographer. I just tried to help him out since he wanted to take some pictures of a wedding gown in a creative way.
 Card Instructions Card Instructions- Trim lavender moon cardstock into an A2 card.
- Stamp background text on aqua mist cardstock and adhere to card front.
- Punch spirals on white cardstock, stamp lines + sentiment, then corner round the edges.
- Tie a ribbon around the white cardstock.
- Stamp "G" and die cut into a circle.
- Die cut a star and adhere to white cardstock.
- Add "G" circle die cut with foam adhesive.
- Adhere white cardstock to card front using foam adhesive.
:: My Goodies {Congratulations G} ::Stamps: Stampin' Up! - great grads; Rusty Pickle - journal stamp Ink: Papertrey Ink - aqua mist + lavender moon Cardstock: Papertrey Ink - white + lavender moon + lemon tart Accessories: Papertrey Ink - lemon tart ribbon; Provo Craft - cuttlebug + concentric star die EK Success - corner rounder; Stampin' Up! - spiral punch; Spellbinders - circle nestabilities Card Size: 4.25" x 5.5"  Click Here to Buy This Card
Card Instructions- Trim smokey shadow cardstock into an A2 card. Trim about 1/4" off the card front.
- Stamp background retro designs on hibiscus burst and lemon tart cardstocks.
- Add smokey shadow strip and adhere altogether.
- Stamp flowers and sentiment.
- Add ribbon.
- Adhere to card front.
- Add cardstock to side of the card front and inside of card (hisbiscus and lemon tart).
:: My Goodies {Wishing you a Happy Birthday} ::Stamps: Papertrey Ink - background basics (retro) + wishing you; Stampin' Up! - pocket silhouettes Ink: Papertrey Ink - smokey shadow Cardstock: Papertrey Ink - hisbiscus burst + lemon tart + smokey shadow Accessories: Papertrey Ink - white ribbon Card Size: 4.25" x 5.5"
 Hey Everyone! How are you?! We tackled the IKEA furniture and it was so easy in the beginning. I did one entire piece by myself. Then, I helped Mac put together the larger pieces. We were doing so well until the end. Why is it that the easiest tasks are so daunting? We ran out of steam and left one final step to complete tomorrow. So, I'm going to start hauling stuff to the new space tomorrow night!!! I did not want to start before the furniture was in place because I thought I might have to keep moving it around other stuff. I'll keep you posted on the progress! Of course I did not make a card yesterday, so here is one that I made a few weeks ago. It is a Hawaiian-themed graduation card! This was a special request to match a graduation gift someone is giving to a graduate. Thanks for visiting today! Take a peek at the Susan B. Komen Race for the Cure pictures from last weekend. I even took a couple! I even saw VP Joe Biden and his family (very close) and photographed Lalah Hathaway. VP Biden was really funny and introduced his wife, Dr. Jill Biden who sort of participated in the race (see pictures). Lalah was a really cool person and sang at the event. I have a picture with her too and will share when Mac 'releases' it! Card Instructions- Trim white cardstock into an A2 card.
- Stamp hula ladies on white cardstock and color.
- Stamp sentiment.
- Trim kraft cardstock to fit card width, then create grass skirt with scissors, and adhere to card front.
- Add ribbon and flowers.
:: My Goodies {Congratulations to the Graduate} ::Stamps: Verve Visual - great expectations; Inkadinkado - hula ladies Ink: Close to My Heart - black; Copic Markers Cardstock: Papertrey Ink - white + kraft Accessories: Making Memories - flowers; Ranger - stickles; Papertrey Ink - hibiscus burst ribbon
 Hey there! I hope you all had a great weekend. My weekend was very lazy, but at the same time busy running errands and finishing a few projects before the deadline. YIKES! I made this graduation card last week. Pink and black color combination is perfect for the female college grad. Well, I hope you enjoy this card and thanks so much for stopping by. Card Instructions- Trim sweet blush cardstock to an A2 card.
- Trim patterned paper to fit top half of card front and adhere.
- Trim black cardstock strip and adhere to patterned paper.
- Tie ribbon + button + rhinestones around metal frame and adhere.
- Apply sticker letters.
- Apply thickers.
:: My Goodies {congrats grad}::Cardstocks: Papertrey Ink - sweet blush + true black Patterned Paper: Papertrey Ink - black and white basics Accessories: Papertrey Ink - black ribbon; Hobby Lobby -metal circle tag + rhinetsones; Making Memories - letter stickers + button; American Crafts - thickers
 OMG...it's already Thursday! YAAAY - It's almost time for the weekend!! The other night, I made this card for K. Werner's 50th Color Challenge. I really liked the color combo and had an idea driving me crazy in my head. Has that every happened to you? It is happening to me more and more and it seems like I'm breathing card designs! HEE Anyway, I sketched out the layout, then while creating it, I selected what parts of the sketch would be certain colors. Now, this is not a technique that I use all the time. I remember a time when I could not even sketch my ideas. It's neat how we evolve over time. Since I purchased my wood-grained background stamp from Michaels earlier this month, I've been thinking of different ways to use it. When I saw this challenge, that stamp was embedded in my brain to use, so I did! The part that took the longest was deciding the sentiment. I sketched something different, but decided to use thickers. Then, I realized after adhering some of the thickers that I didn't have all of the letters in red to spell the sentiment. UH OH! SHOOT! What should I do? OOOH! Use some coordinating color thickers and alternate!! There's always a solution in paper crafting and that's why I love it. It is like problem solving to me. Since it's graduation season, 'CONGRATS!' fits perfect! Oh yeah, I forgot to photograph the back, but there are cute red polka dots stamped on the back!!! I was going to use it on the front, but thought it was too busy. I just discovered that decorating a coordinating pattern on the back is so NEAT! Maybe I should photograph it (later)! I hope you all like how it turned out. I hope to be back tomorrow with a fast card, but if not, you still got one on Monday this week! I will share a card regardless! There's always something laying around here to share. One of the engagement session pictures are up!! These are just a select few of the shots taken. Enjoy them HERE! They're awesome! Thanks for coming by today and I'll catch you tomorrow! Card Instructions- Trim turquoise cardstock to an A2 card.
- Trim brown cardstock into a rectangle and stamp wood grain pattern, then heat emboss.
- Corner round brown cardstock bottom edges.
- Take a strip of red cardstock and create scallops using slot punch (deeper effect).
- Adhere scallop edge cardstock to top center of card base.
- Tie ribbon around wood grain cardstock and adhere to card front with foam adhesive.
- Add thickers and rhinestones.
- Corner round the edges of card front.
:: My Goodies {CONGRATS!}:: Stamps: All Night Media - wood grain background rubber stamp (Michaels) Ink: Versamark Cardstocks: Papertrey Ink - dark chocolate + pure poppy; Close to My Heart-turquoise Accessories: Heat Gun; White Embossing Powder; American Crafts-thickers; Kaiser Craft-rhinestones; Stampin' Up!-so saffron ribbon + slot punch; Corner Rounder
 What's going on out there? Since this week is Earth Week, I thought I'd make an eco-friendly card. I used recycled paper and reused a recylced tag. The tag was originally wrapped around a hand towel I picked up at West Elm a couple weeks ago. The towels are made from organic cotton and they marketed it with recylced papers and fibers. I liked the tags so much that I saved them! I have one more! I covered the West Elm logo with the sentiment and lightly stamped over the 'green' label with a sentiment. I left the tree that was already centered on the tag. Since we use so much paper in our craft, try to reuse some materials this week or see if you can find some recycled paper or anything green! I know a really good way to use embellishments we already have and that's those extra buttons that come with our clothes we buy. I save all of mine in a jewelry box and then use them as needed. It's just my own way I think I contribute to conserving and saving instead of throwing them out. GO GREEN! Thanks for stopping by and have a great Tuesday. I'll be back tomorrow with my video. I recorded it last night! I hope you like the card I made. Card Instructions- Trim kraft cardstock to 5.5" x 4.25" (cut 8.5"x11" cardstock in half at 5.5", then score at 4.25")
- Stamp sanded background on card front.
- Trim patterned paper into a rectangle.
- Trim slightly larger new leaf cardstock and scallop edge the right side.
- Adhere patterned paper to new leaf cardstock.
- Add cording and tag; doodle around tag.
- Stamp sentiment and adhere.
- Adhere to card front with foam adhesive.
:: My Goodies {Congratulations}:: Stamps: Stampin' Up! - sanded + great grads + congrats
Ink: ColorBox-chestnut; Stampin' Up! - chocolate chip marker Cardstocks: Papertrey Ink - new leaf + kraft Patterned Paper: DCWV - The Green Stack recycled paper Accessories: Michaels - jewelry cord; Stampin' Up! - scallop edge punch; West Elm-tag
 This is a not so fast card! Sorry, yesterday I was a little under the weather and took a break from the studio. But, I still have a card to share with you! I made this one after last week's K. Werner Challenge, but I decided to still use the colors (minus the green, which somehow I forgot until the end). I thought the colors screamed "teenager," so that's who I had in mind when I created it. I hope you have a great weekend. Tonight, I am doing the Girls Night Out event at the National Harbor and will be selling cards (hopefully)! Mac will be the photographer. Click here for details if you want to come! Tomorrow, we're doing an engagement photo session in Old Town, Alexandria (love that town)! I'll share the photos with you when they're done in about a week! We also have another engagement shoot at Washington Nationals baseball stadium on Sunday. BUSY BUSY BUSY BEES! It's going to be a beautiful weekend, so we'll have a blast and hope you do as well! Card Instructions- Trim pacific point cardstock into an A2 card.
- Trim white cardstock into a square and stamp wood grain background (stamp off on scratch paper, then stamp on your white cardstock).
- Add pom pom trim and tie ribbon around into a bow.
- Adhere white square to card front with foam adhesive.
- Die cut scallop circle and adhere.
- Add chipboard letters, embellish with white gel pen.
- Add glitter to chipboard star and adhere.
- Round corners.
:: My Goodies {You Rock!}:: Stamps: All Night Media - wood grain background rubber stamp (Michaels)
Ink: Stampin' Up!- pacific point Cardstocks: Papertrey Ink - white; Stampin' Up! - ruby red + pacific point Accessories: Papertrey Ink - true black ribbon; Michales-Offray pom pom trim; Spellbinders-circle nestabilities; Provo Craft - cuttlebug; corner rounder; Heide Swapp-chipboard star (originally copper); American Crafts-chipboard letters; Uniball-signo white gel pen
 I hope everyone had a Happy Easter! We safely journeyed to Philadelphia and back and had a great trip! We ate at the Continental yesterday for brunch. Cool spot! The twins were so adorable, tiny, and CUTE! I held them, fed them, and even put one to sleep! It was my "first" time! I had NO clue what I was doing, but quickly caught on. Twins seem like so much work, especially when you have an almost 2 year-old running around! I did get to see what their daily life is like. Better them than me! This card is inspired by this week's Loonie Stampers Challenge. The colors were 'babyish' and also involved the use of lace. So, I think that kind of decided the baby-themed card here. I left it with a simple sentiment and I think the card could be for the unknown expecting baby (boy/girl) since the card is pink, blue, brown, and cream. I used PTI's Guidelines 2 to create the pink patterned paper. I chose to stay monotone for a few reasons: (1) the color challenge limited me in choices and (2) my sweet blush + aqua mist inks are running out (I've had them over a year now and they're very light colors, so it's time for reinkers in my next order). Card Instructions- Trim pink cardstock into a rectangle and stamp background design.
- Add aqua mist cardstock to pink cardstock and stamp sentiment at bottom.
- Chalk edges.
- Adhere to an A2 card front.
- Add lace and tie ribbon into a bow.
- Add trinket pins.
:: My Goodies {congratulations}:: Stamps: Papertrey Ink - Guidelines 2; Stampin' Up!- Congrats
Ink: Stampin' Up! - chocolate chip; ColorBox-chestnut roan chalk Cardstocks: Papertrey Ink - sweet blush + aqua mist + dark chocolate Accessories: Papertrey Ink-vintage cream ribbon; Michaels-lace; Maya Road-pearl trinket pins
 Hey there! So glad it's Friday EVE! Thanks so much for stopping by yesterday and watching my very first video! I appreciate all of your generous comments!! I hope to improve over time! :) Today's card was inspired by SCS Color Challenge. I really liked the color combo, but didn't know what I was going to make! I started with Great Friends and stamped the frame using my new SU! markers because I do not own all of the stamp ink pad colors. I thought this was the most effective way (other than investing in the ink spots) to get most of the colors quickly! I used the technique where you color onto the rubber stamp. It works GREAT! Just as if I stamped it. So, I'm very pleased. Also, I used Great Grads for the sentiment and if you have it, you know that there are three congratulations sentiments on one stamp, so the marker worked wonders to stamp the one I wanted. I will be needing another graduation card, so I made it "congratulations." I practiced using my SU! slot punch to make larger scalloped edges and love the technique. I have no idea why I haven't been using it, but I will now...watch for it soon! By the way, I am uploading my cards on Flickr and many times before I post them here, so if you want to see cards and projects I've completed before a blog posting view them here. I've also added a Flickr badge on the left side of the blog that features the most recent uploaded card! Speaking of photos, did you notice a slight change in my pictures? I started using Mac's camera, an Digital SLR (is that right?!), and it works wonders! Now that I have identified the correct settings to use, I feel comfortable using it. Boy, did I make his day when I said, "I love your camera!" I know he thinks I'm going to start photography now, but naaaah, only for my projects and I'll leave the rest for him! I enjoy directing the sessions just fine. Oh yeah, we will photographing a TWINS infant session this weekend....HOW FUN! I'll share with you the maternity session from a couple weekends ago soon, along with a couple of my personal projects used! Thanks for coming by and have a wonderful day! Card Instructions- Trim bashful blue cardstock into an A2 pre-scored card.
- Trim close to cocoa cardstock into a rectangle/square, dry emboss it, scallop edge one end, and corner round the opposing two ends.
- Stamp frame on baskful blue cardstock, cut out and adhere to close to cocoa cardstock with foam adhesive.
- Stamp flowers on so saffron cardstock, cut out and adhere to frame.
- Stamp sentiment, cut strip, add button + rhinestone, and adhere to frame/cardstock.
- Tie ribbon into a bow.
- Adhere close to cocoa cardstock with foam adhesive to card front.
- Corner round the card base.
:: My Goodies {congratulations}:: Stamps: Stampin' Up!-great grads + great friend
Ink: Stampin' Up!-close to cocoa (marker only) Cardstocks: Stampin' Up!-bashful blue + so saffron + close to cocoa Accessories: Stampin' Up!-chocolate chip corduroy button + scallop edge punch + so saffron ribbon; KaiserCraft-rhinestone; Provo Craft-cuttlebug + swiss dots embossing folder; corner rounder
 Yes...it's TGIF Eve! :) Today's 'bold and new' card has a punk style to it...well, at least I think so! The chandelier is actually a STICKER! Isn't that weird? Probably not for you, but I don't care for stickers too much. I saw these American Craft beauties and had to have them. I thought of a way to use them so they don't look like stickers. I apply them to my cardstock, then cut them out like I do stamped images or even rub-ons. I added rhinestones to the light and stamped the sentiment on pattern paper. It is a very basic card, but packs a lot of color. Tonight, I finished altering some baby wood blocks and can't wait to share them with you and how they are used. I plan to use them next weekend and will be able to share the results the week after. Stay tuned! Oh yeah...they aren't for me...for those thinking 'those' thoughts! :) I haven't forgotten about the How to Stamp PTI Guidelines video I promised. I plan to record and edit it by the weekend showing a new card! Happy Thursday to ya! :: My Goodies {Absolutely Fabulous}:: Stamps: Papertrey Ink-Mixed Messages
Ink: Papertrey Ink-raspberry fizz Cardstocks: Papertrey Ink-white; Stampin' Up!-taken with teal Pattern Paper: Papertrey Ink-bitty dots Accessories: Papertrey Ink-black ribbon; KaiserCraft-rhinestones; dimensionals; American Crafts-remarks fashion accents stickers
 When I saw K. Werner's Color Challenge earlier today, I just HAD to create something with those colors. Oh how pink and brown look so lovely together. But, when I sat down to create, I stumbled and stamped a couple of things, then said YUK! Finally, I pulled out Papertrey Ink by Dawn's new Damask Designs set and started stamping. I decided on a simple layout and added a little texture with embossed dots. Don't you all know how much I love a damask design? Just take a look at my blog design. ALL DAMASK! :) My bedding is damask and probably a few other things I have, like a skirt! This design is so classic, yet trendy now. I like how it can be used in various color schemes. Anyway, have a great Friday Eve! :) Step-by-Step- Trim dark chocolate cardstock to an A2 card.
- Trim close to cocoa cardstock to 3.75"x4.5", then stamp damask design.
- Using a Scor-Bug, score dotted lines on bottom of cocoa cardstock.
- Stamp sentiment.
- Tie ribbon around cocoa cardstock into a bow.
- Mat on white cardstock.
- Add flowers.
:: My Goodies {celebrate}::Stamps: Papertrey Ink-damask designs Ink: Colorbox-chestnut Cardstocks: Papertrey Ink-dark chocolate + white; Stampin' Up!-close to cocoa Accessories: dimensionals; Papertrey Ink-sweet blush ribbon; Stampin' Up!-pretties kit flowers; Scor-Bug Card Size: 4-1/4 x 5-1/2
 Edited to Add: Edited to Add:Many requests regarding the flourish stamp used above. It's an Inkadinkado wood mounted rubber stamp that I purchased at AC Moore. There is no 'name' listed on the stamp, but you should be able to locate it on their wall of stamps. Last time I checked, it was still there. They have two sizes, small and large. I used the large one on the card above and stamped it twice. I hope you can find it!    I made four cards using Four Square by Stampin' Up! All of the cards are quite different, but at the same time similar because I used kraft cardstock and brown ink. I used simple one layer stamping, then added the square as a dimension. I only used ribbon on one, but that was because I took it too far! I was supposed to do simple cards only! I have a lot of cards and I have finally decided to part with them. Most of the cards, if not all, have all been posted on the blog, so you have seen them before. I am going to slowly, but surely update my online store. I have neglected the store for quite some time now, but I wanted to make sure I used it more this year. So, be on the look out for some 'for sale' posts...hopefully sooner than later. Not interested in my cards? Well, you may want to keep an eye out for some craft supply for sale postings. Soon, I will be looking for new homes that will appreciate some great craft supplies I have neglected over the past few months from Prima flowers to stamps. I hope all of my readers can find something to buy. So, start saving a few dollars and get ready! Anyway, for these cards, I'm not going to post instructions or supplies because tonight I'm being lazy...really...and I want to go watch American Idol (on TiVo). But, if you have any questions on what I have used or how I made the cards, please feel free to ask by leaving a comment or e-mailing me. I'll update the post as necessary! Want these cards? They will be available to purchase very soon!
 OMG - it's Thursday already! YAAAAY! I really do not have anything special to share today. Oh yeah, I purchased a Making Memories embellishment organizer from Michaels and love it! It has a top that opens and two drawers with lots of storage space. I have seen it many times and thought that's just a bunch of 'cubbies' not knowing that I would eventually buy one. It holds so much little stuff. It was on sale, so I decided to try it as organization is high on my priority list. It has organized many of my small embellishments, such as brads, letters, clips, chipboard, metal effects, tags and even scraps that did not make a project. I have put a lot of stuff in it, but still have a lot of space left. I have not been using some supplies because I forget about them tucked away in a storage box...INEFFECTIVE STORAGE METHOD! Now, I have a specific place to go for those tiny items where I can easily find them. I also jotted down the maker/name of the supply and dropped it in the bottom of each cubby so I would know how to get it again if I ever were to run out! That's a way to overcome "what is this" when you take items out of the original packaging. Well, I hope you all enjoy your day and thanks so much for dropping by to 'see' me! Instructions: - Trim brown cardstock to 4.25" x 5.5" and set aside.
- Die cut squares and scallop square out of cardstocks.
- Stamp sentiment on green cardstock.
- Using dimensionals, adhere the squares to the scallop square.
- Trim 1/2" patter paper and adhere to card base.
- Trim 3.5" ribbon and adhere on top of pattern paper.
- Add decorative brad to ribbon.
- Adhere scallop square over ribbon and pattern paper.
- Adhere card base to pre-scored A2 card.
:: My Goodies {congrats}::
Stamps: Stampin' Up!-Say it With Scallops
Ink: SU!-Chocolate Chip
Cardstock: Papertrey Ink-sweet blush; dark chocolate; spring moss
Patter Paper: K&Co-Amy Butler Sola Lounge Stripes
Accessories: Chatterbox-brad; Papertrey Ink-spring moss grosgrain ribbon; Spellbinders-square + scallop square nestabilities; cuttlebug; Papertrey Ink-pre-scored A2 card
Card Size: 4.25 x 5.5
|
|


 Hey there! I hope you all are enjoying your week so far! We're at that halfway point, until another "Wonderful Weekend" begins! Today, I'm sharing a card inspired by Lucy Abram's wedding flowers photograph. She hosts challenges over on her blog and this time, we were to be inspired by beautiful flowers her mom arranged for her wedding. I was inspired by the vintage teapot and assortment of colors.