After December 4, 2010, all future posts are on a new site. Please subscribe to my NEW feed at www.ashleynewell.com or click below to subscribe to the NEW feed.
Hey Everyone! First, I'd like to thank you for all the wonderful comments I've received over the past few days. I have really enjoyed reading them and appreciate all of your kind words. For my new blog readers, Welcome!
Today, I have a special post for my husband of 5 years, McArthur. Friday was our wedding anniversary, but today is our 13th anniversary together. So, I thought it would be sweet to celebrate here on the blog for the "other" anniversary. So, check out the card and if you're interested, feel free to check out the tribute and videos as well.
Since the 5th wedding anniversary gift centers around wood, I thought it would be cool to design a wood grain card as a focal point. I stamped the pattern on the back of Jillibean Soup patterned paper (white macaroni) since it has a great kraft color - and used black ink. I die cut the car, stamped and paper pieced it together. The polka dot patterned paper is by My Mind's Eye (haunted collection, harlequin paper). I added some distress ink. I stamped polka dots on cream cardstock, then stamped the sentiment. Added a little zig zag stitching, then adhered it to the A2 card base and I was done. I popped the car right off the center to finish it off. Simple and masculine.
The choice in colors - decided based off our wedding colors of cranberry and gold. Instead of designing the exact colors in a formal style of card, I made them a little more flat using a burgundy and kraft and coupled it with black (like his tux) and cream (like my dress - it was not white even though it looks like it in photos)!
I decided to use this car stamp set as my focal point along with the wood grain pattern to celebrate me and McArthur's journey together. We have spent the past 13 years together - through undergraduate, graduate, and law school. We've experienced some great times and even a little down times, but we have held each other up along the way making sure both of us has a smile and laughs. I've enjoyed the ride so much with him over these past few years and I can't wait to continue that journey for many more years.
Seriously, I think I have the best husband in the world. He loves CHA! I mean enough said, right?! But really, he loves me unconditionally and with that there's not much more I can ask for in life. So, here is a short video I compiled using our wedding photos and video highlight from our wedding to take us back down memory lane to 2005!
UPDATE: This card has been temporarily removed for publication. You may find this card in CARDS magazine February 2011.
Happy Friday to you, Bleeps! I hope you all have a fabulous weekend! Thank you so much for joining me on Moxie Fab World's blog yesterday. It was super fun! Today, I have a card to share with you, along with a video tutorial.
Instructions
Trim patterned paper to about 4" x 5.25", ink the edges, add ribbon to corners, and adhere to rustic cream A2 card front.
Stamp lacey frame on rustic cream cardstock, cut out, and ink.
Ink the chipboard embellishment, stamp sentiment, and pop off lacey frame.
Ink card front edges.
Video Tutorial
Here is a video tutorial on how I made the crinkly stained ribbon used in this card.
Today, I'm sharing a card using some of my scraps I had on hand, inspired by The Shabby Tea Room challenge for the week. I recently used My Mind's Eye Lush and Creative Imaginations' notes ledger patterned papers for other projects and thought they paired well together for a card. The sentiment is also a scrap. If only you could see the back of it; it is all stamped on! Don't forget to use the back of scraps as well - just a little hint I thought I'd share.
**Trying a new photo sharing experience here. Let me know if you like it. My photos now highlight some of the card elements. Is it worth it? Do you like it?**
Also, don't forget, I have a new stamp set for sale here!
I hope all of you are enjoying your Easter weekend. "See" you tomorrow for a fun Caardvarks challenge!
Thanks for "hopping" by this Easter to take a peek!
Instructions
Trim ocean tides cardstock to create an A2 card base.
Trim edge from notes ledger patterned paper and ink.
Adhere notes ledger paper to polka dot patterned paper and ink.
Tie twill tape into a bow, then adhere to card front.
Add rhinestone flourish.
Stamp sentiment on rustic cream scrap, hand cut, crinkle, ink and pop off card front at an angle.
Ink flower and add to ribbon knot with glue.
Supplies
Stamps :: Waltzingmouse Stamps - say it with style Ink :: Ranger - tea dye, antique linen Cardstock :: PTI - rustic cream Patterned Paper :: My Mind's Eye - Ooh La La collection (la dee dee); Creative Imaginations - notes ledger Embellishments :: Prima - flower, rhinestone flourish; Melissa Phillips - twill tape
Hey there, Bleeps! Today, I have an anniversary card to share with you. It's pretty simple and not feeling too chatty as I type this. I did make some banana nut bread and it turned out great. I'm now doing Project 365 on my iPhone, which is the easiest way for me, so I'll probably tweet my photos every day or so. I'll share my banana nut bread photo later. The recipe is by Laura and it's super easy and fast. Well, that's about all I have to share, so I'll just 'see' ya'll tomorrow!
Have a great day and thanks for stopping by again!
The card that McArthur MADE for me for our anniversary
Flowers McArthur sent to my job
Water spilled out on car ride home...going to refill!
Our kitchen before the surprise (taken with an iPhone camera)
Our kitchen after the surprise
Larger photo after the surprise...
Yes, I 'jam' listening to my iHome while cooking...
Yes, I keep my counters this clean (USUALLY)...
now for the story...
Hey there, Bleeps! I thought I'd do a Saturday leisure post for you all to share our anniversary tidbits since you all gave us so many well wishes, this was the least I could do! As a side note, McArthur was out of town (in Dallas) for work for the past few days. He did not return home until late on Thursday (our anniversary). He made sure he made it back, even if it was to see my face! I picked him up from the airport and we had a glorious Chick-fil-A meal in "CC" (my car)! We were very excited to see one another, having been a part for the past 6 days or so.
The Card
When we got home, he couldn't wait to share his card with me. If you've been a "Bleep" for a while, you'll know that last year he got Dawn McVey to make me an anniversary card, so I was really excited to see what he was going to do this year. Well...he made that card pictured above! When I pulled it out, I screamed, "YOU MADE THIS?" Don't get me wrong, McArthur is a great painter and artist, but card maker, never thought about it! While away, he went to Target and bought all of the paper crafting supplies he could find. I call the card a 'hybrid' card because he used some pre-made cards (the butterfly portion) and combined it with other papers. He wanted a focal point, so he cut out "TODAY" from USA TODAY newspaper that the hotel so graciously provided. This is one of the cutest cards! What do you think?!
The Flowers
So, the story goes a bit like this: Thursday, McArthur calls me around lunch time to ask if I was at work. I told him no, but was on my way back because I met my high school cheerleading friend for Pho! So as the day went on, he started texting me about a 'delivery.' I told him no delivery. At that point, I knew he was getting anxious. Long story short, the florist never made the delivery. He was so upset. Fast forward to Friday, and the florist finally delivered the flowers pictured above mid-afternoon. I took a photo and sent to McArthur to express my gratitude, but only to find out that is NOT what he ordered. I felt so bad for him because ordering flowers can be a daunting task. Regardless, I thought they were pretty and it was a thoughtful gesture!
The Surprise
As I was on my way home from work on Friday, I told McArthur I was making a few stops (to the mall) to pick up some items for my Thanksgiving dinner plans. Did I mention I really like Williams Sonoma? Okay, back on track! He said it was okay and I told him I would be home shortly. Well, after an hour passed, he called again. I had to make a U-Turn from my second stop to rush home per his request. When I drove towards the house there was a what I like to call a "random" van parked in the driveway. I drove past and parked. Walking up to the door, I peered into the windows trying to figure out SOMETHING! He never gets anything past me! So, I figured he was getting our ice maker fixed (which is broken). He heard me at the door and opened it swiftly. He ushered me upstairs and VOILA into our updated kitchen. I think I was speechless; not because I did not like it, but because he REALLY SURPRISED me this time! It is so beautiful and the fact that he took a photo of the tiles I picked out at the store over a year ago, remembered that he had them, and came up with the design himself was really, really thoughtful. Since moving into this house, I wanted my backsplash tiled and now it is!
Live in the Washington DC area? Tile work was completed by Global Remodeling, Inc. - Jalal Tosi. If you're interested, I have additional contact information.
Random Tidbits
At the crack of dawn, I'll be on a bus heading up to Rehoboth Beach, Delaware on a shopping trip with my mom. Let's hope we find some good deals!
My brother-in-law just 'opened' his website, which features his music. Please note, if you do not like hip hop or rap you may not want to listen! I really like it and is proud of his talent. One of his singles is also on iTunes under his artist name, Hendrix Law. Check it out here.
Thanks so much for stopping by and reading about our anniversary and extra tidbits. I hope it was somewhat entertaining!
This post is dedicated to the celebration of our wedding anniversary (just a fair warning)! Four years ago today, McArthur and I decided to tie the knot. However, exactly 11 years ago when we started dating I knew we shared something special. We dated 7 years before Mac proposed and got married near our 8-year dating anniversary. So, when we celebrate our anniversary, it is not only our wedding anniversary, but our anniversary of our relationship.
I met Mac when I was 13 years old, he was 14. I traveled to North Carolina to attend a summer science and math camp for I think 1-2 months and he attended as well. We were friends, but merely that. At the end of the camp, we said our goodbyes and parted our ways, never to exchange numbers. We ran into each other twice since the camp, once in Baltimore and the other in Raleigh. Finally, in Raleigh he asked for my number and I gave him my pager number (the sign of the time)! I never returned his pages because the number was unrecognizable! HAHA One day, he saw me walking on campus (our third run-in) and he gave me a ride. I can remember that day so vividly, so clear. That was our last run-in because we never parted again.
Our journey together has been amazing. It's such a remarkable life experience to see someone, let alone your partner in life grow. Mac and I share a lot of commonalities, especially the arts; however, we also have our differences, such as he's the "talker" and I'm the "watcher." Whether we're celebrating 4 years of wedded bliss or 11 years of partnership, I'm so thankful for our time together and our relationship we have built.
Today, I say I love you to my husband, my partner, my best friend! Happy Anniversary, "Flave!" (...don't ask about the nickname, I give him a new one every so often and he does the same to me!)
The photos of us above are in chronological order from old to new. I wish I gave more time to this to dig up and scan some really old ones so you can see how young we looked, but darn it, I ran out of time.
Thanks for stopping by to share this day with us and I hope you enjoy the card, which was quite difficult to make. It is inspired by SCS Sketch SC255.
Instructions
Trim navy carstock to create an A2 card base.
Trim white cardstock into a block and adhere to card front center.
Trim green cardstock strip and adhere to card front.
Trim kraft cardstock block, stamp text background, stamp leaves, stamp sentiment, and adhere with foam adhesive on card front.
What's going on folks?! It's almost the weekend and today marks a few great weather days to come in the DC area...WOO HOOO...I {heart} warm weather! I was inspired by SCS Color Challenge and made this card. I like pink and gray together, but the rose red was throwing me off, so I added it with a floral design by coloring my acrylic stamp with my SU! marker (it worked even though it looked like it wouldn't - you have to 'huff' it or breath heavily on it to get the ink moist enough to stamp evenly). That stamp set is one of the many I won during Paper Crafts' Stamp It Week! I received so many goodies!!
Thank you all for stopping by so I can share my creations and I hope you enjoy your day!
Card Instructions
Trim pink cardstock to an A2 card.
Trim gray cardstock into a square.
Dry emboss design on gray cardstock and sand.
Stamp flowers, cut out, and adhere to gray cardstock + add rhinestones.
OMG, I finally finished editing my video (well, Mac did)! This was a lot of work, so since it's my first, please don't be too cruel! I'm sure my next will be better because I know what to expect and how to work things a little better. So, you get to 'hear' me and maybe one day watch me, but I hate being on camera. It's such a rough version, but I'm trying to get the hang of shooting a video!!
Anyway, this video is how I stamp a background using Papertrey Ink's Guideline 1 set. When learning how to stamp a background, I suggest starting with a small piece of cardstock for projects, then stamp larger sheets if you want once you perfect the technique. Trust me, practice makes perfect!
Have a great day and enjoy the 'show!' EDITED TO ADD: A new video will be created with a new card soon. This video and card was removed for publication purposes. Thanks in advance!
I'm back with my background-building card for Papertrey Ink's Blog Hop. To join in on the fun, please log in to the forum!
**Sorry, like a DORK, I forgot to take a photo before I finished the card, so I explained it in text for you.
How I did it What I did here was create a three-panel background. To simulate pattern paper strip panels, I stamped damask designs on three strips of kraft cardstock using a light shade of brown ink to create a washed-out, vintage appeal. I also inked around the edges using ColorBox chestnut roan chalk to create more distressing. Mat pattern panels to a solid cardstock and adhere to the card base. Stitching around the panels would add great texture (just another option, but my sewing machine is broken).
You can decorate the top of the panels any way you want. I chose to apply three of the same flowers. These flowers are from a set by Close to My Heart, but you can easily use any flower stamp set, such as PTI's Flower Frenzy would work as a perfect substitute. I already owned this set after I discovered PTI and refused to purchase multiple flower stamp sets that resembled each other. So, for the flower stamps, you can stamp the entire flower (as I did) or if the stamp set comes with a flower and stem separately great, stamp on green cardstock for the stem and on your color cardstock for the flower. I stamped two flowers for each panel to create added dimension and used a few pop dots and pulled them up.
Tie a ribbon around the front of the card and pop the stems over the ribbon. Stamp your sentiment and your DONE!
Hello! Please accept the attached card for November/December issue of Paper Crafts magazine. Thank you for your consideration!
Step-by-Step Instructions
Trim card front to 5.5" x 4.25."
Trim kraft cardstock panels to about 1.5" x 3.25" and stamp damask background.
Ink edges and mat on green cardstock and ink those edges, then adhere to card front.
Stamp flowers, cut out, and adhere to panels.
Add ribbon and stamped sentiment.
:: My Goodies {i love you}::
Stamps: Papertrey Ink-damask designs; Close to My Heart-Thoughts of You
Today, I'm sharing some great news! A few weeks ago, I was asked to join Splitcoast's Product Review Team! After receiving products from vendors, we use them, and write a review on what we think about the products. The reviews are posted in Splitcoast's Weekly Inkling and can be found here or here online. You may subscribe to the Weekly Inkling, by clicking here and entering your e-mail in the blue box on the top right.
Of course I accepted, so first I am reviewing Scor-Pal's line of products. Check out all of our reviews here and also the samples we made using the product here!
Splitcoaststampers = SCS
Here are some samples I've made using Scor-Pal, Scor-Bug, Scor-Tape, and Scor-Mat! I use the Scor-Pal for every card I make (to score the fold) and the Scor-Mat as my working surface.
Scor-Bug used to make lattice design
Scor-Pal + Scor-Tape used for custom envelopes
Scor-Pal + Scor-Tape used for custom envelopes
Scor-Pal + Scor-Tape used for custom envelopes
:: My Goodies {thanks chickie}::
Stamps: Papertrey Ink-handwritten notes; Stampin' Up!-frames with a flourish
Ink: Stampin' Up!-chocolate chip Cardstocks: Papertrey Ink-dark chocolate + melon berry + ripe avocado Accessories: Craft Supply-button; dimensionals; Close to My Heart-twine; Michaels-brown satin ribbon; Scor-Bug; Scor-Pal
Instructions
Trim melon berry cardstock to 4.25"x 5.5"
Scor lattice design by angling cardstock on Scor-Pal and running Scor-Bug along the lines.
When I saw K. Werner's Color Challenge earlier today, I just HAD to create something with those colors. Oh how pink and brown look so lovely together. But, when I sat down to create, I stumbled and stamped a couple of things, then said YUK! Finally, I pulled out Papertrey Ink by Dawn's new Damask Designs set and started stamping. I decided on a simple layout and added a little texture with embossed dots.
Don't you all know how much I love a damask design? Just take a look at my blog design. ALL DAMASK! :) My bedding is damask and probably a few other things I have, like a skirt! This design is so classic, yet trendy now. I like how it can be used in various color schemes.
Anyway, have a great Friday Eve! :)
Step-by-Step
Trim dark chocolate cardstock to an A2 card.
Trim close to cocoa cardstock to 3.75"x4.5", then stamp damask design.
Using a Scor-Bug, score dotted lines on bottom of cocoa cardstock.
It's Tuesday already! My Monday went by fast, did yours? This is one of my cards I stamped this weekend. Since Papertrey Ink sold out of the Damask Designs set, I found this design in one of the SU Simply Sent sets. I really like it and have made a variety of cards and even wedding themed paper art with it. This is an anniversary card and also features satin pleated trim from New York City. I went on a surprise mini vacation for Valentine's and picked this up at M&J Trimming. That place was PACKED full of ribbons, trims, and buttons. It really was overwhelming, so I stuck with pleated trim on this trip! Some were expensive so I limited myself to one yard, which is plenty when working with cards. What do you think? I liked it because it was something different than the usual flat ribbon and like nothing I've seen before. It reminds me of a skirt (giggle)! I made a matching envelope too with my new favorite design stamp.
Oh yeah, thanks to everyone wishing me and my knee better. It is healing well and I'm being a little more cautious than usual now! As for the baby scrapbook I'm working on, I got pretty far tonight by finishing 3 layouts and the cover page too! Tomorrow, I hope to finish it completely, but that's a big goal because I have 6 more layouts!! I do have layout themes mapped out, so hopefully it won't take long.
Instructions
Trim ocean tides cardstock to 4.25" x 5.5"
Stamp damask design on the bottom of ocean tides cardstock (using stamp-a-majig).
Stamp leaves on kraft cardstock, then cut out.
Adhere trim above stamped design.
Adhere leaves.
Stamp sentiments, cut out and adhere.
Apply to pre-scored A2 card.
Stamp damask design on envelope.
:: My Goodies {Happy Anniversary}:: Stamps: SU!-simple delights; Papertrey Ink-garden of live + heart prints Ink: Colorbox-chestnut Cardstocks: Papertrey Ink-kraft + ocean tides + lemon tart + berry sorbet Accessories: dimensionals; stamp-a-majig; M&J Trimming-stain pleated trim; PTI-pre-scored A2 card Card Size: 4-1/4 x 5-1/2
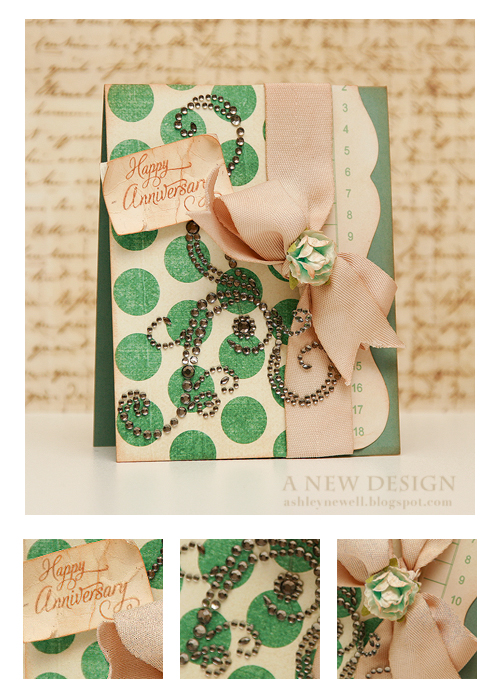
This card uses some bling for this week's Loonie Stamper's Challenge. I also combine it with K. Werner's Color Challenge (again). I do not know why I selected these colors again, but it started out with me thinking that the bling will show up best on dark cardstock, so I went for black and the rest is history!
Once I found out the Loonie Challenge, I sketched out an idea on paper. I normally do not do this, but for the past few weeks, I have been sketching card designs. This card transformed many times. I had to remove the scalloped square focal point a few times because the first time, I stamped the sentiment REALLY crooked (RE-DO), then the second time, I thought that the swiss dots embossing was needed...bad! So, I took my time, trying not to get frustrated and finally finished!
Does anyone have these Heide Swap bling frames? Well, to me they are very hard to center on your cardstock, especially if you are trying to fit in a scalloped square! I worked with that about 4 times, finally to get it on and centered enough! Is there some other technique I should know about? If so, please share!!
Well, I hope you all have a good weekend and take a look at the Loonie Stamper's Challenge and K. Werner submissions!!
How did I make that?
Trim yellow cardstock to 4.25" x 11", then score at 5.5".
Dry emboss top portion of the card base.
Stamp sentiment on the bottom of card base.
Tie ribbon around card base in a bow, then set aside.
Die cut scalloped square.
Adhere bling square to scalloped square.
Stamp hearts on cardstock (the red heart is clear heat embossed) and cut out.
Adhere hearts to scalloped square.
Stitch button to flower and adhere to heart.
Adhere scalloped square to card base.
:: My Goodies {anniversary bling}:: Stamps: Papertrey Ink-heart prints Ink: Stampin' Up!-basic black; Close to My Heart-black Cardstock: Papertrey Ink-pure poppy, spring moss; Stampin' Up!-so saffron; American Crafts-black Accessories: SEI button; Bazzill-floss; Spellbinders-scalloped square nestabilities; cuttlebug; swiss dots embossing folder; American Crafts-felt flower; sheer white ribbon; Heide Swapp-bling frame Card Size: 4.25 x 5.5
Yaaay...it's Thursday! I'm excited because I have a four-day weekend coming up and get to create to my heart's desire! This card I'm sharing with you today is very easy to create. It probably took about 10-minutes to do. This card can be for an anniversary, just because, or valentine's.
Anyone watch American Idol? I don't know how I get lured into watching it every season! The auditions are just too exciting to turn away. Well, I hope you enjoy the remainder of your day. I have to finish making a masculine birthday card, which are so challenging, but fun!
Instructions
Make your card base by trimming baja breeze cardstock to 4.25 " x 11", then score at 5.5".
Stamp swirls on left side of card base.
Stamp sentiment on right side of card base.
Attach brads to flowers.
Adhere flowers to card base around stamped swirls using tacky glue.
Score lines at the bottom of card base.
:: My Goodies {Love You Forever}:: Stamps: Papertrey Ink-Remember + Heart Prints Ink: SU!-Chocolate Chip Cardstock:SU!-baja breeze Accessories: prima flowers; vanilla brads; scor-pal Card Size: 4.25 x 5.5
Hi Everyone! It's Sunday, which means the weekend is coming to an end, but I'll still take the day! Today, I wanted to share with you a little bit about my anniversary. So, Mac knows I like Dawn McVey. Well, he contacted her and asked her to make a card for him to give to me. Here we go with another surprise! So, last week or so, I checked the mail and see "Dawn McVey" package and get all excited, so of course I interfered with the surprise again, but I was only checking the mail! hee
Anyway, I just opened the card on Friday (we celebrated then, although anniversary was Wednesday). It is fabulous, right! I was so excited to see what she designed! Look at the glassine bag she put on top of the card. That is ingenious! I have those same little baggies and had no idea what to do with them. She even embossed them with a swiss dots embossing folder. Anyway, she has a blog post to tell you all about it here.
I just wanted to point out how Mac "scrapbooked" in the card! I told him now he's an official scrapbooker! He wanted a card that allowed him to write a lot of notes in it. So, the "Love" brown cardstock pulls out and he wrote his greeting on the back, then on the inside he added the pictures and more text. This was such a great idea!
This is my second card from Dawn, so I'll treasure it along with the other! So, this was a RAK card from Dawn even though Mac asked her to make one because she did it. So sweet!
We ate here and had a great dinner. For those who don't know, my favorite cuisine is THAI!
So, enjoy the remainder of your weekend! I'm heading out for afternoon lunch/siesta with a friend!!!
Mac is very thoughtful and wrote a letter to me as my gift...yes, I still have it!
Just me!
On November 19, 2005 around 6:00 p.m. it was the best day of my life. Fast forward, and I have spent the best three years of my life with my best friend of 11 years. Our journey together has been amazing. Just a quick story of us in case you don't already know.
We met when I was 13, he was 14 at Bennett College in Greensboro, NC. We were attending a summer science and math camp (and no we weren't nerds). I wanted to get away for the summer (I am from Maryland) and he was forced to go by his mother! We knew each other at the camp, but at the end we just said our good-byes without exchanging information. Fast forward a few years, I was still in high school, but my sister was in college. We went to one of the basketball games in Baltimore and I heard someone yelling "Binky," which was my nickname they gave me at the camp (please, no questions!). By that time, I forgot the nickname and didn't respond until after the person kept saying it. When I turned around, I realized it was "him" (Mac). We talked very briefly, and again went our separate ways. Fast forward about two years, now I am a freshman in college and went to a football game. Again, I hear someone yelling "Binky" and again I forget that is "my" nickname. Finally, I realize it's Mac and finally we exchange numbers - pager numbers that is - this just goes to show how old we are!
Well, for the next few weeks I was wondering who was paging me with the unfamiliar number, so I never returned the call thinking it was the 'wrong number.' One day I was walking to class and someone was behind me yelling "Binky" (again, I ignored it because I never went by a nickname, only Ashley). Finally, I turned around and I see Mac in his car. I walk over and he asks if I want a ride to class and of course I agree because I was only half-way there. We chit chatted briefly to learn that he was paging me and exchanged phone numbers. Somehow, from that day on we never parted. We hung out for a few months as friends, but that friendship quickly blossomed into something more, much more.
We dated through his college graduation, mine, his graduate school graduation, mine, and my law school graduation before we got married. But, for another quick story...the proposal. I know you remember the show on TLC called Perfect Proposal. Well, I used to watch it faithfully. Mac wrote the show and was accepted (little to my knowledge). So, he planned the proposal for months keeping it a secret from me. For anyone who knows Mac, he is a TALKER! A SUPER TALKER, making it difficult to not tell me. Fast forward to the week of the shooting of the show and he basically spills the beans the day before the proposal. Not to mention my sister and I look for wedding venues WITHOUT A RING (what was SHE thinking?). Anyway, we finally make it to the proposal location - Pentagon City Mall. I take my sweet time shopping to come across a game that just happens to be filmed (yeah right). I was really skeptical, but went along. I knew this was IT, but what was it? Then, I thought well, I better not count my chickens before they hatch because this could very well not be it! I look around and do not recognize anyway and continue on. I notice at the end of the game (a gift exchange) there is a tiny box. Now, why wouldn't they hide it in a big box? Of course Mac eventually comes out and squats down and proposes. I boo-hoo like it's a tearjerker movie and accept. It was so much fun and excitement. It just so happened that my co-pastor was at the mall and she was able to bless the rings...such a great end to the night. Sorry, I don't have a link to that video online. Maybe I can get it on YouTube one day, then I'll share it. But, here are a couple of pictures:
The proposal and 'the TV cry'
Nichole (my sister), Nikki Boyer (host of Perfect Proposal), Mac, me (yes, I had the shortest hair cut of my life - got weeks before the proposal and my sister did the OMG the show look, but I had no idea - it grew out fast for the wedding), Matt (DJ of Z104/host of game), and Mommy (my mom)
So, with this posting, I wanted to share a little love. You can see our wedding highlight video by clicking here.
To my husband, my love, and my best friend, I love you and wish you a HAPPY ANNIVERSARY! It's been great and I can only hope we can share many more. I can't wait to see you!
Here is a card I made. It was so hard to create an anniversary card for a guy and my husband at that. I couldn't do anything too frilly and girly, so I decided to select a picture from the wedding and make it a card. It is really simple with the picture adhered to a gold card. A cranberry ribbon (from the wedding) is wrapped around the card base with hodgepodge hardware. "I Love You" is stamped in Purely Pomegranate on vanilla cardstock, then distressed with Ranger antique linen and matted on Bravo Burgundy cardstock. I stitched around the edges to rough it up a bit. I hope he likes it! EDITED TO ADD: See the removed picture in this posting.
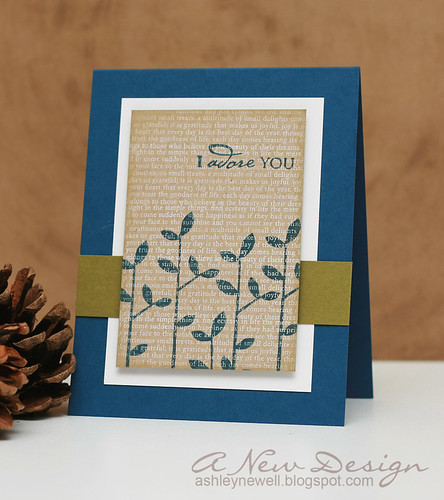
This card was a requested case of this card. The only stipulations were to add blue and try to make more masculine since it is to a couple. So, I decided to keep it simple and use light blue, chocolate, and vanilla. I stamped the background flourish/flower images, then placed the brown grosgrain ribbon across the bottom. I stamped the sentiment on blue cardstock, then matted on vanilla. I stamped all of the flowers, cut them out, then popped them off the card using pop dots (my favorite supply). A crop-a-dile is used to set the brown eyelets on the sentiment card.
:: My Goodies :: Stamps: SU! Friendship Blooms, Verve Visual: Anniversary Birds Ink: Brown Craft Paper:Cardstock: PTI-Aqua Mist, SU!-Very Vailla Accessories: brown ribbon; stickles; crop-a-dile; eyelets Technique: Stamped
I will post my K. Werner Color Challenge later this evening when I get a chance to photograph my card! Thanks for visiting today. It's almost the weekend!
Thanks to everyone for their support on my new shopping web site. I appreciate all of the feedback and well wishes I received.
I was motivated to try watercoloring on my cards from Tessa. Although this card turned out okay, I am not into coloring my paper art in any way! I thought I'd try it out to determine whether I like it and discovered I don't! I was supposed to watercolor the flower, but ended up using my watercolor pencils and blender pens than my aqua painter. I discovered I am not your traditional artist, but more of a designer and style artist.
Remain true to yourself and who you are as an individual, but be open to change and new ideas to discover a part of your unknown.
My Goodies Stamp: Verve Visual (Anniversary Birds); SU! From the Garden (flower) Ink: black Paper: PTI summer sunrise, spring garden Accessories: brads Technique: Stamped; COLORED
I made this card with limited supplies, so to be honest...I don't like it! It looks unfinished, so I will re-post it with more to it later. I think I am going to add brads or flowers to the empty space on the right! I'm just not your average "Plain Jane" and neither are my cards, so this one bothers me!
The stamp set is great and by a new company called October Afternoon. I have a calendar stamp set by them as well to make desktop calendars! Their stamps are of good quality and stamp well.
My Goodies Stamp: October Afternoon (Night Owl) Ink: Brown Paper: PTI summer sunrise; brown, vanilla Accessories: NONE and SCREAMING TO ADD MORE! Technique: Stamped
This was a special request for the blue/brown lover! I stamped the birds - to make them kiss - in brown ink on vanilla cardstock. The edges are distressed. I popped off of a blue/brown pattern paper and placed on brown card base. I added clear dew dots on the right side of the card.
My Goodies Stamp: Verve Visual (Anniversary Birds) Ink: Brown Paper: brown, vanilla, (scrap pattern paper) Accessories: dew dots Technique: Stamped
To end this post, I'll leave you with "Live...Laugh...Love" for the weekend. It's important to be grateful for the 'free' stuff we all have. So, have fun and love one another!
Web Site Update My shopping web site is basically complete. I have some kinks to straighten out, but I have products and everything! As soon as my blog design is transformed and I create some more products and 'test' out everything, I will go live! So, look for a "Grand Opening" next month!!!
Since I was out of town for the last few days, I almost forgot a couple of anniversaries! Quick, fast, and in a hurry, I created these two cards with the same stamp set!
This card was fairly simple by applying the pattern paper on the blue card stock base. I stamped the birds on the limb and the sentiment on the cream card stock. I added buttons for flair!
My Goodies Stamp: Verve Visual Anniversary Birds Ink: SU! Chocolate Chip Paper: Pattern Paper - Chatter Box Chocolate Woods; Cream card stock; Blue card stock - CTMH Accessories: Buttons; Twine Technique: Stamped Card Size: 4.25" x 5.5"
I stamped the birds on a limb, then cut out. I dry embossed the blue card stock and popped the birds on a limb off of it. I matted it on cream and 'sanded' pattern paper. Polka dot ribbon was added. All was matted on blue card stock with a scalloped edge (created by circle punches). I stamped the sentiment on the card base at the bottom center.
My Goodies Stamp: Verve Visual Anniversary Birds Ink: SU! Chocolate Chip; Chestnut Roan ColorBox Cat's Eye Paper: Pattern Paper - Chatter Box Chocolate Woods; Cream & Blue card stock - CTMH Accessories: Cuttlebug; Swiss Dots Embossing Folder; Ribbon - AC Moore Technique: Stamped Card Size: 5" x 7"


