After December 4, 2010, all future posts are on a new site. Please subscribe to my NEW feed at www.ashleynewell.com or click below to subscribe to the NEW feed.
Welcome to the first day of the Spellbinders™ Paper Arts Holiday Hoppin’ Blog Hop! Spellbinders, along with their Cross Promotional Partners are showcasing their newest products just in time for your Holiday crafting and gift giving. Lots of creative ideas are in store, as well as prizes galore! Each participating company has generously donated towards the prize package listed on the Spellbinders Blog. A total of two identical prize packages, one for each day, November 18 and 19 will be given away! To enter, just leave a comment on a participating blog! Comments in the first 48 hours of the post are eligible. One commenter each day will be randomly selected as the winner. Winners will be announced on November 22, on the Spellbinders Blog!
Be sure to see all of tomorrow’s Holiday Hoppin’ blogs for inspiring projects and another chance to win!
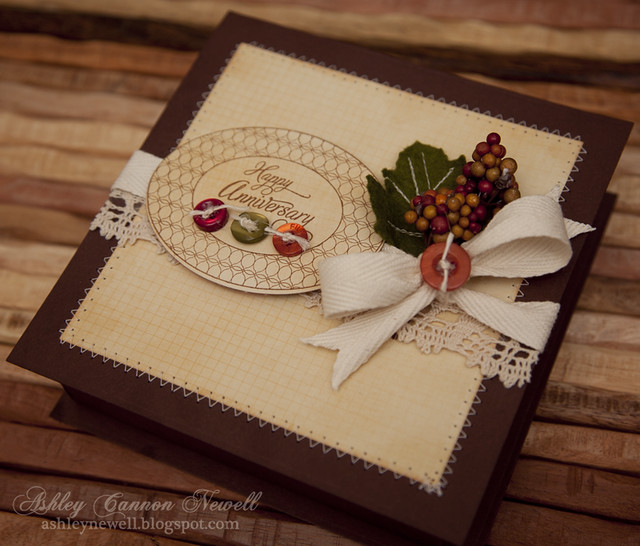
Today, I am sharing a custom gift box using LF-126 Grand Classic Squares die templates. I used the squares to create a base for the box and also a lift-up lid. I also showed how the die templates can be used as a mat on the same project by die cutting a smaller grand classic square die template from patterned paper and stitching it on the box lid.
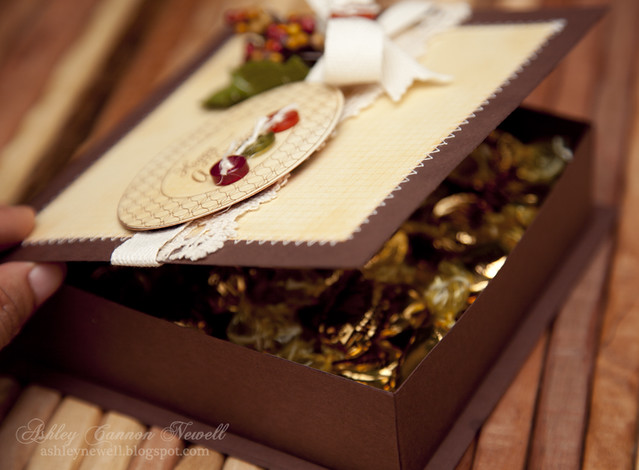
Here is a view of the box being opened. Check out those gold goodies!
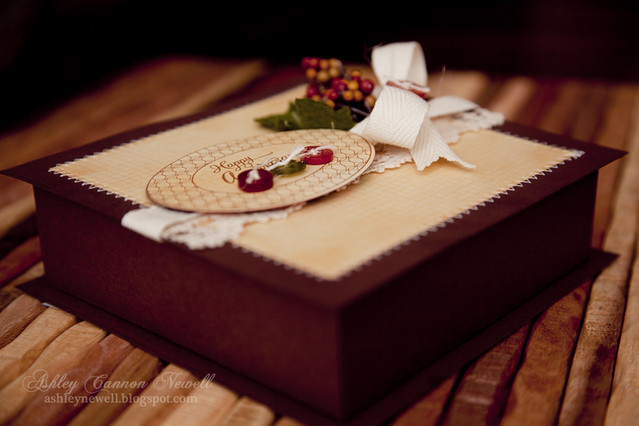
Here is a view of the box from the side. Adding the square die templates creates the traditional chocolate box look.
View an interactive version here on YouTube or below.
Simply leave a comment on my blog to be eligible to win the Spellbinders Holiday Hoppin’ Prize Package! One winner will be chosen from all the comments on all the blogs participating today. Comments made in the first 48 hours of this post will be eligible to win. Winner’s names will be published on the Spellbinders Blog on November 22, and they will have 48 hours to reply to Spellbinders to claim the prizes.
Instructions
Trim brown cardstock to 8.5" x 8.5", then score at 1-5/8" on all four sides. (Tip: When creating a box base, you may score on all sides at any height to determine the depth of your box, so less inches = shallow box and more inches = deeper box)
Cut one of the short scored lines (1-5/8") on all four sides, then assemble box base. (Tip: Cutting one of the scored lines allows you to fold the box in and assemble)
Die cut two squares from brown cardstock. Adhere one square die cut to the bottom of the box base.
Die cut another smaller square from patterned paper, then stitch to other brown die cut square.
Add twill tape and crochet ribbon.
Die cut leaf, add stitching, then adhere to square. Add berry spray and button to ribbon knot.
Die cut oval from patterned paper. Stamp border and sentiment, then pop off square die cut.
Add buttons to embellish.
Trim 5" x 1.5" brown cardstock strip, then score down the center. Adhere one side of the strip to the inside of the box, then adhere the other side to the square die cut (inside). This creates the joint for the box lid.
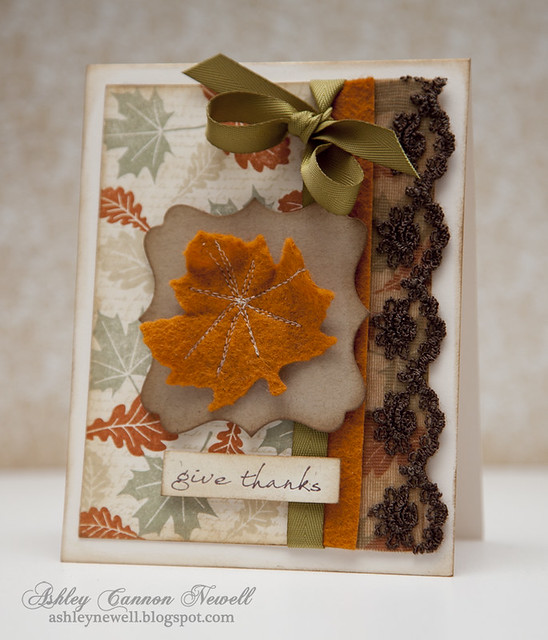
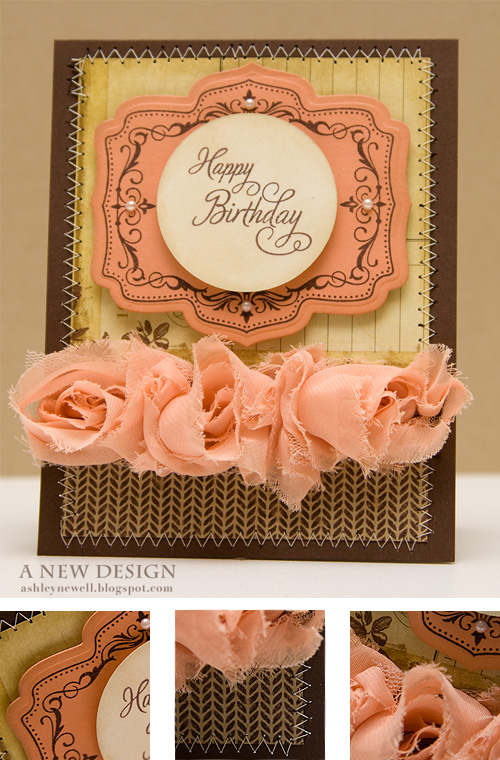
Hey Everyone! I hope you're enjoying your Sunday. I've been busy reorganizing my studio. I've organized my ribbon and buttons and added a wall mounted cabinet above my counter top workstation. I'm really excited about it and have yet to fill it up because I had to make this card! I know, really funny! Anyway, I'm really thankful for the studio space that I have and for McArthur for helping me organize my space and building the furniture and installing it! He was a real IKEA trooper yesterday and I appreciate that! I now have a full space and he's moved up to my old studio to have his own 'private' office! I'm going to miss him on the computer with me, but having an extra work table is also exciting. So, my day yesterday inspired the creation of this card to give thanks for my life.
Here's a detailed photograph showcasing the felt leaf die cut that I stitched to create the veins.
Instructions
Trim cream cardstock to 4" x 5.25" and stamp leaves and text background.
Adhere vintage trim, felt border, and green twill tape ribbon.
Die cut label, ink the edges, and adhere to cardstock with foam adhesive.
Die cut leaf from felt, ad stitching, then adhere to label with foam adhesive.
Stamp sentiment on cardstock strip and adhere with foam adhesive.
Ink the edges of the cardstock and adhere to an A2 card base, then ink those edges as well.
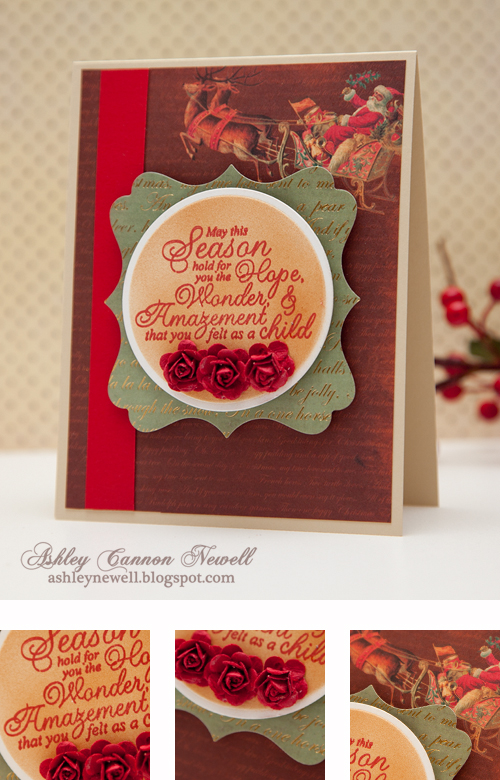
Welcome to JustRite Stampers’ newest Wednesday feature, 12 Weeks of Christmas Blog Hops #4! Every Wednesday up until Thanksgiving some of your favorite designers will be joining some of the JustRite design team for a series of Christmas blog hops, showcasing JustRite’s entire Christmas Collection of stamps! This week, it’s the Spellbinders design team! So mark your calendars for Wednesdays at 9 am CT for great Christmas gift, card & project ideas, starting at the JustRite Inspiration blog!
Instructions
Trim patterned paper to about 4.25" x 5.25", then adhere on an A2 card base.
Trim red cardstock strip and adhere to left side of patterned paper.
Die cut label from patterned paper and adhere to card front center with foam adhesive.
Die cut circle from white cardstock, airbrush, then stamp sentiment.
Adhere circle die cut on label with foam adhesive.
Add flowers.
Tips, Tricks & Techniques Although I did not create a video sharing how I made this card, I did record a few techniques to share with you, including using a positioner to stamp images in the perfect location and to get a bolder ink impression and airbrushing with a die template.
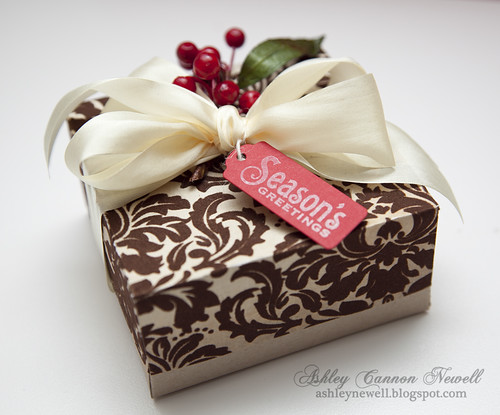
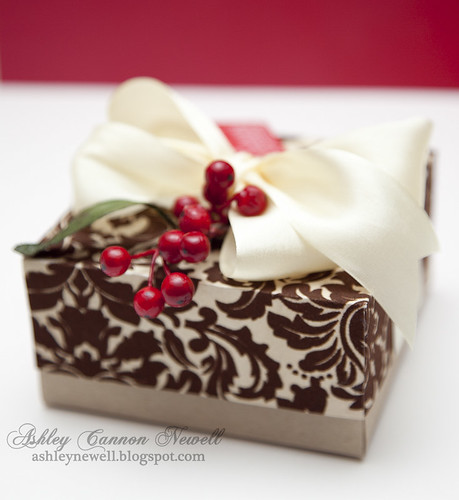
Hey there! Happy Friday to you all and welcome. Today, I'm participating in Paper Crafts magazine's 12 Designer's of Christmas Blog Hop. I worked on the Holiday Cards & More, Vol. 5issue mostly last year. I find it easier to create during the holiday season. Knowing that Paper Crafts will have special holiday issues and calls, I plan ahead and save projects specifically for thematic submissions. Holiday projects are really fun to create because it is the time of year when family and friends reunite and fellowship. Creating projects that portray loving thoughts is such a fulfilling past time. For this issue, I had fun selecting unique color combinations and holiday packaging. Cards are a major element of the holiday season; however, gift giving is a really close second. So, finding creative ways to package special gifts makes the entire experience just a tad more special for the recipient.
The Holiday Cards & More issue is amazing. You definitely will be inspired to create fabulous holiday cards, gift bags, tags, boxes, and more for all of your loved ones. From simple to intricate designs, there is something creative that shall inspire everyone in this issue. If you have not already picked up a copy of this issue, you can order it here.
Today, I'm sharing a special gift box made for this hop. I used Leslie Webster's template to create this gift box. It is a super easy pattern that any crafter can use to make one or multiple gift boxes. Fill boxes with special food treats, jewelry, or cute hair accessories. Make sure you check out the pattern here.
Don't forget to stop by the other designers in this hop. They also have special projects to share that will inspire you beyond belief. Additionally, you will have 14 chances to win a holiday collection package by leaving comments on all 12 designers' blogs, plus on the Paper Crafts Connections and Moxie Fab World blogs. All comments must be posted by Sunday, September 19 at 12:00 AM MDT. The grand prize winner will be announced on Tuesday, September 21 on the Paper Crafts Connection blog.
But, wait...there's more! One person who comments on my blog will win an issue of Holiday Cards & More! I'll share the winner (by random selection) on Tuesday, September 21.
Trim kraft cardstock to 8"x8", then score at 2" on all sides.
Assemble box bottom and set aside.
Trim patterned paper to 7"x7", then score at 1.5" on all sides.
Assemble box top.
Add ribbon treatment.
Adhere berry spray.
Stamp sentiment, then die cut tag and tie with twine.
Tips & Tricks
Flocked Patterned Paper is perfect for gift packaging. The texture on the paper will be appreciated by the recipient and it shows very well. Give it a try!
Floral Sprays are perfect ways to embellish projects, from cards to altered items. Check some artificial sprays at your local craft store and simply trim the stems.
Supplies
Stamps :: Waltzingmouse Stamps - very vintage christmas Ink :: Papertrey Ink - vintage cream Cardstock :: Papertrey Ink - pure poppy, kraft Patterned Paper :: Kaisercraft - tis the season collection (reindeer specialty paper) Embellishments :: May Arts - ivory silk ribbon, twine; Michaels - berry spray Tools :: Spellbinders - S3-148 tags trio, wizard; Scor-Pal - scoring tool Box Size :: 4"L x 4"W x 2"D
Thanks so very much for stopping by today and for your comments. Please know you are appreciated! Good luck and have a great weekend.
This is day 1 of a 2 day event! Be sure to check Skipping Stones Design tomorrow for more.
I have joined up with Skipping Stones Design (SSD) to help raise money to fight the breast cancer battle. SSD is celebrating the release of 2 new stamp sets. They are also donating $2 for EVERY stamp set sold this week to help with breast cancer research. This is a one-of-a-kind-blog bounce! Every project that is showcased in the "Blogs 4 Boobies" blog bounce is up for auction! All of the money raised through the silent auction, on our blogs, will be donated to the Susan G. Komen foundation.
There are 3 ways that you can help, and join in on the fun!
1. Shopping For every stamp set purchased during Sept 15 - 23. SSD will donate $2 to the Komen Foundation. Stamping and shopping that you can feel good about! Click here to check out SSD stamps
2. Bidding Another way you can help us raise money for the Komen Foundation is to bid on a project along the blog bounce. A $5 or more starting bid is recommended. Your bid includes the project and shipping to your address as well. Place a Bid for the Card Step #1 Find the comment section of the blog that shows the "Blogs 4 boobies" card or project that you want to buy. You may only bid on the card/project shown in the specific "blogs 4 boobies" post. Any bids not placed on the correct post will be considered invalid.
Step #2 Once you are in the "blogs 4 boobies" comment section fill in the dollar and cents amount of what you are willing to pay for the card/project. We recommend a starting bid of $5 or more. 100% of the bid proceeds will be donated to the Susan G. Komen Foundation.
Step #3 Next to your $ bid please type in your email address. During a silent auction bidders sign their name next to their bid. Typing your email address is the electronic equivalent of signing your bid. Also it will help the blogger contact you if you are the highest bidder.
Step #4 Watch and wait. Once you have entered your bid/comment sit back and wait. If someone outbids you, then you may bid again. Bidding will continue until September 23 at 8:00 p.m. MT. After Bidding Watch and Wait The "Winner of the Auction" will be the highest bid (that includes an email address) in the comment section of the most recent blogs 4 boobies post at the end of the silent auction. Please note that ALL cards/projects will be re-posted on the 23rd of September. The silent auction will end September 23 at 8:00 p.m. MT
Things to keep in mind Near the end of the bidding you may not see bids as they come in. Most blog have a comment feature where the blogger must approve comments before they are published. So bid high. You might have the highest bid that is published, but someone might have outbid you in an unpublished comment/bid.
The blogger will declare who has won the silent auction. Skipping Stones Design will send you an invoice for your donation/bid amount. Please pay that invoice as soon as possible, so the designer can get your card/project in the mail to you.
Yep! I'm back today, so I guess I made up for my day off yesterday already! This time, I'm back for a special celebration! Today, is my friend Kelly Marie's birthday! She is one of Lawn Fawn's owners and is a positive person. So, I thought I'd create a photo card. I hope that's not too lame! haha I made it super colorful, added some Lawn Fawn goodness, and of course some happy patterned paper that hopefully appeals to Kelly!
So, this is a blog hop with several other designers who are also celebrating Kelly's birthday with her. Hop along to the other blogs if this is your first stop; otherwise, continue on to Winter's blog!
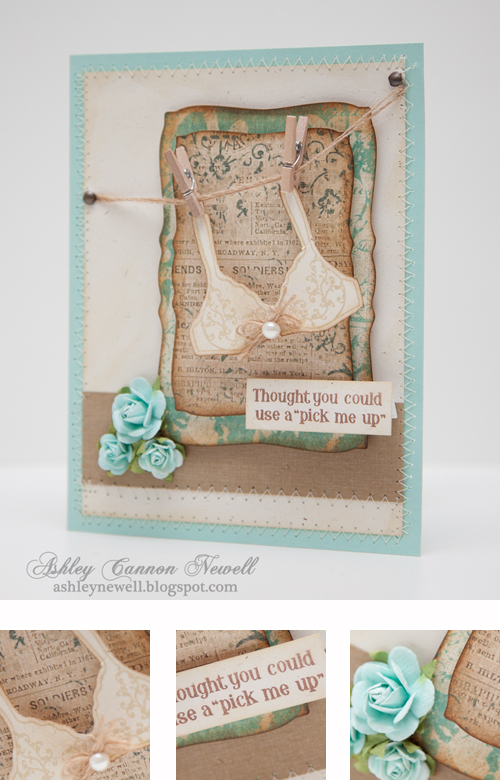
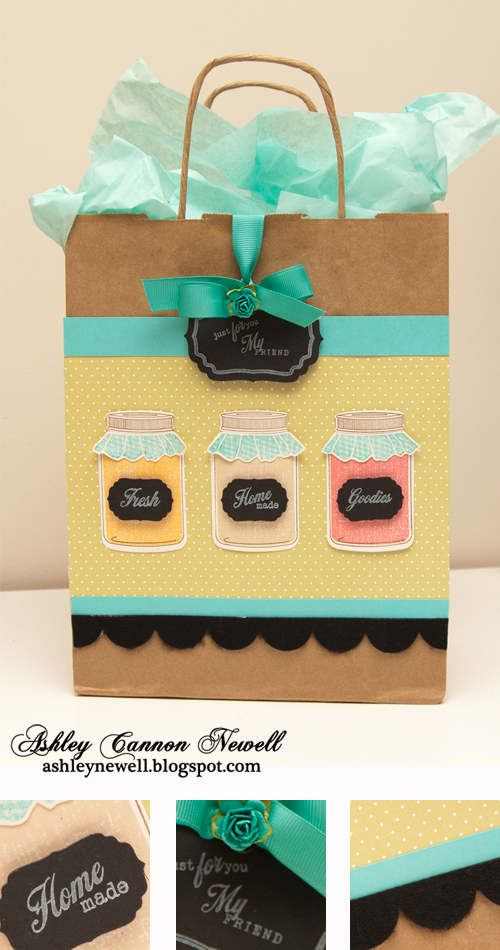
Hey Everyone! I barely made it to the PTI Blog Hop! I was really rushing here placing the final touches on my gift bag. I chose the more traditional route and used a kraft gift bag I had in my craft supply and altered it for "Fresh Homemade Goodies...Just for you, My Friend!" So, here's a brown paper bag project that even adults can appreciate.
I was inspired by a segment on Good Morning America today that featured chalkboard sticky labels. I wanted to order them, but thought I could use my Spellbinders™ Labels Four die templates and some white ink to replicate the chalkboard concept. I really like how that part turned out!
Thanks for hopping by. Here are so more details on my gift bag.
Instructions
Trim polka dotted patterned paper and adhere to bag front.
Trim hawaiian shores cardstock strip and adhere to bag front.
Die cut scalloped edge border from felt and adhere to bag front.
Trim another hawaiian shores cardstock strip (slightly larger than the previous one) and adhere to the top part of the bag front.
Die cut jars, stamp insides and lids.
Stamp imitation fabric, cut out and assemble jars.
Adhere jars together.
Die cut label from black cardstock and stamp sentiments.
Die cut larger label from black cardstock. Stamp border and sentiment.
Punch hole and set eyelet.
Add ribbon and flower treatment and secure label on bag front.
Adhere stamped jars to the center of the bag.
Add tissue paper.
Supplies
Stamps :: Papertrey Ink - friendship jar; Waltzingmouse Stamps - very vintage labels no. 4 Ink :: Tsukeniko - VersaFine - vintage sepia; Stampin' Up! - white; Papertrey Ink - berry sorbet, summer sunrise; Close to My Heart - bamboo Cardstock :: Papertrey Ink - rustic cream, hawaiian shores, true black Patterned Paper :: Papertrey Ink - bitty dots spring moss Embellishments :: Papertrey Ink - hawaiian shores grosgrain ribbon, black felt; Recollections - flower; Craft Supply - kraft gift bag + tissue paper Tools :: Papertrey Ink - large scalloped border die, jar die/lid; Spellbinders - S4-190 Labels Four, W-001 wizard; Provo Craft - cuttlebug
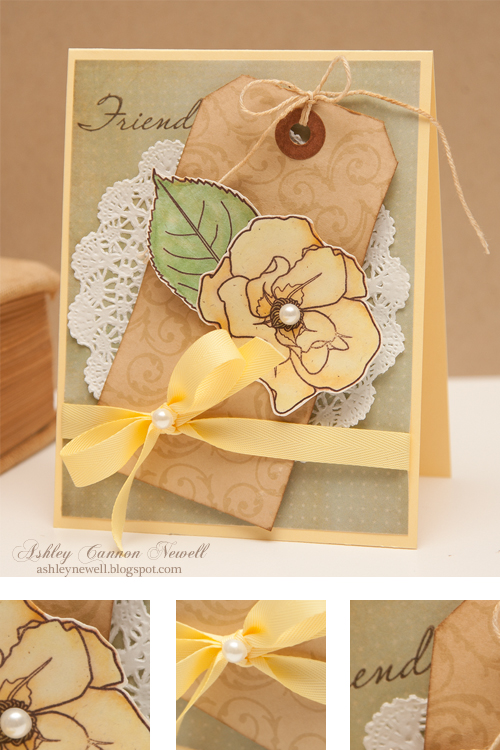
Hey Everyone! I cleaned my studio on Saturday and it seems like it stifled my creativity. Yes, I like 'organized chaos!' As I looked around my clean work spaces, I did not see anything to grab and work in a small 6" square foot space! So, I was not sure if I would be able to be inspired enough to create something for Waltzingmouse Stamps' Blog Waltz. But, hours and a few mistakes later, here it is! The biggest mistake I made was that I had an additional sentiment at the bottom that stated, "You are my best friend." That obviously did not make sense with the "Friend" sentiment! So, I just removed it! Anyway, thanks so much for waltzing by today. Here are some card details.
Instructions
Trim patterned paper to 4" x 5.25".
Adhere doily.
Stamp flourish pattern on vintage tag, then adhere over top of doily.
Stamp flower and leaf, color, then cut out and adhere on vintage tag.
Add ribbon treatment.
Add pearls.
Supplies
Stamps :: Waltzingmouse Stamps - seasons of love, roses in bloom Ink :: Stampin' Up! - chocolate chip; Copic markers; Close to My Heart - bamboo Cardstock :: Papertrey Ink - lemon tart, rustic cream Patterned Paper :: Kaisercraft - up, up & away collection (bumpercar) Embellishments :: Papertrey Ink - lemon tart twill tape; Vintage Scrap Shop - vintage tag; Craft Supply - doily; Recollections via Michaels - pearls
Hey there Bleeps! Happy Sunday to you. Today, DeNami Design is hosting a blog hop. The theme is polka dots, so I created a card that's a bit on the 80s side! Have you tried their stamps? If not, you should. I stamped my card today with a new polka dot background stamp and it was SUPER EASY to line up the dotted design...yes, even with a rubber stamp! Just thought I'd share that tidbit because I surprised myself too! Their stamps are cut around the images as opposed to a straight line, which means you can peek over one side and see where you are stamping. This also means that no extra ink gets on that red rubber. DeNami Design's stamps are great quality rubber stamps. Prize: 3- $20 DeNami gift certificate. (One "hidden" winner on three different blogs) The winners will be chosen and announced on the DeNami Design blog on August 17th.
Thanks for hopping by! Please hop on to check out Ayana Posadas!
Instructions
Trim rustic cream cardstock to 4" x 5.25" and stamp polka dotted background with black ink.
Spritz glimmer mist on cream cardstock and mat on black cardstock.
Stamp square border on soft stone cardstock and die cut square. Then, stamp sentiments.
Trim a 1" strip of pink cardstock and adhere it to card front at an angle.
Adhere square die cut with foam adhesive.
Add double ribbon treatments with button embellishments.
Stamp flowers on turquoise paper, cut out and pop off square die cut.
Adhere onto turquoise cardstock and an A2 card base.
Hi there! I hope you're enjoying your weekend. I had a full day of cleaning, purging, and organizing. I have a few huge bags of clothes, purses, and shoes to donate to charity. My closet is actually looking better now! So, while I waited for some laundry in the washer and dryer, I took some time to finish up a project and join Papertrey's July Blog Hop! This challenge was all about office supplies, so I used a ledger stamp, spiral notebook punch, and a mini library clip to create this card. There's a story behind this card, but I can't share it just yet! I'm be sure to tell the story a bit later! Anyway, here are some details about this card.
Instructions
Trim kraft cardstock to create an A2 card base and emboss the front.
Stamp ledger background on rustic cream cardstock, trim to about 3" x 4", then punch spirals.
Ink the edges and entire cardstock.
Stamp clouds and balloon baskets on the cardstock.
Stamp balloons on a scrap piece of cardstock, cut out, ink the edges, then pop off stamped cardstock.
Add twine treatment and mini library clip.
Pop 'notebook' piece off card front at an angle
Supplies
Stamps :: Papertrey Ink - up, up & away; Unity Stamp Co - old ledger Ink :: Close to My Heart - bamboo; Ranger - spiced marmalade, antique linen, tea dye; Papertrey Ink - enchanted evening Cardstock :: Papertrey Ink - kraft, rustic cream Embellishments :: Stampin' Up! - mini library clip; May Arts - twine Tools :: Provo Craft - swiss dots embossing folder, cuttlebug; EK Success - spiral notebook punch
Before I leave, I just wanted to remind you all about the photography session I'm planning to post this week! Here are the details, so don't forget to check it out! Thanks so much for stopping by! Enjoy your day!
Hey there! I decided to come back today to share another card for Waltzingmouse's Waltz. The challenge was to use shades of blue and green. I focused on softer hues of the color combination and highlighted the blue a little more than the green.
Instructions
Trim rustic cream cardstock to 4" x 5.25" and stamp polka dotted background.
Add distress ink the the entire stamped background and edges.
Stamp scalloped border image on white cardstock and cut out.
Add twine treatment, then adhere to polka dot background stamped cardstock.
Adhere green cardstock to the back of the chipboard frame.
Add distress ink to the frame and green cardstock, then stamp sentiment.
Pop chipboard frame off polka dotted background stamped cardstock.
Add flower.
Mat on green A2 card base.
Tips & Tricks
Stamping Off - To achieve a softer hue, stamp off on scrap paper, then onto your project. I used this technique for the polka dotted background as well as the scalloped border.
Supplies
Stamps :: Waltzingmouse Stamps - say it with style, faux fun, off beat backgrounds Ink :: PTI - aqua mist; Ranger - tea dye, antique linen; Tsukineko - versafine (vintage sepia) Cardstock :: PTI - rustic cream, spring moss Embellishments :: May Arts - twine; Prima - flower; Tattered Angels - chipboard frame
Thanks so much for waltzing by! Enjoy your weekend.
Today, we have a fun blog hop for all of our fans, readers, members, and subscribers! We have some great designers who are featured in Embellish Magazine's Premiere Issue who have created some awesome projects to share with you today. We are really excited about our first issue and its success and we hop you will celebrate with us this weekend.
Exclusive Crinkly Stained Ribbon Tutorial is now available to Embellish Magazine members and subscribers! If you have access to view the magazine, then you will have access to this great new tutorial! Embellish Magazine members and subscribers, please click here and login to access the video. If you get lost, go to the “Dashboard” and it will be the first posting under the “News” section.
If you are not already a member or subscriber, you can easily obtain access here.
Make sure you hop around to each designer and leave a comment on every blog. There will be prizes awarded to blog hoppers who leave a comment. There will be 10 winners of various prizes, including twine samplers, crinkly stained ribbon, Embellish Magazine subscriptions, Lawn Fawn stamps, and as an added surprise bonus a Clear and Simple Stamps gift certificate.
The blog hop will be open through Monday, May 31, 2010 at 5:00 pm EST. Winners will be announced on this blog on Tuesday as well as the selected 'mystery' designer's blogs.
The blogs will be chosen at random as will the winners, so make sure you leave some 'love' on each designer's blog for your chance to win the following:
5 persons will win a subscription to Embellish Magazine
2 persons will win a twine sampler
2 persons will win crinkly stained ribbon
2 persons will win Lawn Fawn stamps
1 person will win a $25 Clear and Simple Stamps gift certificate
*Make sure you stop by CSS blog for your chance to win*
Thank you to all of our sponsors, designers, and subscribers who have supported us on this great adventure!
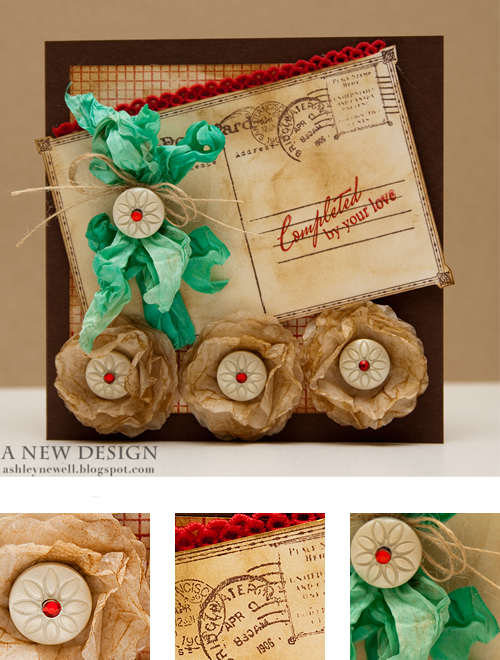
Instructions
Trim white cardstock block and stamp grid pattern in red ink. Add distress ink to the edges and adhere to a 5.5 square card base.
Stamp vintage post card image on white cardstock and add distress ink. Cut out and add crinkly stained ribbon and twine/button treatment.
Pop postcard off card front.
Die cut large scalloped circles from kraft colored tissue paper, crinkle, stain and add button treatment.
Add poofy flowers to card front.
Stamp sentiment on postcard.
Add vintage red trim.
Supplies
Stamps :: Waltzingmouse Stamps - blessed by you (sentiment), off beat backgrounds (grid background); Unity - vintage postcard
Ink :: PTI - pure poppy; SU! - chocolate chip; Ranger - vintage photo, old paper, tea dye
Cardstock :: PTI - dark chocolate, white
Embellishments :: Craft Supply - crinkly stained ribbon, tissue paper; Jenni Bowlin - buttons; KaiserCraft - red rhinestones (placed on buttons); May Arts - twine; Webster's Pages - red trim
Tools :: Spellbinders™ - wizard, big scalloped circle sm nestabilities (S4-250); ranger - blending tool
Hey there, Bleeps! I hope you had a great weekend! I celebrated my birthday Saturday and danced the night away. I also got a lot of rest the entire weekend, which means I didn't get as much done in the studio, but I bet you that rest was much more important than anything I could have created!
Today, I am participating in Waltzingmouse's Blog Waltz to celebrate their first year in business! Claire is a really great designer and I've been a huge fan of her company since the beginning, especially with the introduction of her stamps that match Spellbinders™ die templates.
Also, I wanted to share with you that Waltzingmouse Stamps has a great interview in Embellish Magazine's Premier Issue here. If you haven't subscribed to this issue yet, you are missing out!
So, here's to your first anniversary, Claire and to many more! I wish you and Waltzingmouse huge successes in the future!
Thanks for stopping by! Have a great Monday!
Instructions
Trim kraft cardstock block and stamp wheat pattern background.
Adhere patterned paper to kraft cardstock and ink the edges.
Add flower trim.
Die cut label and emboss, then stamp border and ink the edges.
Die cut circle, stamp sentiment, and ink.
Pop circle off label die cut.
Pop label die cut off patterned paper.
Adhere focal point to card front and stitch the edges.
Supplies
Stamps :: Waltzingmouse - say it with style, very vintage labels no. 5, off beat backgrounds Ink :: SU! - chocolate chip; Ranger - old photo Cardstock :: PTI - kraft, dark chocolate, melon berry Patterned Paper :: Webster's Pages Embellishments :: Webster's Pages - peach bloomer trim Tools :: Spellbinders - labels five nestabilities (S4-229 ), standard circle nestabilities large (S4- 114), wizard
**NOTE: This is my second post for the day. If you are here looking for the JustRite Stampers Mega March Blog Hop, please scroll down to the next post! Thanks for your visit!**
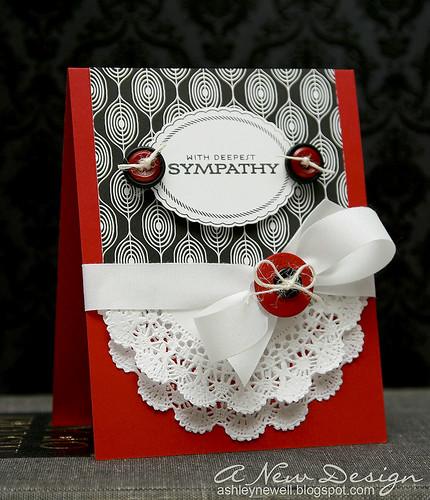
I'm back again today to participate in Papertrey Ink's Blog Hop. This month's challenge is to use buttons. I used them in a traditional way by embellishing my ribbon and sentiment focal point on this sympathy card.
Instructions
(1) Trim pure poppy cardstock to create an A2 card base.
(2) Trim patterned paper and adhere to card front.
(3) Trim doily in half. Adhere half to card front and the overlay the other half with foam adhesive.
(4) Add ribbon treatment with button and twine.
(5) Stamp oval decorative border and sentiment and cut out/die cut.
(6) Adhere sentiment focal point to card front with foam adhesive.
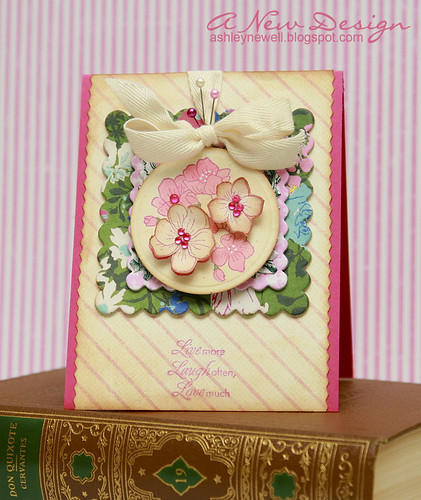
Hey there, Bleeps! It's JustRite's 3rd and final day in their Mega March Blog Hop and I'm so happy to be a part of it! They have some great new releases this year that I've been stamping with and I'm glad to share another card today. There have been lots of designers participating and even more today, so check everyone's blogs out! Thanks so much and enjoy your day! Keep on reading...there's more!
Card Details
Instructions
(1) Trim raspberry fizz cardstock to create an A2 card base.
(2) Trim patterned paper to about 4" x 5.5", then cut sides using pinking scissors.
(3) Ink around patterned paper.
(4) Adhere layered frame to patterned paper.
(5) Using a craft knife, cut a slit through patterned paper and feed twill tape through and tie into a bow.
(6) Add pins in the knot.
(7) Stamp flowers and die cut circle and emboss.
(8) Color flowers with Copic markers and ink.
(9) Stamp flowers again and cut out two, ink, then pop off circle die cut.
(10) Embellish flowers with rhinestones and white gel pen.
(11) Adhere circle die cut on top of layered frame with foam adhesive.
Tools :: Spellbinders - standard circle nestabilities; Provo Craft - cuttlebug; pinking scissors
Blog Hop Details
30 designers, FIVE shopping sprees each day. No one knows where the prizes will be! Each day of the hop JustRite will have five Mystery Blog Candy Prizes hidden along the hop with a total retail value of $600. JustRite will randomly select five mystery blogs each day of the hop and randomly allocate each of the shopping sprees. For your chance to win, simply leave a little love (a comment) on each designer’s blog including the JustRite blog. The more designers you leave comments with, the better your chances of winning. Each day’s comments will remain open for three days. A winner from each of the mystery blogs’ comments will be randomly chosen using Random.org. Consult the listing of designers at the JustRite blog each day (each day’s designers will be different) and start out on your way! Beginning Friday, March 26, summaries of all the winners will be posted on the JustRite blog. Good luck to everyone and enjoy all the JustRite eye candy along the hop!
Today during the JustRite Mega March Blog Hop (Day Three) JustRite and its sponsors will be giving away the following five prizes:
Blog comments for Day Three will be open until Saturday at 6pm EST. On Sunday, JustRite will announce on their blog which five blogs have the mystery candy for Day Three. You will need to go to the JustRite blog to determine where you need to go to find out if you are one of the five lucky winners.


