After December 4, 2010, all future posts are on a new site. Please subscribe to my NEW feed at www.ashleynewell.com or click below to subscribe to the NEW feed.
Hey Everyone! How was your weekend? Mine was great! We celebrated Mac's birthday with a few "old" friends at the house. Mac has many of his childhood friends who live in the area, so they were able to meet up and chit chat. Yesterday, we went to Adams Morgan Street Festival. It was great to smell all of those food vendors and even find some great buys! Guess what I did?! I talked my way into a good deal!!! I used Mac's talking skills and it worked. He waited for me outside of the booth and I couldn't wait to tell him I talked the vendor down another $2! :) Hey...I have to start somewhere!
Today's card is inspired by Travelinmama's Etsy Shop (Tina Fussell in Morocco). I received this pack of fun embellishments from the shop and wanted to make sure I used them instead of hoard them! The camel die cuts are so great. I love coordinating orange and blue and went for it here. I really rushed last night to make a card and post it for you all and Tina's bag of embellishments was perfect in helping me do just that! Have you ever seen a camel in real life? Those are some LARGE animals! All I can remember is that a camel's eye is about as big as my entire head! I was in high school at the time, but still, it was HUGE! Okay, off on a tangent there, but had to share that tidbit of a story!
Card Instructions
Trim enchanted evening cardstock to an A2 card.
Trim kraft cardstock into a strip, then adhere to card front.
Die cut label, stamp polka dot background.
Adhere camel die cut, then adhere label to card front.
Add buttons.
Stamp sentiment, cut into strips, then adhere to card front.
Add faux stitching + corner round edges.
:: My Goodies {just because} ::
Stamps: Papertrey Ink - paper tray +polka dot 2
Ink: Papertrey Ink - enchanted evening
Cardstock: Papertrey Ink - kraft + enchanted evening + white
Accessories: Craft Supply - twine; Travelinmama - camel die cut + buttons + flower bling; KaiserCraft - rhinestone; Spellbinders - labels 4 nestabilities; Provo Craft - Cuttlebug; Uniball - white gel pen; foam adhesive; We R Memory Keepers - corner chomper
Hi there! Last night, we went to Cheesecake Factory. Needless to say, I have lunch and dessert for today! :) They serve so much food. I also went to bed really early as opposed to my usual nap, then up until 3 am routine. I hope that habit is gone now! Anyway, before dinner, I got a chance to make this quick card. My friend, Sarah, told me about the Scrapmaster's Paradise color challenges. I love color challenges, so I was eager to give it a try. I dug out one of my CHF Scrapblock background stamps! This time it's a distressed grid. I think I may like this one better than the distressed polka dots! I used my SU! marker to apply the ink since I did not have soft suede ink pad. It worked fine on that huge rubber stamp, but came out a little darker than I thought. I thought soft suede would be obviously lighter than chocolate chip, but maybe not!
Thanks for stopping by and enjoy your Friday Eve! :)
Hey Everyone! How is it going? Here is a card using patterned {paper} that I have had for a few months. It is KI Memories Elsie collection and is really fabric that is backed on self-adhesive paper. When I removed a corner, it didn't seem to have adhesive on the fabric, so not sure about that! I kept the backing on to maintain the fabric's stiffness and used foam adhesive for dimension. I also used some ribbon in my stash I rarely pull out and I was so happy to use 'old' stuff! Another oldie, but newbie to me is my Stampin' Up! Autumn Days set. I think that is a quail, but anyway, I stamped it on Bermuda Bay to make it a little different. I love all kinds of birds on my cards (owls too)!! (ETA: Correction - it's a pheasant! Thanks ladies! I knew it was something else, but couldn't recall the name of it) The ironic thing is that I am not a bird watcher or anything! I used some Kaiser rhinestones and really like this color. I hope PTI carries this blue hue soon! HINT HINT!
Thanks for stopping by and have a great Friday EVE!! Hey, I gotta look on the bright side!
Card Instructions
Trim kraft cardstock into an A2 card.
Dry emboss card front.
Trim pattern paper and corner round some edges.
Tie ribbon and add button, then adhere to card front.
Stamp sentiment and pheasant and cut out.
Adhere quail to card front and add rhinestones.
:: My Goodies {take care} :: Stamps: Papertrey Ink - paper tray; Stampin' Up! = autumn days Ink: Stampin' Up! - chocolate chip Cardstock: Papertrey Ink - kraft; Stampin' Up! - bermuda bay
Patterned Paper: KI Memories - Elsie Jack+Abby apron dot self-adhesive fabric paper Accessories: We R Memory Keepers - corner chomper; KaiserCraft - rhinestones; Offray - ribbon; Papertrey Ink - button + twine; Provo Craft - cuttlebug + swiss dots embossing folder Card Size: 5.5" x 4.25"
What's been going on? For me, lots of crafting time. I just picked up Papertrey Ink's Wise Owl set by Alli Miles and it's so versatile. Every time I look at it, I want to stamp owls. Sorry for the multiple owl cards, but it is a different one! Instead of stamping their bellies, I used those great buttons! I'm not sure if someone else has done this or not, but since the introduction of Everyday Button Bits, I've been thinking of more ways to incorporate buttons into my designs. Since I was adding buttons, I thought about the eyes and used rhinestones. Isn't it great that PTI is now offering rhinestones for sale?! Kaiser is by far my favorite rhinestone manufacturer. They have a great selection of colors. I'm so excited that PTI will be carrying them because I'm confident they will carry the best color choices all of the time, unlike some LSS where they sell out and you can't find that color again.
Anyways, enjoy your day and thanks for visiting!
Card Instructions
Trim summer sunrise cardstock to an A2 card.
Trim patterned paper, scallop edge punch, and add ribbons, then adhere to card front.
Stamp owls, cut out, and add buttons, then adhere to card front. Add rhinestones to owl eyes!
How was your weekend? Mine was fun! Our cousin visited us for the weekend and my friend from law school came by for a photo session. We all hung out and had a great time. My cousin wanted a card for his wife, so I made this one. He liked it without a sentiment and I agreed that the card said enough by itself. I intended to join in on the PTI blog hop on Saturday, but we got a bit carried away with time and well...I forgot!
So, I'm gearing up for Orlando this weekend. Can Thursday get here fast enough? NOPE!
I made some Clam Chowder Soup last night and I enjoyed it, so I thought I'd share just in case you don't have a recipe. Please share any variations if you have any!
Ingredients
bacon/bacon bits (2 slices or a handful of cooked bacon bits from salad aisle)
onion (diced - medium size)
large potato (diced - about a cup or so depending on how many potatoes you like)
chopped clams (4-6.5 oz. cans - located near canned tuna at your local grocer)
clam juice (1 bottle - optional - located near canned clams)
heavy whipping cream (1 cup)
cream of celery soup (2 cans)
pepper (to taste)
Directions
Cook bacon and chop (if using fresh bacon), then add onion and saute.
Add clam juice from canned clams (or use bottled clam juice).
Add potatoes and cook until tender.
Add clams, heavy whipping cream, cream of celery soup, (and bacon bits if already cooked).
Cook until thickened. If too soupy, add a thickner, such as corn starch or flour.
Add pepper to taste.
Yields about 4-5 bowls.
EASY PEASY!
Enjoy your day and thanks for visiting!
Card Instructions
Trim hibiscus burst cardstock to an A2 card.
Trim vintage cream cardstock and stamp text.
Adhere to card front and stitch.
Stamp flowers (three times for the dimensional layers) + leaves, cut out and adhere to card front using foam adhesive.
Add ribbon.
:: My Goodies {true love} ::
Stamps: Papertrey Ink - in bloom; 7 Gypsies - Nottinghill
Happy Thursday to you all! I created this card mainly using patterned paper. I have been doing a lot of stamping before, but now I like to add patterned paper to the cards. I find it much faster to have to only stamp the sentiment! I just realized that this card has the same sentiment (different stamp) and a butterfly similar to yesterday's card. They are vastly different designs, but odd that I was drawn to some of the same elements.
So, last night I opened my Janome Sew Mini, set it up and started stitching. I made sure that my adhesive was applied only to the center, not the edges. There are a few stitches that are not in a straight line, but for the most part, I picked up where I left off on my sewing technique.
Yesterday, I mentioned that I would wait until I got to CHA to make some Papertrey Ink purchases. Well, somehow I forgot to mention to you all that I am going to be at the CHA Super Show! I'm really excited to do lots of shopping, but better yet meeting some of you! It looks like a lot of paper crafters will be there and of course tons of vendors too! I can't wait! So, if you are going to CHA, leave a comment and let me know. I'd like to meet each of you there. McArthur will be coming to keep me company, take pictures (of my experience and to share who I met), and carry the goodies I load up on! Wait, it sounds like he has a list of to-dos while there, right?!
The voting for Gallery Idol is officially over (for this week's session anyway). Thank you to all of those who voted for me/my card. I really appreciate it. On Friday, they will announce the top 15 winners who will be moving on to the next round. I'm all nervous and excited waiting for Friday to arrive.
Thanks so much for your comments yesterday on the video blog (VLOG). I enjoy talking to you and hope to share more soon. Last night, I also arranged my video camera set up to record how-to videos on cards and such. So, it looks like a "Watch Me Wednesday" video should be coming very soon.
Thanks for stopping by and have a great day!
Card Instructions
Trim aqua mist cardstock into an A2 card.
Trim patterned paper and lemon tart cardstock and adhere together (only add adhesive to the center, not edges to prevent adhesive from sticking to sewing machine needle).
Add green ribbon, then tie berry sorbet ribbon into a bow.
Adhere cardstock to card front (only add adhesive to the center).
Stitch around border.
Trim patterned paper, scallop edge punch, then adhere to card front.
Already Hump Day! That's what I'm talking about! :) Have you ever seen a card design and think, "I wanna try that?" Well, that's what I've said when I have seen similar butterfly card designs. I like my Martha Stewart butterfly punch (yep, I have two)! So, I stamped a design, then punch them out. I wanted a bit of pizazz, so I added some fun beads to the center. The colors were inspired by Loonie Stampers Challenge. Since I do not have PTI's scarlet jewel (yet, because I'm waiting to go to CHA), I used ColorBox chianti and wine ribbon (from my wedding stash). I think the colors are close enough. I would have never selected this color combo and still do not know what to think of it, but glad I tried something new.
Speaking of trying something new, I am training myself how to edit videos on the iMac using iMovie. Yep, you heard that right, videos. I will soon start my videos up again. They should be a lot easier for me to edit and upload. So, very soon expect to see videos again. I did post a fun "here's what I got" craft supply video last night. Wanna watch it? You can here. But, I will warn you, I'm a bit goofy! I am not used to staring at a camera lens, especially when you can see yourself on a HUGE 24-inch screen!!
Card Instructions
Trim aqua mist cardstock into an A2 card.
Stamp damask background on ripe avocado cardstock.
Punch butterflies and set aside.
Trim lemon tart cardstock to fit on aqua mist card front.
Create scallop edge using a slot punch on ripe avocado cardstock and adhere to lemon tart cardstock.
Add ribbon and adhere cardstock to card front.
Adhere butterflies, add beads to the center, and stamp sentiment.
:: My Goodies {just because} :: Stamps: Stampin' Up! - friends 24-7; Papertrey Ink - mixed messages Ink: ColorBox - chianti Cardstock: Papertrey Ink - aqua mist + lemon tart + ripe avocado Accessories: Paper Mart - wine satin ribbon; Martha Stewart - butterfly punch; Stampin' Up! - slot punch; Stix 2 Anything - red seed bee'd Card Size: 4.25" x 5.5"
Happy Monday Everyone! Today's card is inspired by Loonie's Stampers Challenge. Sorry, I do not have any photos of the new studio yet, but this weekend was really a lazy one for me. I barely made anything and just felt like lounging! We got an iMac and literally played with it all weekend long! If you have any Mac/iPhone tips and tricks/shortcuts to share, please leave a comment! My first computer was a Mac (years ago), so it will be a bit of a learning curve to readjust. There is some familiarity with the computer, but not with everything.
I did get a chance to step out for a bit to the Great American Scrapbook Convention. I picked up a few items that have been on my list for a bit, such as Spellbinders Label 4 dies, Melissa Frances appliques, Basic Grey small chipboard letters, Quick Quotes Amaretto chalk ink, ColorBox inks (becoming my favorite ink now) and a few Copic markers. I think I did fairly well, but went past the budget just a bit! :) I do not know what I am going to do at the CHA Super Show next month! I should only have a gift card to spend to control my budget! Maybe that idea will work!
This week is a short work week for me. Looking forward to our trip to New Orleans to attend the Essence Music Festival and photograph Susan G. Komen's Circle of Promise affairs! This should be really exciting.
Well, thanks for stopping by today and take time to enjoy yourself (even if it's only for 30 minutes)!
Card Instructions
Trim kraft cardstock into an A2 card.
Trim so saffron cardstock, stamp leaf pattern, heat emboss, tear, and adhere to card front.
Tie twin around card front and add button and leaves.
Ink chipboard, stamp polka dot on wing, adhere to card front.
Stamp sentiment and adhere.
Draw faux stitching
:: My Goodies {Have a Wonderful Day} :: Stamps: Hero Arts - floating leaf pattern ; Papertrey Ink - out of the box; Art Warehouse - journal Ink: Versamark; Close to My Heart - twilight; Stampin' Up! - white Cardstock: Papertrey Ink - kraft + spring moss; Stampin' Up! - so saffron Accessories: Stampin' Up! - chipboard; Making Memories - button; twine; heat gun; white embossing powder; white gel pen Card Size: 5.5" x 4.25"
Hey there! Happy Tuesday to you! I've been dying to make a button frame as a focal point for a card for a while now and decided to try it out last weekend. It took a while to find the right size buttons to fit and also stitch them all to the card front. A quicker project that will have the same impact would be to do it on a smaller focal point, such as a small rectangle with a sentiment stamped in the center or around a circle card front, which is much smaller than an A2 card. Although it was time consuming, it was very soothing to sew these buttons around and in the end I felt like I accomplished this huge achievement! :) I kept the center simple, only stamping a single tree limb and a quote. I hope you like it!
Card Instructions
Trim kraft cardstock to an A2 card.
Trim vintage cream cardstock into a rectangle and adhere to card front.
This is a Monday Fast Card! I couldn't hold it until Friday, so I decided to share today. The longest step is heat embossing and die cutting, but once that's done, the card is basically finished. I really like the heat embossing of the wood grain background, so you may see this again soon! The heat embossing shows the texture of the wood grain, so its really effective. This is a very simple card and you can hand-write your own sentiment in the empty space.
This weekend was fun-filled. I got my eyes checked and picked out some new glasses. They won't be ready for a while, so I'll share a video-blog with you when they are so you can see them and tell me what you think! I usually only wear my glasses at work, but also on occasion when I'm crafting. They're exactly what I wanted, bold and fun!
I saw Obsessed and it is your new Fatal Attraction. It was entertaining, but no movie of the year. It's a good movie, but not necessarily a must-see at the big screen, but DVD, yes! Don't worry, I won't spoil the movie for you, you'll just have to see for yourself.
We also did another infant + family session and it was great! I'll definitely share the photos with you when they're done. I have such a fun time with McArthur on these shoots and meeting new people. You get a chance to step into the lives of others and see them in their best light.
Last, but not least, I picked up my new video camera!!! I videoed TWO recordings of cards already. It's very easy to use and has much better video quality than my previous camcorder. Although I didn't get the Flip Mino, I did get a comparable HD camera that is budget-friendly and effective for my recording purposes. I'll let you know what it is after I finish editing it and am 100% sure I want to recommend it!
Have a great Monday and thanks for stopping by!
Card Instructions
Trim berry sorbet cardstock to an A2 card.
Emboss wood grain background stamp on dark chocolate cardstock.
Die cut circles and adhere to card front with foam adhesive.
Stamp sentiment.
Corner round edges.
:: My Goodies {Enjoy Everyday Enjoy Life}::
Stamps: Papertrey Ink - handwritten notes; All Night Media - wood grain background rubber stamp (Michaels)
Ink: Versamark; Stampin' Up! - chocolate chip Cardstocks: Papertrey Ink - berry sorbet + dark chocolate Accessories: Spellbinders - circle nestabilities; ProvoCraft-Cuttlebug; White Embossing Powder; Heat Gun; Corner Rounder
Hey Everyone! It's Friday and time for another fast card. Now, anyone can whip this card up in a jiffy. You know how when you want to send a little note along in a package? Well, this card is the perfect solution for that and you can make it in under 10 minutes (should be 5 if you work quickly from these steps). Drawing or handwriting on a card adds a personal touch, but is also super quick. Don't like your handwriting? Practice or purchase a handwriting stamp. Papertrey Ink has plenty, Technique Tuesday's Alli Edwards has a few, and even rubber stamps found at A.C. Moore or Michaels (like the one I used) work as a great substitute. One-layer cards can look plain, but I like them sometimes for simplicity and they remind me of graphic cards I can purchase in a pack in a store, except I made it! :)
I hope you all have a great weekend. We have some fun plans. Of course, we have another photo session. This time it's a family + newborn. I have some great ideas and I just hope the baby stays asleep so we can do them! We plan to go to the movies to see the new Beyonce movie with the lady from Heroes, Ali Larter, called Obsessed, it looks so dramatic! Other than that, I have lots of projects and cards to make in the between time to keep me happily busy. Oh yeah and I hope to pick up my new Flip Mino HD Video Camera too and play with that!
Thanks for stopping by!
Card Instructions
Trim gray cardstock to an A2 card.
Adhere felt sticker to the center of the card front.
Stamp sentiment.
Doodle a frame around the center.
:: My Goodies {Just a little Note}::
Stamps: Stampendous - just a note
Ink: Stampin' Up! - white Cardstocks: Papertrey Ink - smokey shadow Accessories:Martha Stewart - felt applique stickers; Unibal-signo gel pen
This is a not so fast card! Sorry, yesterday I was a little under the weather and took a break from the studio. But, I still have a card to share with you! I made this one after last week's K. Werner Challenge, but I decided to still use the colors (minus the green, which somehow I forgot until the end). I thought the colors screamed "teenager," so that's who I had in mind when I created it.
I hope you have a great weekend. Tonight, I am doing the Girls Night Out event at the National Harbor and will be selling cards (hopefully)! Mac will be the photographer. Click here for details if you want to come!
Tomorrow, we're doing an engagement photo session in Old Town, Alexandria (love that town)! I'll share the photos with you when they're done in about a week! We also have another engagement shoot at Washington Nationals baseball stadium on Sunday. BUSY BUSY BUSY BEES! It's going to be a beautiful weekend, so we'll have a blast and hope you do as well!
Card Instructions
Trim pacific point cardstock into an A2 card.
Trim white cardstock into a square and stamp wood grain background (stamp off on scratch paper, then stamp on your white cardstock).
Add pom pom trim and tie ribbon around into a bow.
Adhere white square to card front with foam adhesive.
Die cut scallop circle and adhere.
Add chipboard letters, embellish with white gel pen.
Add glitter to chipboard star and adhere.
Round corners.
:: My Goodies {You Rock!}::
Stamps: All Night Media - wood grain background rubber stamp (Michaels)
Ink: Stampin' Up!- pacific point Cardstocks: Papertrey Ink - white; Stampin' Up! - ruby red + pacific point Accessories: Papertrey Ink - true black ribbon; Michales-Offray pom pom trim; Spellbinders-circle nestabilities; Provo Craft - cuttlebug; corner rounder; Heide Swapp-chipboard star (originally copper); American Crafts-chipboard letters; Uniball-signo white gel pen
Yes! It's Friday EVE! I'm excited because the weather is going to start warming up today and through the weekend here in DC!
I used SCS Color Challange for inspiration. I wanted to use the Sketch Challenge too, but I'm not too good with sketches, so that didn't work out! ;) I also wanted to use some new stamp sets I won from Paper Crafts Stamp It Week contest. They aren't stamp sets I would usually buy, so I liked working with them. I used two in this card, plus a PTI stamp (couldn't resist)!
Do you see that vintage frame? Isn't it so striking? I really like it and I picked it up last week at Michaels when they were having their Easter sale. There are four frames in each package and they are made to coordinate with other Sabrina Making Memories items.
This card took me FOREVER to make. Not because I was slow cutting or something, but because I couldn't figure out the layout, what to add, embellishments, etc. Finally, it all came together. I'm just glad I had the time to devote to it. I'll sure be happy to make a fast card for tomorrow's post and be done in a JIFFY!
One of my life's moments included a FAST and easy white chicken pizza I made last night. Have you ever had leftover chicken breast? Well, if you do (or if you just buy those grilled chicken strips in the deli section) you can make this pizza super fast. I've made it before, but this time I decided to share! I discovered the recipe from Sandra Lee from the Food Network. Here is the real recipe!
Ingredients
1 Crescent Rolls package 1 Bag of Mozzarella Cheese Bit of Spinach (optional) 1 Chicken Breast cut into small bite-size pieces 2 Tbsp Alfredo Sauce (maybe less)
Instructions
Roll out crescents into one sheet (will be a rectangle shape).
Apply alfredo sauce lightly over the dough.
Add chicken breast, spinach, and mozzarella cheese.
Bake in oven at 375 degrees for about 10 minutes (or until done).
Yummy as an appetizer if you cut into mini squares, a quick lunch, or if you're like us a dinner! :) I hope you enjoy!
Thank you so much for stopping by today. I truly appreciate you all! Have a great Thursday and enjoy life's moments.
Card Instructions
Trim brown cardstock into an A2 card and emboss card front.
Adhere frame to card front.
On blue cardstock, stamp image and cut out.
Tie ribbon around image and adhere to card front.
Stamp flowers on pink cardstock, cut out and adhere under ribbon.
Stamp sentiment on yellow cardstock, cut into a rectangle, and adhere to card front.
Stamp butterfly, cut out, and adhere to card front.
Add rhinestones.
Round corners.
:: My Goodies {Life}::
Stamps: Papertrey Ink - out on a limb sentiments; Jen Wilson Laundry Line - flirty lil girl; Sandylion - french impressions
Ink: Stampin' Up!- chocolate chip Cardstocks: Papertrey Ink - dark chocolate; Stampin' Up! - so saffron + bordering blue + pink pirouette Accessories: Stampin' Up!- chocolate chip ribbon; Making Memories - vintage frame; Hero Arts - rhinestones; Provo Craft - cuttlebug + swiss dots embossing folder; corner rounder
It's Wednesday! This week's video features a quick mini square card. The card is 4.25" x 4.25" and is great because it fits into an A2 envelope (no extra postage required for this square card)!! I made sure I added a ribbon tied in a bow, so everyone could see how I did it. It's not really a tutorial, but you can watch it for what it's worth! I also show how I made the scallop edge using a slot punch. Sorry about the quality, but that camera was 'acting up' this week! :)
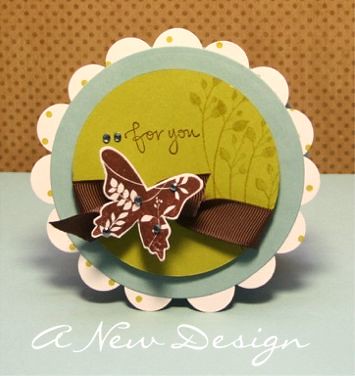
Hey there everyone! I'm back today with a card inspired by K. Werner's Color Challenge. I was in the mood to make a circle card, so I pulled out my largest circle nestie and die cut two of them! I let the design flow from there as usual.
Not feeling too chatty...so, have a good day and thanks SO much for stopping by!
Card Instructions
Die cut two circles in baja breeze cardstock (larges circle die).
Stamp polka dot background on white cardstock, then punch circles.
Adhere circles to one of the circle die cuts.
Die cut a smaller circles in kiwi kiss.
Stamp floral sprays in kiwi kiss, sentiment in brown, and tie ribbon around into a knot.
Stamp butterfly, cut out and adhere to ribbon knot.
Add rhinestones, adhere circle to baja breeze die cut with foam dimensionals.
On the second baja breeze die cut, score a line at about 1/4 from one of the ends and adhere it to the back of the newly created scalloped circle.
:: My Goodies {for you}::
Stamps: Stampin' Up!-polka dot + great friend
Ink: ColorBox-Chestnut; Stampin' Up!-kiwi kiss + chocolate chip Cardstocks: Papertrey Ink-white; Stampin' Up!-kiwi kiss + baja breeze Accessories: Stampin' Up!-chocolate chip ribbon; KaiserCraft-rhinestones; Creative Memories-3/4" circle punch
Trim pattern paper into a square and distress the edges.
Paper pierce the pattern paper and faux stitch.
Trim raspberry fizz cardstock into a square and add flower soft on the edges.
Hand-cut flower from pattern paper and distress and ink the edges.
Draw stem and adhere flower with button on raspberry fizz cardstock.
Tie ribbon around pattern paper.
Adhere raspberry fizz cardstock to pattern paper.
Stamp sentiment and add button, then adhere to ribbon/cardstock.
Adhere pattern paper square to square card base.
:: My Goodies {with gratitude}::
Stamps: Papertrey Ink-beautiful blooms
Ink: Close to My Heart-Topiary Cardstocks: Papertrey Ink-raspberry fizz + white; Joann-pre-scored square card Pattern Paper: Papertrey Ink-bitty dots; American Crafts-Metropolitan Accessories: Papertrey Ink-raspberry fizzs ribbon; Craft Supply-button; Flower Soft-sunshine yellow; KaiserCraft-rhinestones; Uniball-white gel pen
Card Instructions
Trim cardstock to an A2 size card.
Trim pattern paper to fit the width of card base.
Trim yellow cardstock into a square and stamp sentiment.
Stamp flowers on kraft cardstock and cut out.
Add flower soft to stamped flower buds.
Tie ribbon around card base.
Add hardware and sentiment.
Adhere flower stamped square and add brads.
:: My Goodies {Sweet Wonderful You}::
Stamps: Papertrey Ink-Out of the Box + Handwritten Notes
Ink: Stampin' Up!-white; Close to My Heart-topiary Cardstocks: Papertrey Ink-lemon tart + kraft + new leaf Pattern Paper: Papertrey Ink-bitty dots Accessories: Papertrey Ink-white ribbon; Stampin' Up!-hodgepodge hardware
Card Instructions
Trim cardstock to an A2 size card.
Trim pattern paper to fit the width of card base.
Paper pierce the bottom portion of pattern paper, add faux stitching, and adhere to card base.
Stamp bunny, cut out, and add flower soft.
Tie ribbon around card base.
Adhere bunny to top of bow.
Stamp sentiment and add buttons.
:: My Goodies {Welcome Little One}::
Stamps: Papertrey Ink-Bitty Baby Blessings
Ink: Close to My Heart-black Cardstocks: Papertrey Ink-white Pattern Paper: Papertrey Ink-bitty dots Accessories: Papertrey Ink-white ribbon; Craft Supply-buttons; Uniball-white gel pen
It's that time again! Splitcoaststampers is at it again...reviewing another craft product for you! This month, we reviewed Flower Soft, a material to add texture to any project. It's somewhere between fun flock and glitter. I made the cards above using Flower Soft in different ways. The first card uses Flower Soft by creating a border around cardstock. It adds texture and bold color. The second card subtly uses Flower Soft as the buds of stamped flowers. The last card warms up a stamped bunny.
Take a look at the reviews and projects here. So, what do you think of Flower Soft? Wanna play?!
Thanks for stopping by today! I'll be back later this evening for Papertrey Ink's Blog Hop! Come back by around 6pm EST for a new card! The challenge is to create a background with stamps. Somehow, I didn't use all Papertrey Ink this time, but I couldn't help it! So silly of me not to use all PTI on Blog Hop night! DUH! I'll offer some PTI options for the stamp set I use.
Today, I'm sharing some great news! A few weeks ago, I was asked to join Splitcoast's Product Review Team! After receiving products from vendors, we use them, and write a review on what we think about the products. The reviews are posted in Splitcoast's Weekly Inkling and can be found here or here online. You may subscribe to the Weekly Inkling, by clicking here and entering your e-mail in the blue box on the top right.
Of course I accepted, so first I am reviewing Scor-Pal's line of products. Check out all of our reviews here and also the samples we made using the product here!
Splitcoaststampers = SCS
Here are some samples I've made using Scor-Pal, Scor-Bug, Scor-Tape, and Scor-Mat! I use the Scor-Pal for every card I make (to score the fold) and the Scor-Mat as my working surface.
Scor-Bug used to make lattice design
Scor-Pal + Scor-Tape used for custom envelopes
Scor-Pal + Scor-Tape used for custom envelopes
Scor-Pal + Scor-Tape used for custom envelopes
:: My Goodies {thanks chickie}::
Stamps: Papertrey Ink-handwritten notes; Stampin' Up!-frames with a flourish
Ink: Stampin' Up!-chocolate chip Cardstocks: Papertrey Ink-dark chocolate + melon berry + ripe avocado Accessories: Craft Supply-button; dimensionals; Close to My Heart-twine; Michaels-brown satin ribbon; Scor-Bug; Scor-Pal
Instructions
Trim melon berry cardstock to 4.25"x 5.5"
Scor lattice design by angling cardstock on Scor-Pal and running Scor-Bug along the lines.
Yes...it's Tuesday already! My first full day into the new time change went better than expected. I did down a large travel mug of coffee, which is not my typical morning routine. So, I bet that helped! I'm going to drink some every day this week, just to make sure ;)! Did you have to spring forward? How did you make it through the day?
I made this card at the crop on Saturday. When I saw the SEI damask velvet paper, I had to have it. Then, I made two cards with it that night, so I picked up one more sheet before leaving to make sure I didn't run out!
What do you think about that pattern paper? I think 'chocolate' is my favorite color, but I like to spice it up with other vibrant colors. How about those buttons? Aren't they too cute? And then...the pom pom trim. It's such a new trendy in the paper art world, right?! Had to have that too. I bet you can guess the other color I bought it in...CHOCOLATE! :) I can't wait to use it!
Thanks for stopping by. I hope you all have an energized day!
Card Instructions
Trim dark chocolate cardstock to an A2 size card.
Trim spring moss cardstock to 3.375" x 4.75".
Trim pattern paper to 2" x 3.375" and adhere to green cardstock.
Trim raspberry fizz cardstock to .75" x 3.375", stamp polka dots, and adhere to green cardstock.
Adhere pom pom trim and tie ribbon into a bow.
Stamp sentiments and add buttons w/ rhinestones.
Adhere green cardstock to card base using dimensionals.
Happy Hump Day! Today's card was inspired by another card I made last year. I can't link it because it is going to be published this summer. I changed quite a few things about the card, so this one is basically an original. My cards usually morph as I am creating them. You can see the metamorphosis on this card because if this sketch were thought out in advance, I would have placed the three squares slightly higher to center it more. But, then again, that's what makes card making fun and interesting, right?!
Unfortunately, I didn't finish the baby scrapbook because I was given a one day extension and when that happens...I take it! :) I only finished one layout and got "creator's block." I thought I should stop because I'd rather create something that looks great, instead of something forced. So, I hope I have plenty of creativity bubbling tomorrow night! :)
One last request, today make a wish, smile, and enjoy your day! Thanks for stopping by and I hope to 'see' you tomorrow!
Instructions
Trim cardstock to 4.25" x 11", then score at 5.5".
Stamp designs on a punched square.
Matte three squares on aqua mist punched squares.
Stamp sentiments on punched circles and adhere to squares.
Adhere squares to card base.
Cut the bottom edge of the card base with scallop punch (along with two other cardstocks).
Adhere scallop edged cardstocks in rows.
Apply ribbon and tie in a knot.
:: My Goodies {wish|smile|enjoy}:: Stamps: SU!-simple delights; Papertrey Ink-mixed messages Ink: Colorbox-chestnut Cardstocks: Papertrey Ink-raspberry fizz + dark chocolate + aqua mist Accessories: dimensionals; Creative Memories-square + circle punch; Papertrey Ink-aqua mist top notch twill ribbon; SU!-scallop punch Card Size: 4-1/4 x 5-1/2
This card is a simple card that can be for many occasions. I made it for a couple who renewed their vows. I'm really liking purple and green on cards lately. Have you all seen the new release over at PTI? I'm going to place my order next week and hope they keep everything in stock! Typically, I like to make sure I want the items I order and try not to impulse shop...anymore! I have a list, but I'm sure by next week, there will be a change with items I need and others crossed off that aren't as necessary. I have to remind myself that I can always buy some later.
I'm just now getting around to making a few cards with my SU! stamp sets I ordered from the new catty. I have one more stamp set to use and then I'll be happy that they are not neglected and can move on to order MORE! :) My camera battery was out (which seems to happen every time I turn it on to take a photo), so I will share some with you tomorrow.