header.gif (12,818 bytes)
Showing posts with label happy. Show all posts

11.05.2009

Caardvarks :: Circle Cards by Clear and Simple Stamps


Hey there, Bleeps! I'm back with a Caardvarks challenge...circle cards! This week's sponsor is Clear and Simple Stamps. I was lucky enough to get my hands on the Flight of the Bee stamp set. I really liked the honeycomb pattern and used it to create a background. I made a traditional circle card and another that featured a circle embellishment. Try your hand at some circle cards to and hop on over to Caardvarks to see what my teammates came up with! There are some cute cards out there using some awesome stamps!
Have a great Friday Eve and thanks so much for visiting!
Instructions :: Card 1
  1. Die cut circles.
  2. Stamp honeycomb pattern on bottom half of yellow circle die cut.
  3. Stamp bee flying lines and sentiment.
  4. Tie ribbon around yellow circle die cut.
  5. Stamp bee, cut out, add rhinestone, then adhere to ribbon knot.
  6. Assemble card base and adhere yellow circle die cut to the card front.

Instructions :: Card 2

  1. Trim raspberry cardstock to make an A2 card base.
  2. Stamp honeycomb background on bottom of the card front.
  3. Die cut a circle and scallop circle.
  4. Stamp bees on yellow circle die cut and add rhinestones.
  5. Adhere yellow circle die cut on scallop circle die cut.
  6. Trim turquoise cardstock, adhere, and add stitching.
  7. Add circle embellishment.
  8. Stamp sentiment and pop off card front.

Supplies

Stamps :: Clear and Simple Stamps - flight of the bee

Ink :: Close to My Heart - black

Paper :: Stampin' Up! - bermuda bay, crushed curry; Papertrey Ink - raspberry fizz, black

Embellishments :: KaiserCraft - rhinestones; Papertrey Ink - ribbon

Tools :: Provo Craft - cuttlebug; Spellbinders - circle, scallop circle nestabilities; Janome Sew Mini (thread)

10.12.2009

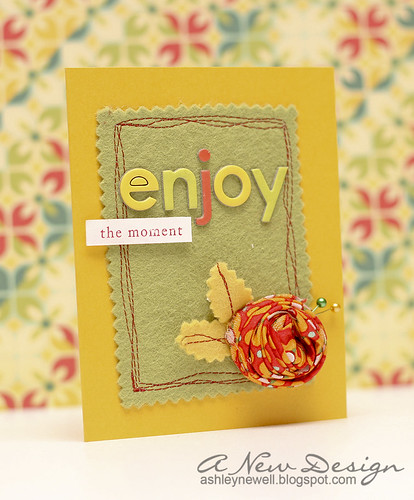
enjoy the moment


"Enjoy the Moment"

This is how I feel after photographing the wedding this weekend in the Outer Banks, NC. I am truly inspired and refreshed. Photographing weddings is one of the most fulfilling parts of my life. From meeting new people to witnessing love at the most highlighted times, photographing weddings make me remember to enjoy the moment.

Today's card captures that moment (or at least I tried to capture it)! Using lots of texture, I created a simple layout and design with lots of color. I hope you enjoy your holiday weekend.

Instructions
  1. Trim crushed curry cardstock into an A2 card by trimming an 8.5" x 11" cardstock in half horizontally.
  2. Trim felt with pinking shears to fit card front and adhere to card front using Creatopia fabric adhesive.
  3. Stitch around felt.
  4. Create a fabric rose by ripping about 1" of fabric, tying a knot at one end and wrap until the end. Adhere the end with glue.
  5. Adhere to card front and add stick pins.
  6. Cut leaves with pinking shears, stitch, then adhere.
  7. Add chipboard sticker letters.
  8. Stamp sentiment and adhere.
Supplies
  • Stamps :: Papertrey Ink - mega mixed messages
  • Ink :: Papertrey Ink - pure poppy
  • Paper :: Stampin' Up! - crushed curry + white
  • Embellishments :: Heather Bailey - felt + fabric; Sassafrass :: chipboard sticker letters; Sewing Machine; Thread; Straight Pins

8.27.2009

Embrace Happiness


Hey ya'll! How is it going? I hope great! Have you crafted lately? I made a few holiday cards last night. I wanted to share for the Moxie Fab World challenges, but none seem to really fit the challenge, so I decided not to share those just yet. I will have to make some new cards for the challenges. So, here is a card I submitted for Paper Crafts March/April issue that did not get picked up. It's kind of shabby, but I like it! I used a fabric strip to create the pleated background.

Thanks for stopping by and have a great Friday Eve!


Card Instructions
  1. Trim kiwi kiss cardstock to an A2 card.
  2. Pleat fabric strips, then stitch to secure.
  3. Adhere fabric to card front.
  4. Paint chipboard tree, then adhere to fabric.
  5. Hand-cut leaves, then adhere to tree.
  6. Stamp sentiment and adhere to card front.
:: My Goodies {embrace happiness} ::
Stamps: Papertrey Ink - mega mixed messages
Ink: Stampin' Up! - tangerine tango
Cardstock: Stampin' Up! - kiwi kiss
Patterned Paper: Fancy Pants
Accessories: Craft Supply - thread; Janome Sew Mini; Maya Road - chipboard tree; Moda - fabric
Card Size: 4.25" x 5.5"

8.12.2009

3 Wise Owls


What's been going on? For me, lots of crafting time. I just picked up Papertrey Ink's Wise Owl set by Alli Miles and it's so versatile. Every time I look at it, I want to stamp owls. Sorry for the multiple owl cards, but it is a different one! Instead of stamping their bellies, I used those great buttons! I'm not sure if someone else has done this or not, but since the introduction of Everyday Button Bits, I've been thinking of more ways to incorporate buttons into my designs. Since I was adding buttons, I thought about the eyes and used rhinestones. Isn't it great that PTI is now offering rhinestones for sale?! Kaiser is by far my favorite rhinestone manufacturer. They have a great selection of colors. I'm so excited that PTI will be carrying them because I'm confident they will carry the best color choices all of the time, unlike some LSS where they sell out and you can't find that color again.

Anyways, enjoy your day and thanks for visiting!


Card Instructions
  1. Trim summer sunrise cardstock to an A2 card.
  2. Trim patterned paper, scallop edge punch, and add ribbons, then adhere to card front.
  3. Stamp owls, cut out, and add buttons, then adhere to card front. Add rhinestones to owl eyes!
  4. Add buttons and sentiment.
  5. Corner round the edge.
:: My Goodies {thank you} ::
Stamps: Papertrey Ink - wise owl
Ink: Stampin' Up! - chocolate chip
Cardstock: Papertrey Ink - hibiscus burst + spring moss + summer sunrise
Patterned Paper: Papertrey Ink - bitty dots
Accessories: Papertrey Ink - buttons + ribbon + twine; Stampin' Up! - scallop edge punch; Kaiser - rhinestones; corner chomper
Card Size: 5.5"" x 4.25"

5.26.2009

Wishing You Happiness


I hope everyone enjoyed their holiday weekend. I decided to take the full weekend off and did not even post yesterday! WOW! I did make three cards yesterday late in the day, but for the most part I was taking a break. This card was inspired by Dawn's Color Challenge for this week.

Here are some photos I have forgotten to share with you:
I hope you enjoy the pictures. Thanks so much for stopping by and have a great Tuesday!

Card Instructions
  1. Make an A2 card with spring moss cardstock.
  2. Trim ripe avocado cardstock into a rectangle and stamp background design.
  3. Tear the left edge of avocado cardstock and corner round the right corners.
  4. Tie ribbon into a bow around avocado cardstock. and adhere to card front with foam adhesive.
  5. On a spring moss strip of cardstock, stamp sentiment, add rhinestone, crinkle and wrinkle + distress, then adhere to card front.
:: My Goodies {Wishing you Happiness}::
Stamps: Papertrey Ink - heartfelt basics + backgrounds basics (spots and dots)
Ink: Papertrey Ink - raspberry fizz + ripe avocado
Cardstocks: Papertrey Ink - spring moss + ripe avocado
Accessories: Papertrey Ink - raspberry fizz ribbon; EK Success - corner rounder; KaiserCraft - rhinestone; Time Holtz - paper distresser

4.01.2009

Embrace Happiness

Guess what?! I got my monthly stamp supplies! So, that means I got to play with some new stamps. This card is inspired by SCS Color Challenge. The stamp set is SU! (except the sentiment is PTI). I have been eyeing this set for a while and after seeing it used on cards, I had to have it. I have discovered I like birds on my cards and of course the damask is PERFECT! I really like how it's kind of a vintage.

I'm so glad it's Wednesday! Happy Hump Day! Stamping definitely gets me through the weeks!

Card Instructions
  1. Trim brown cardstock to an A2 size card.
  2. Stamp background on card front.
  3. Trim cream cardstock to a large square and stamp bird.
  4. Stamp again on a different piece of cardstock in red ink and cut out the bird.
  5. Adhere the bird on top of the brown stamped bird with foam dimensionals.
  6. Add flowers and stickles.
  7. Stamp sentiment.
  8. Mat onto red cardtsock.
  9. Adhere to card front with foam dimensionals.
:: My Goodies {Embrace Happiness}::
Stamps: Stampin' Up!-Friends 24-7; Papertrey Ink-Mixed Messages
Ink: Stampin' Up-chocolate chip; Close to My Heart-cranberry
Cardstocks: Papertrey Ink-dark chocolate + vintage cream; Stampin' Up!-riding hood red
Accessories: Ranger-stickles; Prima-flowers

2.03.2009

Happy Birthday Birdie


I'm really liking the raspberry fizz cardstock and find that it goes with almost every color! How on earth is that possible? I brought out my 'old' SU! Always bird...a classic! This is more of my scrappy style of a card that I typically do not do. It take a lot of steps and was difficult for me to tell you how to make because I did it last weekend! It's a lot of layering.

I've added a poll to the blog on the left. I just wanted to know whether anyone wanted to see more out of my blog. I was pondering a few ideas and wanted to see if they're even worth my efforts. So, if you get a chance, select one or more options to the poll OR you can even leave me a comment/email with any suggestions. I like to share my work and any information I find useful with each of you and want to make sure that it is effective!

A few weeks ago, my sister and I were 'models' for Mac, the photographer! Take a peek here and give him some love for those awesome shots!

Thanks for stopping by to see my birthday birdie. You have a great Tuesday!


Here is how you can make this birthday card:
  1. Trim blue cardstock to 4.25" x 8.5", then score at 4.25".
  2. Die cut circle and scallop circle.
  3. Dry emboss circle die cut.
  4. Stamp bird and cut out.
  5. Stamp sentiment and cut strip.
  6. Trim two strips of vanilla cardstock.
  7. Adhere circle die to scallop die.
  8. Adhere bird to circle die with dimensional.
  9. Tie ribbon around card base.
  10. Adhere scallop die to card base using dimensional.
  11. Adhere sentiment under ribbon and bird.
  12. Adhere two cardstock strips at the bottom of card base.
  13. Stick pin through ribbon knot.
  14. Adhere rhinestone to bird's eye.
:: My Goodies {Happy Birthday Birdie} ::
Stamps: Stampin' Up!-Always; Papertrey Ink-Birthday Basics
Ink: ColorBox-Chestnut; Stampin' Up!-chocolate chip
Cardstocks: Papertrey Ink-vintage vanilla + dark chocolate + spring rain + rapsberry fizz
Accessories: Making Memories-hat pin; Papertrey Ink-raspberry fizz polka dot ribbon; Spellbinders-circle + scallop circle nestabilities; swiss dots embossing folder; cuttlebug; KaiserCraft-rhinestone; dimensionals
Card Size: 4-1/4 x 4-1/4
Blog Design: Girly by Design