|
|
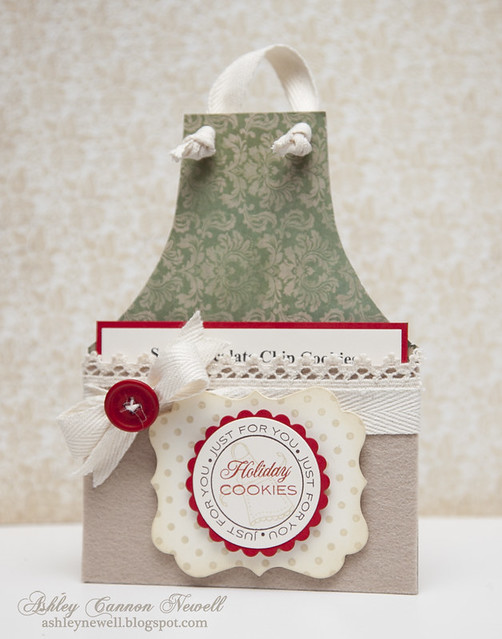
 Hey ya'll! I'm back to share my final project as a member of the Caardvarks Crew. I've been on the team for a year now and enjoyed every bit of it! The team is amazing and the challenges are so much fun! The current challenge is sponsored by Creative Cuts & More. I used an A7 Apron Pocket card to make this simple holiday gift of sharing a recipe. It's the simple things, right?!  On the pocket, I covered it with felt by measuring and adhere with Helmar glue. Then, I added some vintage trim and twill tape. On a label die cut, I stamped polka dotted background, inked the edges and layered it with Spellbinders scalloped circle and standard circle. To get the sentiment to say "Holiday Cookies," I combined two sentiments. On the "Holiday" sentiment, I only inked the "holiday" portion and left the rest uninked from that set! Tricky, but I had the sentiment I wanted in mind, just had to make it work!  Now, don't laugh at my crooked trimming! I don't know how that happened! Anyway, I copied a recipe into Photoshop CS 5, then printed it on the 3.5 x 4.5 cream cardstock and matted it on red cardstock. On the back, is the same template featuring the remaining directions for the cookie recipe! By the way, I'm keeping this pocket card for myself because this is one of the cookie recipes that was recommended to me by MANY blog readers here. Thanks to those readers who suggested it! Instructions- Adhere patterned paper (right side up) over apron top, then trim around the border. Punch holes with crop-a-dile by flipping apron over, you can still see original holes.
- Assemble pocket, then trim felt and adhere to pocket front.
- Adhere vintage trim and twill tape with button.
- Stamp polka dot pattern on label die cut, then ink the edges.
- Die cut circle and scalloped circle from cardstock.
- On circle die cut, stamp border, then apron, then sentiment. Adhere to scalloped die cut, then pop off of label die cut.
- Adhere label die cut to pocket front with foam adhesive.
- Add twill tape to apron top for neck loop!
- For inside, trim red cardstock to about 3.75 x 4.75, then trim cream cardstock to 3.5 x 4.5 and print recipe, then mat on red cardstock on front and back.
SuppliesStamps :: Papertrey Ink - just for you, 2008 holiday tag collection; Hero Arts - polka dot background Ink :: Close to My Heart - cranberry, bamboo; Stampin' Up! - chocolate chip; Ranger - antique linen, vintage photo Cardstock :: Papertrey Ink - vintage cream, pure poppy Patterned Paper :: Kaisercraft - tis the season collection Embellishments :: Craft Supply - twill tape; Hero Arts - woven lace trim; Papertrey Ink - pure poppy button, linen felt Tools :: Spellbinders - S4-114 standard circles lg, S4-124 classic scalloped circles lg, GC-001 grand calibur; We R Memory Keepers - crop-a-dile If you're looking for more projects, please check out my earlier post here. If it's before 1:00 pm EST and you haven't entered, don't forget about my blog giveaway too! Have a great weekend! Thanks for your visit!
Hey there, Bleeps! I hope you enjoyed your weekend. I'm already looking forward to our upcoming weekend since it will be a nice 3-day for me. Today, I am sharing some cards for the new Caardvarks challenge sponsored by SRM Stickers. The challenge involves scrap lifting one of the cards from the design team. The entire new release of SRM Stickers is the featured prize. Head on over to the blog to check out how everyone used these clear stickers. Edited to Add: By publisher's request, the image for this card was removed.
To view this card, please see Cards magazine April 2011 issue.
The image will be re-uploaded after May 2011.
Instructions- Trim patterned paper block and adhere to orange A2 card base.
- Trim doily in half and adhere to card front.
- Apply sentiment stickers to die cut embellishment, then adhere to card front.
- Add buttons with twine and bloomer.
SuppliesCardstock :: Papertrey Ink - orange zest Patterned Paper :: Kaisercraft - hippy girl collection Embellishments :: SRM - sentiment sticker; Craft Supply - doily; American Crafts - bloomer; Papertrey Ink - buttons; May Arts - twine; Kaisercraft - die cut embellishment (hippy girl collection)  Instructions Instructions- Trim patterned papers to fit A2 card front and adhere.
- Die cut label and trim one end, then adhere to card front to create a border.
- Add ribbon.
- Punch folder tab and add sentiment stickers, then adhere to card front.
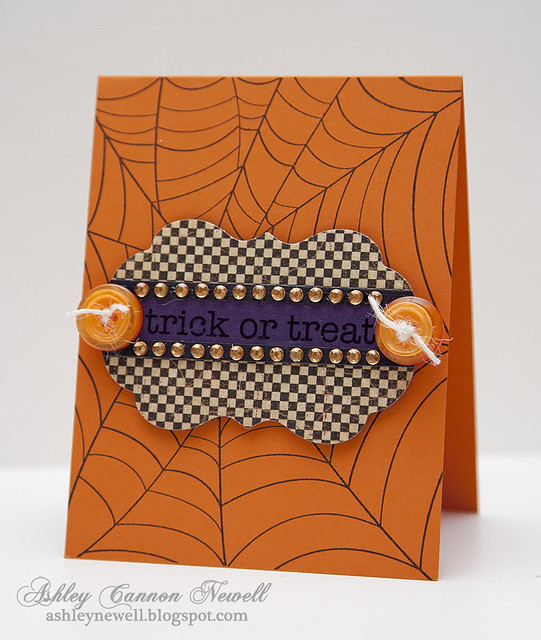
SuppliesCardstock :: Stampin' Up! - elegant eggplant; Papertrey Ink - rustic white Patterned Paper :: Kaisercraft - hippy girl collection Embellishments :: SRM - sentiment sticker; Papertrey Ink - ribbon Tools :: Spellbinders - S4-290 labels fourteen, wizard; McGill - folder tab punch  Instructions Instructions - Trim cardstock to create an A2 card base.
- Stamp web pattern.
- Die cut label, then adhere purple and black cardstock strips.
- Add sentiment sticker, then adhere buttons with twine.
- Embellish with rhinestones, then adhere to card front with foam adhesive.
SuppliesStamps :: Hero Arts - web background Ink :: Close to My Heart - black Cardstock :: Papertrey Ink - orange zest; Stampin' Up! - elegant eggplant; American Crafts - black Patterned Paper :: Graphic 45 - hallowe'en in wonderland collection (harold's square) Embellishments :: SRM - sentiment sticker; Kaisercraft - rhinestones; May Arts twine; Papertrey Ink buttons Tools :: Spellbinders - S4-290 labels fourteen, wizard Thanks so much for visiting today! Take care!
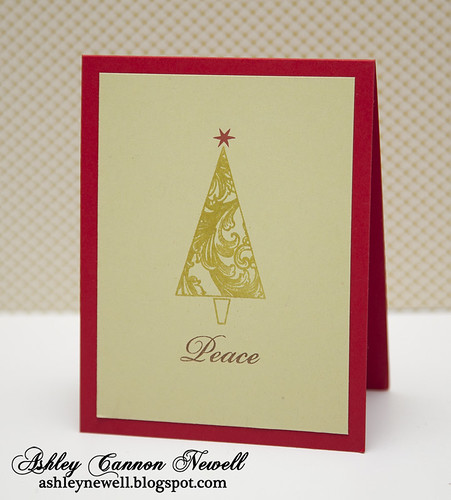
Hey ya'll! I hope you enjoyed your weekend! Thank you all for stopping by on Friday for the Paper Crafts blog hop celebrating the Holiday Cards & More issue. Also, thanks for the bids that I have received for my "Blog 4 Boobies" card. If you are interested in finding out more and want to bid, please click here. Today, I am sharing a few Hero Arts cards for the new Caardvarks challenge. This time, the challenge is all about keeping designs clean and simple. Most of my designs are pretty simple, but I did sneak one in there with a slightly more pizazz! Head on over to the Caardvarks blog to check out some amazing designs and maybe get inspired to create your holiday card this year. Clean and simple designs are perfect to create bulk holiday cards.  Instructions Instructions- Trim red cardstock to an A2 card base and emboss card front.
- Stamp trees on cream cardstock, cut out, and adhere to cream block.
- Stamp sentiment.
- Mat on green cardstock, then add gemstones.
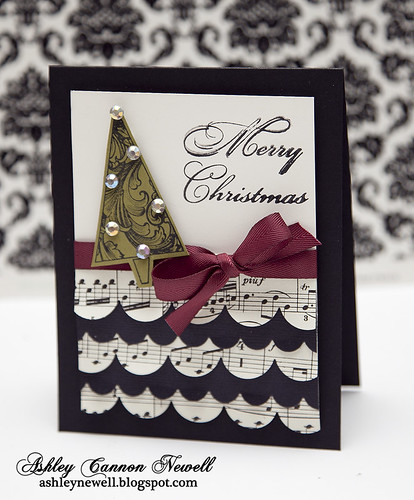
SuppliesStamps :: Hero Arts - get merry Ink :: Tsukineko - versafine spanish moss, memento tuxedo black Cardstock :: Papertrey Ink - pure poppy, vintage cream, ripe avocado Embellishments :: Hero Arts - gemstones Tools :: Provo Craft - Cuttlebug, swiss dots embossing folder  Instructions Instructions- Trim music sheet and black cardstock into strips, die cut scalloped borders, then adhere together.
- Add cream cardstock block to scalloped borders.
- Add twill tape and tie into a bow.
- Stamp sentiment.
- Stamp tree on green cardstock, cut out, then pop off.
- Pop off focal point off A2 black card base.
SuppliesStamps :: Hero Arts - merry christmas trees Ink :: Stampin' Up! - black Cardstock :: Papertrey Ink - true black, vintage cream; Craft Supply - vintage music sheet Embellishments :: Hero Arts - gemstones; Papertrey Ink - scarlet jewel twill tape Tools :: Papertrey Ink - medium, small scalloped edge dies; Provo Craft - cuttlebug  Instructions Instructions- Trim green cardstock to 4" x 5.25".
- Stamp tree, then heat emboss with clear embossing powder.
- Add gemstone.
- Stamp sentiment.
SuppliesStamps :: Hero Arts - merry christmas trees Ink :: Tsukinkeo - versamark watermark ink, versafine vintage sepia; Close to My Heart - cranberry Cardstock :: Papertrey Ink - pure poppy, spring moss Embellishments :: American Crafts - clear embossing powder  Instructions Instructions- Trim kraft cardstock block, then stamp "JOY" in red and add remaining sentiments around it in white.
- Stamp snowflakes and stars on blue cardstock and adhere to kraft cardstock.
- Add twine and ink the edges with white chalk ink.
- Pop off A2 card front, then add gemstones.
SuppliesStamps :: Hero Arts - get merry, merry christmas trees Ink :: Papertrey Ink - aqua mist; Stampin' Up! - white; Clear Snaps - colorbox white; Close to My Heart - cranberry Cardstock :: Papertrey Ink - kraft, white, aqua mist Embellishments :: Hero Arts - gemstones; Craft Supply - twine Thanks so much for visiting today! I hope you have a marvelous Monday!
Hey Everyone! I hope you're enjoying your weekend! The wedding was SUPER DUPER fun! I almost picked up a British accent by the end of the night! :) I also picked up a bunch of pesky mosquito bites. So, I reached out to Twitter and Facebook for help on remedies to stop the itch, burning and irritation. Thanks to everyone who responded. Here are a few remedies: - apple cider vinegar
- hyrdro cortisone
- vinegar
- preparation h
- ice (lots)
- benadryl itch stick
- campho phenique
- baking soda/water paste
- clear nail polish
- ammonia
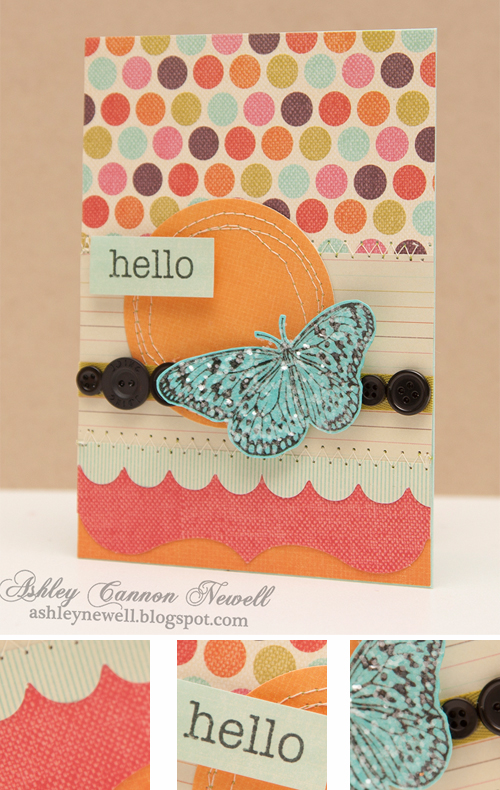
I only was able to try out the vinegar so far and it worked! I did not have any apple cider vinegar on hand, so I dabbed some (regular white vinegar) on my itchy bites and it calmed down the irritation. However, by the end of the night, I needed more application. So, I need to try more stuff out! I'm going to try some more later before I go out and purchase some other stuff I obviously need in my household stash! I thought these were great remedies and if you all have "True Blood" like myself, you'll need this list one day too! Oh yes, that means I'm a TRUE True Blood fan! I'll be watching tonight's episode on Monday while we're resting up from this evening's wedding. Caardvarks is hosting a new challenge. There are some fun sketches over there for you all to be creative with, so head on over to the blog. First, make sure you check out all of the designer's projects, then see what the challenge is all about! Here are a couple cards I made using digital images by Tiffany Doodles.  Instructions Instructions- Trim polka dotted patterned paper to about 4.25" x 6".
- Trim striped patterned paper to about 4.25" x 2" then adhere to center of polka dotted patterned paper.
- Trim orange patterned paper to about 4.25" x 1" and adhere to bottom of polka dotted paper.
- Add decorative edge bracket and scalloped edge die cut strips and trim excess to fit 4.25" width.
- Add zig zag stitching to borders.
- Die cut circle from orange patterned paper. Add stitching and adhere to patterned paper.
- Add green twill tape strip.
- Print digital butterfly image, add adhesive and coat with glitter. Adhere to card front with foam adhesive.
- Add buttons with glue.
- Stamp sentiment on blue patterned paper and adhere to card front with foam adhesive.
- Adhere patterned paper to 4.25" x 6" card base.
SuppliesInk :: Tsukineko - memento tuxedo black Cardstock :: Papertrey Ink - hawaiian shores Patterned Paper :: Kaisercraft - hippy girl collection Digital Image :: Tiffany Doodles - paper kit butterfly Embellishments :: Papertrey Ink - buttons, chartreuse twill tape; Martha Stewart - glitter Tools :: Spellbinders - S4-116 standard circles sm, wizard; Janome - sewing machine   Instructions Instructions- Trim card base to about 2.5" x 6"
- Trim strips of green cardstock to various heights and 2.5" wide and adhere to card front to create a gradient.
- Print dogwood digital image, color, add glue and glitter, cut out, and adhere to card front with foam adhesive.
- Add tulle with button at the top.
- Stamp sentiment.
SuppliesInk :: Tsukineko - memento tuxedo black; COPIC markers Cardstock :: Stampin' Up! - certainly celery, kiwi kiss, old olive; Papertrey Ink - rustic cream, spring moss Digital Image :: Tiffany Doodle - dogwood Embellishments :: Craft Supply - green tulle; GCD Studios - black button; Martha Stewart - glitter Thanks for visiting today! Have a great Sunday!
I'm back today to announce Caardvarks' new challenge. Sponsor
JustRiteTo see how JustRite stamps work, click HEREFor a die/punch compatibility chart, click HERETo visit JustRite Stamper's blog, click HERETo shop, click HEREChallenge
Create a NEW Holiday gift tag or mini card that incorporates stamping! Enter your project via Mr. Linky at the end of this post by the end of the month. Prize
What else but a generous JustRite Stampers Prize Package of *new* JustRite stamps! So, head on over to the Caardvarks' blog to check out all of the holiday tags and mini cards the DT created. They're awesome! Thanks so much for coming by (again)!
Hey there, Bleeps! I hope you all had a great weekend. I truly enjoyed myself with friends and family over the extended holiday weekend. It was great to spend some time at my mom's and poolside! It is REALLY scorching here in DC - over 100 degrees, so I got a little tan! :) Sorry, I don't have any extra festive pictures to share showing me chow down on Maryland crabs, but it's probably best that I didn't! :) It's time for a new Caardvarks challenge this month. The challenge is sponsored by My Favorite Things and I created some cards using their stamps.  Instructions Instructions- Trim pink cardstock to create a landscape A2 card base.
- Adhere two doilies together, then adhere to card front.
- Edit photo to a B/W image, then print, trim and adhere to card front.
- On manila tag, stamp baby announcement information.
- Add strips of patterned paper as dividers.
- Hand write baby announcement information, then tie twine and jewel and pop off announcement.
SuppliesStamps :: My Favorite Things - baby makes three Ink :: Memento - tuxedo black Cardstock :: PTI - sweet blush Patterned Paper :: My Mind's Eye - lush collection (pink houndstooth) Embellishments :: Craft Supply - doilies, manila tag; KaiserCraft - rhinestone Tools :: Epson - Stylus Photo 1400 printer, 4x6 photo paper; iPhoto  Instructions Instructions- Trim patterned paper to 4" x 5.25", then ink the edges and add stitching.
- Adhere patterned paper to A2 kraft card base.
- Adhere kraft envelope at an angle.
- Add ruffled ribbon.
- Add rhinestones.
- Stamp image, color, add distress ink to pigment the skin, and pop off card front.
- Stamp sentiment, then pop off card front.
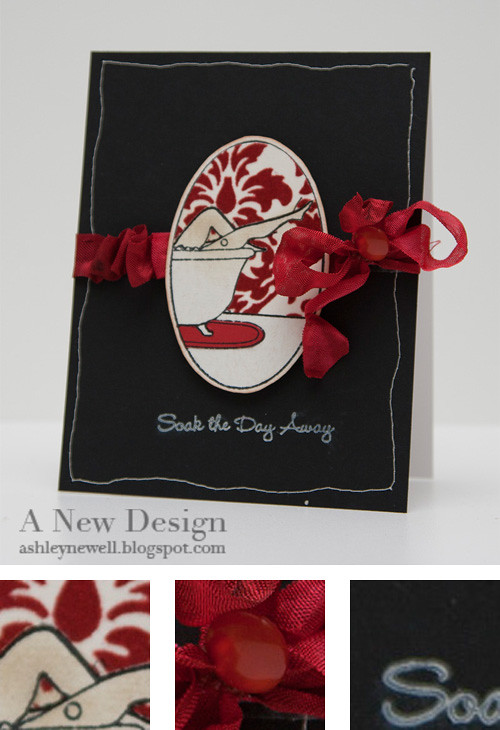
SuppliesStamps :: My Favorite Things - lollipop girl Ink :: Ranger - antique linen; Memento - tuxedo black; Copic markers Cardstock :: PTI - kraft; WorldWin - canvas Patterned Paper :: My Mind's Eye - lush collection (pink houndstooth) Embellishments :: KaiserCraft - rhinestones; Maya Road - envelope; PTI - sweet blush satin ribbon Tools :: Janome - sewing machine; Craft Supply - thread  Instructions Instructions- Trim black cardstock to create an A2 card base. Add stitching.
- Stamp image and cut out.
- Paper piece wallpaper and rug, then add distress ink.
- Add ribbon treatment with button.
- Pop focal point off card front.
- Stamp sentiment.
SuppliesStamps :: My Favorite Things - bath time mini set Ink :: Memento - tuxedo black; Ranger - antique linen Cardstock :: PTI - true black; white, pure poppy Patterned Paper :: My Mind's Eye - lush collection (red damask) Embellishments :: MemrieMare - red ribbon; PTI - button Tools :: Janome - sewing machine; Crafty Supply - thread Thanks so much for popping over! I'll be back a bit later with a new card for Lawn Fawn's new release!
Hey Everyone! Today, I'm back with a few cards inspired by Caardvarks' June Challenge. This month's challenge is sponsored by DRS Stamps. The challenge is to use embossing (wet/dry). I made a few cards featuring three DRS stamps.  This card is for my sister. Happy Birthday, Nichole! She likes heat embossed cards, so I decided to use the Bloomin' Huge Flower to emboss the entire background. I used the watermark resist technique and added the distress ink to the background. Here are a few pictures of Nichole and I last year (I think). This is when McArthur first started photography. We were one of his first portrait models! We laugh like this all of the time! 
 Instructions Instructions- Trim rustic cream cardstock to create a 5.5" square card.
- Stamp flowers in watermark in over card front, then add clear embossing powder and heat emboss.
- Using blending tool, add distress ink to cover card front.
- Add linen ribbon by ruffling it, then overlay yellow ribbon treatment. Add flower center.
- Stamp sentiment.
Technique- Watermark Resist - this is not a new technique, but since I have not featured it here on my blog, I thought I'd mention just in case some of you have not tried it. After your watermark stamped image is heat set, add ink to the background and the stamped image will resist the ink and show through any ink you add!
SuppliesStamps :: DRS Stamps - bloomin' huge flower; Walztingmouse Stamps - say it with style (sentiment) Ink :: Ranger - old photo, vintage photo; Versamark Cardstock :: PTI - rustic cream Embellishments :: Prima - flower center; May Arts - linen ribbon; MemrieMare - cabbage rose ribbon; American Crafts - clear embossing powder Tools :: Ranger - blending tool, heat gun  Instructions Instructions- Use leftover scrap from 5.5" square card above - measures 3.5" x 5.5"
- Stamp flower on yellow cardstock and color with Copic Markers, then add distress ink.
- Cut out flower, add flower center, and pop off card front.
- Stamp sentiment and add distress ink.
SuppliesStamps :: DRS Stamps - bloomin' huge flower; Waltzingmouse Stamps - say it with style Ink :: Versamark; Ranger - old photo; Copic markers - Y19, Y21 Cardstock :: PTI - rustic cream, lemon tart Embellishments :: Prima - flower center Tools :: Ranger - blending tool  Instructions Instructions- Trim brown cardstock to create an A2 card base.
- Trim white cardstock block and stamp background design in brown ink. Add distress ink.
- Add twill tape strip, then overlay ruffled ribbon.
- Stamp ribbon scalloped oval, die cut oval, then stamp sentiment and add rhinestones.
- Punch butterfly and adhere everything to card front.
SuppliesStamps :: DRS Stamps - vicki's versatile background, ribbon scallop 2.5" mega oval; JustRite - just a note Ink :: SU! - chocolate chip; Ranger - old photo Cardstock :: Gina K. - white; PTI - dark chocolate, kraft Embellishments :: Melissa Phillips - twill tape; MemrieMare - cabbage rose ribbon; KaiserCraft - rhinestones Tools :: Spellbinders - classic ovals large (S4-110), wizard Thanks so much for stopping by! Enjoy the rest of your weekend!
 Hey there! I'm back with my Caardvarks' post. This month, Tiffany Doodles is sponsoring the challenge and our very own Heidi Van Laar has created some great sketches for all of us to use. The cards I created for this challenge were based off both of the sketches. To see my other card, travel on over to the blog to check it out and the rest of the design team's too! Thanks again for stopping by today! Instructions- Trim sweet blush cardstock to create an A2 card base.
- Stamp post card background in black ink.
- Print dogwood image and color with Copic markers, then cut out and pop off card front.
- Add lace trim and ribbon.
- Stamp sentiment, ink and adhere to card front.
SuppliesStamps :: Tiffany Doodles - dogwood digital image; Unity - post card; Waltzingmouse Stamps - roses in bloom Ink :: Memento - black; Ranger - old photo; Copic Markers Cardstock :: PTI - sweet blush, white Embellishments :: PTI - true black twill tape; Prima - vintage lace trim
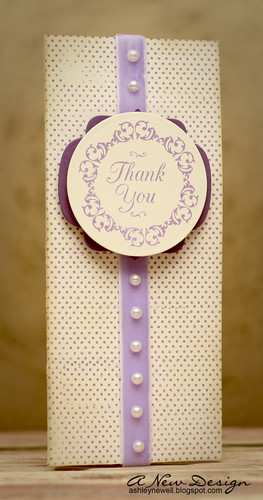
Hey everyone! I'm back today to share with you a few cards I made for Caardvarks! Core'dinations is the sponsor and they are offering a 3-month guest design team position! How fun is that?! All you have to do is create a monochromatic card! Check out the blog post here for all of the details!
 Instructions Instructions- Trim cardstock to create an A2 card base and sand it a bit.
- Trim embossed cardstock block, sand, and distress edges with fingernail.
- Adhere cardstock to card front.
- Apply scor-tape to card front bottom, then add rose trim and ruffle along the tape.
- Add pearls.
- Trim sentiment from cardstock and adhere to label die cut, then adhere to card front center.
- Add pearls to label die cut.
Tips & Tricks- With all of the great trims on the market, don't forget to use them in creative ways. With this trim, I ruffled it up so the roses will appear closer together.
Supplies
Cardstock :: Core'dinations - Jenni Bowlin collection (embossed text), core essentials Embellishments :: Donna Downey - fabric scrapbook kit (sentiment printed on cream cardstock); K&Co - label die cut; KaiserCraft - pearls; American Crafts - rose trim (Dear Lizzy collection) Tools :: sanding tool  Instructions Instructions- Trim whitewash cardstock to create an A2 card base and sand it up a bit.
- Trim whitewash cardstock blocks, emboss, then sand and mat on opposite purple side of cardstock.
- Stamp label and heat emboss with clear embossing powder, then die cut label.
- Pop label off card front.
- Add ribbon and flowers.
- Tear one end of focal point.
Tips & Tricks- To create a monochromatic look, try using clear embossing powder to maintain the same color hues.
Supplies
Stamps :: Waltzingmouse Stamps - very vintage labels no. 5, say it with style Ink :: Versamark Cardstock :: Core'dinations - whitewash Embellishments :: American Crafts - ribbon; Prima - flowers Tools :: Provo Craft - swiss dots embossing folder, cuttlebug; sanding tool 
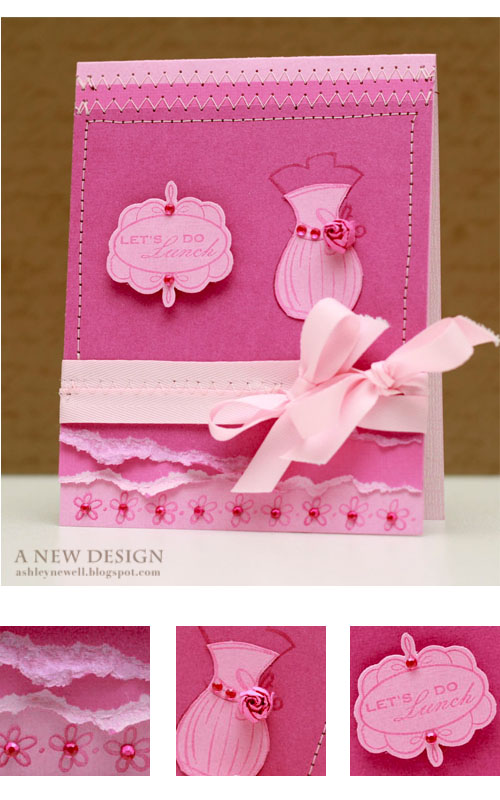
Instructions- Trim cardstock to create an A2 card base.
- Mat two additional coordinating pink cardstock layers and tear the bottoms.
- Add stitching.
- Stamp dress form with watermark ink and heat emboss with clear embossing powder.
- Stamp dress form again on light pink cardstock, cut out, and pop off card front.
- Stamp sentiment on light pink cardstock, cut out, and pop off card front.
- Embellish with rhinestones and flower.
- Stamp bottom flowers and add rhinestones.
- Add double ribbon treatment.
Tips & Tricks- If you need a smaller flower, pull off a few petals to create a tighter rose bud. You can secure them with tacky glue.
Supplies
Stamps :: Lawn Fawn - sew lovely; JustRite - girl's night out Ink :: Versamark; PTI - raspberry fizz Cardstock :: Core'dinations Embellishments :: KaiserCraft - rhinestones; Prima - flower; PTI - ribbon Tools :: sewing machine Thanks so much for your visit! Enjoy the rest of your day!
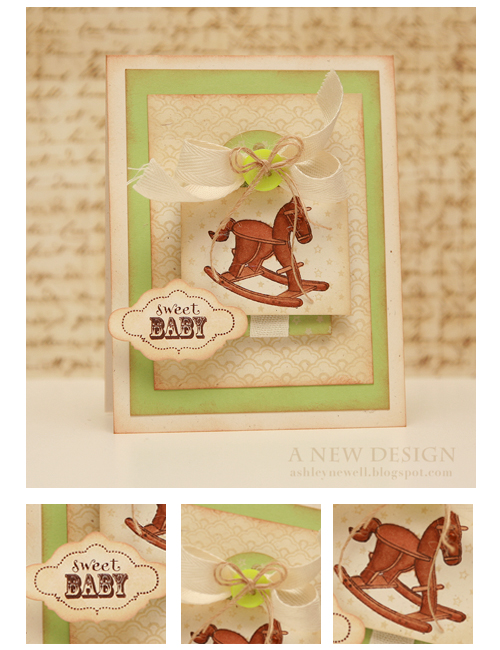
 Hey there! I hope everyone enjoyed your weekend! Today, is a Caardvarks day! We are doing a blog hop along with Clear and Simple Stamps! So, feel free to jump right in and start hopping along! Check out Caardvarks blog (linked below) for full blog hop details! Thanks to those who gave me some great feedback yesterday regarding my new photo. I really do appreciate it all! Your recommendations were well received. Some of the elements you would like to see highlighted more, I felt could deserve more explanation in my instructions, rather than depicted in a photo. It's hard to photograph how something is adhered, but easier to say it is adhere with tacky glue. Regarding the sentiment, the cardstock is crumpled, then inked with a blending tool using dye inks. As far as the sizes of the thumbnails, I personally do not like a lot of pictures of one project, unless it's a detailed altered item, so I was trying to minimize the sizes of them. Again, this is just my opinion of how I want my blog to look, not to say that others who take multiple detailed photographs is 'wrong.' I just like to keep my blog postings as clean and simple and possible. But, to address the thumbnail sizing issues, I'll try to zoom a little better in the future to highlight some of the design elements used, which was my initial reasoning for trying this new photo showcase with you all. I plan to enhance my "Instructions" section a bit more. I think I was assuming some of you all knew how to do certain things, so I'm glad that was pointed out! I'm also adding a "Tips and Tricks" section if I have something extra to share about how to do something in the project showcased. Thanks again for your feedback. It was really helpful! :) So, here's how I created today's card...in more detail! Instructions- Trim rustic cream cardstock to create an A2 card base and ink.
- Trim green with envy cardstock to 3.75" x 5" and ink, then adhere to card front.
- Trim rustic cream cardstock to about 3" x 4," then stamp background pattern, ink and adhere to card front.
- Punch tag from green with envy cardstock, stamp stars background with cream ink, then ink edges.
- Add twill tape ribbon treatment through tag hole and add button with twine (using tacky glue).
- Pop tag off card front center.
- Stamp horse rocker on rustic cream cardstock, then color with Copic markers. Stamp star background with antique linen ink.
- Stamp star background with antique linen ink, then ink edges and pop off tag.
- Add rhinestone to horse rocker eye.
- Stamp label border and sentiment on curly die cut.
- Ink the die cut and pop off card front.
Tips & Tricks- Using Distress Inks - Use a light inks, such as Ranger brands or other light dye inks and apply with a foam tool or even cosmetic wedge applicators. Rub on edges and blend throughout the cardstock as desired. Start with a little because you can always add more, but never take away!
- Foam Adhesive - Sometimes, one layer is not enough. Double, triple, or even quadruple the foam layers to get the desired height.
SuppliesStamps :: Clear and Simple Stamps - rock-a-bye, wall flower Ink :: Ranger - antique linen, tea dye; SU! - chocolate chip; Copic markers Cardstock :: Clear and Simple Stamps - green with envy; PTI - rustic cream Embellishments :: Clear and Simple Stamps - green with envy button, curly label die cut; PTI - twine; Technique Tuesday - twill tape Tools :: Ranger - blending tool with foam applicator
  
Hello Everyone! I'm very happy that it's the weekend! Today, starts a new Caardvarks challenge. This challenge is sponsored by JustRite Stampers. This is one huge contest! The winner will be a guest designer for JustRite and some goodies! That's such a great prize! So, all you have to do is create a stamped card with lace. For all of the details, please visit Caardvarks.
Have you ever stamped with JustRite's stamps? If not, you should try them. They require using their stamp mounts, so don't forget to add those to your cart as well. As a design tip, you are not limited to the circles shapes the stamps are designed. I tried to showcase that in the last card. You can stamp the images on another shape and not use the borders. You can also simply stamp the sentiment without the images. On the last card, I did not ink the spool to create a sentiment-only stamped image. So, I just wanted you to know JustRite stamps are more versatile than they may initially appear, you just have to be creative! However, the circles are always a great design element to incorporate as well - as I did in two of the cards above!
I had fun with this color combination, so I used it on all three cards. It's really great to see how you can use the same colors, but come up with totally different designs. Try giving it a shot one day!
Here is a little bit about my cards!
Supplies
Paper :: PTI - kraft, sweet blush, aqua mist, white Patterned Paper :: PTI - bitty dots Ink :: PTI - pure poppy, sweet blush; Ranger - antique linen, vintage photo Embellishments :: PTI - buttons, ribbon, twine; Nice Package - doilies Tools :: Spellbinders - scalloped circle, circle nestabilities; Provo Craft - cuttlebug; We R Memory Keepers - corner chomper
I hope you have a great weekend!


Happy Weekend, Bleeps! Yep, you read that title right, we're using stickers on cards and they are really versatile. SRM Stickers is the sponsor for this challenge featuring their stickers they have designed specifically for cards. I met Sue, the owner at CHA and she was so great! They have a very wide selection of stickers, even for scrapbookers and calendars. Here are a few cards I made using the stickers and you probably can't even tell they are stickers. It just amazes me. I've linked the SRM products I used in my card designs above so you can find them quickly. For some, I used my craft knife to easily alter the sticker to fit my card, others I kept in its original format.
Prize: Prize package of SRM Stickers
Deadline: March 1st at Midnight, PST
Theme: Sticker challenge
So, head on over to Caardvarks to read more about it and also check out what the other ladies from the DT did with their sticker stash. They did a great job!
Thanks for visiting and enjoy your Saturday!
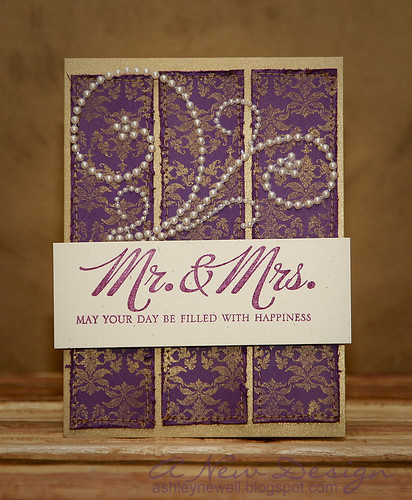
 Hey Bleeps! TGIF!! I'm so excited to share with you this vintage-modern wedding card. I can picture this given to one of the Ace of Cakes employees again. I watch way too much Food TV! Anyway, this card is for Caardvarks new challenge...wedding cards and is sponsored by CARDS magazine. Both elements of this challenge make me super happy because I enjoy making wedding cards and also browsing and creating for CARDS magazine. So, each of you should make a wedding card and enter it into this challenge because the winner will get PUBLISHED in CARDS' July issue! Isn't that great news?! I was so excited when I first heard about it and couldn't wait to share it here!
About this card...
Last weekend, I knew I had to make this card for the challenge to share with you all, but as usual I was procrastinating because I "think" I work well under pressure! :) We were snowed in a bit on Saturday and I was watching Extreme Home Makeover. It was a repeat I believe (the one with Mary J. Blige as the special guest). Well, one of the designers added damask wallpaper to one of the rooms. The wallpaper was purple with a gold damask pattern. I immediately said aloud, "That is so pretty. I'm making a card from that!" So, here it is!
Speaking of snow. We're expecting about 20" at least starting today through Saturday. So, I guess I'll be watching more TV, making more stuff, cooking, looking out the window, and napping! This is going to be one long weekend, but a happy one!
Take care and enjoy yourself!
Instructions - Create an A2 card base.
- Trim purple paper to fit card front and stamp damask pattern.
- Cut purple cardstock into 3 even strips and add stitching, then adhere to card front.
- Add pearl flourish.
- Stamp sentiment on cream cardstock and pop off card front.
Supplies
Stamps :: PTI - damask designs, big and bold wishes Ink :: Encore - gold; VersaColor - purple Paper :: CutCardstock - gold, purple; PTI - rustic cream Embellishments :: ZVA - pearl flourish Tools :: sewing machine, thread
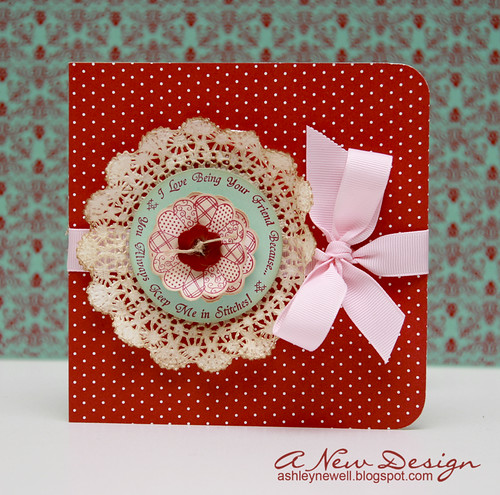
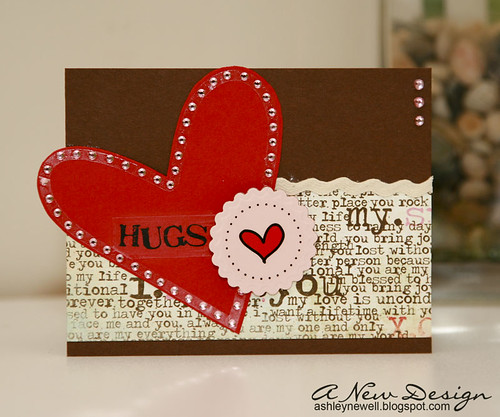
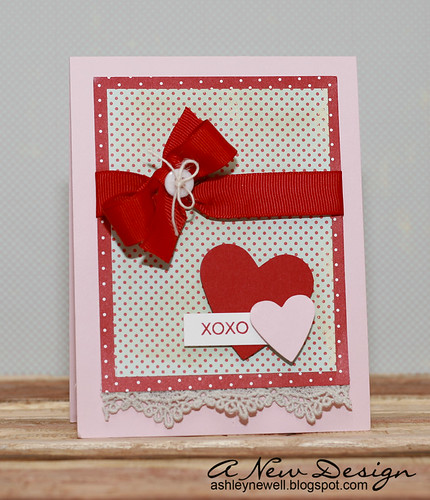
 Hey there! It's already Hump Day and that calls for a celebration! So, head on over to Caardvarks! There's a new challenge hanging around and it's sponsored by Lil Lambs Boutique! You have to create a card using red hearts. Now, I used only one red heart. Why, I don't know, but imagine the pink one is red too! :)
Meet my new poofy flower hair clips! This is a part of my Project 365 I'm doing on my iPhone, so bear with me! I was blog surfing one night and was on Jessica Rosario's site. She mentioned them and I had to check them out and then the next thing I knew, they were ordered. Now, they're here! Maybe I can wear one tomorrow! I feel like now I have to make some for a card...coming soon!
Thanks so much for stopping by and show some 'heart' today!
Instructions - Trim cardstock to create an A2 card base.
- Trim patterned papers and matte together, then tie ribbon around into a bow, and adhere lace trim to the bottom.
- Adhere patterned papers to card front.
- Punch hearts and adhere with foam adhesive.
- Stamp sentiment and tuck into hearts.
Supplies
Stamps :: Hero Arts - everyday sayings Ink :: Papertrey Ink - pure poppy Paper :: Papertrey Ink - sweet blush, white, bitty dots (patterned paper); Making Memories - passport collection (blue polka dot patterned paper) Embellishments :: Papertrey Ink - ribbon, twine, button; Prima - lace trim Tools :: heart punches
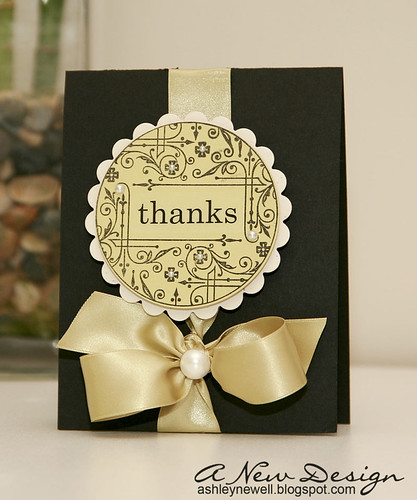
   Happy New Year! Caardvarks is back with a great sponsor, JustRite Stampers! Head on over to Caardvarks to see what's going on! I made a few cards using JustRite's new stamps. These are super fun. I'm going to provide supplies for each card, but no instructions since there are so many. If you have any questions about how I made any of them, please ask!
Thanks for visiting! :) Enjoy your holiday!
Supplies - Thinking of You
Ink :: Stampin' Up! - black; Ranger - antique linen Paper :: Papertrey Ink - sweet blush, white, ripe avocado; GCD Studios - Paris Nights (patterned paper) Embellishments :: Close to My Heart - Autumn Garden Organdy ribbon rounds (Z807) Tools :: thread, sewing machine
Supplies - Make a Wish
Ink :: Papertrey Ink - pure poppy Paper :: Papertrey Ink - kraft, pure poppy, enchanted evening; Stampin' Up! - so saffron Embellishments :: KaiserCraft - rhinestones; Nice Package - tag; Papertrey Ink - button Tools :: Spellbinders - scallop and circle nestabilities; Fiskars - star punch
Supplies - Miss You
Ink :: Clear Snaps - chestnut Paper :: Papertrey Ink - aqua mist, dark chocolate Embellishments :: Fancy Pants - lace trim; Papertrey Ink - sweet blush ribbon; Heide Swapp - rhinestone frame
Supplies - Thank You
Ink :: Papertrey Ink - plum pudding; Ranger - antique linen Paper :: Papertrey Ink - cream, plum pudding Embellishments :: KaiserCraft - pearls; Making Memories - velvet trim Tools :: Spellbinders - labels 9, circle nestabilities
 
  
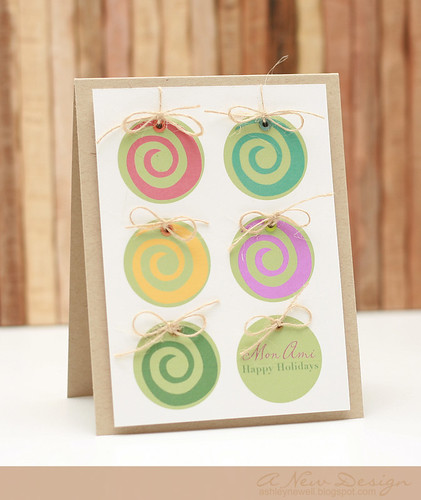
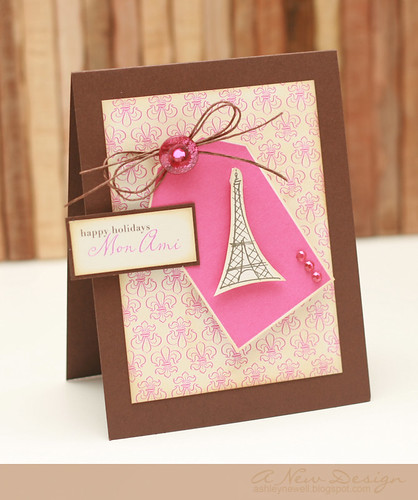
 Hey there, Bleeps! I'm back with another post for Caardvarks. This challenge is sponsored by Hero Arts and their digital image kits. These are so great and easy to work with. Imagine all of the possibilities! I even created holiday cards from the Ah Paris! kit!! The first card I used Simple Tags kit to create the circles and the Ah Paris! kit for the sentiment and the swirl on each ornament. I added my own "happy holidays" text, which translates to My Friend, Happy Holidays. I punched holes and added eyelets using the Crop-a-dile Big Bite. Then, I added twine to finish it off. Last, I matted it on a kraft card base with foam adhesive. For the next set, I created a card that featured a tag and a gift box with a tag. I used the Ah Paris! kit and the Simple Tags for this entire card. I used one of the fleur de leis in the kit to create my own patterned paper in Photoshop. I used the brush tool and created a line, then copied the line on the image source and printed it out. If you have any questions, I'd be happy to answer. Working with digital images is not as hard as it seems. I was intimidated at first, but now much more comfortable. Thanks for stopping by. Head on over to Caardvarks to enter to be one of two people to win a Hero Arts digital kit (details here) and to see the rest of the designer highlighted features using Hero Arts digital kits!
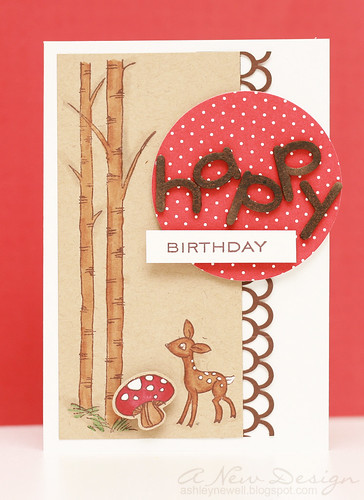
 Hey there, Bleeps! TGIF and time for another Caardvarks Challenge! It's all about coloring this time! How did I do? I am a newbie at coloring and using Copics, so what do you think?! I find the shadow part the hardest for me. For instance, where do I put it and when is it too much? If you have any tips, feel free to share them with me!
Thanks also for all of the anniversary wishes. Mac was blown away and read them too! I'll share with you a card HE MADE this weekend! Challenge DetailsSponsor: My Scrapbook NookChallenge: Color a stamped image Prize: 4 copic markers from My Scrapbook Nook Reader discount: 20% off duing the challenge period, code: NWS20 Enjoy your weekend and thanks for stopping by! Instructions- Trim white cardstock to , score in half to create a card base.
- Trim kraft cardstock block.
- Stamp images and color.
- Stamp mushroom on a separate kraft scrap, color, cut out, and pop off.
- Punch decorative edge trim and adhere it to right side of kraft cardstock.
- Adhere kraft focal point to card front.
- Die cut circle from patterned paper and adhere to card front.
- "Color" chipboard letters with Maya Mist and adhere.
- Stamp sentiment, then pop off card front.
SuppliesStamps :: Papertrey Ink - birthday basics; Stampendous - birch buddies Ink :: Copic - markers; Uniball - Signo Board white gel pen; Stampin' Up! - chocolate chip Paper :: Papertrey Ink - white, kraft, bitty dots Embellishments :: Maya Road - chipboard letters Tools :: Martha Stewart - loopy edge punch; Provo Craft - Cuttlebug; Spellbinders - circle netsabilities; Maya Road - maya mist bronze
  Hey there, Bleeps! I'm back with a Caardvarks challenge...circle cards! This week's sponsor is Clear and Simple Stamps. I was lucky enough to get my hands on the Flight of the Bee stamp set. I really liked the honeycomb pattern and used it to create a background. I made a traditional circle card and another that featured a circle embellishment. Try your hand at some circle cards to and hop on over to Caardvarks to see what my teammates came up with! There are some cute cards out there using some awesome stamps! Have a great Friday Eve and thanks so much for visiting! Instructions :: Card 1 - Die cut circles.
- Stamp honeycomb pattern on bottom half of yellow circle die cut.
- Stamp bee flying lines and sentiment.
- Tie ribbon around yellow circle die cut.
- Stamp bee, cut out, add rhinestone, then adhere to ribbon knot.
- Assemble card base and adhere yellow circle die cut to the card front.
Instructions :: Card 2 - Trim raspberry cardstock to make an A2 card base.
- Stamp honeycomb background on bottom of the card front.
- Die cut a circle and scallop circle.
- Stamp bees on yellow circle die cut and add rhinestones.
- Adhere yellow circle die cut on scallop circle die cut.
- Trim turquoise cardstock, adhere, and add stitching.
- Add circle embellishment.
- Stamp sentiment and pop off card front.
Supplies Stamps :: Clear and Simple Stamps - flight of the bee Ink :: Close to My Heart - black Paper :: Stampin' Up! - bermuda bay, crushed curry; Papertrey Ink - raspberry fizz, black Embellishments :: KaiserCraft - rhinestones; Papertrey Ink - ribbon Tools :: Provo Craft - cuttlebug; Spellbinders - circle, scallop circle nestabilities; Janome Sew Mini (thread)
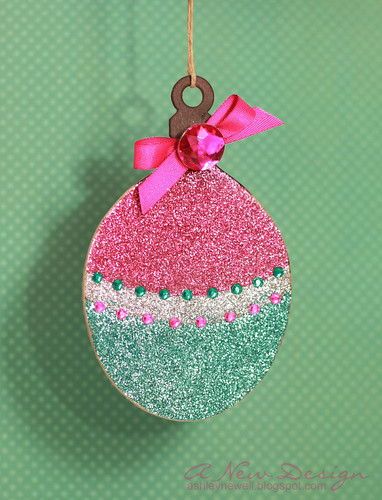
 Today is the last day of the Holiday Blog Hop and I'm using MORE GLITTER! I think the holidays should be all about the shine, glitz, and glam and I showcased that in Creative Cuts and More die cut elements. I hope you enjoyed blog hopping along these past few days! Remember there is a coupon code so you can pick up your items in the online store, so start shopping now! Thanks for hopping by and leaving lots of love over here on the blog! It's appreciated to the fullest and gives me smiles all day long! So, what are you waiting for? Get to hopping, there's more!
Prizes
Halloween Mini Album
Fall Card Kit
CCM $25 Gift Card
*Also a 15% Shopping Discount for our readers. Enterholidayhop2009 at checkout.
Discount good from November 1st - 4th.
Instructions - Ink ornament top in brown ink.
- Add adhesive and glitter each section.
- Let glitter dry.
- Add rhinestones, ribbon, and brad.
- Add twine and hang ornament.
Supplies
Ink :: Clear Snaps - colorbox chestnut Embellishments :: Creative Cuts and More - chipboard ornament; Craft Supply - Twine; Recollections - pink brad; Papertrey Ink - raspberry fizz ribbon; Martha Stewart - glitter; Kaiser Craft - rhinestones Tools :: Sparkle N Sprinkle - glitter glue
|
|


