After December 4, 2010, all future posts are on a new site. Please subscribe to my NEW feed at www.ashleynewell.com or click below to subscribe to the NEW feed.
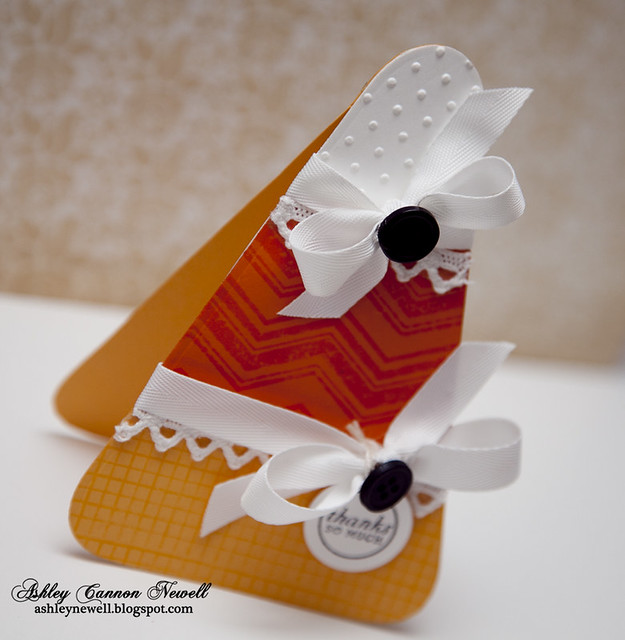
Hey there! It's time for another Watch Me Wednesday video. Since Halloween will be wrapped up by next week's video date, I thought it would only be fitting to celebrate with a candy corn shaped card. I made another candy corn card here, which was featured on Paper Crafts' Moxie Fab World blog post here. I was thrilled that it was showcased there with so many other fabulous Halloween projects. Mine was so simple than my usual cards lately that I thought, I must re-do that card to 'dress it up.' So, I'm sharing how I created this shaped card and how you can embellish it more (or not like I did previously).
I stamped background patterns on the cardstock to give it some depth. I also added ribbon and tag treatment. The tag border was created using the Spellbinders Standard Circles LG die template as a stencil. I kept the cardstock in the die template after cutting and traced the circle. You can see this in the video though!
To create more texture, I added some crochet trim and embossed the top portion of the 'candy corn' with Provo Crafts' swiss dots embossing folder.
I created a template for the entire card. For all of my shaped cards, I have two shapes, one for the card front and the other for the card back. I score the top portion of the cardstock used for the card back, then adhere it to the back of the top of the card front's cardstock. That sounds really confusing, so check out the video if it really was!
Stamps :: Waltzingmouse Stamps - off beat backgrounds; Papertrey Ink- mixed messages Ink :: Papertrey Ink - summer sunrise; Tsukineko - memento tuxedo black; Ranger - spiced marmalade Cardstock :: Paper Source - white; Papertrey Ink - summer sunrise, orange zest Embellishments :: Papertrey Ink - snow white twill tape, true black buttons; Maya Road - crochet zig zag trim; May Arts - twine; Making Memories - eyelet Tools :: Spellbinders - S4-114 standard circles lg, GC-001 grand calibur, S4-278 nested candy corn; We R Memory Keepers - crop-a-dile
Do you all have fall allergies? What's up with that? Well McArthur and I do. Last week, he had them and this week it's my turn! I have a big-head feeling, very itchy and burning eyes, and that dry cough. So, I'm going to take it easy because it's wearing me out! Anyway, thanks very much for watching! Have a great Hump Day!
Hallowe'en is almost here! Are ya'll ready? Although I really do not celebrate Halloween, I do get a big bowl of candy for the neighborhood kids. I think that's the best part. I can recall my childhood years, getting dressed up (usually finding something around the house to create a costume), and grabbing a pillow case (yep, a pillow case) to go trick or treating in my neighborhood. Our neighbors were extremely generous. I usually returned with nearly a half-full pillow case full of goodies! When we returned, we would dump our candy out on the floor and check it for any 'tricks!' Seems like I recall sorting "adult" candy too like those charlie chews! Parents always get their fair share too. I've always been a candy lover, so Halloween is so exciting to get FREE CANDY!
The thing is, I really never liked designing paper crafts for Halloween, until this year. I've really enjoyed it and I'm glad I didn't throw in the towel and give up. I hope to be able to do more holiday related cards this year, especially for Easter. It seems that I struggle in that area! What about you. Is it hard to create for certain holidays?
Instructions
Trim flocked diamond patterned paper to 5" x 5".
Trim polka dotted patterned paper to about 2" x 5" and adhere to diamond patterned paper.
Add crocheted trim.
Add glitter (using Scor-Tape).
Add word ribbon and saddle stitched ribbon and tie into a bow.
Add leaf trinket pins. (TIP: Using wire cutters, trim the pin ends to prevent injury.)
Add button with twine to ribbon knot.
Trim playing card patterned paper and adhere to felt (cut using pinking scissors), then add zig zag stitching and adhere to card front.
Add sentiment tag, then adhere to 5" square card base.
Hey Everyone! I hope you enjoyed your weekend. I'm still on holiday, so one more fun day for me! I just made this fun candy corn shaped card using Spellbinders' nestabilities. It was super easy to create a template with the die cuts. I kept the design super simple. It even looks great without the trim aligned up at the cardstock seams. There are so many possibilities in creating these cute shaped cards for Halloween and would make perfect invites. Check out how I did it below.
Instructions
Die cut candy corn, stitch three die cuts together to create a template.
Using template, trace shape onto two sheets of cardstock and cut out.
Die cut candy corn from white, orange, light orange cardstocks in the respective sizes, then adhere to one of the cardstock shapes you cut out.
On another cardstock shape cut out, score the top portion at about 1/2", then adhere to pieced shape to create a card base.
Well, I am going to try to make it to my {not so} LSS tomorrow to run a few errands. I'll let you know how that goes! Thanks for visiting and have a happy Monday!
Hey there, Bleeps! I hope you enjoyed your weekend. I'm already looking forward to our upcoming weekend since it will be a nice 3-day for me. Today, I am sharing some cards for the new Caardvarks challenge sponsored by SRM Stickers. The challenge involves scrap lifting one of the cards from the design team. The entire new release of SRM Stickers is the featured prize. Head on over to the blog to check out how everyone used these clear stickers.
Edited to Add: By publisher's request, the image for this card was removed. To view this card, please see Cards magazine April 2011 issue. The image will be re-uploaded after May 2011.
Instructions
Trim patterned paper block and adhere to orange A2 card base.
Trim doily in half and adhere to card front.
Apply sentiment stickers to die cut embellishment, then adhere to card front.
Add buttons with twine and bloomer.
Supplies
Cardstock :: Papertrey Ink - orange zest Patterned Paper :: Kaisercraft - hippy girl collection Embellishments :: SRM - sentiment sticker; Craft Supply - doily; American Crafts - bloomer; Papertrey Ink - buttons; May Arts - twine; Kaisercraft - die cut embellishment (hippy girl collection)
Instructions
Trim patterned papers to fit A2 card front and adhere.
Die cut label and trim one end, then adhere to card front to create a border.
Add ribbon.
Punch folder tab and add sentiment stickers, then adhere to card front.
Hey Everyone! How was your weekend? I hope it was refreshing. Mine wasn't too shabby, but an extra two days would've been nice! But, I did get a chance to party with some friends, hang out with my sister, shopped at IKEA, and even crafted a bit! What more could I ask for...really?!
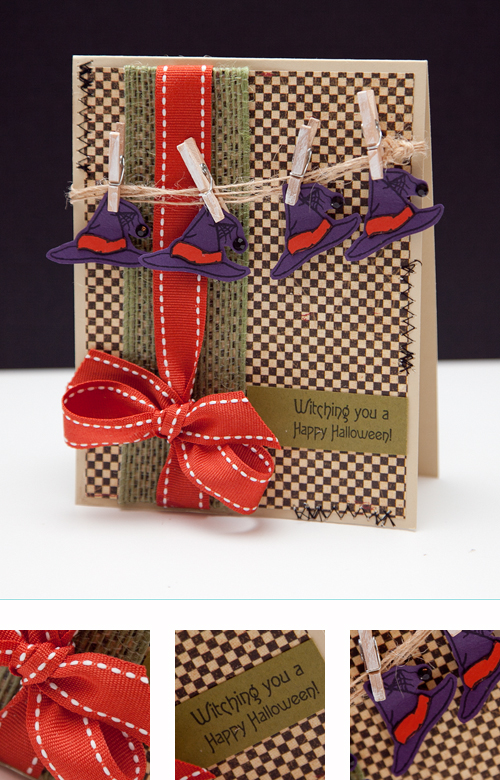
Today, I have {another} Halloween card to share with you. I'm surprising myself over my desire to create for Halloween. This card used a sketch I created for Skipping Stones Design (see below). I used their Boo stamp set for the witch hats and sentiment, along with some Graphic 45 patterns! Here's how I made the card.
Instructions
Trim patterned paper to about 4" x 5.25", then add twine decorative trim.
Tie saddle stitch ribbon around patterned paper into a bow.
Stamp hats on purple cardstock, then stamp on rust cardstock. Trim hat border from rust cardstock and paper piece on purple hats.
Cut out hats and string on twine with mini clothespins. (I painted a few clothespins before this project with white acrylic paint.)
Stamp sentiment on olive cardstock strip and adhere.
Adhere paper to an A2 card base.
Add zig zag stitching randomly so it looks like sutures!
Supplies
Stamps :: Skipping Stones Design - boo Ink :: Tsukinkeo - memento black Cardstock :: Papertrey Ink - linen, ripe avocado, terracotta tile; Stampin' Up! - eggplant Patterned Paper :: Graphic 45 - hallowe'en in wonderland (square hare) Embellishments :: May Arts - twine; Crafts Supply - mini clothespins; Papertrey Ink - terracotta tile saddle stitch ribbon; Offray - green twine trim
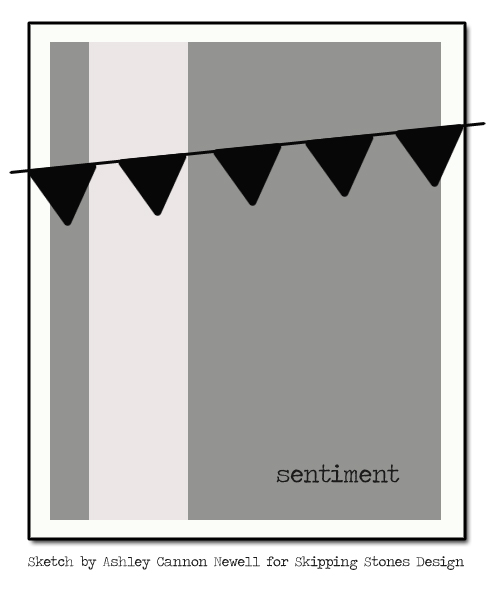
So, here's the sketch I made! It's sort of strange, but you never know what you can come up with until you try! If you have a banner you want to create, it's perfect to use, so give it a try and link it up on SSD's blog! If you find you're loving their stamps, some are up for grabs on Embellishes Background Stamping Color Challenge too! This is my last sketch for SSD. I had fun creating the sketches both creatively and digitally! Thanks for having me again Skipping Stones!
You all take care and as always, thanks so much for showing me some love and stopping by!
Hey Bleeps! Happy Friday to you! I have {another} Halloween project to share. Two years ago, you could not pay me to create Halloween-themed projects. Today, that's obviously a different story. I love life! As time moves along, so do people - in their careers, families, and even creative ways. I'm very surprised that I like creating Halloween projects and really love the color combination of purple, orange, green, and black (with a "pop" of yellow here)! So, instead of fighting that creative urge, I embrace it! There are still some other holidays that I'm not too keen about creating for, but I'm sure in due time my likes and dislikes can change.
Here, it's a holiday weekend so we have Monday off of work *YAAAAAAY*! HOWEVER, I have to work Friday and Sunday...for McArthur. Yep, he's my boss {sometimes}. We have two weddings to photograph this weekend...TWO! I didn't realize how popular labor day weekend weddings were until this year. I'm super grateful for the opportunities to capture these special loving moments and for Saturday and Monday to regroup! We'll definitely need those two days of downtime. I'll be sure to share my favorite shots taken by myself from the two events. I'll be using my new camera for the first time and I'm a bit nervous {again}.
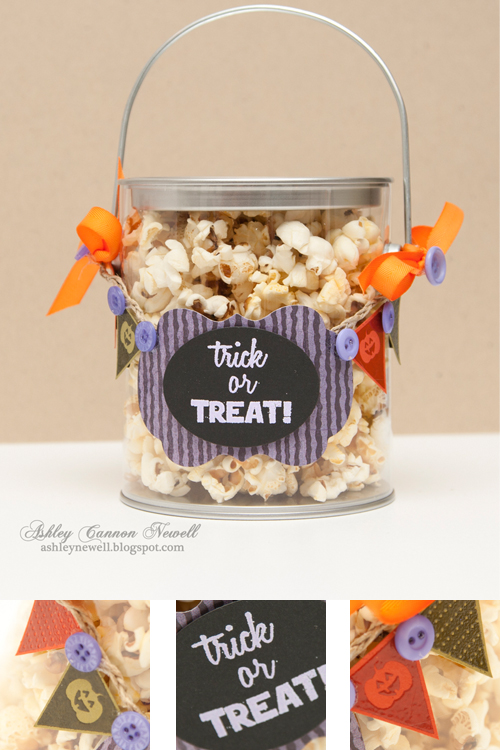
Anyway, I hope you all have a great weekend and do something fun! I know I'll probably nap and make some projects on my two days off! Here's more about this fun Halloween Popcorn Pail that you can give as treats at child Halloween parties, Halloween gifts, or even switch it up for a movie-theme party favor!
Instructions
Tie twine together and secure around pail handles.
Stamp sentiment with watermark ink on black cardstock, then heat set with embossing powder.
Die cut oval from sentiment.
Die cut label from patterned paper, then layer oval die cut and adhere to pail with foam adhesive.
Stamp pennants and heat emboss. Cut pennants and adhere to pail under twine.
Add ribbons and buttons.
Fill with popcorn or any other Halloween treat.
Supplies
Stamps :: The Stamps of Life – banners4all, thanks2fall Ink :: Tsukineko – VersaMark watermark ink Cardstock :: Papertrey Ink – true black, terracotta tile, ripe avocado Patterned Paper :: Graphic 45 – Hallowe’en in Wonderland collection (the mad hatter) Embellishments :: Papertrey Ink – orange zest twill tape; Clear and Simple Stamps – purplicious buttons; Craft Supply – twine; American Crafts – lavender and clear embossing powder; Stampendous – clear pail Tools :: Spellbinders – S4-290 labels fourteen, S-110 classic ovals large, W-001 wizard Size :: 4.5” x 7.5” with handle
Thanks for visiting! Have a Fab Friday! I'll be back Sunday with a new Caardvarks challenge post!
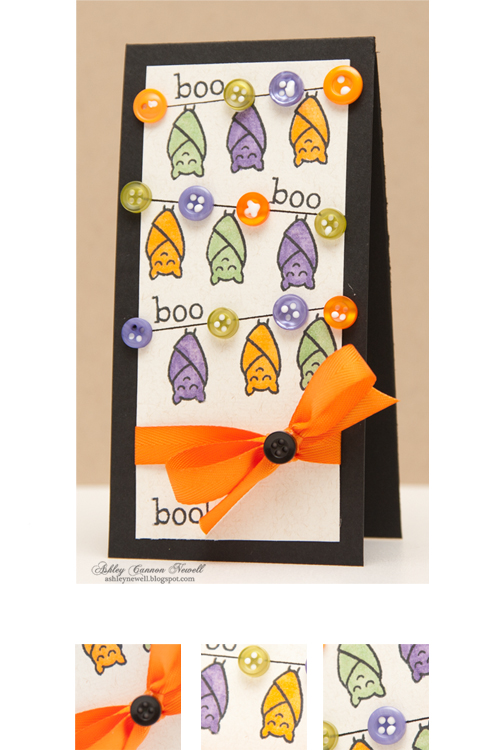
Boo! It's Monday! :) Did you get all you wanted accomplished this weekend? Well, I didn't. I started off strong, then sort of lost my momentum after Friday night. I was able to create this quick mini Halloween card featuring Lawn Fawn's Heebies Jeebies stamp set.
I've had this idea to have the bats hanging off multiple diagonal lines, but the first time I tried to create the concept, it didn't work out so well. My initial idea was to stitch diagonal black lines on cardstock, similar to how I drew them here, but with more texture. Then, I wanted to stamp the bats and have them all black and one colored on each row. Well, I realized that the stamps weren't solid and that if I colored it black, then you wouldn't see the details. DUH! So, of course I could've stamped the bat on black cardstock with white ink, but that just took away from my idea. So...I tried it again and here's what I ended up with!
Yes, I couldn't wait for my tacky glue to dry, and that's what's peeking through the buttons, but it will dry clear!
Instructions
Trim cream cardstock to about 2.25" x 5" (I used a scrap).
Draw diagonal lines using a ruler and black gel pen.
That's right, Bleeps, you read it right! My "Watch Me Wednesday" series is back! I've been dying to start a weekly VLOG post sharing my card making process with you all. Over the months, I encountered a few problems with my video cameras, but recently purchased a new one and finally cleaned my area enough to start videoing! I am hoping to record a new video every Wednesday, but don't hold me to it! As you know, sometimes time gets all in the way of everything and then runs out. So, I did not want to say anything to you all until I was sure enough ready to start! I even have next week's card already sketched out! I'll keep this up as long as you all like it, so let me know if you're still interested!
As a side note, this week's video is a bit yellow and not true to color. Working on my lighting issues and learning my new camera. Hoping to have a better picture next week! :)
Now, onto today's card...another Halloween theme (yep, I know it's 2 months early, but I'm trying to create a pattern here and be ready for Christmas early this year)!
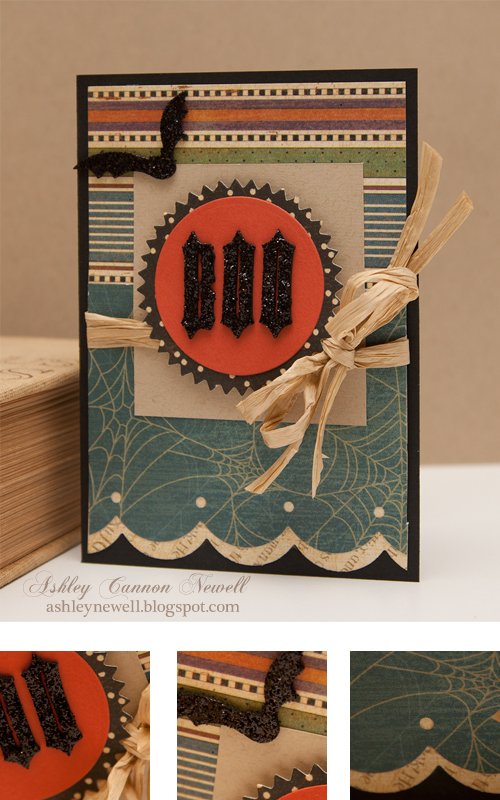
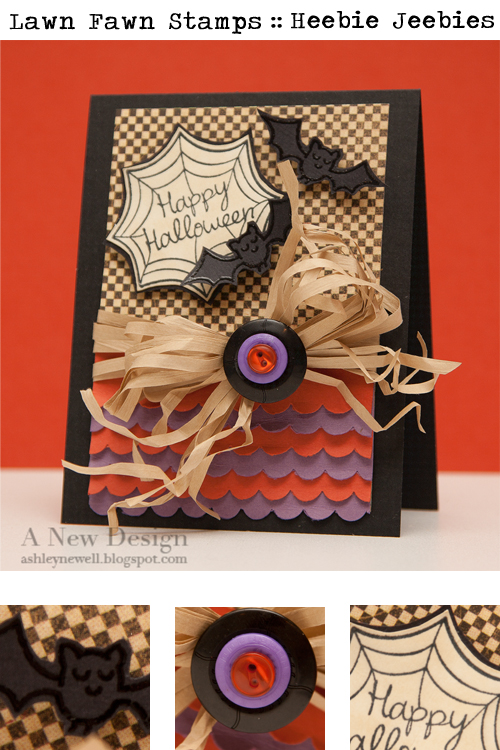
Hey Everyone! I hope your week is going great! Thanks so much for checking out my previous peek of Lawn Fawn's Bannerific + Sophie's Sentiments sets! It's great to hear that you are as excited about it as I am! But, that's not it! Today, I'm sharing another card that features some of the stamps from "Heebie Jeebies." This is such a cute Halloween set and I had so much fun stamping with it. I love using the color combo of purple, orange, black, and cream for my Halloween projects and incorporating raffia trim is just the perfect ribbon treatment! In this card, the raffia trim almost looks like a crazy spider!
The stamp sets will be released and available to purchase here on Thursday, August 12, 2010 at 12 am EST! Check out the rest of the design team's sneak peeks on Lawn Fawn's blog here!
Although I've created projects using multiple scalloped edge trims before, I was inspired by Kim Kesti's card featured on Paper Crafts' magazine's September/October issue cover. Have you all seen this great card! All of the scalloped edges really pop out to you and that design made me want to create a Halloween card using that great technique.
Instructions
Trim patterned paper to about 3.5" x 4.5".
Trim 3.5" strips of rust and purple cardstocks, then punch scalloped edges.
Adhere the scalloped edged strips together on the patterned paper, alternating the rust and purple colors.
Then, take your hand and crinkle and wrinkle them. Make them pop up and down!
Add raffia trim and button treatment.
Adhere to A2 black card base.
Stamp sentiment/web on white cardstock and add distress ink.
Cut out sentiment/web and mat on black cardstock and cut a mat.
Pop sentiment/web off card front.
Stamp bats on black cardstock with watermark ink and heat emboss with clear embossing powder. Cut out bats and pop off card front.
Tips & Tricks
Inspiration - Being inspired can be interpreted to mean a lot of things. For me, it's admiring a design style, technique, element, or colors to jump-start my creativity. Here, I was inspired by Kim Kesti's layered scalloped edge technique, even though I've done something like that before, I liked the colors in her design. Make your inspiration work for you in your design. So, instead of using a gradient color palette, I chose to alternate my colors! Make sure you give credit to your inspired designs, even if you've done them in another format to share how your creativity was jump-started too!
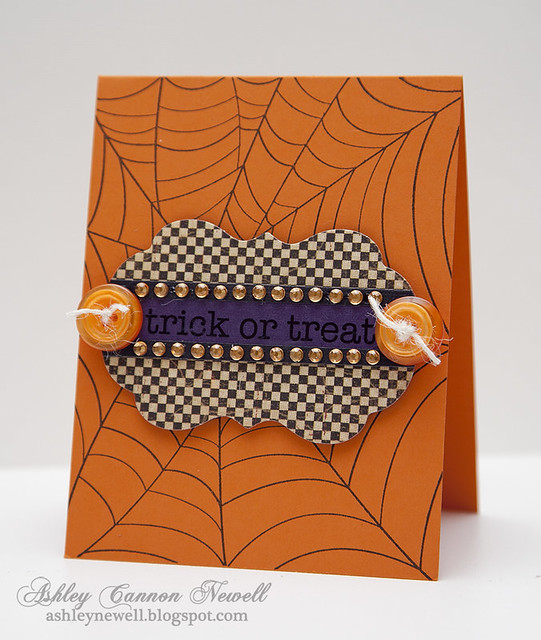
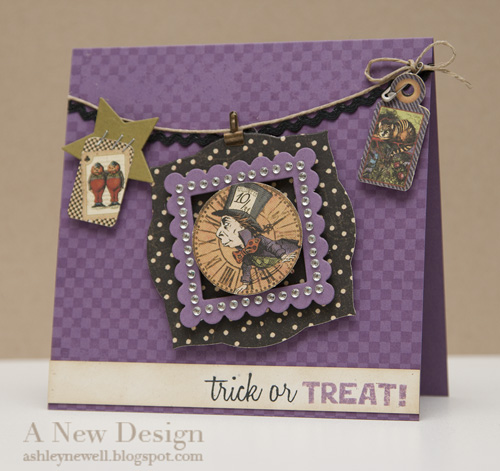
Hi Bleeps! I hope you all are having a great week! Last night, I was inspired by some new patterned paper I've been eyeing since it's reveal, Graphic 45's Hallowe'en in Wonderland collection. I usually do not create any Halloween projects, but this collection helps out...a lot!
I'm getting really excited about our upcoming trip. We're headed to CHA! I hope to see some Bleeps and meet new ones too!
Instructions
Trim purple cardstock to create a 5.5" square card base.
Stamp checkered background pattern with purple ink.
Adhere ric rac trim and twine to the card front.
Die cut label from patterned paper.
Die cut scalloped square frame purple cardstock, then add rhinestone frame.
Pop scalloped square frame die cut off label die cut.
Pop patterned paper circle die cut off center of frame embellishment.
Add mini library clip to frame embellishment and pop off card front.
Add tag with mini safety pin to card front.
Die cut star and staple die cut, then pop off card front.
On rustic cardstock, stamp sentiment, add distress ink, then adhere to card front.
Tips, Tricks & Techniques
DIY Die Cut Framed Embellishments - Yes, you can do-it-yourself! Simply use your die templates to create your own custom framed embellishments now being sold in the markets. Combine shapes, patterns, and textures for fun embellishments.
Stamping with Distress - Want an uneven stamped image? Try adding uneven ink coverage!
Supplies
Stamps :: Waltzingmouse Stamps - off beat backgrounds (checkered pattern); The Stamps of Life - thanks2fall (sentiment) Ink :: Papertrey Ink - plum pudding; Ranger - antique linen; Tsukineko - memento tuxedo black Cardstock :: Papertrey Ink - plum pudding, ripe avocado, rustic cream Patterned Paper :: Graphic 45 - wonderland classifieds, tags (hallowe'en in wonderland collection) Embellishments :: Heidi Swapp - bling frame; Craft Supply - twine, black ric rac trim; Stampin' Up! - mini library clip; Creative Impressions - safety pin Tools :: Spellbinders - classic scalloped squares LG (S4-127), classic squares LG (S4-126), stars five (S4-092), labels three (s4-189), wizard; Ranger - blending tool, mini stapler
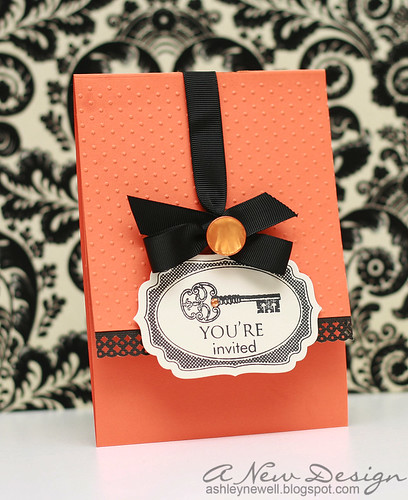
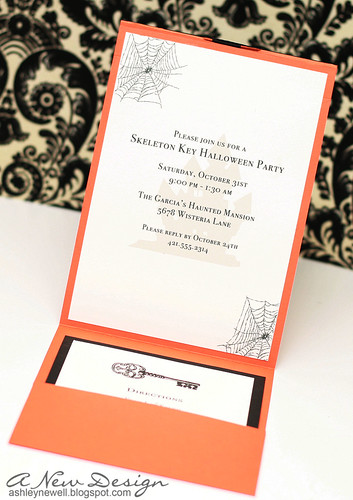
Happy Friday Eve! Today, I have a fun Halloween invitation to share with you. I received lots of cardstock and other goodies to try out from Cut Cardstock.com. So, you can say this is a personal review (over the next week). You have to check them out. They have a very large selection of all types of cardstocks, pre-scored invitations, place cards, envelopes, and other fun, hot items. I was surprised by all of the options available for paper here, so go...take a look!
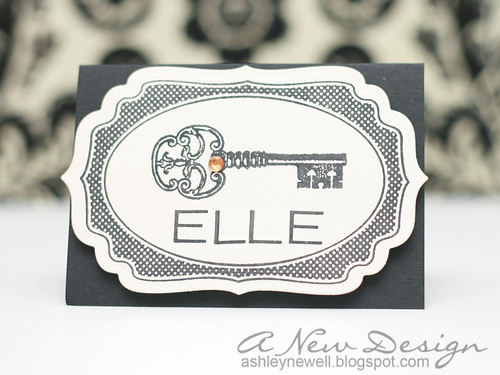
I decided to try out this Pocket Fold Invitation. I've always wanted to make these, but it is super difficult because cardstock just is not large enough. Then you have to deal with the pocket and everything, which means you might as well buy one, right?! This was super easy to design because the template was already there! I trimmed down the top part a bit to show off the label a little better, but everything else remained the same. I even ran the top portion through my Cuttlebug (twice) to get the polka dot embossed image! On the inside, I used some of their shimmer cardstock. It prints extremely well. I adhered a matching label, with an attendees name to a place card.
The label was stamped using Waltzingmouse Very Vintage Labels No. 4. The "antique key" is a rubber stamp by Rubber Stampede (picked up from Michaels or A.C. Moore). The decorative trim is a punch by EK Success (picked up from Michaels). The name on the place card was stamped using Papertrey Ink's fresh alphabet. The invite was created in Photoshop CS4.
More pictures are available on my Flickr page!
I also did another card for an Embellish challenge. Please go check it out here. Go make a card today too because the challenge does not end until late tonight!!
Thanks for visiting and enjoy your Thursday!
I hope this gets you feeling the need for some candy! Hurry up and go pick some up, it's already starting to go on sale (trick or treater or not)!
How's it going Bleeps? I hope your Monday went well. Today, I am sharing a card that is totally outside of my comfort zone. First, I am not a big fan of halloween. Although I love handing out candy to the neighborhood kids and seeing them in their cute costumes, I don't get into all of the entire theme. So, I usually do not make halloween anything, let alone cards because who would I even give one too?! However, I received a new stamp set by Stephanie Barnard's new stamp company called, the {stamps} of life. I thought the pumpkins were nice and I just had to try out her stamps. I also wanted to use my new QuickKutz embossing folder to see how that worked along with some Core'dinations cardstock and this is what transformed.
I used my Cuttlebug to dry emboss the dots and it worked fine using the same sandwich you would use with any other Provo Craft embossing folder. So, for those of you out there who were interested in finding out if it worked for sure...it does! I also used a bit of that raffia ribbon I picked up in the $1.99 bin at Archiver's this weekend! I liked how it looks with the pumpkin. The stamp sets are really versatile and offer faces to interchange on the pumpkin. I kept mine 'nice' and used the sentiment to overlap. Those leaves at the top of the pumpkin are actually leaf trim, which can be ordered at i {heart} papers!
Instructions
Trim spring moss cardstock into an A2 card (trim 8.5" x 11" cardstock vertically).
Dry emboss core'dinations cardstock, then distress/sand and trim/tear bottom.
Mat core'dinations cardstock on rust cardstock, then adhere to card front.
Stitch around edges.
Tie straw ribbon around card into a knot and crinkle.
Trim strips of core'dinations cardstock and adhere to card front bottom, then sand.
Stamp pumpkin on rust cardstock, cut out, then adhere to card front with foam adhesive.
Stamp sentiment on strips and adhere to card front with foam adhesive.
Add leaf trim to pumpkin.
Supplies
Stamps :: The Stamps of Life - Thanks2Fall (October)
Ink :: Close to My Heart - black
Paper :: Stampin' Up! - dusty durango; Papertrey Ink - spring moss; Core'dinations - black magic collection
Embellishments :: Paper Reflections - raffia ribbon; Tim Holtz - distresser; QuickKutz - polka dots embossing folder; Provo Craft - cuttlebug; Janome Sew Mini; thread; Creative Impressions - leaf trim
Since Friday is Halloween, I thought I should post the only Halloween card I have made this year. I'm not that into the creepy cards, so this is the best I could do. I stamped the skeletons and then placed googly eyes on them. The card base is layered with cardstock and pattern paper. The bottom features a sentiment, which is a stamp that is trimmed.
A very easy and quick Halloween card!
Have a good Monday.
:: My Goodies :: Stamps: Michael's $1; Hero Arts Ink: Black Paper: Cardstocks: orange; black; green Pattern Paper: K&Co Accessories: dimensionals; googly eyes; scallop punch Technique: Stamped Card Size: 4.25 x 5.5