|
|
   Hey Bleeps! I hope you had a great weekend! I got a chance to spend it with friends and family!! I even got a chance to hangout in DC on Saturday night to celebrate my friend's birthday. Since I'm always late, here's a card for her that I will {hopefully} mail today! I was inspired by the Waltzingmouse Sketch Challenge. I altered the sketch a little bit because I just couldn't adhere my tag perfectly straight, so I angled it slightly. I call it a tag card because the entire card's focal point is the tag. I added the text background on the card front so it wouldn't be "naked!" I've got a few more birthdays I'm behind on, so I'll be making lots of birthday stuff this week! I'm sure people think I'm crazy for not sending cards timely (if at all) since I make them often, but I like to say I'm a crafter of cards, not a card sender! Then, on top of that - you'd think I'd dig in my large stash of cards to select one and send. NOPE - I always have to make a new one! Going to work on getting better at that ... now! Anyway, I'd love for you to take a peek at how I created it! Instructions- Stamp background patterns on tag.
- Add twill tape, crocheted trim, then adhere buttons.
- Die cut circle, then adhere resin frame (after adding distress ink) and add flower. *Create* your own embellishment!
- Tie twine around tag and secure resin frame tag embellishment.
- Stamp sentiment on tag front.
- Stamp background text on A2 card front, then ink the edges.
- Adhere the tag with foam adhesive at an angle
SuppliesStamps :: Waltzingmouse Stamps - very vintage lables no. 5; Papertrey Ink - background basics (text style), fillable frames #4; Skipping Stones Design - grunge Ink :: Close to My Heart - desert sand, bamboo; Ranger - antique linen, vintage photo Cardstock :: Papertrey Ink - aqua mist Embellishments :: Vintage Scrap Shop - tag; Hero Arts - crocheted trim; Melissa Phillips - twill tape; May Arts - twine; DeNami Design - sand buttons; Melissa Frances - resin frame; Prima - flower Tools :: Spellbinders - S4-116 standard circles sm, GC-001 grand calibur Thanks so much for visiting! I hope you have a great week!
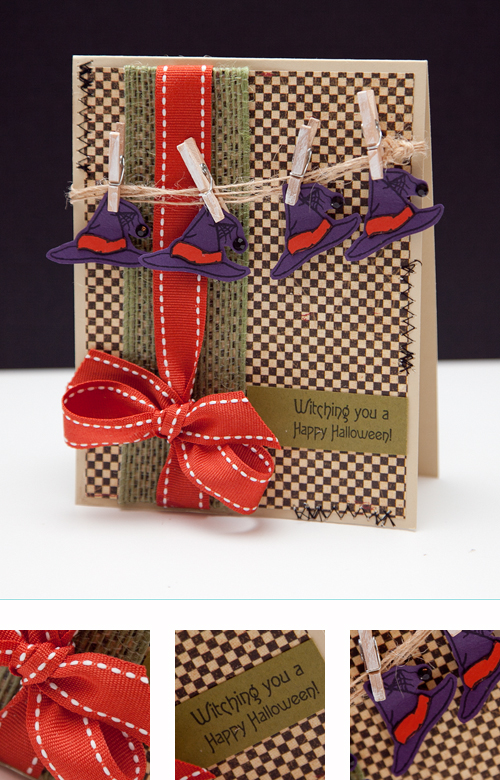
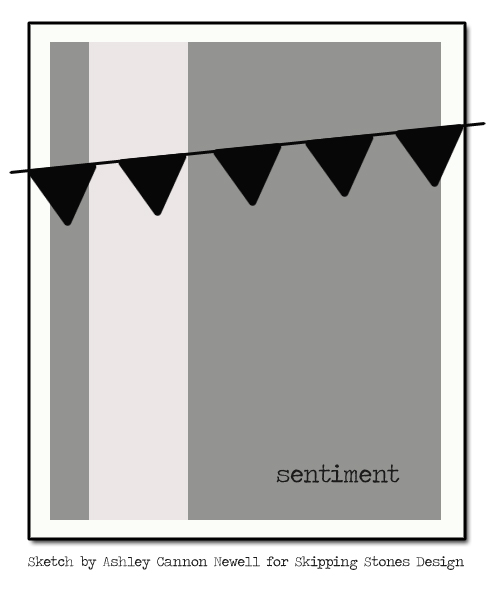
 Hey Everyone! How was your weekend? I hope it was refreshing. Mine wasn't too shabby, but an extra two days would've been nice! But, I did get a chance to party with some friends, hang out with my sister, shopped at IKEA, and even crafted a bit! What more could I ask for...really?! Today, I have {another} Halloween card to share with you. I'm surprising myself over my desire to create for Halloween. This card used a sketch I created for Skipping Stones Design (see below). I used their Boo stamp set for the witch hats and sentiment, along with some Graphic 45 patterns! Here's how I made the card. Instructions- Trim patterned paper to about 4" x 5.25", then add twine decorative trim.
- Tie saddle stitch ribbon around patterned paper into a bow.
- Stamp hats on purple cardstock, then stamp on rust cardstock. Trim hat border from rust cardstock and paper piece on purple hats.
- Cut out hats and string on twine with mini clothespins. (I painted a few clothespins before this project with white acrylic paint.)
- Stamp sentiment on olive cardstock strip and adhere.
- Adhere paper to an A2 card base.
- Add zig zag stitching randomly so it looks like sutures!
SuppliesStamps :: Skipping Stones Design - boo Ink :: Tsukinkeo - memento black Cardstock :: Papertrey Ink - linen, ripe avocado, terracotta tile; Stampin' Up! - eggplant Patterned Paper :: Graphic 45 - hallowe'en in wonderland (square hare) Embellishments :: May Arts - twine; Crafts Supply - mini clothespins; Papertrey Ink - terracotta tile saddle stitch ribbon; Offray - green twine trim So, here's the sketch I made! It's sort of strange, but you never know what you can come up with until you try! If you have a banner you want to create, it's perfect to use, so give it a try and link it up on SSD's blog! If you find you're loving their stamps, some are up for grabs on Embellishes Background Stamping Color Challenge too!  This is my last sketch for SSD. I had fun creating the sketches both creatively and digitally! Thanks for having me again Skipping Stones! You all take care and as always, thanks so much for showing me some love and stopping by!
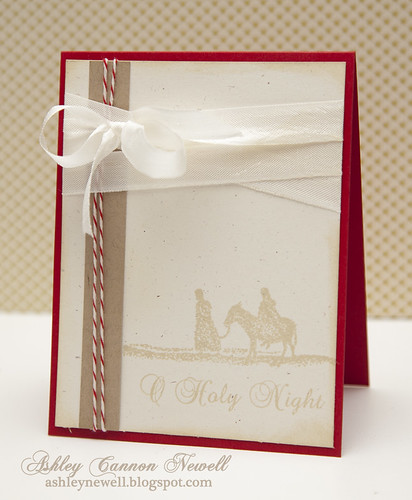
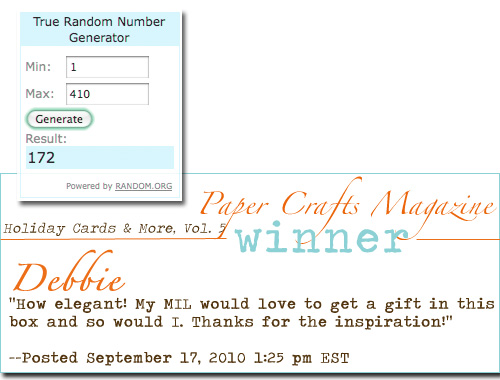
 Hey Everyone! I hope you enjoyed your Monday. Thanks so much for your kind words on my Hero Arts holiday cards. They mean so much! Today, I am sharing a card prepared for Skipping Stones Design's sketch challenge. I designed the sketch, which you can find over here. If you get a moment, take time to participate in this challenge and check out the stamps too! Isn't the font and the sentiment so great?! This set is perfect for traditional, religious Christmas cards. Now, on to some important messages! **Miss the detailed thumbnail photos? If so, let me know! **Don't forget about the Blog 4 Boobies Blog Bounce where you can bid on my card here. The highest bidder so far is at $14! **Paper Crafts Blog Hop Winner is Debbie! Please e-mail me your mailing address Debbie so I can see that you get your new Holiday Cards & More, Vol. 5 issue! Congratulations and thanks to the 410 of you who commented on my holiday box! I read every comment and smiled!!  Instructions - Trim cream cardstock to about 4" x 5.25", then stamp scene and sentiment.
- Add distress ink to the edges.
- Add kraft strip and twine.
- Add seam binding ribbon treatment, then adhere to an A2 red card base.
SuppliesStamps :: Skipping Stones Design - wisemen Ink :: Close to My Heart - bamboo; Ranger - antique linen Cardstock :: Papertrey Ink - rustic cream, pure poppy, kraft Embellishments :: Craft Supply - eggshell seam binding, twine Thanks for seeing what I was up to today! Check back tomorrow for my Watch Me Wednesday video!!

Hey Everyone! Thanks so much for participating in the Bleeps Appreciation Giveaway. If you haven't entered yet, you still have one more day to enter! Please do so soon...it's all for you, Bleeps! Last night, I wanted to create, but was 'stuck.' So, what's a girl to do? A challenge! There are so many paper crafting challenges out there, but one of my newest favorites is Waltzingmouse Stamps' Sketch Challenge. Then, I saw the sketch and was sort of stumped again. That is, until I saw some holiday stamps and just got into the Christmas spirit. Well, when that happens, I don't fight it! So, I created this Christmas tag! Hey, don't throw tomatoes at me, you can't start too early for Christmas...well, I can't! Plus, when I start in my creating zone, I just let it go. I hesitated sharing this with you all today, but then I thought, what's the purpose of my blogging if it's not real?! So, here it is and what I was creating last night, while watching True Blood, Season 1! Ya'll...it's GOOD! Instructions- Stamp label border and sentiments on kraft cardstock in brown ink.
- Die cut label.
- Punch hole, set eyelet, and add twine treatment.
- Stamp hollies on ripe avocado cardstock in ripe avocado ink, cut out and pop off tag.
- Add rhinestones to hollies.
- On ripe avocado rectangle, stamp background in the center.
- Punch hole and set eyelet at the top of ripe avocado cardstock, then tie red cabbage rose ribbon with button treatment.
- Pop kraft tag off ripe avocado larger tag at an angle.
SuppliesStamps :: Waltzingmouse Stamps - very vintage christmas Ink :: SU! - chocolate chip; PTI - ripe avocado Cardstock :: PTI - kraft, ripe avocado Embellishments :: May Arts - twine; MemrieMare - cabbage rose ribbon, button; KaiserCraft - rhinestones Tools :: Spellbinders - large labels nestabilities (S4-168), wizard; We R Memory Keepers - crop-a-dile + eyelets Thanks so much for your visit! Have a happy Tuesday!!
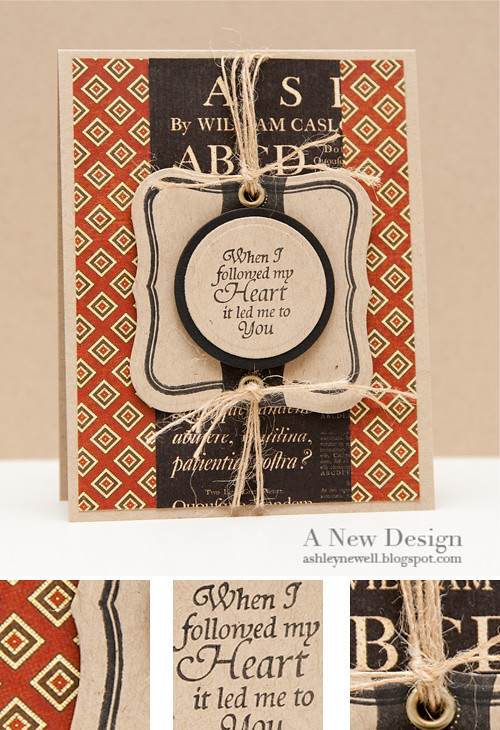
 Hey Bleeps! Happy Hump Day! Today, I am sharing a card inspired by a few challenges. I usually do not combine challenges because it's very difficult to do, unless it's a generic challenge, like masculine for JustRite and The Shabby Tea Room. I also used Kazan's sketch from 2 Sketches for You! :) I'm going to be honest here. This card took me about two hours to make. I was powered from a long nap, but just wasn't prepared to spend that long on a card. Good thing I had my leftovers to eat! :) Check out how I made it - seems easier and faster, but boy did this card's thought process take for-ever! Instructions- Trim patterned paper to about 4" x 5.25", then adhere a black patterned paper strip in the middle.
- Die cut and emboss label.
- Stamp 'tags' and 'border.'
- Punch holes and set eyelets.
- Tie label onto paper with twine.
- Die cut two circles to mat together.
- On kraft circle, stamp sentiment, then pop off label die cut.
Tips & Tricks- Patterned Paper :: If you have difficulty working with multiple patterned papers (like me), I recommend placing the patterns down and walking away to stare at them from across the room to see if it's too busy, not busy enough, too much, overwhelming, or just "it!"
- Use patterns from the same or similar manufacturers. Working with the same collection is also an easy way to match patterns too. Here, I used the same vendor, but two different collections.
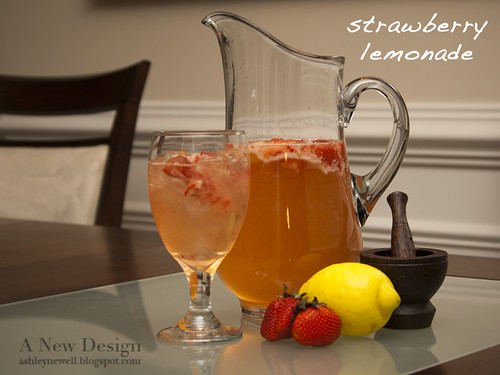
SuppliesStamps :: JustRite - romantic sentiments; Waltzingmouse Stamps - very vintage labels no. 1 Ink :: SU! - black Cardstock :: PTI - kraft, true black Patterned Paper :: Graphic 45 - a proper gentleman collection {harberdasher}, communique collection {a fine specimen} Embellishments :: May Arts - twine; We R Memory Keepers - eyelets Tools :: Spellbinders ™ - labels one nestability (S4-161 ), standard circles nestability small, large (S4 -114, S4-116), wizard; We R Memory Keepers - crop-a-dile, crop-a-dile big bite Now, in case that was a little too manly for you, here's something that should sweeten you up! I made some strawberry lemonade for the first time last night. I really like ordering this out at restaurants, so I thought why not?! I usually make fresh lemonade/tea and combine them (I will do a separate post for that concoction later), but this beverage screams summer and perfect for gatherings or just plain 'ole drinks in your house! Now, I'm sure you can 'jazz' it up a bit and add some 'licka' to it, but I haven't played with that just yet!  Here's how I made it: 3 lemons 6 strawberries 2.5 c sugar (about - to taste - WARNING - I don't measure) lemon juicer mortar and pestle Cut lemons in half. With one lemon, slice it a few times and set aside. Juice lemons and add to your pitcher. Crush and juice strawberries in mortar and pestle. Add strawberries to pitcher. Add sugar and water, then stir until dissolved. Add sliced lemons, stir, and serve! The mortar and pestle is a tiny one I picked up in Kanchanaburi, Thailand. I thought it was too cute. I never thought I'd use it, which is why I bought a 'baby' one! You can find one at your local kitchen gadget store. Thanks for visiting today. I hope it was refreshing!
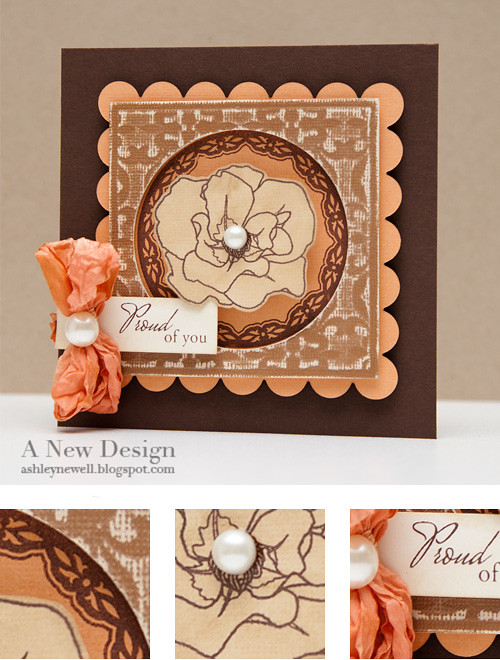
 Hey Everyone! Well, at least we can say it's Tuesday! Today, I have a card inspired by Waltzingmouse's Sketch Challenge! They are sponsoring the current Embellish challenge, so check out both! If you haven't already, please become a fan of Embellish! We have almost reached 600 fans; our goal for the week! Check out how I made it! Instructions- Die cut scalloped square nestability and stamp circle border in the center.
- Die cut square nestability with circle nestability insert to create a frame, then emboss with impressability and sand it.
- Pop square die cut frame off scalloped square die cut.
- Stamp rose, ink, and cut out. Pop rose off circle center.
- Stamp sentiment, ink, then pop off bottom left corner.
- Add ribbon treatment and pearls.
- Adhere to 5" square card front with foam adhesive.
Tips & Tricks- When working on sketches, I like to assemble the card in sections before adhering it all together. This allows me the chance to review several design options, such as flipping the sketch or using other embellishments/shapes to incorporate into the sketch.
SuppliesStamps :: Waltzingmouse Stamps - blessed by you (sentiment), vintage circles small (circle border), roses in bloom (flower) Ink :: ClearSnaps - chestnut; Ranger - old paper; SU! - chocolate chip Cardstock :: Core'dinations - chocolate box collection; PTI - vintage cream, dark chocolate Embellishments :: Craft Supply - crinkly stained ribbon; SU! - pearls Tools :: Spellbinders - standard circles large nestability (S4-114), classic scalloped squares small nestability (S4-120), class squares nestability small (S4-128); fleur de lis pattern impressability (I2-1014), wizard, sanding tool So, last night I also got back into the kitchen. I tried an Orange Chicken recipe that I've cooked before. When you're like me and use recipes to build up your cooking skills, you have to cook some recipes at least twice before they're really 'introduced' into my kitchen. So, this time around, I discovered that I personally make more chicken than the recipe calls, which means I need to make more 'sauce.' The sauce is easy to whip up as I did after I made the plate pictured below. Although I did not have another orange on hand, simple soy sauce, brown sugar, and red pepper flakes on the stove was all I needed to 'juice' it up! :) Give it a go! It's super fast! I do have a huge rice cooker that I ordered from Dillards online using some wedding gift cards I had. If you don't own one and you eat rice like me...get it! McArthur came into the kitchen and said, "It looks real. Did you cut the chicken yourself?" What he meant was, he thought I ordered it and put it in the skillet and/or that the chicken was pre-cut. I did take a short cut! You know I LOVE kitchen short cuts because I have to eat and get in that studio! I buy my chicken usually from Costco. I get the boneless skinless chicken breasts. This time, I got the chicken tenders, which cuts my cutting time in half! Anyway, I love those pre-packaged chicken packs because cooking for two can be difficult, but not with those packages! I also discovered Perdue's flat chicken breasts! They're great for stuff like that Panini I made on Thursday, grilled chicken breasts in general, or chicken parmesan...no more mallets! Well, here it is - Pei Wei in my kitchen! HA! 
 Hey there, Bleeps! It's Tuesday and that means only one more work day for most of us who aren't taking off! I have to make one more trip to the grocery store today to pick up the perishable items, like eggs, milk, cheese, and so forth. Yesterday I made a card using Savitri's daughter, Emma's sketch combined with Dawn's color challenge. Boy, was this a doozy! Mac said he liked it, so here it is posted! I got the chance to use a few of my new Papertrey Ink stamps and boy do I like the new background stamp! WOW! The Big & Bold sentiment stamp set is loaded with the best sentiments. I chose this one to send to a family friend. I'm going to have to make an envelobox with my Ultimate Crafter's Companion to mail this one! I love that feature! Now, my 'big' cards can fit in a mini box! It allows just enough room for dimensional elements.
Instructions - Trim white cardstock to create an A2 card base.
- On aqua mist block, stamp background pattern.
- Add pink dots to the centers of background pattern.
- Adhere aqua mist block to card front.
- Tear a strip of book text and distress, then adhere to card front.
- Add a strip of raspberry fizz cardstock.
- Adhere scallop trim and add ribbon.
- On a new aqua mist block, stamp sentiment and adhere to card front.
- Add buttons and rhinestones.
Supplies
Stamps :: Papertrey Ink - big & bold wishes, diamonds background basics Ink :: Clear Snaps - chestnut; Papertrey Ink - aqua mist; Stampin' Up! - pink marker Paper :: Papertrey Ink - white, aqua mist, raspberry fizz Embellishments :: KaiserCraft - rhinestones; Book Text; Stampin' Up! - ribbon; Cosmo Cricket - scallop trim; Papertrey Ink - buttons; Twine
Have you all checked out Laura's new food blog? As you know, I love blogging about food, so I had to try out something on Laura's blog and I did last night. It is the Taco Salad! It was a perfect dish to make the week of Thanksgiving because it's light and not too difficult. I think I'm officially a 'foodie!' So, this post marks the start of the food posts that will follow for Thanksgiving. Last year, I blogged about the place cards and menus, but this year, I plan to take it a step further. I hope you all will enjoy it!
Food Stations
My Plate "dressed up"
The original recipe may be found here. However, I usually alter a recipe a bit to fit my personal preferences. As suggested by Laura, the taco salad can be served with chicken as opposed to ground turkey. So here is what I used and how I made it! Enjoy!
Ingredients
2 chicken breasts 1 can of corn 1 can of black beans 1 can of rotel (can be used as a complete tomato/jalapeno substitute) I like HOT 2 roma tomatoes Some lettuce Some cheese Some onions 1 jalapeno/serrano pepper salt (to taste) tortilla chips
Directions - Slow cook chicken breasts in crock pot. (I choose this step so that the chicken is ready when I return home from work.)
- Add taco seasoning overtop of chicken and set crock pot on low for about 6-8 hours.
- Remove chicken from slow cooker and pull the chicken a part.
- Add chicken to the skillet, along with 'broth' from slow cooker.
- Cook the chicken until the meat absorbs the chicken.
- Chop onions, jalpeno pepper, and tomatoes and toss in a bowl.
- Add corn, black beans, and some rotel to the bowl (Hot version will spice it up) and toss.
- Season with salt (if desired).
- Chop lettuce and shred cheese.
- Set up stations and create a taco salad or traditional tacos on soft or hard-shell tortillas.
- Serve with tortilla chips.
Thanks for stopping by and enjoy yourself today!
|
|