|
|
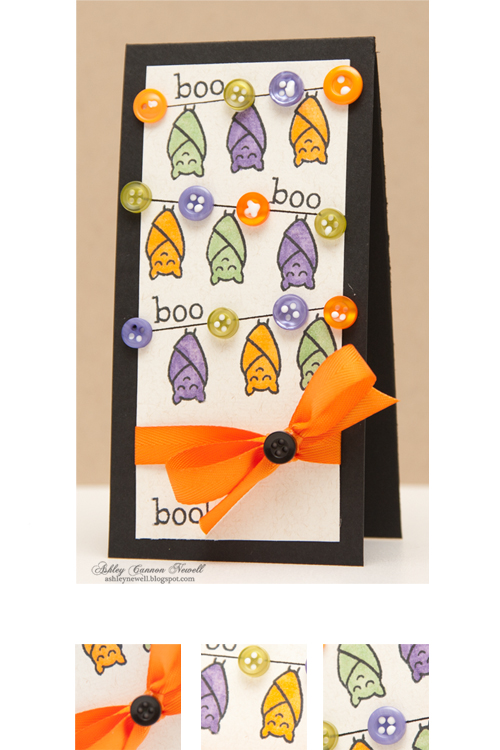
 Boo! It's Monday! :) Did you get all you wanted accomplished this weekend? Well, I didn't. I started off strong, then sort of lost my momentum after Friday night. I was able to create this quick mini Halloween card featuring Lawn Fawn's Heebies Jeebies stamp set. I've had this idea to have the bats hanging off multiple diagonal lines, but the first time I tried to create the concept, it didn't work out so well. My initial idea was to stitch diagonal black lines on cardstock, similar to how I drew them here, but with more texture. Then, I wanted to stamp the bats and have them all black and one colored on each row. Well, I realized that the stamps weren't solid and that if I colored it black, then you wouldn't see the details. DUH! So, of course I could've stamped the bat on black cardstock with white ink, but that just took away from my idea. So...I tried it again and here's what I ended up with! Yes, I couldn't wait for my tacky glue to dry, and that's what's peeking through the buttons, but it will dry clear! Instructions- Trim cream cardstock to about 2.25" x 5" (I used a scrap).
- Draw diagonal lines using a ruler and black gel pen.
- Stamp bats and color with markers.
- Stamp sentiments.
- Add ribbon treatment and buttons.
- Mat on black 3.5" x 5.5" card base.
SuppliesStamps :: Lawn Fawn - heebies jeebiesInk :: Tsukineko - memento tuxedo black; Copic markers - V17, G24, YR04; Staples - black gel pen Cardstock :: Worldwin - canvas; Papertrey Ink- true black Embellishments :: Papertrey Ink - orange zest twill tape, buttons; Clear & Simple Stamps - purplicious buttons Thanks for taking a peek at my mini Halloween card today. Have a great Monday.
 
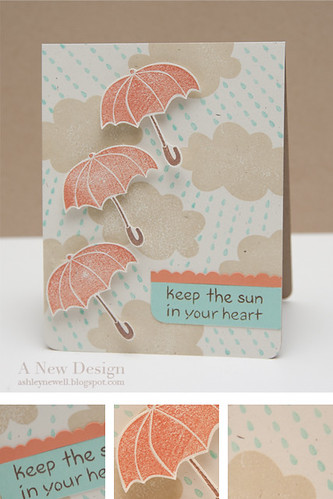
Hey there! I'm back today with another Lawn Fawn card, but this time it's because they're sponsoring an Embellish Magazine Color Challenge! This challenge is all about the quirky, cutesy, and clean design style that Lawn Fawn makes it so easy to create using their stamps. They just had an amazing release, selling out of stamps, so make sure you check them out if you haven't already! The design team really made awesome cards using this beautiful color palette, I think I will be definitely using again! I hope you have time to make a quirky, cute, and clean project for this challenge. We're looking forward to seeing your designs! Instructions- Trim rustic cream cardstock to 4.25" x 5.5" and stamp clouds.
- Stamp rain in aqua mist ink.
- Stamp umbrellas, cut out and pop off card front at an angle.
- On aqua mist cardstock strip, stamp sentiment in brown ink, corner round one edge, and adhere to card front.
- On a strip of melon berry cardstock, cut a decorative edge using scissors and adhere to card front.
- Adhere card front to an A2 kraft card base and corner round the bottom corners.
SuppliesStamps :: Lawn Fawn - partly cloudy Ink :: Tsukineko - VersaFine vintage sepia Cardstock :: Papertrey Ink - aqua mist, melon berry, rustic cream, kraft Tools :: Craft Supply - decorative scissors; We R Memory Keepers - corner chomper Thanks so much for visiting today and have a great weekend!
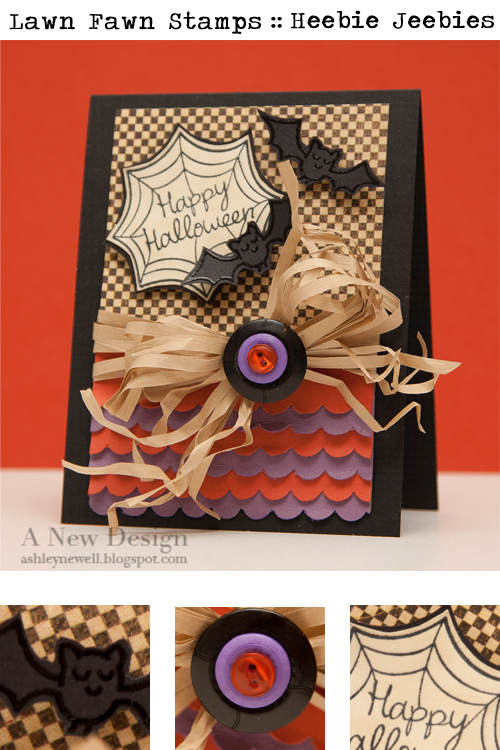
 Hey Everyone! I hope your week is going great! Thanks so much for checking out my previous peek of Lawn Fawn's Bannerific + Sophie's Sentiments sets! It's great to hear that you are as excited about it as I am! But, that's not it! Today, I'm sharing another card that features some of the stamps from "Heebie Jeebies." This is such a cute Halloween set and I had so much fun stamping with it. I love using the color combo of purple, orange, black, and cream for my Halloween projects and incorporating raffia trim is just the perfect ribbon treatment! In this card, the raffia trim almost looks like a crazy spider! The stamp sets will be released and available to purchase here on Thursday, August 12, 2010 at 12 am EST! Check out the rest of the design team's sneak peeks on Lawn Fawn's blog here! Although I've created projects using multiple scalloped edge trims before, I was inspired by Kim Kesti's card featured on Paper Crafts' magazine's September/October issue cover. Have you all seen this great card! All of the scalloped edges really pop out to you and that design made me want to create a Halloween card using that great technique. Instructions- Trim patterned paper to about 3.5" x 4.5".
- Trim 3.5" strips of rust and purple cardstocks, then punch scalloped edges.
- Adhere the scalloped edged strips together on the patterned paper, alternating the rust and purple colors.
- Then, take your hand and crinkle and wrinkle them. Make them pop up and down!
- Add raffia trim and button treatment.
- Adhere to A2 black card base.
- Stamp sentiment/web on white cardstock and add distress ink.
- Cut out sentiment/web and mat on black cardstock and cut a mat.
- Pop sentiment/web off card front.
- Stamp bats on black cardstock with watermark ink and heat emboss with clear embossing powder. Cut out bats and pop off card front.
Tips & Tricks- Inspiration - Being inspired can be interpreted to mean a lot of things. For me, it's admiring a design style, technique, element, or colors to jump-start my creativity. Here, I was inspired by Kim Kesti's layered scalloped edge technique, even though I've done something like that before, I liked the colors in her design. Make your inspiration work for you in your design. So, instead of using a gradient color palette, I chose to alternate my colors! Make sure you give credit to your inspired designs, even if you've done them in another format to share how your creativity was jump-started too!
SuppliesStamps :: Lawn Fawn - heebie jeebies Ink :: Tsukineko - memento tuxedo black, VeraMark watermark ink; Ranger - antique linen Cardstock :: Papertrey Ink - true black, terracotta tile, plum pudding, stamper's select white Patterned Paper :: Graphic 45 - Hallowe'en in Wonderland, Square Hare Embellishments :: Papertrey Ink - buttons; Archiver's - raffia trim; American Crafts - clear embossing powder Tools :: EK Success - scalloped edge punch I'm so glad you came by today! Thanks so much for visiting and enjoy your Hump Day!
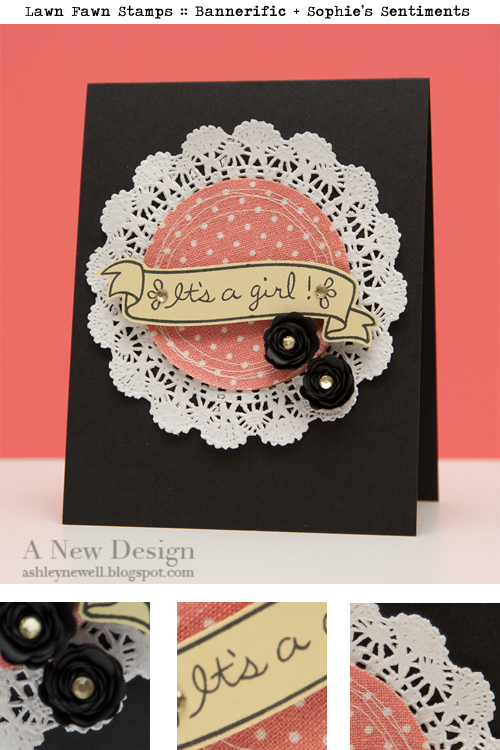
 Hey there, Bleeps! Thanks so much for taking a peek yesterday of my card featuring some stamps from Lawn Fawn's Bannerific + Sophie's Sentiments stamp sets. As promised, I'm back today with another card, using the same stamp sets, but different stamps from the sets, and a slightly different style! I just wanted to show you how versatile the sets are. You can create something a little more elegant and also clean and graphic with a flair of elegance (my favorite)! And who says a baby card can't be elegant and cute? Why do we design baby cards as if they're given to the baby? They're given to the new parents, right? So, I thought to add some black to this baby card, not to weigh it down, but to add elegance and maturity for the new parents! So, if you're wondering about those cute paper rosettes, they're from my friend, Maile Belles. I so admire her style and design and she's such a sweet person. Well, she made some for projects shown on her blog and I really like them, but somehow I can't make them! I only tried once, but she made it look so easy! I was super happy to receive some in the mail, especially handmade by Maile. That makes these great rosettes even better than if I made them myself! I think she could package them as embellishments and sell them! The banners in "Bannerific" are a great way to add a sentiment and embellishment to your projects. When you see the entire set, you'll know it's a must-have for any stamper's collection! To see more sneak-a-peeks featuring these new sets, please head on over to Lawn Fawn's blog to check out what the rest of the design team created! Instructions- Adhere doily to an A2 black card base.
- Die cut circle from fabric and add stitching.
- Adhere circle die cut to doily center.
- Stamp banner and sentiment on green cardstock, cut out, then pop off card front center.
- Add black rosettes and embellish with rhinestones.
Tips & Tricks- Stitching - Adding stitching, whether super straight seamstress-style or quirky and fun (like I've used today), is a great way to add texture and movement in paper crafting designs. If you're like me and have a difficult time sewing straight, sew crooked...on purpose! Not only is it fun, but you get a neat result too! If you want to practice sewing straight...well, don't ask me! I do find that sewing machines with a foot pedal speed are a lot easier to control. In my experience, going slow was the best way I could get a straight and even stitch. If you don't have a fabulous machine (again, like me - I broke my good one), then barely press the pedal, align the edge of the project on the sewing machine to something to keep it straight and use both hands to feed it through!
SuppliesStamps :: Lawn Fawn- bannerific + sophie's sentiments Ink :: Tsukineko - memento tuxedo black Cardstock :: Papertrey Ink - spring moss, true black Fabric :: Love My Tapes - sticky-back polka dot Embellishments :: KaiserCraft - rhinestones; Maile Belles - black rosettes; Craft Supply - doily Tools :: Spellbinders™ - S4-114 standard circles LG nestabilities®, W-001 wizard; Janome - sewing machine Thanks so much for checking out more peeks today! I'll be back tomorrow with something bold and something new...and more Lawn Fawn!
 Hi Everyone! I hope you had a great weekend. I had a relaxing one because CHA in Chicago really kicked my butt! So, I worked a little bit yesterday on some projects for this month's Lawn Fawn's release. You're really going to like this one, so hold on tight! Today's card showcases a sneak-a-peek at Bannerific + Sophie's sentiments. Make sure you check out Lawn Fawn's blog to see what the rest of the designers created using these two sets too. I'll be back tomorrow with another card using the same sets, different stamps, and even a different style! So, make sure you come back! Instructions- Trim patterned paper to about 4" x 5.25", then mat another patterned paper piece at 4" x 4" on top. Add zig zag stitching.
- Adhere on an A2 card base and add more zig zag stitching.
- Add distress ink to chipboard frame.
- Add twill tape and button embellishment.
- Stamp birds on patterned paper.
- Pop chipboard frame off card front, at an angle.
- Stamp banner and sentiment on kraft cardstock, cut out, then pop off chipboard frame.
SuppliesStamps :: Lawn Fawn - bannerific + sophie's sentiments Ink :: Clear Snaps - ColorBox chestnut roan; Papertrey Ink - plum pudding; Ranger - antique linen, tea dye Cardstock :: Papertrey Ink - plum pudding, kraft Patterned Paper :: Webster's Pages - Nature's Storybook, Violette Wings (purple) Embellishments :: Papertrey Ink - button; Melissa Phillips - twill tape; Ranger - button; KaiserCraft - rhinestones Tools :: Janome - sewing machine Thanks so much for taking a peek! Have a good Monday!!
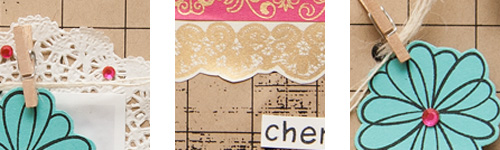
  Hi there! I'm back with another Lawn Fawn sneak-a-peek. This stamp set is called "Judy's Blooms" and is full of stamps that will make your heart bloom with glee! Can you believe it? I created a scrapbook layout to share with you all to feature those blooms. The flowers on the "clothesline" is one of the blooms in the set. The set will be available July 8, 2010 at 12:01 am EST. Please hop on over to Lawn Fawn's blog to check out more sneak peeks by the design team. Instructions- Trim patterned paper lace strips and adhere to scrap layout base.
- Adhere two doilies to the back of a 4 x 6 photo, then adhere it to scrap layout base.
- Punch holes in layout and set eyelets.
- Add twine to make a "clothesline."
- Stamp blooms on aqua cardstock, cut out, then add to "clothesline" with mini clothespins.
- Add rhinestones to flowers and doilies.
- Stamp journaling on white cardstock strips, then adhere to scrap layout base.
- Add thickers for the main title.
SuppliesStamps :: Lawn Fawn - Judy's Blooms (available July 8, 2010), Harold's ABCsInk :: Memento - tuxedo black Cardstock :: PTI - hawaiian shores, white Patterned Paper :: Hambly Screenprints - 3/4" graph, on edge, old lace Embellishments :: KaiserCraft - rhinestones; American Crafts - root beer float thickers; Making Memories - eyelets; May Arts - twine; Craft Supply - mini clothespins, doilies Tools :: We R Memory Keepers - crop-a-dile big bite
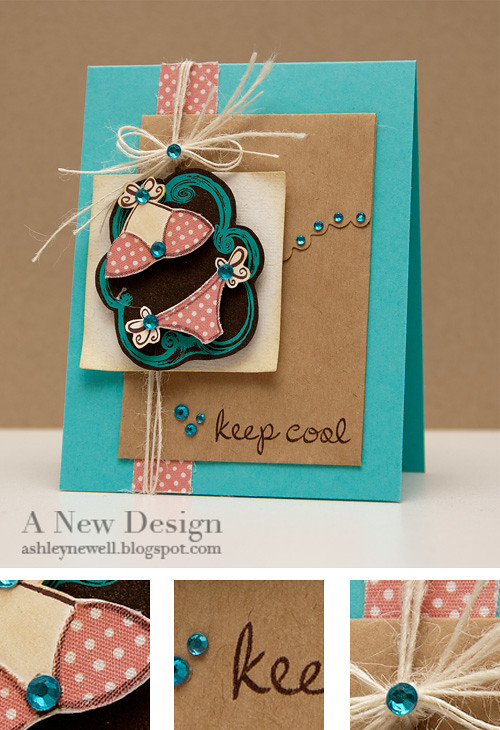
 I'm happy to report it's time for a Lawn Fawn new release. So, today I'm here to share a sneak-a-peek at one of the new stamp sets. This set is called "Swimsuit Season" and includes fun summer stamps. There's so much you can do with them. I fabric pieced the bikini stamps for some texture. Check out what the rest of the design team created here. The set will be available for sale on July 8, 2010 at 12:01 am EST. Instructions- Trim aqua cardstock to create an A2 card base.
- Trim polka dotted fabric strip and adhere to card front.
- Add kraft envelope.
- Triple up some twine and tie it around card front and add a rhinestone.
- Die cut a square, add distress ink and set aside.
- Trim frame and set aside.
- Stamp bikini on white cardstock and cut out.
- Stamp bikini on polka dotted fabric, cut out, then piece on cardstock bikini.
- Add distress ink and rhinestones to bikini, then pop off decorative frame.
- Pop decorative frame off square die cut.
- Pop square die cut off card front.
- Stamp sentiment.
- Add rhinestones to card front.
SuppliesStamps :: Lawn Fawn - swimsuit season (introduced July 8, 2010 at 12:01 am EST) Ink :: SU! - chocolate chip; Ranger - antique linen Cardstock :: PTI - hawaiian shores; white; WorldWin - canvas Patterned Paper :: Hambly Screenprints - frame wallpaper Embellishments :: KaiserCraft - rhinestones; American Crafts - dear lizzy collection (tickled tulip sticky back fabric); May Arts - twine; Maya Road - envelope Tools :: Spellbinders ™. - classic squares LG (S4-126), wizard Thanks for visiting today! Take care!
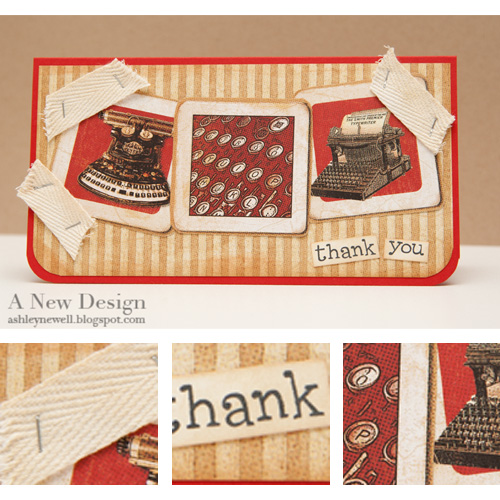
 Hi Everyone! In case you didn't get the memo, it's FRIDAY! Today, I have a fast card to share with you and some food (below)! Instructions- Trim patterned paper to about 3.5" x 6.75", round bottom corners, then adhere to a 3.75" x 7" pure poppy card base. Round card base bottom corners too!
- Trim "typography" images from patterned paper and adhere to card front.
- Trim twill tape, fray ends, then staple to corners.
- Stamp sentiment, add distress ink, and adhere to card front.
Tips & Tricks- Tape Technique :: Tapes are becoming a new 'hot' trend in paper crafting. I remember seeing Making Memories tapes years ago and wondered, "What would I use that for?" Well, now we all know! Although I do own a few rolls of tapes, I thought it would be cool to share how to create your own "tapes!"
- Use twill tape to create a tape look. Here, I cut it like tape could appear and used staples to adhere it. You could also use ribbon to get this effect.
- Another option for tapes, could be to trim a thin strip of patterned paper, then tear the ends. Cool, right?
- Want some fabric tape? Trim fabric strips = fabric tape! You can run it through an adhesive runner or just use glue, such as Helmar liquid fabric adhesive!
- Want to customize your own fabric tape? On sticky-back canvas, stamp your own pattern and trim a strip and voila, your own custom fabric tape!
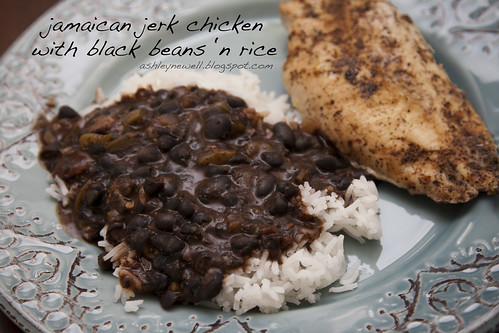
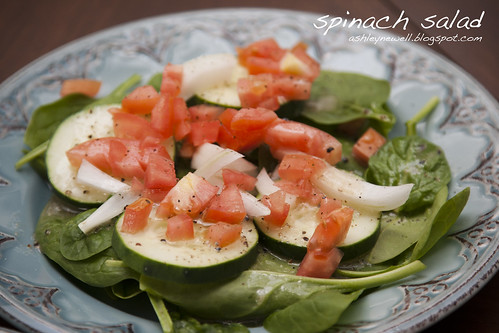
SuppliesStamps :: Lawn Fawn - just my type tooInk :: Memento - tuxedo black; Ranger - tea dye, old paper Cardstock :: PTI - pure poppy, vintage cream Patterned Paper :: Graphic 45 - communique collection {typography, on the dot} Embellishments :: Craft Supply - twill tape Tools :: We R Memory Keepers - corner chomper; Ranger - mini attacher Are You Hungry?Last night, it was Caribbean night at our house. We made some jerk chicken with black beans and rice. We've made this plenty of times, but never together. Actually, the last time I made the black bean soup was about four years ago, right after we got married. Mac loves the jerk chicken. We discovered "Walkerswood Jerk Seasoning" during one of our travels to the Caribbean. Now, I can't recall the country we were in, but usually when I travel, one of the items I shop for are seasonings, hot sauces, and such! If we run out, I find them online and buy them! I found the jerk seasoning at our World Market, so I didn't have to order this one! But, they've closed our store, so I'll have to see if another World Market still exist or if they've closed them all? I still get the e-mails, so I'm unsure about this one. Does anyone know? Anyway, the black bean soup is a recipe from Bahama Breeze, a restaurant I used to visit quite frequently during my Raleigh, NC days in law school. I loved their black bean soup and was surprised that they posted their recipe right on their site ( here). So, usually I take short cuts, but this time I took a longer route. Instead of using canned black beans as suggested by the recipe, I cooked dry black beans in my slow cooker all day and night. When I got home from work, the beans were done! I picked right back up at the recipe after it says dump the beans in the pot! Dry beans are much better than canned beans, well anything canned is not as good as fresh, right? Anyway, I'm no health nut, I just like to cook and eat well! Now, I know black beans look yucky in the photo, but believe me, they were good! I'm going to freeze the rest because I'm sure I will not want them this weekend. Remember, I don't do well with leftovers! :)  We also had a spinach side salad with our meal. I didn't put it on my plate (pictured above) because some foods just can't touch! My salad is one of them! So, it gets its own special plate/bowl usually! One more thing to note, Mac dumped some of his jerk chicken into his salad and said it was great! Just as an added thing to do with the leftovers or another dish altogether! We usually eat spinach salads because someone has an allergy in the house to lots of stuff, including lettuce (no names mentioned, but it's not me)! :) Anyway, I just sliced some cucumbers, tomatoes, and of course onions because I LOVE ONIONS! I use vingarette dressing usually on my salads, but sometimes I venture out to ranch (only at Outback it seems) or a sun dried tomato dressing.  Thanks so much for stopping by! I hope you all have a fantastic weekend!
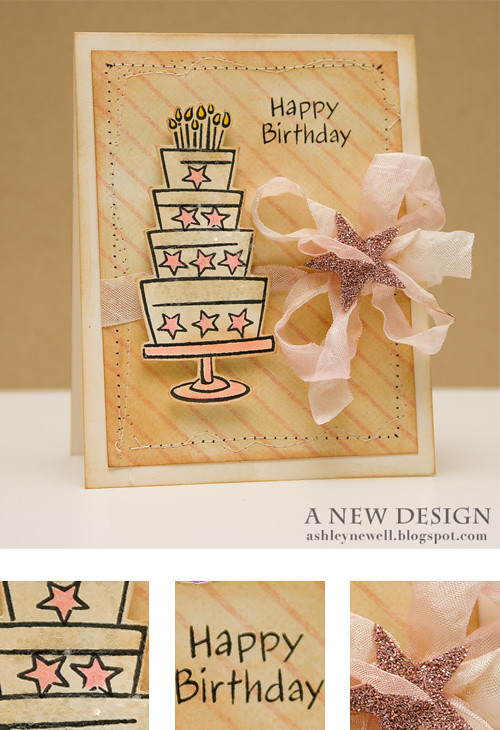
 Bleeps...I'm back with the third stamp set for Lawn Fawn's June release! It's called Bake Me a Cake and if you're not already a baker, you will be after you see and stamp with this set! There are so many 'sweet' options. I made a birthday card full of stars perfect for that superstar birthday girl! I added some glitter to the cake, but it did not photograph well. You can peek at it a bit more in the detailed thumbnail. **All NEW Lawn Fawn stamp sets will be available June 3 @ 12:01 am EST**
Instructions- Trim patterned paper to about 3.75" x 5", ink, and add border stitching.
- Stamp cake on white cardstock and color stars/candles.
- Cut cake out, ink, and add glitter.
- Add ribbon treatment with star and pop cake off card front.
- Stamp sentiment.
- Adhere to an A2 card front.
SuppliesStamps :: Lawn Fawn - bake me a cake Ink :: Memento - black; Ranger - tea dye, old photo Cardstock :: Gina K. - white; PTI - vintage cream Patterned Paper :: My Mind's Eye - lush collection ooh la la Embellishments :: MemrieMare - star, cabbage rose ribbon Tools :: Janome Sew Mini sewing machine Check out what the rest of the Lawn Fawn Design Team created here. Thanks for stopping by!
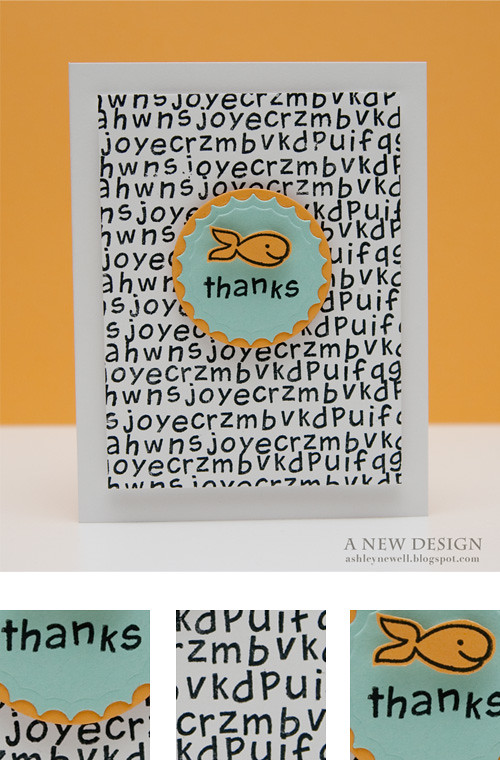
**Please Note: I have two postings today. Please scroll down to see my special Dearest Dad Papertrey Ink post.**   Hey Bleeps! I'm back today with another Lawn Fawn sneak-a-peek. Remember when I told you that yesterday's sneak-a-peek would relate to today's? Well, here is why - I created an ensemble to go with the entire young boy's party. I made a thank you card and party favor, which highlights the Critters in the Sea set along with Harold's ABCs. With Harold's ABCs, you can personalize anything and create your own sentiment, like I did with the "thanks" and even your own background pattern. Here's how I did it! Instructions- Trim white cardstock to 3.5" x 4.5" and stamp text background pattern. See next section on how I made it quick and easy and more options.
- Pop text background off an A2 card front.
- Die cut and emboss circle and inverted scalloped circles and mat together.
- Stamp "thanks" and pop off card front center.
- Stamp "fish" and pop off die cut.
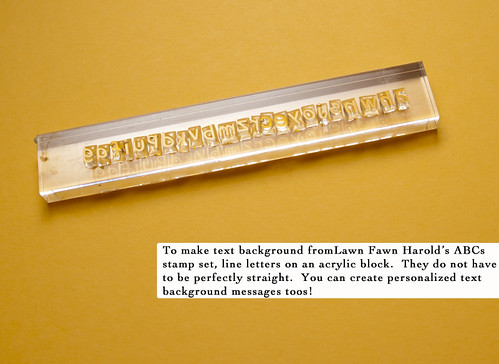
Tips, Tricks & Techniques- Line letters on acrylic block and stamp like you would any background stamp. See photo below.
- You can create a special background pattern with a personalized message.
- Imagine using a different color ink to make a special sentiment 'jump' out of the text background stamped pattern.
- Recycle containers. The container I used here was recycled from a packaged treat Mac brought home to me from a retirement party at work. There are craft supplies everywhere!
 SuppliesStamps SuppliesStamps :: Lawn Fawn - harold's abcs, critters in the sea Ink :: Memento - tuxedo black Cardstock :: PTI - stamper's select white, summer sunrise, aqua mist Embellishments :: Craft Supply - clear container Tools :: Spellbinders - standard circles large nestabilities (S4-114), classic inverted scalloped circles large nestabilities (S4-194), wizard Check out what the rest of the Lawn Fawn Design Team created here. Thanks for stopping by!
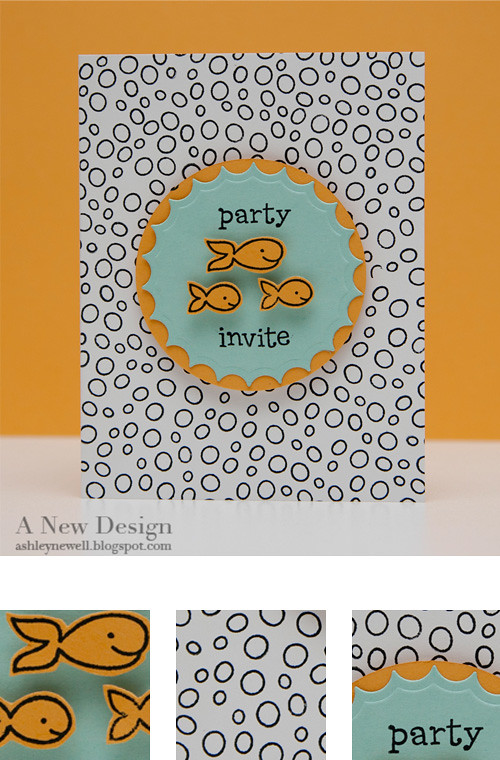
 Hey there everyone! I hope you're enjoying your weekend. Today, starts the sneak-a-peeks of Lawn Fawn's new stamp sets. Critters in the Sea is the stamp set I'm featuring today; however, today's project will relate to tomorrow's sneak-a-peek, so make sure you come back! I created a simple party invitation, perfect for a little boy's party. I could only imagine how difficult it would be to create fun and cute boyish party invites, but the Critters in the Sea set will make it a cinch! Here's how I made it! Instructions- Cut white cardstock to create an A2 card base.
- Stamp 'bubble' background in black ink.
- Die cut and emboss circle and inverted scalloped circle from summer sunrise and aqua mist cardstock, respectively.
- Stamp 'fish' on summer sunrise cardstock, cut out and pop off inverted scalloped circle die cut.
- Stamp 'party invite' with black ink.
- Mat together and pop off invite front center.
Tips & Tricks- Keep handmade invitations simple so you can create them in batches.
- To add an extra step, you could color the bubbles or ink them in various colors.
SuppliesStamps :: Lawn Fawn - critters in the sea, just my type tooInk :: Memento - tuxedo black Cardstock :: PTI - stamper's select white, summer sunrise, aqua mist Tools :: Spellbinders - standard circles large nestabilities (S4-114), classic inverted scalloped circles large nestabilities (S4-194), wizard Check out what the rest of the Lawn Fawn Design Team created here. Enjoy your Memorial Day and I'll be back late tonight with a couple more posts! Thanks for your visit!
 Hey Everyone! I hope you had a fantastic weekend. I did a lot of scrapbooking without photos. What's that? Well, that's what I do when I have special requests to make scrapbooks for people to give as gifts. It's quite a task if you've never tried it before. But, it's a great introduction for me to scrapbook again. In the meantime, I was playing around with some new ribbon I got and created my own crinkly and stained ribbon (a sample used in today's card). I didn't buy the ribbon with intentions of creating it, but it just happened in a matter of minutes. As a special thanks to my Embellish Magazine members and subscribers, I'll be providing a tutorial there later this week. I'm really grateful for your support and the least I can do is give you all the first peek at a great tutorial. I'll let you know when it's available. If you're not already a member, it's quick and easy to sign up and you get to check out some great card designs while you're there in Embellish Magazine's Premier Issue too! Today, I created a card with lots of vintage flair. I hope you enjoy it. Here is how I made it and some tips too! Instructions- Trim striped patterned paper to fit an A2 card front.
- Trim black and white patterned paper block and adhere to striped patterned paper.
- Trim music sheet paper, add distress ink, and adhere.
- Add vintage trim and distress ink.
- Add ribbon treatment and glass button with twine.
- In word editing software, type sentiment and print.
- Trim sentiment strip, stamp rain background, and add distress ink.
- Adhere sentiment strip to card front.
- Stamp umbrella, cut out, add distress ink, and pop off card front.
- Add black rhinestone to umbrella.
Tips & Tricks- If you want a sentiment or a certain size sentiment, use your computer and printer to generate what you want exactly.
- Add stamping to the sentiment and voila a hybrid card!
SuppliesStamps :: Lawn Fawn - partly cloudyInk :: SU! - black; Ranger - tea dye, antique linen Cardstock :: PTI - white Patterned Paper :: GCD Studios - Paris Nights collection; Craft Supply - vintage Mozart music sheet Embellishments :: Vintage Scrap Shop - trim; Craft Supply - crinkly stained ribbon; Making Memories - vintage glass button; May Arts - twine; KaiserCraft - black rhinestone Software :: Font - Andes; Microsoft Word; Epson printer
 Hey Bleeps! I hope you all are doing great. I'm back home and am pleased to share that my personal situation is improving very well! Today, Lawn Fawn has three new stamps released in their store along with some Clear Snaps ColorBox inks! Go to the store here to check them all out! Thanks for your visit. I'll be back later with my Caardvarks post! See you then! Instructions- Trim berry sorbet cardstock to create an A2 card base.
- Stamp post card image on white cardstock, cut, and ink using blending tool and dye inks.
- Stamp rain drops using old paper ink.
- Add ruffled ribbon and tie a ribbon around post card into a bow (twice).
- Adhere post card to card front.
- Stamp umbrellas twice (first in berry sorbet ink, then in plum pudding ink - stamping the handle in ClearSnap ColorBox chestnut roan ink).
- Cut out umbrellas and pop them off card front.
- Add rhinestones/pearl.
- Stamp sentiment on white cardstock, ink, then pop off card front.
SuppliesStamps :: Lawn Fawn - partly cloudy; Unity - post card Ink :: ClearSnap - chestnut roan (ColorBox chalk); PTI - berry sorbet, plum pudding; Ranger - old paper Cardstock :: PTI - berry sorbet, white Embellishments :: MemrieMare - cabbage rose ribbon; KaiserCraft - rhinestones/pearl Tools :: Ranger - blending tool
 Hi Everyone! I'm back today with another Lawn Fawn Sneak Peek. This card features another new stamp set, Partly Cloudy. We had a family emergency and I'm out of town using very minimal supplies, but was able to finish this card. I even ran out of adhesive. I threw some supplies in my bag and did not pay attention to the adhesive level and wouldn't you know - almost 75% done and I can't adhere it all together. I made a last minute stop at Wal-Mart and bought a glue stick. That will have to suffice for now! Anyway, that is the story behind this card and the 'new' photo since I'm not at home. Back to Lawn Fawn, take a peek at what the other Fawnies created. Thanks for your visit! Instructions- Create an A2 card from red cardstock.
- Stamp umbrellas on cream cardstock and cut out. *See Tips*
- Trim rustic cream cardstock block and adhere umbrellas.
- Tie brown ribbon into a knot.
- Stamp sentiment and mat on turquoise cardstock.
- Mat on patterned paper and adhere to card front.
Tips & Tricks- Ink the umbrella in a color first, then ink the handle in brown on the corner of the ink pad.
SuppliesStamps :: Lawn Fawn - partly cloudy Ink :: Clear Snaps - Colorbox (chestnut roan, mint, yellow); PTI - pure poppy, ripe avocado Cardstock :: PTI - pure poppy, rustic cream, hawaiian shores Patterned Paper :: My Mind's Eye Embellishments :: PTI - brown twill tape
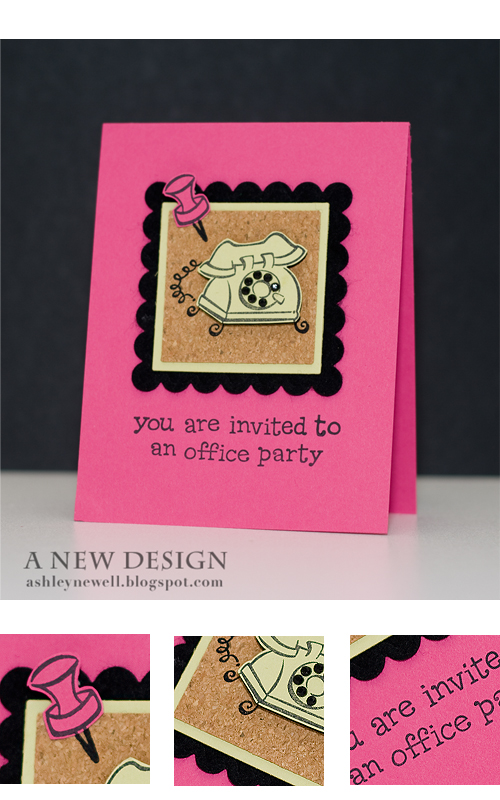
 Hey there! I hope everyone had a great weekend! I'm back today with another Lawn Fawn "Sneak-a-Peek!" Today's card features an addition to the Just My Type set showcased on Friday. It includes a lot of great sentiments and wording to incorporate with Just My Type, hence the name Just My Type Too! I created an office party invitation for the fun office...it exists! I used a lot of texture for the card, including cork, felt, and rhinestones. Don't forget to take a peek at what the other "Fawnies" created using this set. You should get another peek at something new in the new stamp set! Instructions- Die cut square from cork.
- Stamp telephone; once on cork and again on spring moss cardstock.
- Cut telephone from cardstock and pop off cork.
- Add black rhinestones to telephone digit buttons.
- Stamp push pin on cork (partially off) and again on pink cardstock. Cut out.
- Mat cork on green cardstock die cut square.
- Adhere square die cuts to felt scalloped square die cut.
- Add push pin stamped image on pink cardstock.
- Adhere focal point to card front.
- Stamp greeting on card front.
SuppliesStamps :: Lawn Fawn :: Just My Type + Just My Type Too Ink :: SU! - black Cardstock :: PTI - raspberry fizz, spring moss Embellishments :: PTI - black felt; QuicKutz - cork; KaiserCraft - black rhinestones Tools :: Spellbinders - scalloped square nestabilities (S4-127), square nestabilities (S4-126, S4-128), wizard
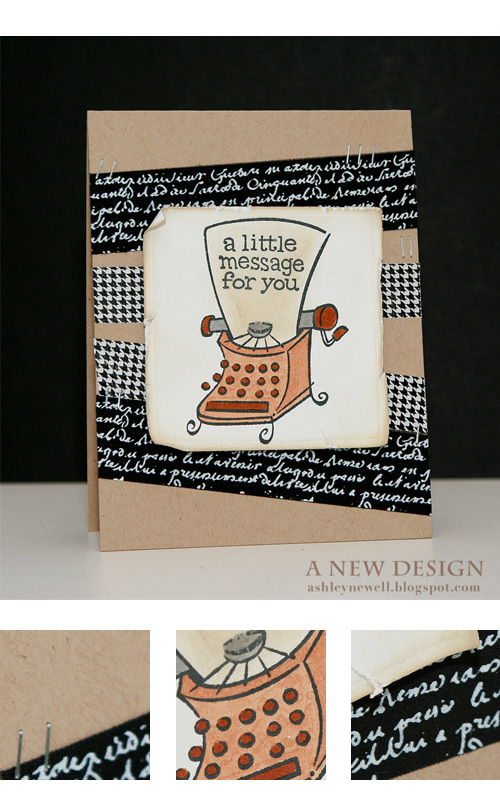
 Hey Bleeps! It's Friday and today I have a fun "Sneak-a-Peek" at a new Lawn Fawn stamp set. I used Just My Type and created the focal point of this card, which includes the typewriter and sentiment. I hope it's 'your type' since this card is gender friendly and oh so retro! I'll be back late tonight with another fun post and on Monday with another Lawn Fawn "Sneak-a-peek!" Have a great day and thanks for stopping by! Don't forget to check out what the other design team members created so you can get more sneak peeks here:
Instructions
- Trim kraft cardstock to create an A2 card base.
- Die cut square from white cardstock.
- Stamp typewriter and sentiment and color.
- Ink and distress square die cut.
- Adhere tapes and add staples to card front.
- Pop square die cut off card front center.
SuppliesStamps :: Lawn Fawn - Just My Type Ink :: Memento - tuxedo black; Copic markers; Ranger - vintage photo, old paper Cardstock :: PTI - kraft, white Embellishments :: 7Gypsies - gaffer tape; Pink Paislee - hounds tooth tape Tools :: Tim Holtz - mini attacher (stapler); Spellbinders - Wizard, Classic Squares Large ( S4-126)
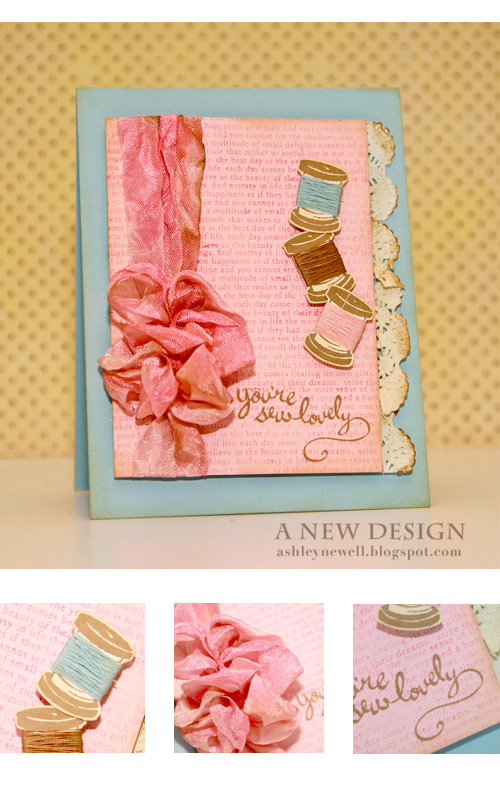
 Hey Bleeps*! I hope you're enjoying your week so far! Today, I'm sharing a card using some Lawn Fawn goodies from the Sew Lovely stamp set. Lawn Fawn's sets are really cutesy, but here's a way to make them vintage cutesy! I created some thread spool embellishments (inspired by Jessica Rosario) and paired them with some vintage flair. Coming soon...new Lawn Fawn stamp set sneak peeks! Thanks so much for visiting! Enjoy your Wednesday! *Bleeps = Blog PeepsInstructions- Trim sweet blush cardstock and stamp text background with sweet blush ink.
- Ink the edges with dye in and a blending tool.
- Stamp thread spools, cut out, and ink the edges.
- Add real thread around thread spools and pop off pink cardstock.
- Add cabbage rose ribbon, tripling it around the cardstock and tie in a bow. Add another bow, then secure with glue dots to make a flower.
- Stamp sentiment.
- Ink a doily, cut, and add to the right side of pink cardstock to create a border.
- Pop focal point off of an A2 card front.
Tips & Tricks- To make something more vintage, try adding subtle inking to the edges.
- Incorporate vintage elements, such as doilies.
SuppliesStamps :: Lawn Fawn - sew lovely; PTI - text style Ink :: Hero Arts - latte; PTI - sweet blush; Ranger - antique linen, vintage photo Cardstock :: PTI - sweet blush, white, spring rain Embellishments :: MemrieMare - cabbage rose ribbon; Craft Supply - doily, thread Q & AQ: What is the ribbon organizer behind me in the videos? A: It is a Clip it Up ribbon organizer that is installed into the wall. A Splitcoaststampers review can be found here. You can find information about my review here.
 Hey there, Bleeps*! It's Friday Eve and I'm so excited because I get to relax a bit and craft a lot. We also have a wedding to photograph on Sunday, so we will be busy, but creatively busy, if that makes any sense! I'm not sure why I'm really liking the brown and peach color combination, but bare with me for one more day! Hopefully, my card for tomorrow will be a bit different. I guess it's just how I'm feeling right now. Anyway, I used quite of bit of products and techniques for this card, so I am going to try to attempt to make sure I remember them all in my explanation below. Thanks so much for stopping by and have a terrific Thursday (corny, I know)!
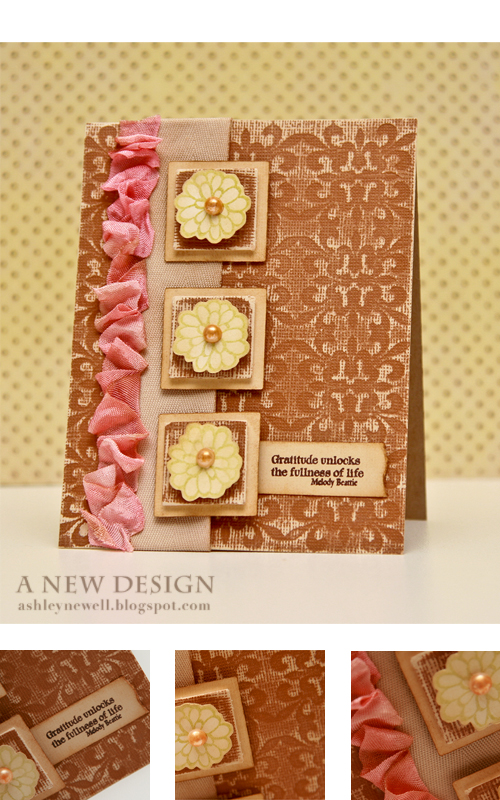
*Bleeps = Blog PeepsInstructions- Trim core'dinations cardstock to 4.25" x 5.5" and dry emboss fleur de lis pattern.
- Sand and distress embossed cardstock.
- Add tea stained twill tape to card front using scor-tape.
- Add cabbage rose ribbon to the left of twill tape by gathering it together (adhered using scor-tape).
- Die cut squares, a one-inch set of three, and another set of three slightly larger for bottom mat.
- Adhere one-inch square die cuts to inchie squares (mat board). Distress and sand cardstock, then pop off larger square die cut.
- Ink around larger square die cuts.
- Stamp three flowers with green cardstock, cut out, and ink. Pop flowers off square die cuts.
- Color white pearls with Copic marker (sand) and adhere to flower centers.
- Adhere die cut squares to card front.
- Stamp sentiment on cardstock, tear one edge, ink, and adhere to card front.
- Adhere card front to an A2 card base.
Tips & Tricks- I use a nail file sander to reveal the core of Core'dinations cardstock after I emboss. A buffer and long nail file work great together.
- Check out Gina K.'s videos on using Spellinders™ Impressabilities here or here.
SuppliesStamps :: Lawn Fawn - petite florals; Skipping Stones Design - healing wingsInk :: SU! - chocolate chip; Ranger - antique linen, vintage photo; Copic marker - sand; PTI - spring moss Cardstock :: Core'dinations - chocolate collection (solid back and textured front) Embellishments :: Inchie Arts - inchie squares (mat board); KaiserCraft - pearls; MemrieMare - cabbage rose ribbon; Melissa Phillips - tea stained twill tape Tools :: Spellbinders™ - square nestabilities ( S4-126, S4-128), wizard, fleur de lis impressabilities ( I2-1014)
 
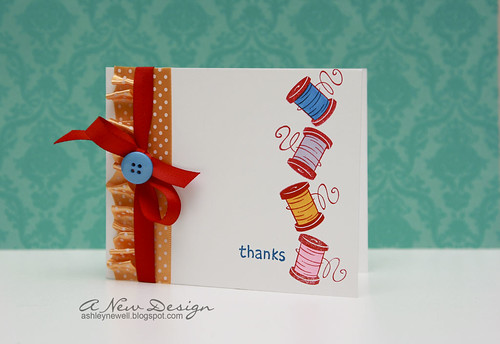
Happy Hump Day! I say that with great ease because my sleeping schedule is still way off track! But, to give you something to do, check out the new Lawn Fawn Stamps web site and order your stamps now before they're sold out! I created a card using Sew Lovely in a different way to showcase the cute thread stamps. Love these!!
McArthur has posted a few pictures to his Flickr page from our Thailand trip. Check them out here!
Thanks so much for stopping by and enjoy your Wednesday...only 2 more days to go! WOO!!
Instructions - Create an A2 card base.
- Stamp threads in a stacking pattern.
- Color.
- Stamp sentiment.
- Add polka dot ribbon. Gather one using scor-tape. Simply adhere the other strip flat.
- Add red ribbon treatment into a bow and secure a button to the knot.
Supplies
Stamps :: Lawn Fawn - sew lovely Ink :: PTI - pure poppy; SU! - pacific point; Copic markers Paper :: PTI - white Embellishments :: PTI - ribbon; GCD Studios - button
  Lawn Fawn Stamps...sneak peek everyone! It's almost grand opening time! Are you excited? I am! This set, called How Delightful, is great to cheer up anyone's day and features some cool handwritten sentiments as well. I jazzed up the chandelier to make it sparkle with some bling. I made the card pretty clean and graphic for your off-the-shelf card effect. Make sure to stop back by tomorrow for another card I have to share and to visit the new online store and pick up your stamps!
Don't forget to drop by the Lawn Fawn blog to check out what the other fabby design team created using this set!
I did not mention the DT member before, but they are:
Thanks so much for stopping by! I'll share a few pictures from our Thailand vacation when they're finished soon. Enjoy your day!
Instructions - Make an A2 card base.
- Trim white cardstock block and stamp chandelier and sentiment.
- Add rhinestones and mat on black cardstock block.
- Adhere to card front with foam adhesive.
Supplies
Stamps :: Lawn Fawn - how delightful Ink :: Versa Color - opera pink Paper :: PTI - raspberry fizz, true black, white Embellishments :: KaiserCraft - rhinestones
|
|