header.gif (12,818 bytes)
Showing posts with label thanks. Show all posts

6.30.2010

a note of thanks


Hi there! In case some of you have forgotten, I call my blog readers "Bleeps" for my "blog peeps." It's just a special little name I made of for all of my blog friends! I can't believe I'm actually back to share another card today. This card has a few of my new favorites, including vintage ensembles, stamps, typewriter fonts.

Instructions
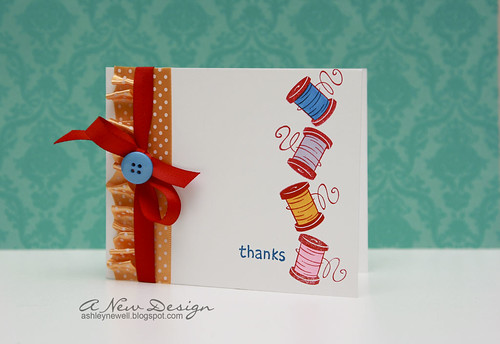
  1. Stamp postcard on aqua mist cardstock, then cut out.
  2. Adhere clear border element on an A2 kraft card front.
  3. Adhere tag to postcard with twine and button treatment.
  4. Stamp label on aqua mist cardstock, cut out, then pop off cardstock.
  5. Stamp sentiment on kraft cardstock, cut out, then pop off label. Add buttons.
  6. Pop postcard off card front.
Supplies

Stamps :: Unity Stamp Company – vintage postcard; Cornish Heritage Farms – on the
desk
Ink :: Tsukineko – tuxedo black
Cardstock :: PTI – kraft, aqua mist
Patterned Paper :: Graphic 45 – communiqué collection (communiqué tags)
Embellishments :: May Arts – twine; PTI – aqua mist button, true black buttons; Me &
My Big Ideas – acetate border
Tools :: We R Memory Keepers – crop-a-dile, eyelet

Coming Soon - Next Month
  • New Releases!
  • Photography Tips, Tricks, and Techniques (from my perspective) I will do a series of postings from using your DSLR camera, setting up your shots, editing project photographs, organizing saved files, importing photos to your blogs! Are you ready?!
  • CHA Summer!

Thanks for stopping by! Take care, Bleeps!!

3.12.2010

Embellish Fabric Color Challenge


Hey Everyone! I'm so very happy to say Happy Friday to each of you! I thought this day would never come. I honestly believe this was the longest week I've had in quite some time. My sleeping schedule slightly improved. After work, I was able to stay awake long enough to make it through Costco and the grocery store. We have been completely out of foodies since we returned from our travels. It's been no big deal because I've been sleeping instead of eating in the evening. But, when I wake up I'm STARVING. So, I've been hitting up the local Dunkin Donuts with a quickness every morning! It's an extra 10-20 to my commute, but since I've been waking up at 4:00 am EST, I'm early to work anyway! :) Do you have a Dunkin Donuts in your area? In my opinion, their drinks are far better than Starbucks. Just saying...

Anyway, it's time for another Embellish color challenge. This time, you have to use fabric. On my card, I used felt and tested out some of PTI's new scalloped edge dies! SO COOL! I've had my red felt for quite some time and picked it up at Michael's. It's very stiff, so it die cuts with ease and without those little hairy pieces. I found it in the kiddie craft aisle I believe! I'll post more details below. My stamped cherries end up looking like cherry jam! After I stamped them in red, I realized I wanted to color them in, which takes away the outlined part...duh...I should've used black (again, like yesterday's mishap)! So, then I tried to make it better and add some glossy accents and it just turned into jam!

Thanks so much for stopping by and make sure to make some time for the challenge this weekend! The colors are quite challenging, but fun in the end! Enjoy your weekend!!

Instructions
  1. Make an A2 card from navy cardstock.
  2. Trim rustic cream cardstock into a block and stamp cherries.
  3. Stamp jar on kraft cardstock with navy ink and cut out.
  4. Stamp label on jar front.
  5. Color cherries and apply glossy accent.
  6. Adhere jar to cardstock with foam adhesive.
  7. Distress edges of cardstock and ink.
  8. Die cut felt with scalloped edge die cut and adhere to card front.
  9. Tie ribbon around cardstock and adhere it to the card front.
  10. Add rhinestones to the scalloped edge felt border.
Supplies

Ink :: PTI - pure poppy, enchanted evening; Ranger - antique linen; Copic markers
Paper :: PTI - enchanted evening, kraft, rustic cream
Embellishments :: KaiserCraft - rhinestones; PTI - new leaf twill tape ribbon; Michaels - red felt (C.P.E "Easy Felt")
Tools :: PTI - medium scalloped edge die; Provo Craft - cuttlebug; Tim Holtz - distresser

3.11.2010

Thanks So Much


Happy Friday Eve Everyone! I'm awake super early! I was up a little before 4 am because I slept all evening and through the night. Yes, my sleeping pattern is confused since our far east travels. Hopefully, this weekend we can catch back up...or really slow back down since Thailand is 12 hours ahead of eastern standard time. So, what does someone do at 4 am? Make a card! This was not easy either! I was a bit groggy, so I ended up with a simple mini thank you card using some new Stamps of Life stamps that were in my mailbox upon my return home. The flowers are great. After stamping them in white, I wished I stamped them in black. Oh well! Here it is!

I also wanted to share some great news with you all. Some of you have already heard, but during my treck to Thailand, Stacey Caron of Spellbinders Paper Arts called me to invite me to be a part of their design team! I was so excited. I submitted my entry and was a finalist and was super excited to receive her phone call of my acceptance. So that means I'll be traveling soon to Phoenix to meet the rest of team (see the links below). I'm so excited and I can't wait!


Thanks so much for stopping by today! I hope you enjoy yourself.

Instructions
  1. Make a 3.5" x 5.5" card base from kraft cardstock.
  2. Stamp flowers in white ink.
  3. Trim green cardstock block and stamp sentiment.
  4. Cut around sentiment, then adhere to card front.
  5. Add ribbon.
  6. Add rhinestones.
Supplies

Stamps :: The Stamps of Life - thanks2you
Ink :: SU! - white, black
Paper :: PTI - kraft, new leaf
Embellishments :: KaiserCraft - rhinestones; Offray - ribbon

3.10.2010

Lawn Fawn :: NOW OPEN


Happy Hump Day! I say that with great ease because my sleeping schedule is still way off track! But, to give you something to do, check out the new Lawn Fawn Stamps web site and order your stamps now before they're sold out! I created a card using Sew Lovely in a different way to showcase the cute thread stamps. Love these!!

McArthur has posted a few pictures to his Flickr page from our Thailand trip. Check them out here!

Thanks so much for stopping by and enjoy your Wednesday...only 2 more days to go! WOO!!

Instructions
  1. Create an A2 card base.
  2. Stamp threads in a stacking pattern.
  3. Color.
  4. Stamp sentiment.
  5. Add polka dot ribbon. Gather one using scor-tape. Simply adhere the other strip flat.
  6. Add red ribbon treatment into a bow and secure a button to the knot.
Supplies

Stamps :: Lawn Fawn - sew lovely
Ink :: PTI - pure poppy; SU! - pacific point; Copic markers
Paper :: PTI - white
Embellishments :: PTI - ribbon; GCD Studios - button

3.05.2010

Lawn Fawn :: Critters in the 'Burbs


Hey there! Happy Friday to you! This is my second post for today so you can check out the Caardvarks post below. I'm back to share another Lawn Fawn sneak peek! This card is a definite must-have for clean and graphic designers. I do not usually design a card that is this graphic, but when I saw this stamp and started creating, this is what came about! This card is "from Ozzy," my Yorkie! He spent time with the pet sitter/other home while we were away. Here's a HUGE thanks to the pet sitter for taking care of "me" so that "I" didn't have to go into a stinky kennel where "I" get sick from separation anxiety. Cute right?! Sometimes your pets need to send cards too OR send one to a pet lover! Here's Ozzy:


Thanks for visiting and here are some details on my card! Have a great weekend!!

Instructions
  1. Make a 4.25" square card base.
  2. Stamp tree, color, cut out, and adhere to card front with foam adhesive.
  3. Stamp tire swing, dog, sentiment, and bird, then color.
  4. Using a ruler, draw frame.
  5. Embellish tree with rhinestones.
Supplies

Stamps :: Lawn Fawn - critters in the 'burbs
Ink :: SU! - black, chocolate chip + marker; Copic markers
Paper :: PTI - white
Embellishments :: Kaiser Craft - rhinestones
Tools :: ruler
Blog Design: Girly by Design