After December 4, 2010, all future posts are on a new site. Please subscribe to my NEW feed at www.ashleynewell.com or click below to subscribe to the NEW feed.
Hey there, Bleeps! I'm posting a bit late today because I got off work early! Our floor in the building lost power, so I finished up my work super fast and came home. I was happy to see my Unity Stamp order was waiting for me at my garage door (the ever so inconspicuous spot my postal deliverer leaves my packages)! So, I came in with the intentions of making a card, but obviously that didn't happen. I decided to create a scrapbook layout...about ME! I've never done this before and boy was it difficult. It was ever so fitting to use Unity's stamps by Melody Ross to show how brave I really am!
*This scrapbook layout will be published in Scrapbook Trends January 2011*
Now, it's just too much to give instructions for this layout, so I'm going to list some tips and tricks for you!
Tips, Tricks & Techniques + How I was Inspired
Adding Texture :: Add texture to your layouts using fabric. Here, I used a swatch of burlap as a mat for my photo. I also incorporated stitching throughout, even on my photo!
Creating Ink Spots :: Using Tattered Angels Glimmer Mist, simply spritz ink on your layout. My inspiration for this technique was from Savitri (HERE).
Creating a Paper Garland :: Super easy to do, just a little time consuming! Die cut your shapes. Here, I used Spellbinders™ standard circles LG (S4-114) and standard circles SM nestabilities (S4-116) to die cut cardstock, music sheet, and patterned paper. Simply run your dies through a sewing machine and voila, your own paper garland! I was inspired by a product for sale on Etsy (HERE). I was REALLY tempted to order it, but the price was just a bit too much, in my opinion, so I made my own...close enough!
Supplies
Stamps :: Unity Stamp Co - one precious life, brave girl Ink :: Tsukineko - VersaFine sepia; Papertrey Ink - melon berry; Ranger - antique linen, tea dye Cardstock :: Close to My Heart - taffy; Papertrey Ink - kraft, rustic cream Patterned Paper :: Hambly Screen Prints - old lace; Craft Supply - vintage Mozart music sheet Embellishments :: Prima - flowers; Craft Supply - burlap Tools :: Spellbinders - standard circles LG (S4-114) and standard circles SM nestabilities (S4-116), wizard; Janome - sewing machine; Craft Supply - thread; Ranger - tiny attacher; Tattered Angels - glimmer mist (turquoise blue, golden terracotta)
I hope you all enjoy your weekend! Thanks so much for stopping by and take care!
Hi there! In case some of you have forgotten, I call my blog readers "Bleeps" for my "blog peeps." It's just a special little name I made of for all of my blog friends! I can't believe I'm actually back to share another card today. This card has a few of my new favorites, including vintage ensembles, stamps, typewriter fonts.
Instructions
Stamp postcard on aqua mist cardstock, then cut out.
Adhere clear border element on an A2 kraft card front.
Adhere tag to postcard with twine and button treatment.
Stamp label on aqua mist cardstock, cut out, then pop off cardstock.
Stamp sentiment on kraft cardstock, cut out, then pop off label. Add buttons.
Pop postcard off card front.
Supplies
Stamps :: Unity Stamp Company – vintage postcard; Cornish Heritage Farms – on the desk Ink :: Tsukineko – tuxedo black Cardstock :: PTI – kraft, aqua mist Patterned Paper :: Graphic 45 – communiqué collection (communiqué tags) Embellishments :: May Arts – twine; PTI – aqua mist button, true black buttons; Me & My Big Ideas – acetate border Tools :: We R Memory Keepers – crop-a-dile, eyelet
Coming Soon - Next Month
New Releases!
Photography Tips, Tricks, and Techniques (from my perspective) I will do a series of postings from using your DSLR camera, setting up your shots, editing project photographs, organizing saved files, importing photos to your blogs! Are you ready?!
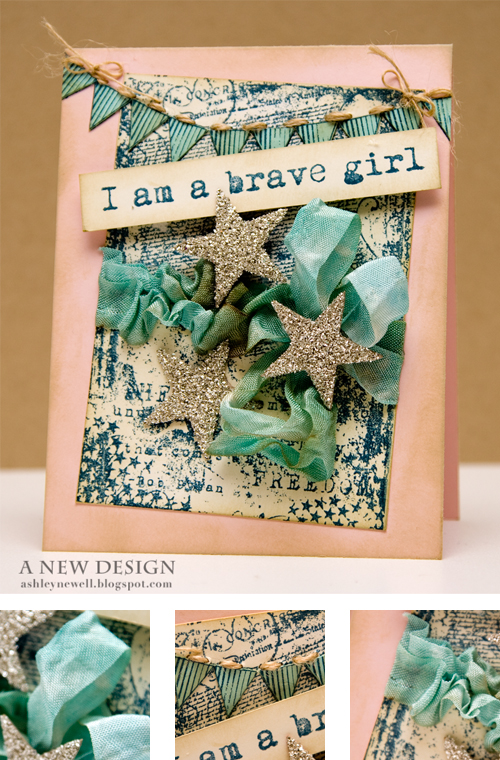
Well, not really me, but that's what this card is all about! Last week, I told you all that I'm working on sending a couple of boxes to soldiers in Afghanistan via a family friend who is currently deployed there. Well, she is soon to return and this card is for her.
She is a brave girl!
I'm not sure if I could have ever been deployed, but she did and I am grateful that she served for me, you, and the rest of our country. We both grew up as military brats and are all too familiar with the military lifestyle, but during times of war it all becomes surreal.
Instead of making a red, white, and blue card, I "pinked" up the blue to make it 'pretty!' I was inspired by The Shabby Tea Room's challenge for the week, which provides that we use stars and stripes. So, here's my card!
Instructions
Trim cream cardstock and stamp background pattern in navy ink.
Add distress ink to the edges.
Ruffle cabbage rose ribbon and tie into a bow.
Adhere at an angle to pink A2 card base.
Stamp banner and flags and paper piece.
Add twine hand stitching.
Stamp sentiment on cream cardstock strip, ink, and pop off card front.
Adhere glitter stars.
Tuts, Tips & Tricks
How to add distress inks to your project to 'age' your projects
Stamps :: Unity - brave girl (sentiment), declare freedom (background); Practicing Creativity Designs - look up Ink :: PTI - enchanted evening; Ranger - old paper Cardstock :: PTI - vintage cream, sweet blush, aqua mist Embellishments :: MemrieMare - cabbage rose ribbon, glitter stars; PTI - twine
But wait, there's more today!
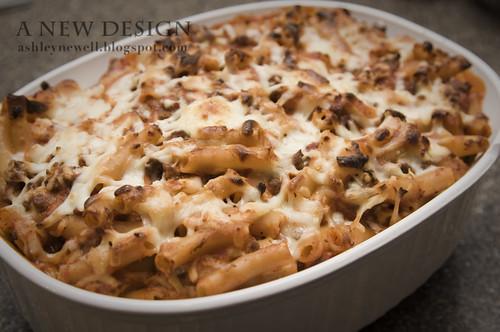
Last night, I made some baked ziti and talked it up on Twitter/Facebook so much that I think some people wanted to see it, so I grabbed my camera and shot a photo! Now, it may look a little dry on top from the melted cheese, but believe me it wasn't in the inside (giggling)! Laura's recipe inspired me to make this meal. However, I cut some corners because I did not feel like stopping by the grocery on my way home from work. I had the bulk of the ingredients and took out the ricotta cheese and replaced sausage with ground beef. I have a small basil plant (LOVE THAT), so I was able to pop a little green in there! So, even with those adjustments, the dish turned out great, plus I have lunch tomorrow! Enjoy and stop by Laura's blog for some fun recipes to try out in your kitchen.
But wait...there is even more!
So, I have a little secret to tell. I really do not eat sweets. I LOVE food, but I usually pass on desserts. I have nothing against them, but when it's dessert time, I usually grab another plate of non-sweet food! However, there are a few desserts I like, such as cheesecake, mango and sticky rice, and strawberry shortcake (with a biscuit).
Now, remember I like to cut corners. I work every day and *need* lots of time to create, so cutting corners is my thing to do, especially during the week. So, I grab some of those Pillsbury individually frozen biscuits to have fresh ones baked within 25 minutes! Now, if I were a true cook/baker, I'd make some on the weekends and freeze my own, but I'm too busy paper crafting and lounging on my sofa...oh yeah and working on Embellish Magazine! I like to pre-make my strawberries, so they are prepared for the week (or however few days it takes to eat 'em). Anyway, here's how I make it:
Ingredients
biscuit(s) 2 scoops (or more) french vanilla ice cream pint of strawberries (cut) 2 cups sugar
Instructions
Cut strawberries and store in a container with LOTS of sugar and place in refrigerator for a few hours. Shake it up here and there while you're getting excited.
Bake biscuits.
Cut biscuit in half, place bottom biscuit in serving dish.
Add ice cream.
Add sugared-down strawberries.
Add biscuit top and more strawberries (and juice).
EAT FAST!
Thanks so much for stopping by today and indulging in one of my favorite blogging moments!
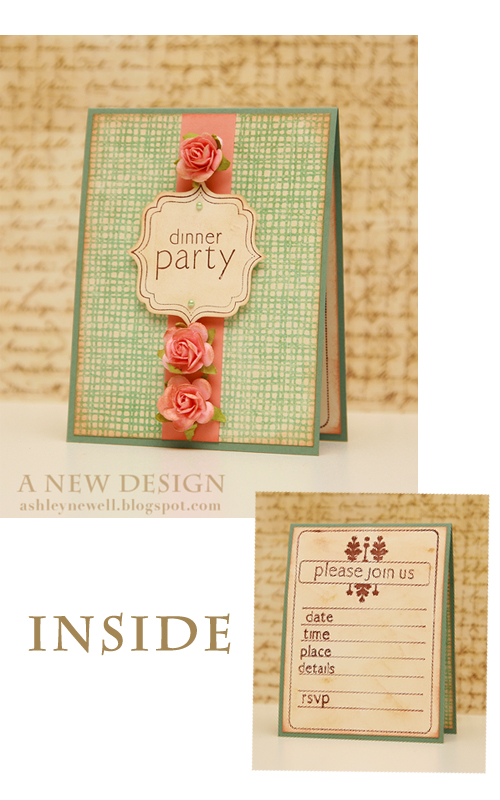
Hey Everyone! I'm so happy that Friday is just around the corner. Today, I'm sharing a quick little dinner invite that you can whip up and send out to your friends. I've been wanting a great, versatile invitation stamp set and Unity Stamp Company made that happen! It's wonderful! When hand making party invitations, you want to make sure they are simple enough to complete them all. I used patterned paper and dressed them up with the flowers. The flowers can be left off and replaced with jewels or pearls for a flatter invitation (for mailing purposes). The options are endless with this set and I thank Unity for creating it for us all to use! This new stamp set was designed just because of my special request! You can do the same thing over at Unity! Check out their blog posting here! The stamp set is revealed!
Regarding envelopes, I have a recommendation. I reviewed the Ultimate Crafter's Companion for SCS last year and really liked their envelope box template. Their template allows you to make a quick and easy envelope that gives you that extra space for bulky cards. Here is my posting about the review here and the SCS link here. At the SCS link, you can find other links directly for the Crafter's Companion. I hope that helps you all with your envelope and shipping woes with those bulky cards! You're probably going to have to pay additional postage, but it's all worth it in the end to send your beautiful hand crafted projects!
I made it a bit vintage. I've been on that trend lately! I wish I could invite you all over for a dinner party. I'd love to that because I love entertaining! It's so much fun to host an event from the planning to the preparation to the big show! Well, this invite will have to work for now!
Thanks for coming by and taking a peek! If you have a chance, hop on over to the Unity forum at SCS to join in on some Hip Hop fun!
Instructions
Create an A2 card base.
Trim patterned paper to 4" x 5.25" and ink.
Trim melon cardstock to about 1" x 5.25" and adhere to patterned paper center.
Stamp label with greeting, cut out, ink, and pop off patterned paper. Embellish with pearls.
Adhere patterned paper to card front and embellish with inked flowers.
On the inside, trim cream cardstock to 4" x 5.25" and stamp invite greeting and ink and adhere!
Supplies
Stamps :: Unity Stamp Co. - soirees and such Ink :: Ranger - antique linen, tea dye; ClearSnaps - colorbox chestnut Cardstock :: PTI - ocean tides, vintage cream, melon berry Patterned Paper :: My Mind's Eye - Ooh La La collection (lah dee dee) Embellishments :: Prima - flowers; KaiserCraft - pearls


 *This scrapbook layout will be published in Scrapbook Trends January 2011*