|
|
 How was your weekend, Bleeps? Mine was good. I relaxed and got a chance to go to the party I mentioned earlier. I was finishing up my card for 2 Sketches 4 You challenge and realized the party had started! So, I had to rush to find an outfit (my original outfit idea was scratched because of the rain and cool air). However, I am glad I got a chance to finish my 2S4Y card because it was selected as the Card of the Week! I'm so excited about that because you know how I feel about sketches; they are a serious challenge for me! This time; however, I did not feel constrained, so perhaps that is why it turned out well in the end.
I'm back today with a card inspired by the Loonie Stampers Challenge. To find more about the challenges, visit Charlene's blog and you can find links to the other Loonies too. I thought I'd pass that along in case you wanted to participate too! This week's challenge is to create a one-layer card. Easy Breezy for me! I like to make no-fuss, one-layer cards because they can be completed in 10 minutes and with a few products. Since fall has started, I made an autumn themed card that focuses on happiness.
Thanks for stopping by and enjoy your Monday and make the best out of it!
Card Instructions - Trim vintage vanilla cardstock to an A2 card.
- Stamp leaves in various inks.
- Stamp sentiment.
:: My Goodies {Happiness} ::Stamps: Verve Visual - happiness found Cardstock: Papertrey Ink - vintage vanilla Ink: Papertrey Ink - summer sunrise + orange zest + ripe avocado + scarlet jewel Card Size: 4.25" x 5.5"

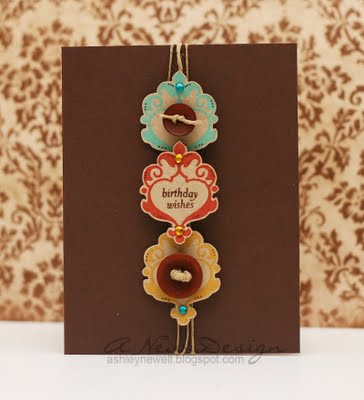
Happy Friday everyone! Today, is Dee's birthday. Happy Birthday, Dee! Are you surprised? So, today's card is inspired by Dee's birthday and this card is made especially for her. It will take some while to get up to Canada, but it's coming (along with Regan's from last month - WHOOPS)!! Please join in on the fun and blog hop around (links are below) to those who are wishing Dee a happy, happy birthday today!
I felt like playing with photography again, so I used a Melissa Frances (Madison) patterned paper as my backdrop. My white counter is used for the 'stage.' I played with angles to show detail. What do you think? I rarely finish the inside of a card, so when I do, I want everyone to see how hard I worked on the inside too! I like to carry in the card design on the inside by using a watermark style in the background of the greeting. Here, I used a Stampin' Up! Bermuda Bay marker to ink my acrylic stamp (yes, it worked) to create the watermark look. Versamark can also work well if you do not have the same color ink.
One more thing...I tore my acrylic stamp (the one used) as I was trying to pull it off of the acetate backing. It was STUCK! So, I pulled and pulled and RIIIIIP. SHOOT! I thought the stamp was ruined. So I inked it up and got a fluent stamped image and kept right on trucking! Does anyone have any stamps out there that stick like this? It's quite annoying because they were all like this. The next time, I will be a little less aggressive in pulling these off, but it is so difficult.
One last thing...for real! Do you see the bottom button and how the twine is knotted? Well, that was by accident, but I love the effect. Here is how you can do it (on purpose, of course). Feed thicker twine/floss through a small button hole. It will cause the twine/floss to unravel and create the jumbled effect! Voila - a new technique (learned by accident)!

Hi there! Thanks for all of your comments on my card yesterday. Today, I am sharing a card inspired by the Loonie Stampers Challenge. I used the design and color palette in the pillow for my inspiration. I did not use to be a fan of a 'tearing tool' thinking you can tear without it. However, I have discovered now that I appreciate the 'perfect' tear and use my tearing tool much more now when I want that effect. It all depends on you. The tool is relatively inexpensive, but not something to run out to purchase.
Last night, I accomplished lots! I was able to get my watermark back! I am so afraid of CS4 that I just stopped using one, as you all may have noticed. Mac helped me create them and gave me great step-by-step tutorial on editing my photos (quickly) and applying a (watermark) brush to the photo. I breezed through lots of photos tonight and now enjoy working in CS4, especially on this huge 24" monitor. I can see every detail in the photo. So, I hope my photos will be enhanced now that I am able to edit them better.
Thanks for stopping by and have a great day.
Card Instructions - Trim ripe avocado cardstock to an A2 card.
- Trim vintage cream cardstock and stamp design.
- Adhere cream cardstock to scarlet jewel cardstock.
- Using a tearing tool, tear the right side.
- Add ribbon, button, and trinket pins.
- Punch scallop circle, stamp sentiment, and adhere under button with a glue dot.
:: My Goodies {thank you} :: Stamps: Papertrey Ink - with sympathy + mega mixed messages Ink: Papertrey Ink - scarlet jewel + ripe avocado + summer sunrise Cardstock: Papertrey Ink - vintage cream + ripe avocado + scarlet jewel + summer sunrise Accessories: Papertrey Ink - scarlet jewel button + ripe avocado ribbon + twine; May Road - leaf trinket pins; Marvy Uchida - scallop circle punch; Creative Memories - tearing tool
Card Size: 4.25" x 5.5"
   Happy Friday! Today is really the BIG DAY! I'm super excited and can't wait to share my experiences and adventures of CHA's first Super Show event with you.
Today's card has a special inspiration sponsored by the Loonie Stampers Challenge ladies. I've been playing along with their challenges for quite a while now and it has been great! Those ladies are dedicated to stamping challenges and help me to keep my creative juices flowing each week. We are celebrating one of the Loonie's birthday today and it's for Regan! Happy Birthday, Regan! I bet you are surprised! So, if you want to start playing along, you can visit any of the Loonie's (linked below). Feel free to make a card for Regan too!
I rarely complete the inside of my cards, by for Regan I did! I shared a photograph with you too! As you can see from my stamping In Bloom and using the patterned paper (strip) there is almost NO difference! Just wanted to let you all know! However, the pattern is slightly smaller on the paper.
Enjoy your weekend and as usual I appreciate your visits, comments, and support!
Card Instructions - Trim melon berry cardstock to an A2 card.
- Stamp card front with In Bloom.
- Trim spring moss cardstock, stamp ballon strings, then add buttons.
- Adhere spring moss cardstock to white cardstock.
- Trim In Bloom patterned paper strip and adhere.
- Adhere focal piece to card front with foam adhesive.
- On white cardstock strip, stamp sentiment, and adhere with foam adhesive.
- On inside, stamp in bloom and sentiments.
:: My Goodies {sending birthday wishes} :: Stamps: Papertrey Ink - everyday button bits + in bloom + birthday basics Ink: Stampin' Up! - white + chocolate chip Cardstock: Papertrey Ink - white + melon berry + spring moss Patterned Paper: Papertrey Ink - in bloom Accessories: Craft Supply - buttons Card Size: 4.25" x 5.5"
 Happy Monday Everyone! Today's card is inspired by Loonie's Stampers Challenge. Sorry, I do not have any photos of the new studio yet, but this weekend was really a lazy one for me. I barely made anything and just felt like lounging! We got an iMac and literally played with it all weekend long! If you have any Mac/iPhone tips and tricks/shortcuts to share, please leave a comment! My first computer was a Mac (years ago), so it will be a bit of a learning curve to readjust. There is some familiarity with the computer, but not with everything. I did get a chance to step out for a bit to the Great American Scrapbook Convention. I picked up a few items that have been on my list for a bit, such as Spellbinders Label 4 dies, Melissa Frances appliques, Basic Grey small chipboard letters, Quick Quotes Amaretto chalk ink, ColorBox inks (becoming my favorite ink now) and a few Copic markers. I think I did fairly well, but went past the budget just a bit! :) I do not know what I am going to do at the CHA Super Show next month! I should only have a gift card to spend to control my budget! Maybe that idea will work! This week is a short work week for me. Looking forward to our trip to New Orleans to attend the Essence Music Festival and photograph Susan G. Komen's Circle of Promise affairs! This should be really exciting. Well, thanks for stopping by today and take time to enjoy yourself (even if it's only for 30 minutes)! Card Instructions- Trim kraft cardstock into an A2 card.
- Trim so saffron cardstock, stamp leaf pattern, heat emboss, tear, and adhere to card front.
- Tie twin around card front and add button and leaves.
- Ink chipboard, stamp polka dot on wing, adhere to card front.
- Stamp sentiment and adhere.
- Draw faux stitching
:: My Goodies {Have a Wonderful Day} ::Stamps: Hero Arts - floating leaf pattern ; Papertrey Ink - out of the box; Art Warehouse - journal Ink: Versamark; Close to My Heart - twilight; Stampin' Up! - white Cardstock: Papertrey Ink - kraft + spring moss; Stampin' Up! - so saffron Accessories: Stampin' Up! - chipboard; Making Memories - button; twine; heat gun; white embossing powder; white gel pen Card Size: 5.5" x 4.25"
 Click here to buy this card How was your weekend? Mine was great! I got a lot of studio time in. Sorry no pictures yet, but it's not completely finished. I have some organizers to hang on the wall and I have not decided where I want them yet. So, I wanted to take my time first before hanging stuff anywhere. Hopefully, next weekend I can have photos for you all to see the new space! Today's card was inspired by Loonie's Stampers Challenge. Most of this weeks cards are inspired by Paper Crafts' Gallery Idol contest. Are you participating? Well, if not, today is the last day to upload your cards to the Flickr Gallery HERE. Sounds like some entertaining summer fun! I have a handful of cards entered in the pool for the initial open 'birthday card' call. I can't wait to see who the winner is at the end of next month! July should be very fun to follow the contest. Enjoy your Monday (if that's possible) and thanks for stopping by today! Card Instructions- Trim smokey shadow cardstock into an A2 card.
- Stamp flowers on spring rain cardstock, then die cut squares.
- Adhere buttons, stamp sentiments, then adhwere to card front.
- Stamp sentiment.
:: My Goodies {Wish, Smile, Enjoy Birthday Wishes} ::Stamps: Papertrey Ink - mixed messages; Inkadinkado - doodle flowers Ink: Papertrey Ink - smokey shadow + vintage cream Cardstock: Papertrey Ink - smokey shadow + spring rain Accessories: Craft Supply - cream buttons Card Size: 5.5" x 4.25"
Happy Monday, everyone! How was your weekend? Mine was very refreshing! I got to spend time in my studio, adding some items (not purchased - just organizing) and even made a few cards. I went to my friend's dinner party at Maggiano's and that was very delicious and fun. Yesterday seemed quite long, but I didn't mind that at all! I enjoyed a hot cup of coffee while some electrical contractors completed a few jobs around the house. I did lots and lots of laundry. I finished the second family room (which is located off of the studio). We were able to enjoy it for most of the day and are loving the new spaces. Mac can watch TV/play video games, while I'm crafting away! I'm glad I'm not in a room all alone anymore! Anyway, here are two cards inspired by the last couple of Loonie Stampers challenges. The colors was very challenging for me, but I finished them (WHEW)! Oh yeah, those bridal pictures I 'modeled' for McArthur are posted here. It may not look like it, but I honestly could barely breathe! Yeah, I got in my wedding dress, but it's nothing like when I wore it on the wedding day. He is a great photographer. I just tried to help him out since he wanted to take some pictures of a wedding gown in a creative way.
 Card Instructions Card Instructions- Trim lavender moon cardstock into an A2 card.
- Stamp background text on aqua mist cardstock and adhere to card front.
- Punch spirals on white cardstock, stamp lines + sentiment, then corner round the edges.
- Tie a ribbon around the white cardstock.
- Stamp "G" and die cut into a circle.
- Die cut a star and adhere to white cardstock.
- Add "G" circle die cut with foam adhesive.
- Adhere white cardstock to card front using foam adhesive.
:: My Goodies {Congratulations G} ::Stamps: Stampin' Up! - great grads; Rusty Pickle - journal stamp Ink: Papertrey Ink - aqua mist + lavender moon Cardstock: Papertrey Ink - white + lavender moon + lemon tart Accessories: Papertrey Ink - lemon tart ribbon; Provo Craft - cuttlebug + concentric star die EK Success - corner rounder; Stampin' Up! - spiral punch; Spellbinders - circle nestabilities Card Size: 4.25" x 5.5"  Click Here to Buy This Card
Card Instructions- Trim smokey shadow cardstock into an A2 card. Trim about 1/4" off the card front.
- Stamp background retro designs on hibiscus burst and lemon tart cardstocks.
- Add smokey shadow strip and adhere altogether.
- Stamp flowers and sentiment.
- Add ribbon.
- Adhere to card front.
- Add cardstock to side of the card front and inside of card (hisbiscus and lemon tart).
:: My Goodies {Wishing you a Happy Birthday} ::Stamps: Papertrey Ink - background basics (retro) + wishing you; Stampin' Up! - pocket silhouettes Ink: Papertrey Ink - smokey shadow Cardstock: Papertrey Ink - hisbiscus burst + lemon tart + smokey shadow Accessories: Papertrey Ink - white ribbon Card Size: 4.25" x 5.5"
 Hey Everyone! How was your weekend? I hope it was great. Today, I am sharing a card inspired by Loonie Stamper's Challenge, which was to use plaid. I created my own plaid design using one of the stamps in Papertrey Ink's Background Basics - Retro set. I spaced the lined stamp and used various ink colors and angles. Plaids can make you feel warm and cozy, so I found this sentiment and added it! What do you think?! Thanks for stopping by and have a great day! Card Instructions- Make an A2 card with dark chocolate cardstock.
- Trim white cardstock into a rectangle and stamp plaid design.
- Corner round one edge and tie ribbon around.
- Trim plum pudding cardstock and adhere to card base.
- Adhere plaid cardstock to card front.
- Stamp sentiment and adhere.
- Stamp heart, cut out, and adhere.
- Using a pen, draw a dotted line along the bottom of the card base edge.
- Corner round bottom right card base.
:: My Goodies {Warm & Cozy}:: Stamps: Papertrey Ink - background basics (retro); Studio G clear stamps (Joanns)
Ink: Stampin' Up! - close to cocoa; Papertrey Ink - plum pudding + berry sorbet + summer sunrise Cardstocks: Papertrey Ink - plum pudding + dark chocolate + berry sorbet + white Accessories: Papertrey Ink - lavender moon ribbon; EK Success - corner rounder; Uniball-signo white gel pen
  This card was inspired by the current Loonie Stampers Challenge. I normally take on the challenge on Sunday, but this week, the challenge was...well...challenging! I did not know what to do! I wanted to use the layout mostly and it was not my usual style, so it was quite difficult. I think I should have just used the colors as inspiration! How do you think it turned out? Sorry, there is no video again. I hope to upload more videos in June. But, I hope you still enjoy the card postings in the meantime. Have a great Wednesday and thanks for your visit. Card Instructions- Make an A2 card with white cardstock.
- Trim core'dinations cardstock, emboss, cut into shape, sand, distress, and adhere.
- Apply stickers and rhinestones.
- Stamp sentiment.
:: My Goodies {Hello, Sunshine}:: Stamps: Papertrey Ink - handwritten notes
Ink: Stampin' Up! - purely pomegranate Cardstocks: Papertrey Ink - white; Core'dinations - vintage collection Accessories: Provo Craft-cuttlebug + spots and dots embossing folder ; American Crafts - fashion accents remarks stickers; KaiserCraft-rhinestones
 Hey there! Here's a quick card inspired by Loonie Stampers Challenge. I needed a birthday card (which will be delivered about a day late), so I was eager to complete this challenge. It's a super simple and quick design because I did not have too many creative juices flowing. We had a jammed-pack weekend and are exhausted. I took a nap, but I really could use an extra day of R&R. I hope I can make the video this week, but it may have to wait until next week. We'll see how the next two days go! Oh yeah, here are some pictures of the twins! Enjoy! I'll share some of the other photos with you when they're completed. Thanks for stopping by! Card Instructions- Trim pacific point cardstock into an A2 card.
- Trim patterned paper to fit top portion of card front and adhere.
- Trim kraft cardstock to fit width of card front and about 2" and punch scallop edge and adhere to card front.
- Add ribbon, button with twine.
- Stamp sentiment.
- Round corners.
:: My Goodies {Happy Birthday To You}:: Stamps: Papertrey Ink-damask designs
Ink: ColorBox-chestnut Cardstocks: Papertrey Ink - dark chocolate + kraft Patterned Paper: Papertrey Ink - friends 'til the end Accessories: Papertrey Ink - pure poppy ribbon; Craft Supply-red twine + button; Stampin' Up!-slot punch; Corner Rounder
 I hope everyone had a Happy Easter! We safely journeyed to Philadelphia and back and had a great trip! We ate at the Continental yesterday for brunch. Cool spot! The twins were so adorable, tiny, and CUTE! I held them, fed them, and even put one to sleep! It was my "first" time! I had NO clue what I was doing, but quickly caught on. Twins seem like so much work, especially when you have an almost 2 year-old running around! I did get to see what their daily life is like. Better them than me! This card is inspired by this week's Loonie Stampers Challenge. The colors were 'babyish' and also involved the use of lace. So, I think that kind of decided the baby-themed card here. I left it with a simple sentiment and I think the card could be for the unknown expecting baby (boy/girl) since the card is pink, blue, brown, and cream. I used PTI's Guidelines 2 to create the pink patterned paper. I chose to stay monotone for a few reasons: (1) the color challenge limited me in choices and (2) my sweet blush + aqua mist inks are running out (I've had them over a year now and they're very light colors, so it's time for reinkers in my next order). Card Instructions- Trim pink cardstock into a rectangle and stamp background design.
- Add aqua mist cardstock to pink cardstock and stamp sentiment at bottom.
- Chalk edges.
- Adhere to an A2 card front.
- Add lace and tie ribbon into a bow.
- Add trinket pins.
:: My Goodies {congratulations}:: Stamps: Papertrey Ink - Guidelines 2; Stampin' Up!- Congrats
Ink: Stampin' Up! - chocolate chip; ColorBox-chestnut roan chalk Cardstocks: Papertrey Ink - sweet blush + aqua mist + dark chocolate Accessories: Papertrey Ink-vintage cream ribbon; Michaels-lace; Maya Road-pearl trinket pins
 Why can't weekends by weekdays and weekdays be weekends?! Wouldn't Mondays be much better? OK back to reality! Today's card is inspired by Loonie Stampers Challenge! The challenge was extended to a background stamped design this week. So, I stamped the polka dots and the flowers! Thanks everyone for stopping by! I won't be able to share my Easter cards with you because I goofed and accidentally deleted them from my camera memory card! UGH! They've already been placed in the mail to their 'owner,' so I'll just have to 'remember' them as they were! I was really excited about them too! Maybe I'll re-make a few. NOT! Have a great day! Card Instructions- Make card base.
- Stamp polka dot background.
- Trim brown cardstock, stamp floral background, and distress edges.
- Tie ribbon around brown cardstock into a bow.
- Stamp bird and cut out.
- Stamp sentiment on a strip of cardstock, adhere to brown cardstock, then adhere bird.
- Adhere brown cardstock to card front and add rhinestones.
:: My Goodies {Heartfelt Thanks}:: Stamps: Papertrey Ink-Polka Dot Basics + Everyday Classics
Ink: ColorBox-Chestnut Cardstocks: Papertrey Ink-raspberry fizz + dark chocolate + ripe avocado Accessories: Papertrey Ink-ripe avocado ribbon; Tim Holtz-paper distress; KaiserCraft-rhinestones
 Hey Everyone! How is your weekend going? Notice I said "going" because there are a few hours left! :) Today, I got a chance to spend some time in the studio making a few cards and filmed my video. I still need to edit it, so don't hold your breath! This card is inspired by Loonie Stamper's Challenge for the week. I needed a get well card and thought the colors were filled a perfect soothing void. Thanks so much for stopping by! I'll 'see' you all in the morning with another card! Card Instructions- Trimmed ocean tides cardstock to 4.25" x 5.5".
- Trimmed spring moss cardstock to 2.75" x 4.5", then stamped floral background.
- Added pom pom trim and ribbon.
- Stamped sentiment on white cardstock, cut out, added bling, and adhered to floral background.
- Adhere green cardstock to card front using dimensionals.
:: My Goodies {feel better soon}:: Stamps: Papertrey Ink-beautiful blooms; Close to My Heart-say it in style
Ink: Stampin' Up-white; Papertrey Ink-ocean tides Cardstocks: Papertrey Ink-white pre-scored A2 card + ocean tides + spring moss Accessories: Papertrey Ink-ocean tides ribbon; Joanns-pom pom trim; Hero Arts-rhinestones
 Hey everyone! I hope your weekend was great. Mine was great. I started and ended it with exercise. Saturday morning was a bike ride and Sunday night was jump rope and Wii Sports! I LOVE my Wii! I should play it more. I know why I don't...I'm too busy crafting! :) So, this card is inspired by Loonie Stamper's Challenge. I used the color combination selected, which was not too bad! I kept it simple, using one of my previous layouts. I wanted a card to express gratitude for someone who was a great hostess when you stayed at their home, regardless if it is a relative or a friend. Being a hostess is a big deal and many times we may take it for granted, so send a card to express your gratitude for all the pre-and-post-cleaning, cooking, chauffering, etc. I hope you all have a great Monday! Card Instructions- Trim cardstock to an A2 size card.
- Trim brown cardstock into a rectangle and raspberry fizz cardstock into a square.
- Stamp images and sentiment.
- Adhere raspberry fizz cardstock to brown cardstock.
- Tie ribbon into a knot.
- Adhere to card front with foam adhesive.
:: My Goodies {For a Gracious Hostess}:: Stamps: Papertrey Ink-With Sympathy + Mixed Messages
Ink: ColorBox-Chestnut Cardstocks: Papertrey Ink-Spring Moss + Dark Chocolate + Raspberry Fizz Accessories: Papertrey Ink-new leaf ribbon; Hero Arts-rhinestones
 What a gloomy weekend we had. It rained just about the entire time. Although I did make a few cards, I pretty much lounged around the entire weekend. But, we all need that from time to time. Today's card is for the Loonie Stamper's Challenge. The colors were a bit of a challenge for me because of the raspberry fizz and the melon berry. I just didn't think they meshed well together. So, why on earth I put them so close...who knows! Anyway, I used Papertrey Ink's Guidelines One (because they just came out with Guidelines Two for this month's release). I kept the card really simple, making it useful for any occasion. I added pink rhinestones for some dimension and bling. Although the stamping takes a little while, it is a very simple and fast card to make. And last, but not least, I started Tweeting on Friday, so you can now follow me on Twitter. See my tweets on the left side of my blog! Join me too! :: My Goodies {Guidelines One}:: Stamps: Papertrey Ink-Guidelines One
Ink: Stampin' Up!-chocolate chip Cardstocks: Papertrey Ink-kraft + dark chocolate + melon berry Accessories: Papertrey Ink-raspberry fizz ribbon; Hero Arts-rhinestones
 The weekend is over already? It went by super fast today because we had to spring forward one hour. It always takes me at least a week to get adjusted to the time change. I hate that! Anyway, this weekend was very encouraging, inspiring, and full of creativity. On Saturday night, I cropped at Scrapdoodles. That store has EVERYTHING in it and I love it! I picked up some great finds that I didn't think existed. Don't you always find stuff when you say I'm not spending any money?! The chipboard flourish and the vintage pom pom trim on today's card were some of the 'hot' new items! This card was inspired by the Loonie Stamper's Challenge for the week. This time, it had nothing to do with colors or layout, but your project must include BUTTERFLIES. I'm not sure if I qualified because I only used one butterfly! I think I must have used the rest in my K&Co embellishment pack! Anyway, this card transformed itself into a vintage feel. At first, the butterfly sat there in the center (with the ribbon/trim) all alone and it was so NAKED! So, I remembered my chipboard flourishes and added one of those. From there, I made it a vintage card and distressed everything. As a side note, does the sentiment on this card make you think of the Golden Girls intro song..."thank you for being a frieeeeeeeeend." Sorry if I put the song in your head now! You all...have a great Monday and thanks so much again for all of your support, encouraging words, and for participating in my Birthday Blog Weekend! Card Instructions- Trim lemon tart cardstock to 4.25" x 5.5".
- Trim brown bitty dot paper to 3.5" x 4.75" and distress the edges.
- Adhere vintage pompom trim to the edge.
- Tie two ribbons around pattern paper.
- Ink chipboard flourish using craft and chalk inks and adhere to polka dot paper.
- Add butterfly and flowers.
- Stamp sentiments, distress, and adhere to card.
- Adhere brown paper to card base using foam adhesives.
- Add rhinestones to flourish.
- Adhere the card front to an A2 card.
:: My Goodies {thank you...friend}:: Stamps: Papertrey Ink-remember
Ink: Stampin' Up!-white; ColorBox-chestnut Cardstocks: Papertrey Ink-lemon tart Pattern Paper: Papertrey Ink-dark chocolate bitty dots Accessories: dimensionals; Papertrey Ink-lemon tart ribbon; Prima-vintage pom pom trim; K&Co-Wild Saffron felt stickers; Tim Holtz-paper distresse; Maya Road-chipboard scroll; KaiserCraft-rhinestones
 How was your weekend? Mine was great and was not as expected. Does that happen to you? I thought I needed much rest for my knee, but it was not as bad as I thought and now just has minor bruising and the scrapes. It's still sensitive to the touch, but like any bruise you may have, you just say, "OUCH!" and move on. So, instead of working on the baby scrapbook (like I should have - I only finished one page), I went to a dance competition in DC and also helped Mac with his photography business. I made a handful of cards that I'll share with you this week. I'm saving them because I know I'll be working hard on that baby book I barely started. Did I ever tell you all that I'm a procrastinator and most times like working that way...under pressure. Somehow, that motivates me to move FAST! Anyway, I'm enjoying the Oscars and routing for Slumdog Millionaire and Benjamin Button because I thought they were good and well, they were the only movies up for awards that I saw besides the Dark Knight and Hancock. :) This card is for Loonie's Stamper Challenge. We were challenged to use kraft cardstock, a shade of pink and NO RIBBON! OUCH! I think that hurt worse than my knee!! I love ribbon and even double it up on some cards, so I made this very basic back-to-school card, wishing a student or educational faciliator the best for the school year (a girl of course)! I slightly cheated with the paperclip because it has a little cream on it, but I thought the paperclip was a good addition to a school-themed card. Have a great Monday! How to Make it:- Trim kraft cardstock to 4.25" x 11" then score at 5.5".
- Trim raspberry fizz cardstock into a square, then dry emboss.
- Stamp apples on sweet blush cardstock, then cut out and adhere to raspberry fizz cardstock using dimensionals.
- Adhere raspberry fizz cardstock to kraft card base with dimensionals.
- Add paperclip.
- Stamp sentiment.
:: My Goodies {best wishes apples}::Stamps: Hero Arts - four apples; Verve Visual - wonderful wishes Ink: Papertrey Ink - raspberry fizz Cardstocks: Papertrey Ink-kraft + sweet blush + raspberry fizz Accessories: dimensionals; cuttlebug; provo craft - swiss dots embossing folder; corner rounder; making memories - paper clip Card Size: 4-1/4 x 5-1/2
 Happy Birthday, Mommy! This posting is dedicated to my mother whose birthday is today! We celebrated this weekend with dinner at SweetWater Tavern and a movie - Slumdog Millionaire. The food was fabulous and the movie was OUTSTANDING! Mac and I love SweeWater and decided to share it with her and she soon realized why we rave over it! The food and service is like no other. No wonder there is almost always a wait (good thing we phoned ahead because our wait time was nearly 2 hours) and no carryout order policy!! As for the movie, normally I do not like the award winning/nominated films, but this one I really enjoyed. If you have not seen it already, well please try; it's worth every penny! I haven't seen a lot of movies, but I think Slumdog beats Benjamin Button! This card was inspired by the Loonie Stamper's Challenge colors of lemon tart, dark chocolate, raspberry fizz, and plum pudding. When I saw the colors, I thought that there was no way I could make card with those colors. I ended up liking how it turned out, but more importantly, so did my mom (well at least she said she did)!!! So, will you make a card with these colors? Well, here's how I made this one: Instructions- Make card base by trimming cardstock to 4.25" x 11" then score at 5.5"
- Stamp damasks in a pattern on card base.
- Trim raspberry fizz cardstock into two different strips and adhere to bottom of card base.
- Tie ribbon around card base.
- Adhere flowers and dew dots over damask pattern.
- Stamp sentiment.
:: My Goodies {Happy Birthday, Mommy} :: Stamps: Papertrey Ink-Birthday Basics; Inkadinkado-Bold Damasks Ink: ColorBox-Chestnut Cardstocks: Papertrey Ink-lemon tart + rapsberry fizz Accessories: Making Memories-flowers; Robin's Nest-dew dots; Papertrey Ink-plum pudding satin ribbon Card Size: 4-1/4 x 5-1/2
 TGIF!! This card uses some bling for this week's Loonie Stamper's Challenge. I also combine it with K. Werner's Color Challenge (again). I do not know why I selected these colors again, but it started out with me thinking that the bling will show up best on dark cardstock, so I went for black and the rest is history! Once I found out the Loonie Challenge, I sketched out an idea on paper. I normally do not do this, but for the past few weeks, I have been sketching card designs. This card transformed many times. I had to remove the scalloped square focal point a few times because the first time, I stamped the sentiment REALLY crooked (RE-DO), then the second time, I thought that the swiss dots embossing was needed...bad! So, I took my time, trying not to get frustrated and finally finished! Does anyone have these Heide Swap bling frames? Well, to me they are very hard to center on your cardstock, especially if you are trying to fit in a scalloped square! I worked with that about 4 times, finally to get it on and centered enough! Is there some other technique I should know about? If so, please share!! Well, I hope you all have a good weekend and take a look at the Loonie Stamper's Challenge and K. Werner submissions!! How did I make that? - Trim yellow cardstock to 4.25" x 11", then score at 5.5".
- Dry emboss top portion of the card base.
- Stamp sentiment on the bottom of card base.
- Tie ribbon around card base in a bow, then set aside.
- Die cut scalloped square.
- Adhere bling square to scalloped square.
- Stamp hearts on cardstock (the red heart is clear heat embossed) and cut out.
- Adhere hearts to scalloped square.
- Stitch button to flower and adhere to heart.
- Adhere scalloped square to card base.
:: My Goodies {anniversary bling}::
Stamps: Papertrey Ink-heart prints
Ink: Stampin' Up!-basic black; Close to My Heart-black
Cardstock: Papertrey Ink-pure poppy, spring moss; Stampin' Up!-so saffron; American Crafts-black
Accessories: SEI button; Bazzill-floss; Spellbinders-scalloped square nestabilities; cuttlebug; swiss dots embossing folder; American Crafts-felt flower; sheer white ribbon; Heide Swapp-bling frame
Card Size: 4.25 x 5.5
 Hi...how was your weekend? Mine was very relaxed. I hope today I'm able to do a little more crafting than I did this weekend. Last night, I did clean up my craft room significantly and organized my file cabinet to store my scraps. I'm finding that it's working really well for me and I'm actually placing the scraps in their proper location after each project! I'm using all of my scraps when I need a piece of this or that color. I highly recommend this organization idea to use all of your cardstock. For my pattern paper, I still dump that in a large photo box. For some of my pattern paper, I return to a Creative Memories paper organizer (I can't link it because I don't think it's available anymore. I can't find it). This card's colors are based off of Loonie's Stamper's Challenge. They're very fun and easy to work with! I really like it for a Valentine's card. I wanted to work with Papertrey Ink's new Heart Prints, which I won! Now, I need a couple of heart punches because I'm not too good at cutting these hearts out like I thought I would be! Anyway, this card is fairly simple (minus the heart cutting), but would be really simple if you have the punch. I added the double-ribbon, which I really like to incorporate into my cards. I just hate that I use so much ribbon! I've had the linen vellum for a while but forgot to use it. I really like it because it's heavy-weight and you can stamp on it and it adds texture. Is that enough reasons?! Happy MLK Day! Here is how you can make this exact card in less than 10 steps: - Make card base by trimming green cardstock to 4.25" x 11", then score at 5.5".
- Trim vellum to 3.5" x 3.25".
- Trim brown cardstock to about 3.75" x 4", then scallop edge punch the bottom.
- Stamp hearts using watermark ink and emboss with clear embossing powder.
- Cut or punch hearts, then adhere to vellum using dimensionals.
- Adhere vellum to brown cardstock.
- Tie pink ribbon around brown cardstock.
- Adhere brown cardstock to green card base using dimensionals.
- Stamp sentiment and hearts on bottom center of card base.
:: My Goodies {be mine}::
Stamps: Papertrey Ink-Heart Prints
Ink: Versamark; Stampin' Up!-Chocolate Chip
Cardstock: Papertrey Ink-linen vellum, dark chocolate; Stampin' Up!-Kiwi Kiss
Accessories: dimensionals; Papertrey Ink-raspberry fizz top notch twill ribbon; scallop edge punch; clear embossing powder; heat gun
Card Size: 4.25 x 5.5
|
|