After December 4, 2010, all future posts are on a new site. Please subscribe to my NEW feed at www.ashleynewell.com or click below to subscribe to the NEW feed.
Hey there! I hope you've had a great week! To end it off, I'd like to share this autumn card. I used patterned paper, which I am super proud of since I usually ignore my stash! I wanted to create a fall card since it's finally starting to feel like autumn in the DC area. We have had a few weeks where it was unseasonably warm, but I'm not complaining because I really enjoy warm weather! But, I also like to switch up my wardrobe and I was getting sick of those tanks or dressing for a cool morning and a hot afternoon! I think it's finally time to switch my drawers - from my summer to my winter fashion collection (haha collection)!
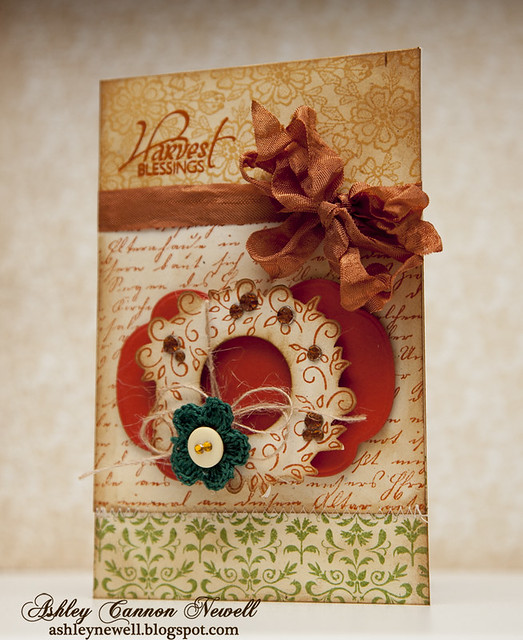
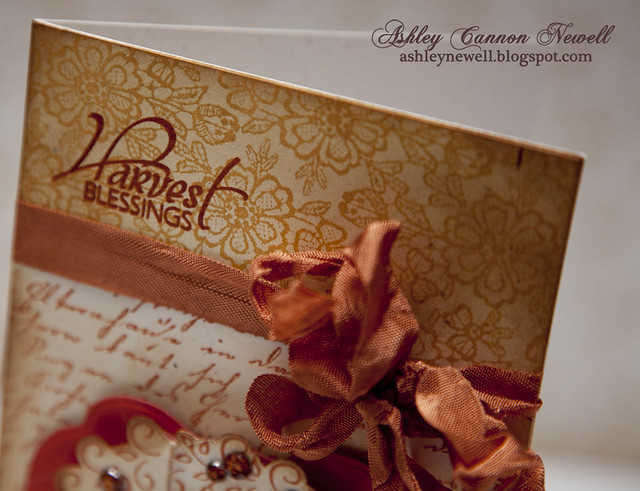
I stamped the sentiment in a deep red ink about 3 times, then overlayed the same sentiment with a brown ink. Yep, then stitched right over that "S!" :)
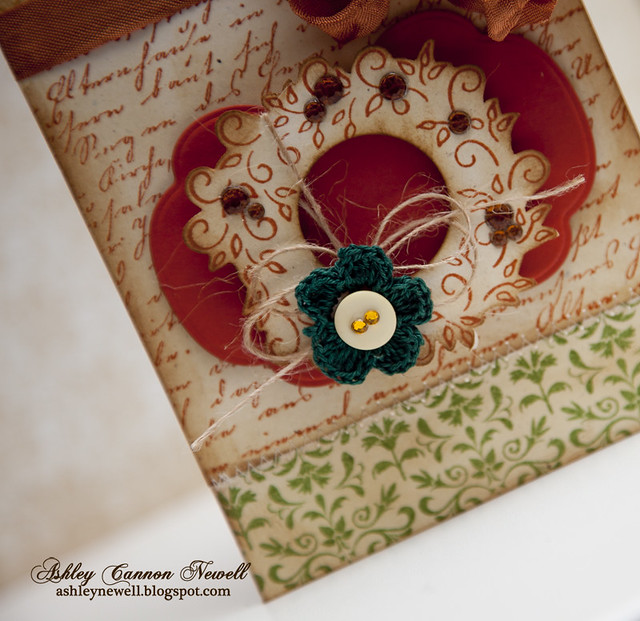
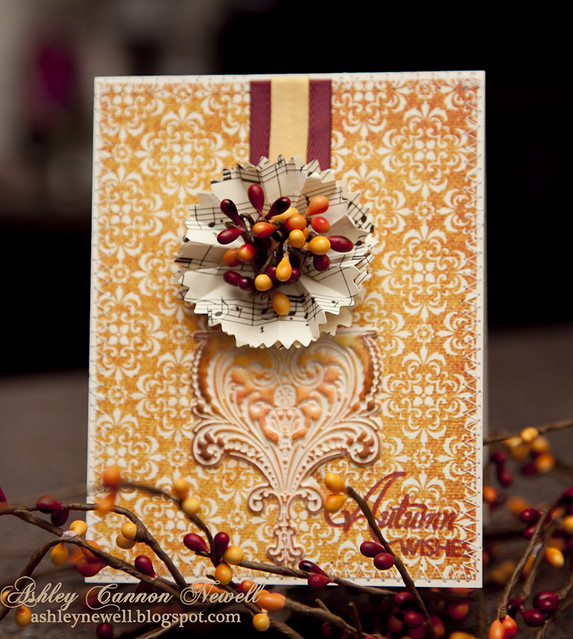
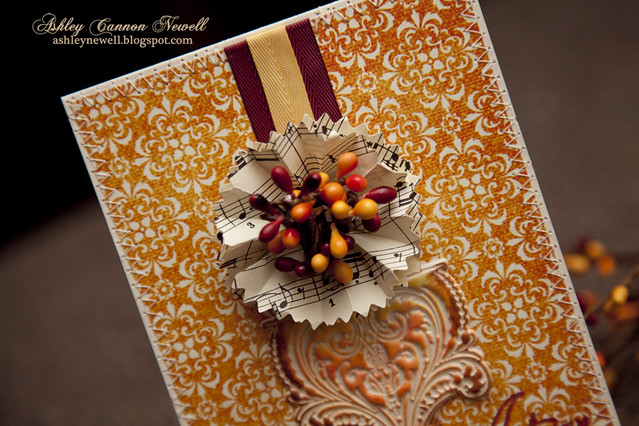
I die cut two pinking circles with a circle die cut in the center, then I cut it to create an opening and accordion folded it and attached the second one and somehow flipped it to create a double "wreath."
I used a Pink Paislee artisan element and inked it with chalk and dye inks to highlight the embossed detail.
Instructions
Trim patterned paper to .25" x 4".
Die cut pinking circles and create accordion wreath. Adhere to patterned paper center.
Trim spray and adhere to center of accordion wreath.
Trim twill tape and adhere to card front.
Ink artisan element and adhere to card front.
Stamp sentiment.
Adhere patterned paper to card front and add stitching
Supplies
Stamps :: Verve Stamps - harvest blessings Ink :: Clearsnap - ColorBox chestnut roan, berrylicious Cardstock :: Papertrey Ink - rustic cream Patterned Paper :: Pink Paislee - 365 degrees collection {daydream) Embellishments :: Pink Paislee - artisan elements ornaments; Papertrey Ink - scarlet jewel twill tape, summer sunrise twill tape; Craft Supply - berry spray, music sheet paper Tools :: Spellbinders - S4-114 standard circles LG, S4-172 small pinking circles; GC-001 grand calibur; Janome Sew Mini - sewing machine __________________________________________________________________
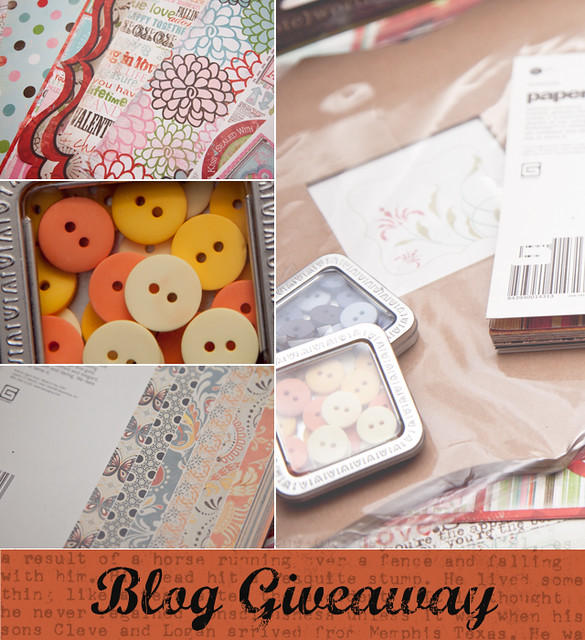
Prize Contents
Bo Bunny Cardstock Stickers (Love is all + Adore) 12 z 12 Stickers (Persuasion Combo Stickers) 12 x 12 Patterned Paper (2 sheets - Persuasion Stripe, Dot, Forever Die Cut, Cut Outs) (1 sheet - Persuasion, Moments, Love Notes, Blooms) (9.5 x 12 scrap Persuasion My Sweet)
Basic Grey Ambrosia 6 x 6 Paper Pad
Maya Road Buttons (Rain + Sunshine
Making Memories Noteworthy 8 x 8 plain mini album with 12- 8 x 8 heavy cardstock pages
Hey Bleeps! Happy Friday! This week sparks a new Embellish Color Challenge! It's all about vintage, so get out your distress inks, doilies, crocheted trims, and other antique elements to participate. There's a great fall color palette to follow as well. I hope you take some time to participate! Our sponsor is Pixie Petals, an etsy shoppe with lots of fun vintage embellishments.
Here's how I made this card, which took about 6 hours to make!
Instructions
Trim cream cardstock strip and stamp lace background in yellow ink, then add distress ink and adhere to card front.
Stamp text background on cream cardstock block in rust in, add distress ink, and adhere to card front.
Trim another cream cardstock strip and stamp antique background in green ink, add distress ink, and adhere to card front.
Add ribbon and stamp sentiment. *TIP* To make that ribbon full, I tied three bows using the long tails leftover!
Die cut and emboss label, then adhere to card front.
Stamp wreath on cream cardstock in rust ink, cut out, then die cut center circle. Add distress ink and rhinestones.
Tie twine around wreath and add flower treatment. Adhere to card front center with foam adhesive.
Add stitching to last border on card front.
Supplies
Stamps :: DeNami Design - leafy vine wreath; Verve Stamps - harvest blessings; Hero Arts - lace background, old letter writing, antique flower background Ink :: Ranger - antique linen, vintage photo; Close to My Heart - autumn terracotta, topiary; Clear Snap - ColorBox ochre Cardstock :: Papertrey Ink - rustic cream, terracotta tile Embellishments :: Pixie Petals - crocheted flower, ribbon; Kaisercraft - rhinestones; May Arts twine; Papertrey in - lemon tart button Tools :: Spellbinders - S4-290 labels fourteen, S4-116 standard circles sm; G-001 grand calibur; Janome - sewing machine (sew mini) Card Size :: 4.25" x 6.5" (yep, it's tall, but will fit great in a 5" x 7" envelope)
I hope you all have a fun, yet restful weekend! Enjoy and take care! Thanks so much for your visit!!
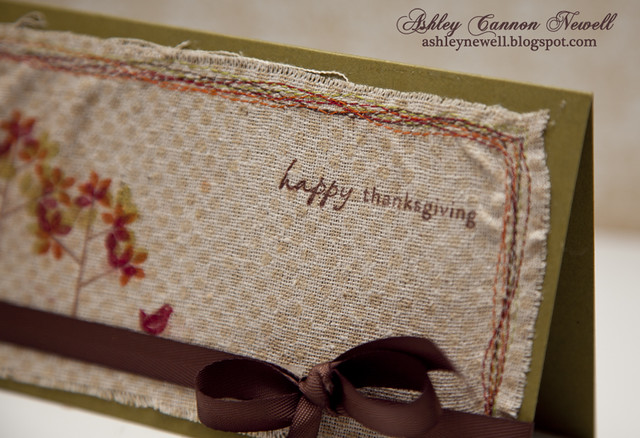
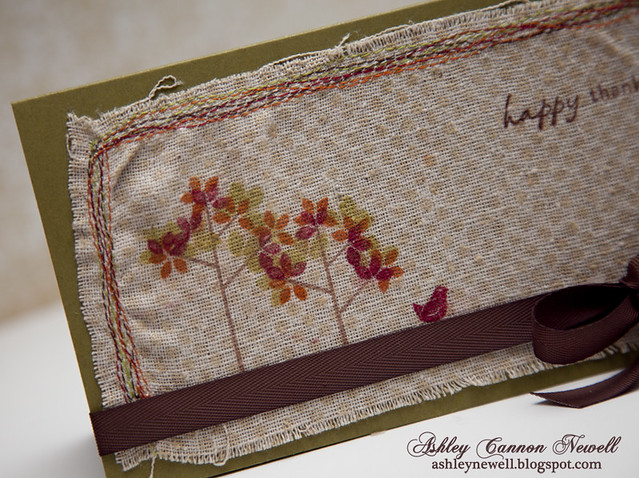
Hey Everyone! It's Friday Eve and I'm excited about that because the weekend is right out the corner. I've been wanting to participate in Waltzingmouse Stamps' sketch challenges again, but just can never find the time, until this week. So, here's my card I created using the sketch. I was inspired by so many designs using the Teeny Trees stamps set, that I felt compelled to use mine. I just used fabric as my focal point, instead of cardstock.
So, have you all started making your holiday plans? I'm not sure what we're doing for Thanksgiving just yet, but I'm sure it's going to involve eating! I did put up a couple of fall things around the house, like my {fake} wheat centerpiece and front door wreath. I like shopping at Marshall's and Home Goods for seasonal items and boy did they have a lot! The Home Goods store was full of Christmas decor and I can't wait to go back to get some new stuff to replace some old! :) So, do you use the same holiday decor every year, add a few pieces to your collection, or start over completely? Starting over is probably a bit extreme, but some of the pieces that I purchased five years ago just isn't my style anymore and I'm ready to chuck it! I'll probably donate it. Oh My...while writing this post, I looked up on a bookcase and noticed one of those CHRISTMAS pieces...why is it still there? All year long? haha OKAY it's really going this year! :)
Instructions
Trim muslin, stamp polka dotted background, trees, leaves, and sentiment.
Add stitching, then run through Creatopia and adhere to card front.
Hey there, Bleeps! Happy Hump Day! It's time for another video. I spared you with a Halloween card today since I created one to share yesterday and made an autumn card instead.
How was your weekend, Bleeps? Mine was good. I relaxed and got a chance to go to the party I mentioned earlier. I was finishing up my card for 2 Sketches 4 You challenge and realized the party had started! So, I had to rush to find an outfit (my original outfit idea was scratched because of the rain and cool air). However, I am glad I got a chance to finish my 2S4Y card because it was selected as the Card of the Week! I'm so excited about that because you know how I feel about sketches; they are a serious challenge for me! This time; however, I did not feel constrained, so perhaps that is why it turned out well in the end.
I'm back today with a card inspired by the Loonie Stampers Challenge. To find more about the challenges, visit Charlene's blog and you can find links to the other Loonies too. I thought I'd pass that along in case you wanted to participate too! This week's challenge is to create a one-layer card. Easy Breezy for me! I like to make no-fuss, one-layer cards because they can be completed in 10 minutes and with a few products. Since fall has started, I made an autumn themed card that focuses on happiness.
Thanks for stopping by and enjoy your Monday and make the best out of it!
TGIF!! Today's posting is a first for me! I'm participating in 2 Sketches 4 You challenge this week. I love challenges, but sketches are a real challenge for me. I stared at this card forever and asked Mac about it about 5 times. I'm sure he was sick of it! He did help a bit because I moved the twine down just a tad and it made the layout look a little better (to me, at least)!
So, while I was on my way to pick up Macwell (Mac's nickname because people tell him he looks like Maxwell, the singer) and was a bit early, soooooo I stopped at one of my LSS to waste some time! I picked up a few goodies you see used here, like the glitter paper and that felt sticker! I got a few other things too. I may do a video of it, but you all may think that's boring now! Who cares what I buy, right?! Well, I ended up still being early because I had to wait in the cell phone area. So happy Mac is back...big sigh! We talked and talked and talked and talked. Boy, he can talk! Tomorrow is his b-day...OMG I forgot to do a card...seriously as I am typing this it hit me that I didn't make one. I sure hope I have time to sneak one in tomorrow night! Anyway, I was saying make sure to check back tomorrow for a special posting - but of what without a card, silly! I'll do one - I have to because he'll be expecting it that's for sure!
By the way, my card was inspired by Lori Roop on 2S4Y DT! Love your work, Lori!
I hope you have a great weekend! I'm sure we'll be doing something worthy for the birthday boy...I mean man! :) Thanks for visiting!
Card Instructions
Trim kraft cardstock to a 4.25" square card.
Die cut circle on glitter paper and adhere to card front.
Draw faux stitching.
Ink edges and add twine.
Add felt sticker.
Stamp sentiment. (TIP: Acrylic stamps can be bent, so bend them to make the image fit your layout.)
Set eyelets.
:: My Goodies {autumn} ::
Stamps: Papertrey Ink - first fruits
Ink: Stampin' Up! - chocolate chip
Cardstock: Papertrey Ink - kraft + Chai
Accessories: Papertrey Ink - twine; Corner Chomper; Uniball - white gel pen; Basic Grey - woolies felt sticker; Crop-a-dile + eyelets; Spellbinders - circle nestabilities; Cuttlebug
Hey there! It's Wednesday already!! Gotta love those four-day workweeks because the week goes by just a tad bit faster! Today, I'm sharing a sneak peek of Tracy Schultz's new stamp set from her The Petal Press collection. This stamp set will be available Wednesday, September 16 at I Heart Papers!
Since school has started back just about for everyone, it's about that time to transition into fall, believe it or not. It's perfect timing for this new stamp set. Check out that sentiment! Isn't the combination of the fonts really nice? What about the pumpkin? Think about all of the ways and color combinations you can stamp this image! I simply stamped the image and colored using Copic markers. I'm such a beginner at coloring, but I will say this, Copics are fairly easy to work with once you practice once or twice. You definitely should have a blender pen and then just color! It seems hard to make a mistake, unless you color outside of the lines (like me)! But, the blender pen forgives many accidents!
I decided to make this design clean and simple and will pop it on over for SCS CAS challenge this week because it involved making a project POP with dimension! The focal image is popped off of the card base, so I thought it was fitting for this week's challenge!
Thanks for popping in today! I hope you have a great Wednesday. Remember to take some time and enjoy yourself (even if it's for 5 minutes)! Check back next week for more sneak peeks and the full reveal!!
Card Instructions
Trim plum pudding cardstock to an A2 card.
Trim rustic white cardstock with decorative scissors.
Stamp image and color.
Add rhinestones.
Stitch around image and ink edges, then add ribbon and set aside.


 Thanks so much for stopping by and taking time to enter! Have a fabulous weekend!