|
|
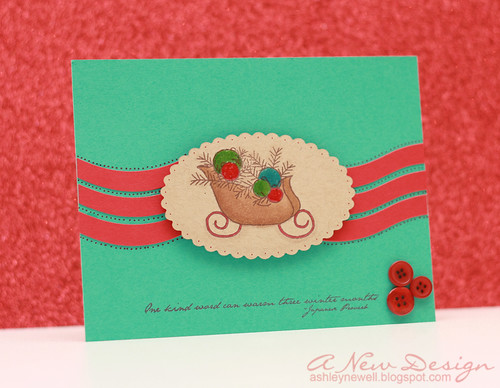
 WOO! It's already Hump Day and I'm happy about that!! Today, I am sharing a card using Tracy Schultz's The Petal Press stamp line, Sleigh Ride. I decided to try out Card Positioning System's sketch for the week (CPS139). I thought it was interesting with the wavy lined background! Ric Rac trim would also look great back there, but I didn't have any that matched my design, so I used a curvy paper trimmer and good old cardstock to create the design! It looked so plain, so I doodled a bit, adding dotted lines, which gave it a little bit more pizazz I think!
Thanks for stopping by!
Instructions - Trim turquoise cardstock to an A2 card base.
- Die cut scallop oval.
- Stamp sleigh image and color.
- Add glossy accents to ornaments.
- Trim red cardstock into curvy strips and adhere to card front.
- Add scallop oval die.
- Doodle.
- Stamp sentiment and add buttons.
Supplies - Stamps :: The Petal Press - sleigh ride
- Ink :: Stampin' Up! - chocolate chip; Copic - markers
- Paper :: Stampin' Up! - bermuda bay; Papertrey Ink - kraft, pure poppy
- Embellishments :: Papertrey Ink - buttons
- Tools :: Spellbinders - scallop oval nestabilities; Provo Craft - cuttlebug; Creative Memories - curvy trimmer
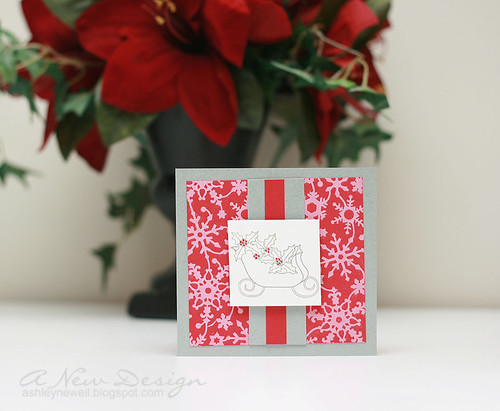
 Happy Hump Day, Bleeps*! Today, I have a special blog candy for you! I'm giving away one of Tracy Schultz's new Sleigh Ride stamp sets!! The card is a mini, measuring 4" x 4.25" and perfect to stash in holiday gift bags or on top of those famous fruit baskets! I kept the design simple and focused on holiday colors and themes so it can be given to anyone regardless of their religious affiliation. The photo does not depict the letter press technique I used with the Spellbinders Impressabilities, but you will just have to believe me when I say it's there. What I mean by it, is the embossed patterned with the white ink overlay. This is such a neat technique and you may find a tutorial on Splitcoaststampers by Beate!
Blog Candy Details
Contest Starts :: Wednesday, October 21, 2009 at 12:30 am EST Contest Ends :: Wednesday, October 21, 2009 at 11:59 pm EST One comment per person (unspecified)
Instructions - Trim silver cardstock to 4" x 4.25" and set aside.
- Trim red cardstock to 3.5" x 3.75", then emboss (see tutorial link above).
- Mat red cardstock on silver cardstock.
- Trim silver cardstock to 1.25", then adhere a .5" strip of red cardstock on top and adhere to card front.
- Stamp image on white cardstock and color berries with marker.
- Adhere image to card front with foam adhesive.
- Adhere entire card front to a pre-cut red card base.
Supplies - Stamps :: The Petal Press - sleigh ride
- Ink :: Papertrey Ink - smokey shadow; Stampin' Up! - white, real red marker
- Paper :: Papertrey Ink - pure poppy, white, silver shimmer
- Tools :: Spellbinders - wizard, snowflake impressabilities
*Bleeps = blog peeps

Hey there! I'm back for my last minute Friday post! We all know how time flies, so this card depicts just that, especially during the holidays. At first, the holidays are approaching, then it's here, and all of a sudden it is over! So go pick up your Sleigh Ride stamp set by Tracy Schultz's The Petal Press line at i {heart} papers so you can make cute sleigh holiday cards!


Giveaway
I have two Paper Crafts magazines to give away to two blog readers! The magazine is the current November/December 2009 issue and features a lot of holiday cards and the Stamping Royalty winning cards too! I have two cards in this issue, so you have to check this one out! Here are the details:
How to Enter the Giveaway
Enter this giveaway by leaving one comment about the Sleigh Ride stamp set or any story about sleighs during the winter season!
Giveaway Timeline
The giveaway will be available the entire weekend from the blog post time through Sunday, October 18, 2009 at 10:00 PM EST.
Giveaway Winners
Winners will be announced on Monday's blog posting!
Enjoy your weekend and thanks for stopping by!
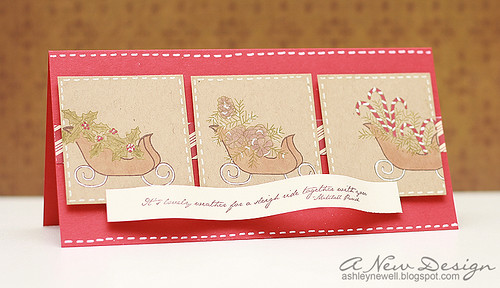
Instructions - Trim pure poppy cardstock to 7" x 3.5".
- Trim three squares and stamp images.
- Color images and add faux stitching.
- Add a strip of striped patterned paper to card front.
- Adhere squares to card front with foam adhesive.
- Stamp sentiment, then adhere with glue dots in a wave.
Supplies
Ink :: Stampin' Up! - chocolate chip
Well, the time has arrived! You may order The Petal Press Sleigh Ride stamp set today! Tracy has made another cute set, but this time for the Christmas holidays that features a sleigh with multiple combinations. Build your own sleigh or use the other images alone! The options are here. I'll be back later today with another sample featuring this stamp set, so make sure you come back. I just wanted to share the entire set with you and let you know you can purchase it now! It is only $10! 
 WOOH WEEEH It's Friday and boy am I am excited about it! Guess what?! Tracy has designed a new stamp set for her collection The Petal Press! Today, I am sharing a sneak peek of the new stamp set, called Sleigh Ride. It is another stamp-building set with various options and possibilities and I used just one of them here! So, what do you think? I'll be back next week with another design using this great stamp set and you will be able to buy it too!
Enjoy the holiday weekend and thanks for visiting!
Instructions - Trim dark chocolate cardstock into an A2 card by trimming an 8.5" x 11" cardstock in half landscape.
- Trim patterned paper, ink edges, and adhere to card front.
- Add stitching.
- Stamp image on white cardstock, color and doodle, then ink the edges.
- Die cut squares on patterned paper and white cardstock, then mat using foam adhesive.
- Adhere square to card front.
- Tie ribbon around card front into a knot.
- Add dew drops.
Supplies - Stamps :: The Petal Press - sleigh ride; Papertrey Ink - mixed messages
- Ink :: Stampin' Up! - chocolate chip; Copic markers; Uniball - gold metallic gel pen; Papertrey Ink - chamomille
- Paper :: Papertrey Ink - dark chocolate + white; Basic Grey - winterberry
- Embellishments :: May Arts - burgundy ribbon; dew drops; sewing machine; thread
 Hey there, Bleeps! I'm back today after a very productive night. Here is a card using Tracy's Happy Harvest set, which is now available over at i {heart} papers. I really like the font for the sentiments. I used a unique color palette and all inspired by the Basic Grey patterned paper. The layout is this week's featured sketch on Splitcoaststampers (SC248).
Don't forget to check out Embellish magazine's site for a wrap up of the Polka Dot Paradise Color Challenge.
Have a great Friday Eve and thanks for stopping by!
Card Instructions - Trim smokey shadow cardstock to an A2 card.
- Trim patterned paper and adhere to card front.
- Stitch around patterned paper.
- Trim orange cardstock into squares and stamp images and sentiments.
- Adhere orange squares to card front with foam adhesive.
- Color image and add rhinestones.
:: My Goodies {give thanks} ::Ink: Papertrey Ink - smokey shadow; Copics Accessories: Janome Sew Mini; thread; KaiserCraft-rhinestones Card Size: 4.25" x 5.5"
 
Hey there, Bleeps (my new term for Blog Peeps)! I have another project to share with you using Tracy's Happy Harvest set, which is now available over at i {heart} papers. While drafting this post, there were only 18 left in stock, so hurry up and dump one in your cart and keep on shopping for papers, ribbons, and nestabilities while you are there!
I wanted to show a little diversity with the set and use it for the Christmas holidays as well. Hurricane vases are used during many holidays, so I thought it was worth the try. The wheat may be a little bit of a stretch, but just think of it as that greenery used during Christmas time! ;)
How I did it and What I Used
I created a simple menu card in Photoshop CS4, printed it on cardstock, then I mat it on ripe avocado and pure poppy cardstocks. I stamped the image, colored it, added rhinestones, and cut it out. Then, I adhered it to the menu card with foam adhesive. The striped background is supposed to replicate a napkin, but is actually patterned paper by October Afternoon.
I also made a place card using Spellbinder's Label 1 nestabilities. I die cut the largest die in pure poppy, then the next size down in ripe avocado. Then, I scored and folded them in half and adhered them together. After stamping and embellishing the image, I added it to the place card. Using PTI alphabet stamps, I personalized the place card with a name (a favorite name of mine)! To finish it off, I added a few rhinestones to create balance.
Giveaway
Yep, you read that right, another giveaway today! What's up for grabs? Tracy's Happy Harvest stamp set! Please leave a comment today on holiday plans, decoration ideas, how much you love this stamp set, or this project. Contest is NOW CLOSED. Here is something new. You may comment as many times as you want! So, if you really want this stamp set, comment away! I'll announce the winner on Thursday's blog post by random number generator! Good luck and start commenting!
The Paper Crafts magazine subscription winner is Maureen said...I've been eyeing up this set!! You did an awesome job with it :) September 22, 2009 5:35 AM. Congratulations Maureen, please send me an email (located on the left side of my blog sidebar) with your full mailing address so that I can add it to my renewal notice. Thanks everyone for commenting and watching my video! I have plans to do more in the future. I know I have said this before, but I am making progress to make it possible. There is a lot that goes into making videos and I want to make sure they're up to par! I'll share my video secrets once they're finalized because I hate secrets! :)
 Hey there everyone! Today is the big day for Tracy Schultz and her new stamp line The Petal Press! Happy Harvest is now available for purchase at i {heart} papers. It is a high-quality clear stamp set and only costs $10. So, if you're looking for a fall set that will take you into Thanksgiving, this set is it! I have designed a card to share with you to get your mojo flowing on what you can create with this stamp set. There are so many options because the set is extremely versatile by allowing you to change the flower arrangements.   Need more ideas? Here is a tip ship on the various combinations to use this stamp set. Let me count the ways...better yet, you can just look at them here:  Card Instructions - Trim rustic white cardstock to an A2 card.
- Stamp images, color, cut out and set aside.
- Trim burlap and stitch on brown cardstock.
- Tie ribbon into a bow.
- Stamp sentiment, then add a tag using twine.
- Adhere focal point to card front.
:: My Goodies {give thanks} ::Ink: Stampin' Up! - chocolate chip Cardstock: Papertrey Ink - rustic white + dark chocolate
Card Size: 4.25" x 5.5"
  Hey there! It's Wednesday already!! Gotta love those four-day workweeks because the week goes by just a tad bit faster! Today, I'm sharing a sneak peek of Tracy Schultz's new stamp set from her The Petal Press collection. This stamp set will be available Wednesday, September 16 at I Heart Papers!
Since school has started back just about for everyone, it's about that time to transition into fall, believe it or not. It's perfect timing for this new stamp set. Check out that sentiment! Isn't the combination of the fonts really nice? What about the pumpkin? Think about all of the ways and color combinations you can stamp this image! I simply stamped the image and colored using Copic markers. I'm such a beginner at coloring, but I will say this, Copics are fairly easy to work with once you practice once or twice. You definitely should have a blender pen and then just color! It seems hard to make a mistake, unless you color outside of the lines (like me)! But, the blender pen forgives many accidents!
I decided to make this design clean and simple and will pop it on over for SCS CAS challenge this week because it involved making a project POP with dimension! The focal image is popped off of the card base, so I thought it was fitting for this week's challenge!
Thanks for popping in today! I hope you have a great Wednesday. Remember to take some time and enjoy yourself (even if it's for 5 minutes)! Check back next week for more sneak peeks and the full reveal!!
Card Instructions - Trim plum pudding cardstock to an A2 card.
- Trim rustic white cardstock with decorative scissors.
- Stamp image and color.
- Add rhinestones.
- Stitch around image and ink edges, then add ribbon and set aside.
- Trim patterned paper and adhere to card front.
- Add zig zag stitching.
- Adhere image cardstock to the card front with foam adhesive.
- Stamp sentiment and add rhinestones.
:: My Goodies {happy fall} ::Stamps: Petal Press - happy harvest (coming soon 9/16 via I Heart Papers) Ink: Stampin' Up! - chocolate chip; Copics; Papertrey Ink - chai ink Cardstock: Papertrey Ink - plum puding + rustic white Accessories: Papertrey Ink - rhinestone + ribbon; Craft Supply - thread + decorative scissors
Card Size: 4.25" x 5.5"
|
|