After December 4, 2010, all future posts are on a new site. Please subscribe to my NEW feed at www.ashleynewell.com or click below to subscribe to the NEW feed.
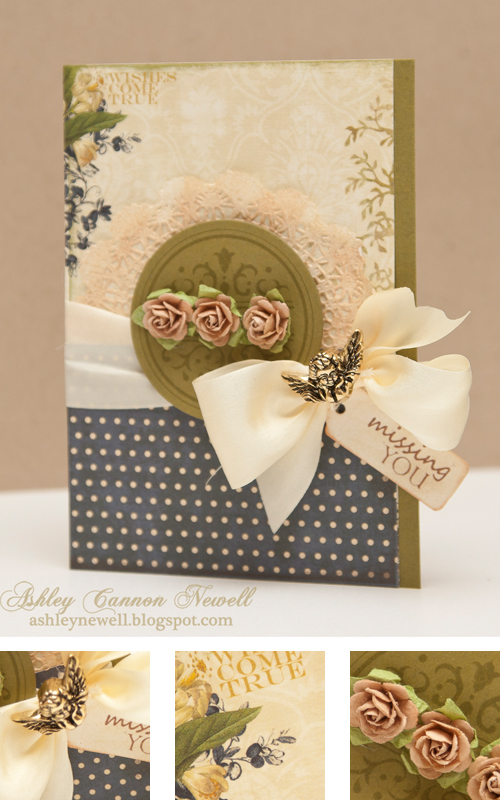
Hey ya'll! Happy Hump Day! I'm back with another video. This week, I chose to do a little stamping, but used more patterned paper than usually. Check out how I made it by watching the video below or here.
Supplies
Stamps :: DeNami Design - decorative crest circle; Papertrey Ink - take three summer (sentiment) Ink :: Papertrey Ink - ripe avocado; Tsukineko - VersaFine vintage sepia; Ranger - antique linen, tea dye Cardstock :: Papertrey Ink - rustic cream, ripe avocado Patterned Paper :: Webster's Pages Embellishments :: Craft Supply - metal cherub button (check back later for more details); May Arts - twine, ivory silk ribbon; Recollections - flowers Tools :: Spellbinders™ - S4-114 Standard Circles LG, S3-149 Tags Trio, W-001 wizard
Hey there! I hope you all enjoyed your weekend. I was able to hang out a bit with friends, finally finish up some projects, and started digging myself out of my craft space. It is really a mess. Well, now it is starting to look a little more like normal. Boy, that's a huge sigh of relief. I did record a video, but it looked REALLY bad and that's no way to introduce you to my space. At first, I thought it would be good to share a space, a real space, one that is not staged like the studios you see photographed in magazines or on blogs. But, we see messy spaces every day - in our own rooms - right?! So, I'm cleaning it up a bit so I can share with you my photography studio and related posts later.
Anyway, today's card is about being inspired. I am inspired by so many things, people, and feelings. I create based off emotion for the most part, which is why most of my designs are 'bold and new' and do not necessarily fit a design style and I am perfectly fine with that. I like not fitting into a mold. It's what I call "art!"
This card was inspired by my other card here. I think you can take your own works and copy them like I did here by using some of the same techniques. Here, I was inspired by the product (patterned paper), technique (distressing edge), and the sentiment.
What is inspiration to you?
Instructions
Trim diamond patterned paper to about 3.5” x 4.5”, distress the edges, then mat on black patterned paper. Adhere the paper on an A2 pure poppy card base.
Adhere tag on black cardstock, trim, then set eyelet.
Add ribbon and button treatment to tag, then adhere to card front.
Stamp sentiment, add ink, then pop off card front.
Supplies Stamps :: Cornish Heritage Farms – on the desk Ink :: Tsukineko – tuxedo black; Ranger – antique linen, tea dye Cardstock :: PTI – pure poppy, true black, rustic cream Patterned Paper :: Graphic 45 – communiqué collection (a fine specimen, communiqué tags) Embellishments :: MemrieMare – ribbon; Craft Supply – vintage button Tools :: We R Memory Keepers – crop-a-dile, eyelet
Thanks so much for stopping by! Take care, Bleeps!
Hey there! As each of you know, I love to travel, so no wonder the Traveling Mama, Tina Fussell herself and I would hit it off! In celebration of her new international traveling adventure, I'm guest blogging on her site today. Here is a sneak peek of the card I made for Tina's blog. So, hop on over there to read a bit more about everything and to see the card! I provided some extra details below, juuuuuust in case you all were interested!
Instructions
Trim black patterned paper to about 4" x 5.25", then distress the edges.
Trim diamond patterned to about 4.75" x 5", distress edges, then mat on black patterned paper.
Trim doily, adhere and ink.
Stamp "post card" image on patterned paper.
Add twill tape - ruffling it along the way with Scor-Tape. Keep the part flat where the focal point will pop off of.
Add staples to the ruffles for add texture.
Trim focal point image, distress, and pop off ruffled twill tape.
Stamp sentiment, add distress ink and pop off card front.
Adhere flower.
Adhere onto an A2 pure poppy card front.
Supplies
Stamps :: Cornish Heritage Farms - on the desk Ink :: Memento - tuxedo black; Ranger - tea dye, old paper Cardstock :: PTI - pure poppy, vintage cream Patterned Paper :: Graphic 45 - communique collection {a fine speciman, typograph} Embellishments :: Prima - flower; Melissa Phillips - twill tape; Craft Supply - doily Tools :: Ranger - paper distresser, blending tool; stapler Bleeps Appreciation Giveaway Winners Pat + Nicole, please send me an e-mail to claim your stamp sets by the following Monday. If unclaimed, a new winner will be selected on Tuesday! You can find me e-mail in the brown envelope on the sidebar.
Thanks so much everyone for entering the giveaway and sharing your summer plans. A lot of people have very nice vacation plans, which sounds great. However, I loved how people shared that they planned on doing things that made them happy, whether if it was spending time with family or crafting.
I'll be doing a bit of both. I do not have any vacation plans; however, I do plan on attending CHA events next month. I hope to meet some of my Bleeps there! :) Food
And as promised, here is the macaroni and cheese recipe! Now, I'm giving you fair warning...this is no healthy dish, but it's comfort food...good for the heart and soul! I don't eat macaroni and cheese as a meal, only as a side dish, so there's lots of portion control! That's about as healthy as it gets!!
*Sorry I do not have measurements, but I rarely use them. The above recipe makes a lot, so I've cut that recipe back, unless I'm cooking for a group.
elbow macaroni shredded cheddar cheese shredded parmesan cheese shredded mozarella/italian mixed cheese feta cheese salt/pepper milk eggs sour cream (the secret ingredient I picked up along the way to retain a moist macaroni/cheese)
Cook elbow macaroni in boiling water until done. Drain.
Combine milk and eggs in a separate bowl.
Stir cheeses in macaroni, along with the liquids.
Add salt and pepper.
Tip maintain a moist macaroni and cheese after day one, add some sour cream into the mixture
Bake 'till done.
It seems like too much cheese, but boy is it good! When you get the bits of feta.....woooo weeee! :)
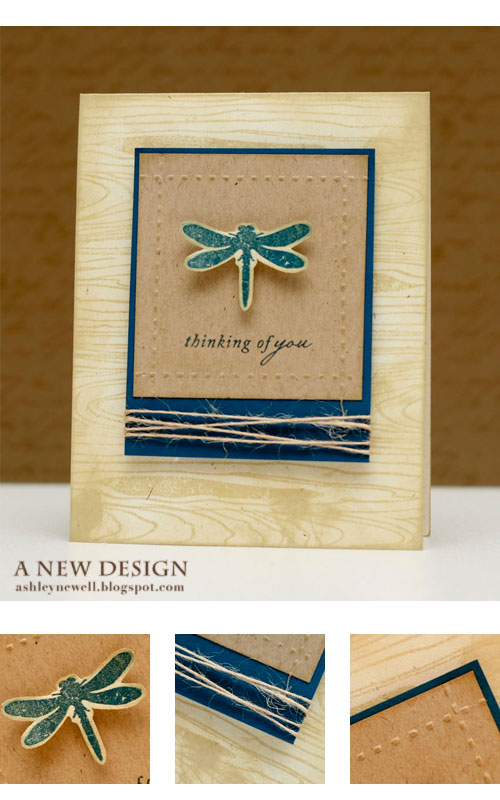
Hey Bleeps*! Happy Hump Day to you! We're almost there, through the week that is! So, to help you out, I've got a few projects to share with you using some of Papertrey Ink's April release products!! Every release is so much fun, so I hope you enjoy my cards! This time, I was feeling a bit clean and simple, so here goes...
Instructions
Trim rustic cream cardstock to create an A2 card base.
Stamp wood grain background on card front.
Using tea dyes ink, distress the edges with the ink.
Trim kraft cardstock block (3" x 2.75") and emboss with scor-bug to create a frame.
Stamp sentiment, then adhere to enchanted evening cardstock (3" x 3.75").
Add twine to the bottom of enchanted evening cardstock.
Stamp dragon fly on rustic cream cardstock, cut out, ink with tea dye, and pop off kraft cardstock.
Pop focal pop off card front.
Tips & Tricks
When using the scor-bug to emboss dotted lines, use the scor-pal to score an even line.
Trim new leaf cardstock to create an A2 card base.
Trim rustic cream cardstock to 3.75" x 5" and stamp flower.
Color flower with Copic markers.
Ink entire cream cardstock with blending tool.
Stamp sentiment.
Add glitter to flowers.
Tie ribbon and add button/twine treatment.
Mat cardstock on sweet blush cardstock, then on raspberry fizz, then adhere to card base.
Tips & Tricks
When applying glitter, I use some tacky glue, place some on my fingertip, then rub on the area I want covered, then shake glitter over project. I dump the excess onto scrap paper and start over on any other areas to be glittered.
Hey there! I like that greeting and here it is in the this stamp set! :) I stamped the background and added the sentiment. It's a very clean and simple layout and design and perfect to give a guy...at least that's what I think!
For those of you who want to see my photos from CHA (as opposed to the slideshow), I have added them to my Flickr gallery here! Enjoy!
I'll be back tomorrow with a card for the new Caardvarks challenge!
Thanks so much for visiting and have a great Friday Eve!
Instructions
Make an A2 card base.
Trim kraft cardstock and stamp tree pattern.
Mat kraft cardstock on red cardstock.
Stamp sentiments.
Add ribbon treatment and adhere to card front center.
Supplies
Stamps :: Stampendous - birch buddies (trees); PTI - big and bold wishes
Hey there, Bleeps! I'm missing CHA, so here's a card for all of my friends I saw in California! Miss ya'll already! This card is a 'publication reject!' Sometimes, the cards I submit for publication do not get picked up. The good thing about getting rejected is that I get to still share them here with my Bleeps! Most times when I submit, I get rejections. I am okay with that because I understand that publishers are selective about the projects shown in their publications for a variety of reasons, from color combinations to design elements. It does not mean that the project is not good. Sometimes, a card presented for one publication is rejected, but accepted for another because the it fits a different publication better (this could be the same publisher). I just wanted to share a bit about my publishing experiences. It's a job. I have fun submitting every month. You just have to try.
Thanks for stopping by!
Instructions
Make an A2 card from cardstock.
Trim polka dot patterned paper strip and adhere to card front.
Ink leaves, then use the kissing technique and stamp polka dot stamp overtop, then stamp on cream cardstock.
Cut out leaves and adhere to card front.
Tie ribbon into a bow and add button embellishment.
Die cut scallop circle from felt and add stitching.
Adhere sticker letters to spell "miss you," then adhere scallop circle die cut to card front.
Supplies
Stamps :: Papertrey Ink- turning a new leaf; SU! - polka dot
Ink :: Papertrey Ink - raspberry fizz
Paper :: Papertrey Ink - vintage cream; SU! - bermuda bay; Cosmo Cricket - early bird collection (patterned paper)
Embellishments :: Heather Bailey - felt; thread; Making Memories - letter stickers; Papertrey Ink - ribbon, button; straight pins; twine
Tools :: sewing machine; Spellbinders - scallop circle nestabilities, wizard
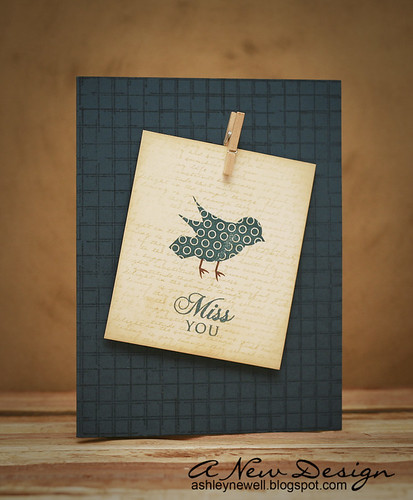
TEE GEE EYE EFF! I am looking forward to tomorrow morning when I can sleep in! Saturday sleep-ins are the best! Anyway, today I have a fast card to share with you. Although there is lots of background stamping to create patterns, it is a clean and simple layout and a quick card to pull together in a jiffy. So, thank ya'll (I have a southern accent from my time living in NC) for stopping by and enjoy your weekend! Now, here's how you can make one too...in a jiffy, that is!
Instructions
Trim navy cardstock to create an A2 card base.
Stamp grid pattern on card front.
On cream cardstock, stamp text background pattern.
This card is made based off of Beate's Weekend Sketch Challenge. I know I am a little late, but at least I did do one this time! I'm going to try to start to do them every weekend, but with the holidays approaching, that may be a bit too much of a commitment! I liked the layout a lot with the double scalloped edge. Instead of the circle, I used a large button. The pattern paper is a special handmade paper I purchased at Oblation in Portland this summer. The paper store was similar to Paper-Source, but more of a 'mom and pop.'
To create this card:
Make card base (using vanilla cardstock) by cutting cardstock to 4.25" x 11", then score at 5.5".
Cut brown cardstock to 4.25" x 5.5" (to use as the card base so stitching will not show through card or you can trim your card in brown cardstock and allow stitching to show).
Trim berry sorbet cardstock to approx. 3.5" x 4.5".
Using the scallop edge punch, scallop both 3.5" edges.
Trim pattern paper to approx. 3.5" x 4.5" and adhere to the center of the berry sorbet cardstock.
With a leftover scrap of berry sorbet, adhere a strip to the center.
Stamp a sentiment on the berry sorbet cardstock.
Thread button with twine and adhere to berry sorbet strip
Add rhinestones to the center of the flowers on pattern paper.
Using a sewing machine, stitch around the edges of the brown cardstock.
Pop the scalloped edge focal point off of the brown cardstock.
Adhere brown cardstock to vanilla card base.
Today is election day, so please do not forget to vote! This could be my last posting for this week because I am off to Orlando/Disney World for the remainder of the week and weekend! I should be back to post some photos at the least!
Oh yeah, the blog has over 10,000 hits, so I may post a blog candy while I am gone for everyone to sign up for...that sounds like a better idea!
:: My Goodies :: Stamps: Close to My Heart - Say it In Style Ink: Brown Cardstock: Dark Chocolate; Berry Sorbet; Vanilla Pattern Paper: Handmade Oblation Papers Accessories: brown button; twine; thread; sewing machine; scallop edge punch; dimensionals; pink rhinestones Technique: Stamped Card Size: 4.25 x 5.5


 Hey ya'll! Happy Hump Day! I'm back with another video. This week, I chose to do a little stamping, but used more patterned paper than usually. Check out how I made it by watching the video below or here.