|
|
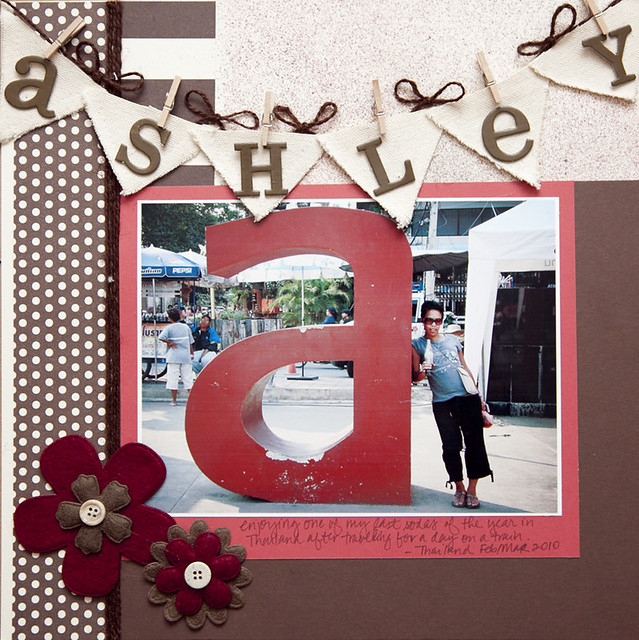
 Hey there! Happy Saturday to you! Yesterday, Embellish started a new color challenge and this one focuses on scrapbook layouts. I know, I rarely do them and usually I struggle, like on this one. I sometimes get stuck and it was a challenge for me. So, I ask you to join me in this challenge. The more you work at it, the better you get! We have a great sponsor for this challenge. Canvas Corp has offered a very generous prize pack with patterned paper, canvas, clothespins, and so much more. Check out what the other team members created. They didn't seem to have as much of a challenge as I did, but I wouldn't expect that because that's why they're on the team, right?! Click here.  I used patterned paper from the Chocolate and Vanilla collection ( Big Stripes) + ( Dot Reverse) as side borders. In between the paper, I included a jute twine border using this chocolate texture. The flower die cuts are old embellishments I picked up from my LSS and I think they're by Creative Imaginations or Creative Cafe, but not 100% sure, just a hunch from my memory about 2 years ago.  Here, I added some mini clothespins to hold the "ashley" banner I created using the canvas diamond die cuts. I cut the diamond die cuts in half to create the pennant banner. I also spritzed some Maya Mist on the top part of the layout to get that paint color. I used a brown and a red mist and sprayed very far away from my page to get that sprinkle effect.
About the photo: This picture was taken by McArthur in Thailand. We rode the infamous train over River Kwai through the countryside. It was VERY HOT on that hour train ride. We ended here, at this market near Kanchanaburi. We returned the day after the train ride to shop a bit in this market. Even in early March, it is very hot in Thailand. I love the heat, but also enjoy a good refreshing beverage, which leads me to my purpose of this picture. I'm leaning against a huge "a" and in my world, it's for Ashley, but as I recall, it spelled WAR and I'm not quite sure why except for that the building the train system from Burma through Thailand caused a war because people were forced to build it. Anyway, I'm drinking a Pepsi. This picture shows one of my last times enjoying a soda. I have not had a soda since July. I did not set out to make this a rule of law for me, but it sort of just happened. I was trying to limit my intake and next thing I remember, I realized a month passed since by last soda, so I decided to try for another week, another month, etc. Now, it's been four months since by last soda. Now, that may not sound all that news breaking, but for this soda drinker, it is! In grad school while getting my MBA, I had night and online classes, so I would stay up really late to work on my projects and study, then wake up around noonish and get ready for my day. To keep me going, I'd drink 2-3 Pepsi's at once, like they were water. This was also the time I discovered my love for Thai food. I lived in a quaint studio apartment right across the street from what I believe is the BEST Thai restaurant ever - Thai Landing in Baltimore, MD. It's authentic and they always treated me like family. I think I ate there about 4 times a week and sometimes twice a day! haha Anyway, I cut back since then, but kept drinking sodas. No, I'm not a Pepsi only drinker, I like Coke and Ginger Ale too! I can drink almost any soda, well I used to be able to at least! I really should have titled the page, "The Last Soda" because that's how I feel when I see this picture. At the time the photo was taken, I had no idea it would be one of my last sodas and I enjoyed it! So, whatever your photo is and whatever motive you have behind it, make sure you scrap it to capture that moment, feeling, and time period of what's going on! I challenge you, even if you are not a scrapper like me to join us for an Embellish challenge! Blog Update - I will be changing my blog in the next week or so. I will be migrating to a new web address, which means if you follow me in your reader or via email, you will need to re-subscribe to a new feed. I apologize for any inconvenience, but each of you will benefit from the blog transfer because of the added features, such as my being able to reply to comments and so much more! Just wanted to warn you, it's happening VERY SOON! My Blogger site will always be available for as far as I know, I just will not have current posts from it; however, new visitors will be re-directed to the new blog! So stay tuned, I'm almost done with the design!Thanks so much for visiting! Today, I'm off to try to decorate the house for the holidays and I get to see my friend's baby for the first time! Take care and have a great weekend!
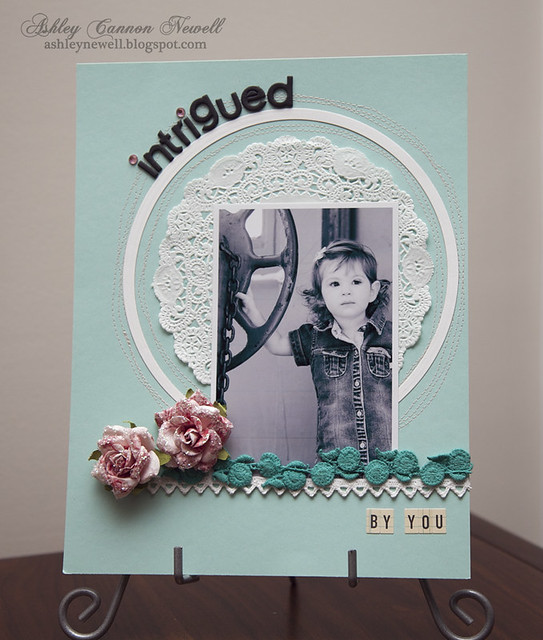
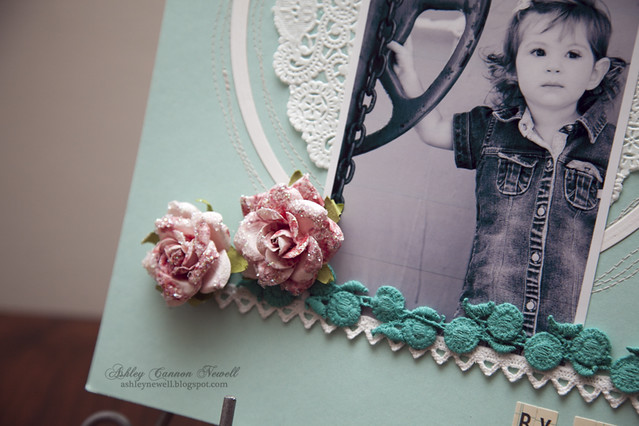
    Hey Everyone! I hope you had a great Monday. I decided to make a quick scrap layout. So, that meant a 8.5" x 11" design. When scrapping, I'm usually inspired by the photo and select that first. I usually edit it to my liking, this time a black and white, then I come up with a sketch. After that, I am inspired by product to incorporate into the sketched design. This is my usual process probably for cards too (just realizing that as I type it out)! It's a pretty clean and simple layout. I like to keep the photos the focal point of my layouts because in my opinion that is the true reason for scrapping them. I really do not like to journal...yet. I like quick and simple titles, so this is how I did it... Instructions- Adhere doily to cardstock.
- Add stitching.
- Die cut circle frame, then adhere to cardstock.
- Print photo, then adhere to cardstock.
- Add vintage trims.
- Add flowers.
- Adhere letters stickers for title and embellish with rhinestones.
SuppliesCardstock :: Papertrey Ink - aqua mist; Paper Source - white Embellishments :: Maya Road - vintage crochet zig zag white trim; Webster's Pages - aqua trim; Prima - flowers; Basic Grey - piper micro-chip stickers (dark chocolate chip); October Afternoon - mini market stickers (ledger); Craft Supply - doily (from a restaurant*), thread Tools :: Janome - sewing machine; Spellbinders - LF-114 grand circles, G-001 grand calibur **The model in the photo is a subject McArthur photographed during a family session recently! Thanks so much for your visit. Take care!
Hey there, Bleeps! I'm posting a bit late today because I got off work early! Our floor in the building lost power, so I finished up my work super fast and came home. I was happy to see my Unity Stamp order was waiting for me at my garage door (the ever so inconspicuous spot my postal deliverer leaves my packages)! So, I came in with the intentions of making a card, but obviously that didn't happen. I decided to create a scrapbook layout...about ME! I've never done this before and boy was it difficult. It was ever so fitting to use Unity's stamps by Melody Ross to show how brave I really am!  *This scrapbook layout will be published in Scrapbook Trends January 2011* *This scrapbook layout will be published in Scrapbook Trends January 2011*Now, it's just too much to give instructions for this layout, so I'm going to list some tips and tricks for you! Tips, Tricks & Techniques + How I was Inspired- Adding Texture :: Add texture to your layouts using fabric. Here, I used a swatch of burlap as a mat for my photo. I also incorporated stitching throughout, even on my photo!
- Creating Ink Spots :: Using Tattered Angels Glimmer Mist, simply spritz ink on your layout. My inspiration for this technique was from Savitri (HERE).
- Creating a Paper Garland :: Super easy to do, just a little time consuming! Die cut your shapes. Here, I used Spellbinders™ standard circles LG (S4-114) and standard circles SM nestabilities (S4-116) to die cut cardstock, music sheet, and patterned paper. Simply run your dies through a sewing machine and voila, your own paper garland! I was inspired by a product for sale on Etsy (HERE). I was REALLY tempted to order it, but the price was just a bit too much, in my opinion, so I made my own...close enough!
SuppliesStamps :: Unity Stamp Co - one precious life, brave girl Ink :: Tsukineko - VersaFine sepia; Papertrey Ink - melon berry; Ranger - antique linen, tea dye Cardstock :: Close to My Heart - taffy; Papertrey Ink - kraft, rustic cream Patterned Paper :: Hambly Screen Prints - old lace; Craft Supply - vintage Mozart music sheet Embellishments :: Prima - flowers; Craft Supply - burlap Tools :: Spellbinders - standard circles LG (S4-114) and standard circles SM nestabilities (S4-116), wizard; Janome - sewing machine; Craft Supply - thread; Ranger - tiny attacher; Tattered Angels - glimmer mist (turquoise blue, golden terracotta) I hope you all enjoy your weekend! Thanks so much for stopping by and take care!
  Hi there! I'm back with another Lawn Fawn sneak-a-peek. This stamp set is called "Judy's Blooms" and is full of stamps that will make your heart bloom with glee! Can you believe it? I created a scrapbook layout to share with you all to feature those blooms. The flowers on the "clothesline" is one of the blooms in the set. The set will be available July 8, 2010 at 12:01 am EST. Please hop on over to Lawn Fawn's blog to check out more sneak peeks by the design team. Instructions- Trim patterned paper lace strips and adhere to scrap layout base.
- Adhere two doilies to the back of a 4 x 6 photo, then adhere it to scrap layout base.
- Punch holes in layout and set eyelets.
- Add twine to make a "clothesline."
- Stamp blooms on aqua cardstock, cut out, then add to "clothesline" with mini clothespins.
- Add rhinestones to flowers and doilies.
- Stamp journaling on white cardstock strips, then adhere to scrap layout base.
- Add thickers for the main title.
SuppliesStamps :: Lawn Fawn - Judy's Blooms (available July 8, 2010), Harold's ABCsInk :: Memento - tuxedo black Cardstock :: PTI - hawaiian shores, white Patterned Paper :: Hambly Screenprints - 3/4" graph, on edge, old lace Embellishments :: KaiserCraft - rhinestones; American Crafts - root beer float thickers; Making Memories - eyelets; May Arts - twine; Craft Supply - mini clothespins, doilies Tools :: We R Memory Keepers - crop-a-dile big bite
     OMG...I actually did a scrapbook page! What's the motivation? Well, there are a couple of reasons. On Saturday, I directed my first family photo session (helping my hubby, Mac, the photographer). I didn't know what to expect, but I came prepared with notes, ideas, and a great attitude that it would work! It all turns out that Layla, who is featured in the photo above, is a natural model and responded well to my direction! The photos turned out so well, I decided to scrapbook a page to capture it in its full form. My other reason for scrapbooking (so quickly) was to participate in American Crafts weekly challenge. This past week, they challenged designers to use three different sets of thickers in one layout! GOT IT! Wanna see a few of the photos? Click here! So proud of Mac...he's a really GREAT photographer! I'm so happy to be able to scrap great photos now! :) Here's what I didI started with an 8.5" x 11" page, added the photo, then strips of paper, pom poms, and buttons. The strip of summer sunrise cardstock is stamped with a circle image from PTI Retro Background Basics! I adhered a small button on top of a large button for added dimension. Boy, I've been WAITING to use that big button...you just don't know how happy I am about the button! The scallop edge on the right side is a short-cut strip by Bazzill that I stamped using PTI Damask Designs in raspberry fizz + summer sunrise! I cut a strip of Amy Butler pink damask fabric and wrapped it around until I created a flower and adhered a glittered brad to the center! I folded a piece of spring moss cardstock and cut two leaves to confirm that "it's a flower." Next, I stamped a border at the bottom, added an eyelet (by SU!-it says, "too cute to handle"), and of course the thickers. I embellished the remainder of the page using my white gel pen, rhinestones, and a curly label punch. I'm giving it to Mom + Dad in a Making Memories shadow box. I really wanted one last minute and couldn't find one - even online (I probably didn't look hard enough). So, I was at Target yesterday, checked out the framed section...NOTHING...then was in the scrapbook section and found it...not there, but by the photo albums...YES YES YES! I knew it was meant to be! I'm such a 'signs' person!! Have a great Thursday! Thanks so much for stopping by! :: My Goodies {layla...got milk?}:: Stamps: Papertrey Ink-damask designs + background basics-retro
Ink: Stampin' Up-white; Papertrey Ink-raspberry fizz + summer sunrise Cardstocks: Papertrey Ink-new leaf + spring moss + summer sunrise + raspberry fizz Pattern Paper: Paptertrey Ink-raspberry fizz mix Accessories: American Crafts Thickers- charcoal lullaby + white giggles + orange sprinkles; Stampin' Up!-scallop edge punch + hooray designer hardware + curly label punch; Amy Butler-pink damask fabric; Bazzill Basics-cardstock strips + floss; Chatterbox-brad; Uniball-signo gel pen; Joann Fabrics-pom pom trim; Craft Supply-buttons; Making Memories-shadow box frame; Photo Courtesy of Boldlifestyle Photography
  {pictured on the wall} I know this looks like a lot of work, but it really is a super-quick project! I decided to create this memorabilia in honor of my father who passed away last Christmas. He was a veteran, so in honor of Veteran's Day and him, I designed this canvas wall hanging. I think I am going to hang it in my office (I haven't decided yet). This is a picture of him as a young man in Thailand. It was the early seventies when dashikis were a fashionable trend. You can barely see it in this photo, but check out that neckline! Then, look at the style of photo. It is a silhouette or shadow or whatever they called those photos 'back in the day.' Well, it wasn't that long ago, because I even have a baby photo like this! I really liked the sentiments in PTI's Remember set, so I decided to highlight them the best way I could! I did not use as many of the flowers since it focused on a picture of my dad, but I still managed to squeeze one in without making it look feminine (at least I think so). So...what do you think? To create this wall decor: - Ink (chalk or spong dabbing works) or paint canvas.
- Trim brown, aqua mist cardstock and pattern paper 9" in length.
- Trim brown cardstock about 4" wide.
- Trim pattern paper about 3" wide.
- Trim aqua mist cardstock about 2" wide.
- Lightly ink pattern paper (vintage-look).
- Stitch around edges of cardstock and pattern paper with white and brown thread, respectively.
- Scallop edge punch aqua mist cardstock, then lightly ink to distress.
- Adhere pattern paper on top of brown cardstock, then adhere scalloped edge aqua mist cardstock to one end.
- Using scor-pal, score where folds will need to be to wrap around canvas - to make a crisp wrap.
- Stamp sentiment on bottom right side of pattern paper - near the score line.
- Adhere paper around canvas (I used tacky glue-Tombo Mono Multi).
- Using nestabilities, create a frame with vanilla and aqua mist cardstocks.
- Lightly distress both cardstocks.
- On aqua mist frame, stamp PTI-Garden of Life flower on it (stamp-off technique).
- Adhere photo behind frame.
- Distress two small pieces of aqua mist ribbon, then adhere them to the upper right side of the frame to create loops.
- Pop frame off of canvas on upper right side.
- Distress a white tag, then stamp sentiment on it and adhere to pattern paper portion of canvas.
- On a small strip of aqua mist cardstock, stamp another sentiment and distress it.
- Stamp curly designs and one flower on vanilla cardstock, cut out, then distress.
- Adhere sentiment slightly over picture and the remainder pop off of canvas.
- Place curly designs underneath sentiment strip and off of the canvas.
- Sew brown button on flower cut-out using ink-distressed twine.
- Adhere the flower image at the end of the sentiment strip.
- Adhere ribbon to the back of canvas to hang (optional).
:: My Goodies ::
Stamps: PTI-Remember; Garden of Life (the blue frame design)
Ink: Brown; Amaretto
Cardstock: Dark Chocolate; Aqua Mist; Vanilla
Pattern Paper: PTI-Everyday Blessings
Accessories: brown button; twine; thread; sewing machine; scallop edge punch; dimensionals; tag; square nestabilities; cuttlebug; aqua mist grosgrain ribbon; dark chocolate polka dot ribbon; scor-pal; canvas concepts-scrapbook decor canvas; paper distresser
Technique: Stamped
Card Size: 6 x 6
 Here is my scrapbook layout for K. Werner's Color Challenge. This week, I've been in the mood to do scrapbook layouts, in addition to cards. I just pick up random photos that are in my studio and focus on that. I find it difficult to sit down to complete an entire scrapbook, so this method may work! If you're like me and like a layout to be two complete pages, then this will be a great start because the second page can flow from this page because the design concept already exists! This scrapbook layout should be called "Where's Ashley?" because you need to try to find the picture with all of the embellishments! This is a brown 12 x 12 page with pink overlay. I cut various strips of pink cardstock on the bottom. The center features a large square with green scalloped edge. The center also has polka dot pattern paper with a green mat. Flowers are stamped on the green cardstock. Additional flowers are stamped on green and pink cardstock, then cut out and placed all over the page. Vanilla ribbon is tied around the green cardstock with a wavy brown ribbon underneath. The title, "delight in you" is stamped at the top. 
:: My Goodies ::Stamp: Delight in Everything by Close to My Heart
Ink: Brown
Paper: Cardstock: Bazzill Basics Bitter Chocolate, PTI Spring Moss, Pink Pattern Paper: Chocolate Kisses by Rusty Pickle Accessories: Ribbon: Rusty Pickle; circle punch: Creative Memories
Technique: Stamped
 Inspired by a few ideas this time around: (1) Beate's Inspiration Challenge, (2) Tessa's card, and (3) Savitri's concept. To start, Beate's weekly inspiration challenges are great because you can use any element of them as inspiration. I've never completed a scrapbook page after being inspired, but something sparked tonight! Ever since Tessa's Card Creations, I've been thinking about those silly posies and how easy they were to make using scraps and since I've been on my "use scraps" kick, I wanted to use this fabulous design. Lastly, Savitri, a new paper artist I've discovered while blogging, showed this ingenious idea of using a box (what basically everyone has) and incorporating it into their paper art! The only non-scrap item (I should've just said new!) was the red solid cardstock for the scrapbook page. I thought that was an exception to the rule since I needed to do a full 12x12! This page should be called raggedy-ann because that's just how it looks! I love the distressed look, which is pretty 'ratty.' I framed the scrapbook page by stitching in black around the edges all over the place. I added torn scraps of cardstock in colors from Beate's Inspiration and from the old photo (yes...that's ME!). The cardboard box scrap also picks up Beate's Inspiration with the linear design (pictured below, right). I added the crumpled posies and buttons to embellish. Instead of journaling, I just added the date and a title emphasizing what I was doing (in my walker). I really liked how this turned out because of the imperfection that it shows...all done on purpose! I also really like the texture.  
 How fun! Capture your four favorite 4th of July pictures on this Independence Day themed layout! The layout may be purchased here. They are 12 x 12 pages to easily insert into a 12 x 12 scrapbook. I cut stars and stripes and applied them all over the page. The page pictured left has two mats to place 4 x 6 photos.  This layout features two mattes to place 4x4 photos. The red stars pop off the page, making it easy to slip pictures underneath. Fireworks are chipboard stickers. A tab is included on the bottom right photo mat that says 4th of July. I hope you all have a fun, safe, and fulfilling 4th!
Here are the remaining scrapbook layouts for the baby girl scrapbook I completed last weekend. I hope you like it! I also posted previous postings here and here.  "Sweet Pea" is a die-cut from the Cricut New Arrival cartridge. It is a simple layout with a pink and green color scheme.  "So Sweet" is another pink and green layout. I punched circles out and placed American Craft Thickers for the title. The circle is Accent Essentials by Cricut.  "Playtime" is a fun layout. I used the New Arrival Cricut cartridge for the animals. The wavy strip is cut using a Creative Memories curvy paper trimmer. The "Fun" is done by alpha felt letters. The "time" is stamped by SU! alphabet stamps.  "Our baby girl" is a simple layout with various lettering from the New Arrival Cricut and foam stickers and Making Memories letters.  "Mommy & Me" title are various lettering from Alphalicious Cricut cartridge and felt letters. Star brads are used at the bottom. Journaling stamp is used on the green card stock to create a page to jot down fond memories.  "Heaven Sent" is the back page to put a large 8x10 professional picture.
Today, I am going to share with you a few layouts of the baby girl scrapbook I made in about 30 hours last Saturday-Sunday! I work well under deadline and pressure! The pictures are taken in the protective sleeve to give you an idea of how they look when protected in a scrapbook, so there may be a glare...sorry! This scrapbook was given along with a card and gift bag featured in this post. More layouts are featured here.  I'll start out with the cover of the scrapbook. I like to get basic solid colors for books, then decorate them. I did not want to do it too much for this book because I was unsure of colors of the baby's room. However, always think personalization. For instance, if I knew the baby's name, I would have included it on the front instead of "our baby." I added hydrangea petals by Prima from The Stamping and Scrapbooking Room in Greensboro. The letters are American Craft Thickers - my new FAVORITE!  This picture is the first page of the book. It is intended to be the baby's birth announcement. I also stamped a birth announcement on the mat for mom or dad to jot in for personalization. I also stamped a onesie and booties and added pink rhinestones. The stamp is from AC Moore by Clearly Wordsworth called "Baby." The background pattern paper is by DCWV Nursery mat stack and are 'chicks.' I added a 2" pink ribbon with a green ribbon tied around it. The title of the scrap-page is "miracle baby" and is created by American Craft Thickers and Cricut cartridge New Arrival.  The "All Dressed Up" layout is one of my favorite designs! I used a onesie pattern paper background for the left side from DCWV Nursery stack and carried it over as mats for pictures on the right side. New Arrival Cricut cartridge used to create onesies on the left page. Accent Essentials Cricut cartridge used to create flowers on both pages. Alphalicious Critcut cartridge used to generate the lettering on both pages.  "Bath Time" is a close second as my favorite design. New Arrival Cricut cartridge is amazing and created the title, bath tub, and ducks! I added "bubbles" on the bath with Alphalicious cartridge. On the left page, the centered white mat is stamped with a journaling stamp for mom or dad to jot down some funny stuff about baby's bath time! I also added a small journaling second on page two with some black corner edges.  "Cute as a Button" is a fun layout. I used pattern paper from DCWV Nursery stack on the left side and plain white card stock on the right. I added strips of the white card stock with buttons on top on the left page. Coordinating pattern paper is added to the right page as the picture mat. The circles were created using the Accent Essentials Cricut. All lettering was by KI Memories; Celebration Collection called "It' a Girl Felt Alpha" and "It's a Boy Felt Alpha" purchased at Archiver's.  "Daddy's Little Girl" was created using Alphalicious and New Arrival Cartridges. I punched cirlces and stamped them with daddy's little girl. I also inserted eyelets on the side and tied hemp around it. Journaling stamp was used on the right page to add a little blurb about the picture. I also stitched around the wave and title at the bottom. The wave was created using Creative Memories curvy paper trimmer. I will share the remaining layouts with you in tomorrow's post, so this one will not be overloaded!
 Here are a few scrapbook layouts for Riley and her parents to preserve memories. I completed this book a couple of months ago, but forgot to share with you! This page and the next picture are one layout for "Daddy's Little Girl." I embellished each of the pages with flowers, ribbon, rub-ons, buttons and stickles!  This pattern paper is from a DCWV Spring mat stack. The die-cut letters are by using Cricut and I made some of the letters backwards for a fun 'kiddie' effect.  This is one page of a layout of "precious angel." The flowers are cut from a pattern paper. I cut a wave strip and punched holes with my crop-a-dile.  For this layout, I punched the circles to match the circle pattern paper. Then, I stamped "Riley" on each circle and popped them off of the paper. I made this page simple for a large 8" x 10" picture.  All babies have onesies, so I thought to create a onesie page. To create the onesie, I sketched it, then cut it out. For the neck and leg holes, I used my circle punch and cut a half of a circle. I embellished the onesie with ribbon and brads. The letters are die-cuts by using the Cricut.  The next two pictures are a layout of the 'birthday.' I used chipboard letters of the date of birth. I overlapped the the mats for the pictures for a unique effect. I added simple flowers to embellish the page.  For the 'birth' I used chipboard letters. Then, I stamped 'day' in Versamark, then applied metallic embossing powder and heated it!  "Sweet baby girl" is a fun layout with pink and brown. I punched circles and then added eyelets at the top with the die-cut letters for 'sweet.' I inked around the corner-edged mats for the pictures.  This was a simple page because the DCWV mat stack included the "baby girl" pattern paper. I added the brown mats for the pictures along with the pink polka dot ribbons on the corners. I hope everyone enjoyed their Memorial Day! I got a chance to stop by Archiver's in Raleigh and picked up too much stuff, including a SCOR-PAL!!! I will be writing a review about it soon!
|
|


 I used patterned paper from the Chocolate and Vanilla collection (Big Stripes) + (Dot Reverse) as side borders. In between the paper, I included a jute twine border using this chocolate texture. The flower die cuts are old embellishments I picked up from my LSS and I think they're by Creative Imaginations or Creative Cafe, but not 100% sure, just a hunch from my memory about 2 years ago.


