|
|
My blog postings this week will be quite different from the usual. I'm not planning on posting any cards or projects to share, just hints, prizes, and the reveal on Friday! My postings will return back to normal after Friday. Thank you for joining me for this week's reveal!
Hint 1 :: Something Bold, Something New
Do you like new paper crafting concepts?
How about discovering a new favorite spot for inspiration and fun ideas?
But wait, what about something YOU can be a part of?
I know this probably is not the type of hint you were looking for, but I am trying to build up to something more for tomorrow's post, so bear with me! It is my blog slogan, but I also thought it was a perfect start to introduce this secret I am keeping! Focus on the words "bold" and "new." To keep you thinking, I have a prize set up for you! The prize is bold and new, something you cannot purchase in the form as given away here today!
Leave a comment telling me what your guess is for Friday's reveal, based on today's hint. Commenters will be eligible to win a Papertrey Ink Button Sampler! From my personal stash, I have contributed 3 buttons in small, medium, and large sizes in the following colors:
summer sunrise dark chocolate  raspberry fizz true black sweet blush melon berry spring rain pure poppy ripe avocado new leaf hibiscus burst lemon tart berry sorbet lavender moon plum pudding enchanted evening spring moss scarlet jewel
Contest is open Monday, August 31 12:00 am - 11:00 pm EST. The winner will be announced on Tuesday's posting by random integer generator. All blog readers are encouraged and welcome to comment for the prize. Please limit your comment to one entry. If the winner does not claim the prize within 24 hours, the buttons may be forfeited to another winner.
Thanks so much for stopping by! Good luck in winning the button sampler!
 
How is your weekend? I hope it's great! I'm back with another Moxie Fab challenge to celebrate the Holiday Cards and More issue. This card was inspired by the Fun and Cute challenge. I loved the polka dot background on Becky Oehlers' card, so I went off of that to create a white distressed polka dot base/snow or whatever! I think it's fun and cute, what do you think?
Don't forget to check back tomorrow for a fun hint on Friday's reveal. I love that people are already guessing! It's fun to read those! :)
Thanks for stopping by and enjoy the rest of your weekend!
Card Instructions - Trim pure poppy cardstock to an A2 card.
- Stamp image on rustic white cardstock, color, and cut out.
- Stamp polka dot on card front. Tip: Use scrap paper on each side to make the polka dot pattern not go all the way across OR only ink the width you desire.
- Adhere image to card front with foam adhesive and add liquid applique for snow.
- Trim new leaf strip and adhere.
- Stamp sentiment.
:: My Goodies {happy holidays} ::Stamps: doodlebug design - home 4 the holidays; Papertrey Ink - polka dot basics 2 Ink: Stampin' Up! - white + chocolate chip; Copic markers Cardstock: Papertrey Ink - pure poppy + rustic white + new leaf Accessories: liquid applique
Card Size: 4.25" x 5.5"
 
What's in store for your weekend? I hope you have lots of fun planned. I have a hair appointment in the morning. After that, I do not have any plans. We'll just wing it, which is my favorite way to live the weekends. You just never know what you'll end up getting into!
So, today's card is inspired by yesterday's card and for Moxie Fab's clean and graphic holiday card challenge. I am not crazy designing holiday cards, but it really is that time of year to start for us paper crafters because if you are like me, it just creeps up on you and before you know it, you have no time to make cards...how embarrassing as the card maker, right?!
I'm really liking that K & Co Amy Butler Lotus stamp set (all over again). I picked it up at Michaels I think last year, so I am not sure if it is still available online somewhere. I used the design to create wreaths. I do not think this is what the stamp was intended for, but I got the idea after creating the card yesterday and wanting to use this set more. I added twine to create a hanging wreath design, added button centers for fun and dimension and popped one wreath off of the card front.
Are you ready for a fun week? I have lots of fun stuff to share with you next week, starting Monday through Friday. Monday through Thursday will be sneak peeks and hints and Friday will be the big reveal! What is it? You'll just have to wait and see, but I just wanted to hint to you to make sure to check for a super fun week!! I hope you're ready because I am! I hate keeping secrets! :)
Enjoy your weekend and as always, I appreciate your visits!
Card Instructions - Trim kraft cardstock to an A2 card.
- Stamp wreath designs on card front and on cream cardstock, then cut out.
- Adhere to card front using foam adhesive.
- Tie twine around card front with buttons.
- Stamp sentiment.
- Add rhinestones.
:: My Goodies {holiday wishes} ::Stamps: Papertrey Ink - 2008 holiday tag collection; K&Co - Amy Butler Lotus stamp Ink: ColorBox - chianti + moss green + chestnut Cardstock: Papertrey Ink - rustic white + kraft Accessories: KaiserCraft - rhinestones; Craft Supply - twine
Card Size: 5.5" x 4.25"

Happy Friday everyone! Today, is Dee's birthday. Happy Birthday, Dee! Are you surprised? So, today's card is inspired by Dee's birthday and this card is made especially for her. It will take some while to get up to Canada, but it's coming (along with Regan's from last month - WHOOPS)!! Please join in on the fun and blog hop around (links are below) to those who are wishing Dee a happy, happy birthday today!
I felt like playing with photography again, so I used a Melissa Frances (Madison) patterned paper as my backdrop. My white counter is used for the 'stage.' I played with angles to show detail. What do you think? I rarely finish the inside of a card, so when I do, I want everyone to see how hard I worked on the inside too! I like to carry in the card design on the inside by using a watermark style in the background of the greeting. Here, I used a Stampin' Up! Bermuda Bay marker to ink my acrylic stamp (yes, it worked) to create the watermark look. Versamark can also work well if you do not have the same color ink.
One more thing...I tore my acrylic stamp (the one used) as I was trying to pull it off of the acetate backing. It was STUCK! So, I pulled and pulled and RIIIIIP. SHOOT! I thought the stamp was ruined. So I inked it up and got a fluent stamped image and kept right on trucking! Does anyone have any stamps out there that stick like this? It's quite annoying because they were all like this. The next time, I will be a little less aggressive in pulling these off, but it is so difficult.
One last thing...for real! Do you see the bottom button and how the twine is knotted? Well, that was by accident, but I love the effect. Here is how you can do it (on purpose, of course). Feed thicker twine/floss through a small button hole. It will cause the twine/floss to unravel and create the jumbled effect! Voila - a new technique (learned by accident)!
 Hey ya'll! How is it going? I hope great! Have you crafted lately? I made a few holiday cards last night. I wanted to share for the Moxie Fab World challenges, but none seem to really fit the challenge, so I decided not to share those just yet. I will have to make some new cards for the challenges. So, here is a card I submitted for Paper Crafts March/April issue that did not get picked up. It's kind of shabby, but I like it! I used a fabric strip to create the pleated background.
Thanks for stopping by and have a great Friday Eve!
Card Instructions - Trim kiwi kiss cardstock to an A2 card.
- Pleat fabric strips, then stitch to secure.
- Adhere fabric to card front.
- Paint chipboard tree, then adhere to fabric.
- Hand-cut leaves, then adhere to tree.
- Stamp sentiment and adhere to card front.
:: My Goodies {embrace happiness} ::Stamps: Papertrey Ink - mega mixed messages Ink: Stampin' Up! - tangerine tango Cardstock: Stampin' Up! - kiwi kiss Patterned Paper: Fancy Pants Accessories: Craft Supply - thread; Janome Sew Mini; Maya Road - chipboard tree; Moda - fabric
Card Size: 4.25" x 5.5"
 Hi Everyone! Yesterday, we got the opportunity to visit the White House! These tickets are not easy to come by, so it was a real treat. We got to see the rooms open to the public, which are limited, but still treasured. Some rooms include the red, blue, green and yellow rooms, China room, and the room they entertain in! The house is so amazing and has so much detail in the trims and decor. No photos were allowed and I kept my cell phone off, so I do not have any pictures to share, just memories! If you ever plan a visit to Washington DC, try to plan ahead and get tickets to tour the White House.
Onto today's card...it is inspired by Scrapmaster's Paradise color challenge. I cheated and used cream as a base, but I already had the card started (which was ditched in another project), so I chose to salvage it for this color challenge. I used some AC Zing embossing powder and it's great. I love that color and the rest of the colors they have available. Yesterday, Peachy Cheap had a set of AC embossing powders on sale for under $9. I jumped on that deal!!
Thanks for stopping by and have a happy HUMP DAY!
Card Instructions - Trim cream cardstock to an A2 card.
- Stamp retro background pattern on bottom half of card.
- Color in dots using markers.
- Tie ribbon in a bow.
- Stamp flower, emboss, and cut out, then adhere to bow and add rhinestone.
- Stamp sentiment on card front.
:: My Goodies {thinking of you today} ::Stamps: Papertrey Ink - retro background basics + everyday classics Ink: Stampin' Up! markers - bermuda bay + melon mambo + only orange; Papertrey Ink - hibiscus burst; Versamark Cardstock: Papertrey Ink - cream Accessories: Michaels - ribbon; American Crafts - embossing powder; heat gun; Papertrey Ink - orange rhinestone
Card Size: 5.5" x 4.25"
 It's Blog Hop time! Fall colors are so warm and inviting and I really enjoy designing with them. So, when I saw Nichole posted this month's Blog Hop theme, I had to join in on the fun. I chose to use burlap and stitching as my forms of texture, combined with a summer sunrise + dark chocolate + kraft color palette. I used an oldie, but goodie, First Fruits stamp set. I have always loved that wheat cluster (or whatever it is called)!
Stamping on burlap (or fabric) is really new to me. I tried to stamp with summer sunrise first to get a bit of a brightness, but the burlap is a bit too dark, so I just went for the brown. I used ColorBox pigment ink to get full coverage and stamped it twice. It worked!
Thanks for hopping by! I'll hop around later this evening!
Card Instructions - Trim summer sunrise cardstock to an A2 card.
- Stamp polka dot background on card front (half).
- Add a strip of brown cardstock.
- On burlap, stamp wheat (repeatedly).
- Die cut an oval from stamped burlap.
- Stitch around oval, then adhere to card front with glue dots.
- Stamp 'ribbon,' cut out, then adhere to burlap.
- Add rhinestone.
- Stamp sentiment.
- Corner round edges.
:: My Goodies {autumn blessings} ::Stamps: Papertrey Ink - first fruits + polka dot basics 2 Ink: Papertrey Ink - summer sunrise; Stampin' Up! - chocolate chip; ColorBox - chestnut Cardstock: Papertrey Ink - summer sunrise + dark chocolate Accessories: Papertrey Ink - orange rhinestone; Craft Supply - burlap + stitching; Janome Sew Mini; Corner Chomper; Spellbinders - oval nestabilities; Provo Craft - cuttlebug
Card Size: 4.25" x 5.5"

Hey Everyone! Todays cards are inspired by Papertrey Ink's Blog Hop. Although this card is not for the Blog Hop, I still wanted to use burlap and stitching. I needed a masculine card and thought the burlap would be a great fit along with Men of Life stamp set. I love pairing chocolate + pure poppy + kraft (burlap) + spring rain + cream for the Men of Life set.
Later this afternoon, we're headed to the White House for a tour. I have visited the White House as a child and have vague memories of the red and blue rooms, so it will be fun to see if anything has changed (seriously doubt it) and how I will perceive it as an adult. I'm looking forward to a fun day in DC! There will be limited photos because no cameras are allowed. I'll see what I can do with my iPhone, so look for some TWEETS!
Don't forget to check back at 5:00 pm EST for my Papertrey Ink Blog Hop posting. I am going to try to remember to add the link from my iPhone because I'm sure I'll still be out and about at that hour. The card will have MORE BURLAP and STITCHING!! I had so much fun making these two cards!
Thanks for stopping by and enjoy your day!
Card Instructions - Trim spring rain cardstock to an A2 card.
- Trim burlap and stitch to card front.
- Stamp sailboat, cut out, then adhere to burlap with foam adhesive.
- Trim red cardstock, stamp background and sentiment, then add spring rain strip.
- Adhere strip to card front and add buttons.
:: My Goodies {burlap birthday wishes} ::Stamps: Papertrey Ink - men of life + everyday button bits Ink: Papertrey Ink - pure poppy; Stampin' Up! - chocolate chip; ColorBox - chestnut Cardstock: Papertrey Ink - spring rain + pure poppy + cream Accessories: Papertrey Ink - buttons; Craft Supply - thread + burlap; Janome Sew Mini
Card Size: 4.25" x 5.5"
 Edited to Add: My photo was terrible and you couldn't see the spring moss, so I took another photo and it's a lot better! My settings were a bit off, so I adjusted my shutter speed and aperture to get a better photo. I hope this is better, ladies!!
Hey there! How was your weekend? I relaxed most of the weekend. That scrapbook I was supposed to start, well didn't quite get started! I did take the packaging off the album! We talked and printed pictures instead of scrapped! I think that is why I cannot go to crops because I spend too much time talking and looking than actually creating!
The color palette on today's card is inspired by Dawn's color challenge. I used some new (to me) Gina K. Designs stamps! Love those flowers because they remind me of those weeds you can pull then blow to make a wish. Did anyone else do that as a child? I added a ribbon charm that I have been hoarding in my stash for quite some time. I thought it would go good with the glitter that I added to the flowers. Can you see it? Well, it's there and sparkly in person. The spring moss ink is so light, you can barely see it in the photo, but again, it's there! I need to exchange my ink pads out for the new pigment inks soon!
Well, thanks for visiting today and enjoy your Monday (as much as you can)!
Card Instructions - Trim spring moss cardstock to an A2 card.
- Trim cream cardstock and stamp flowers and sentiment.
- Mat cream cardstock on hibiscus burst cardstock.
- Tie ribbon around cardstock and add ribbon charm.
- Using foam adhesive, pop cardstock off card front.
- Add a little glue, then sprinkle glitter on flowers.
:: My Goodies {wishing you success} ::Stamps: Gina K - many wishes Ink: Papertrey Ink - hibiscus burst + spring moss + melon berry Cardstock: Papertrey Ink - cream + spring moss + hibiscus burst Accessories: Papertrey Ink - stamp and stick glitter + hibiscus burst ribbon; Craft Supply - rhinestone buckle (Hobby Lobby)
Card Size: 4.25" x 5.5"
 YES YES YES - It's FRIDAY! WOOO HOO!! I think I live for the weekends! I have lots of crafting to do this weekend, including starting a scrapbook for my friend's party Mac photographed. I'm not going to commit myself to finishing it because that's just too much! I will however start and hopefully get halfway finished! If I finish it, GREAT!
I received my goodies from the Gallery Idol contest and lots of American Crafts stuff. So, I wanted to see if I liked it. The best I could come up with for this bright colors was a kiddie card. What do you think? It seems kind of busy for me, but it's a kiddie card so... busy it is!
Have any plans this weekend? Please share!
Thanks for popping in today and have a fabulous weekend. Make sure to do something fun! :)
Card Instructions - Trim bermuda bay cardstock to an A2 card.
- Stamp polka dots on left side with watermark ink.
- Mat patterned paper on red cardstock, then tie ribbon into a bow.
- Add adhesive badge to bow knot and adhere to card front with foam adhesive.
- Stamp sentiment, cut strips, then adhere to card front.
:: My Goodies {happy birthday} ::Stamps: My Favorite Things - sassy sayings; Papertrey Ink - polka dot basics 2 Ink: Stampin' Up! - chocolate chip; Versamark Cardstock: Stampin' Up! - bermuda bay; Papertrey Ink - summer sunrise + pure poppy Patterned Paper: American Crafts - craft fair Accessories: Papertrey Ink - summer sunrise ribbon; American Crafts - flair badge
Card Size: 5.5" x 4.25"
 Hi there! Last night, we went to Cheesecake Factory. Needless to say, I have lunch and dessert for today! :) They serve so much food. I also went to bed really early as opposed to my usual nap, then up until 3 am routine. I hope that habit is gone now! Anyway, before dinner, I got a chance to make this quick card. My friend, Sarah, told me about the Scrapmaster's Paradise color challenges. I love color challenges, so I was eager to give it a try. I dug out one of my CHF Scrapblock background stamps! This time it's a distressed grid. I think I may like this one better than the distressed polka dots! I used my SU! marker to apply the ink since I did not have soft suede ink pad. It worked fine on that huge rubber stamp, but came out a little darker than I thought. I thought soft suede would be obviously lighter than chocolate chip, but maybe not! Thanks for stopping by and enjoy your Friday Eve! :)
Card Instructions - Trim soft suede cardstock to an A2 card.
- Stamp background (using marker as ink).
- Stamp flowers and sentiment and heat emboss.
- Stamp froggy, cut out, and adhere.
- Add rhinestones.
- Corner round edges.
:: My Goodies {just because} ::Stamps: Cornish Heritage Farms - distressed grid; Colorbok - friendly forest; American Crafts - sentiments Ink: Versamark; ColorBox - moss green Cardstock: Stampin' Up! - soft suede Accessories: Hero Arts - rhinestones; corner chomper; white embossing powder; heat gun; Stampin' Up! - soft suede marker
Card Size: 4.25" x 5.5"

Happy Hump Day! This week is going slow and fast at the same time. Is that possible? Well, this week feels that way! Here is card where I am trying something different. I am using one of American Crafts new stamp sets that I picked up at Archiver's. I used a pure graphic style for this design. I'm not sure if I like it. The rhinestone brads are now making me think of Texas (giggle)! I used the letter 'hi' because I had to remove them from another project. Instead of tossing them, I added them to this card. Somehow, I lost the dot to go over the "i" so I used another brad. OVER-BRAD! :)
I've been working on lots of projects and will be able to share them with you sooner than later. One is a major project that will involve you, hopefully! That's all I'm telling until it's time for me to tell! :)
I hope you enjoy your Wednesday and thanks so much for visiting!
Card Instructions - Trim white cardstock to an A2 card.
- Stamp scallop border.
- Trim patterned paper and adhere to card front.
- Stamp frame, cut out, and stamp flowers, then add brads.
- Adhere to card front.
- Add brads to scallop border.
- Adhere chipboard letters and brad.
:: My Goodies {hi} ::Stamps: American Crafts - sentiments Ink: ColorBox - mint; Papertrey Ink - berry sorbet Cardstock: Papertrey Ink - white Patterned Paper: Papertrey Ink - bitty box Accessories: Papertrey Ink - berry sorbet ribbon; foam adhesive; JoAnns - rhinestone brads; Basic Grey - chipboard letters
Card Size: 4.25" x 5.5"
 How is it going everyone? I hope all is well. I really do not have that much to share. I have done a little shopping. I was in Raleigh over the weekend and made a pit stop into Archiver's. I only picked up a handful of stuff, so I did not do too much damage. The only 'new' item I got was an American Crafts stamp set. I also purchased a few items for my studio to try to complete the room so I can finally show it. It basically is finished, but I would hate to show it, then add an element here or there that I would like to share, so I am going to hold out on the reveal until I feel it is complete.
Today's card is inspired by PTI's Everyday Button Bits stamp set. Although I really did not use it, I got the idea from it. I used the topiary stamp, but added an abstract flower pot and elongated the stem by placing the pot as far down as possible. I used a large new leaf button for the topiary plant. Nothing fancy, but it is like a plant to give someone under the weather or not doing so great.
Enjoy your day and thanks for visiting!
Card Instructions - Trim kraft cardstock to an A2 card.
- Stamp card front background.
- Trim raspberry fizz cardstock and mat on cream cardstock.
- Stamp topiary stem and add button.
- Stamp woodgrain background, then cut abstract pot (this was a scrap piece for me).
- Adhere to card front and tie ribbon.
- Stamp sentiment on cardstock strip then adhere to card front.
:: My Goodies {topiary get well} :: Stamps: Papertrey Ink - everyday button bits; All Night Media - woodgrain; Cornish Heritage Farm - distressed circles Ink: Stampin' Up! - white + chocolate chip Cardstock: Papertrey Ink - vintage cream + kraft + raspberry fizz Accessories: Papertrey Ink - new leaf button + ribbon + twine; foam adhesive
Card Size: 4.25" x 5.5"
 Hey there! It's Monday...again. However, I am still cheesing from my SCS DD DT Reveal this weekend. Thank you so much for all of your nice, sweet, and thoughtful comments here on the blog and over on SCS. I really appreciate your support and joining in on my happiness. This is going to be an exciting and fun six months. I'm already gearing up for October's theme, so get ready!!
Today, I used PTI's exclusive CHA stamp set, Floral Fusion. I added rhinestones (that I hope they carry by the way because this shade matches plum pudding perfectly...HINT HINT) to the flower centers. It is a very simple layout and design using limited supplies.
Thanks so much for stopping by and again I appreciate your comments and support on my new design team venture.
BYE!
Card Instructions
- Trim plum pudding cardstock into an A2 card.
- Trim lavender moon cardstock, then mat on ripe avocado cardstock.
- Stamp floral theme and sentiments, then add rhinestones.
- Tie ribbon into a bow, then adhere to card front with foam adhesive.
:: My Goodies {grow with love} ::
Stamps: Papertrey Ink - floral fusion
Ink: Papertrey Ink - plum pudding + ripe avocado
Cardstock: Papertrey Ink - plum pudding + lavender moon + ripe avocado Accessories: Papertrey Ink - plum pudding satin ribbon; KaiserCraft - rhinestones
Card Size: 5.5" x 4.25"
Email readers, click here for video. I'm so happy today has finally arrived! Now, I do not have to hold this secret any longer! Earlier this summer, Jenn Balcer contacted me to ask me one of the Splitcoaststampers Dirty Dozen Designers!! How could I turn down that offer! I honestly did not know what I was getting into, but it's been great these past couple months learning everything and meeting everyone. The Splitcoaststampers family has made me feel so welcomed. Joining me this month is Karen Giron! Please hop on over and wish her a congratulations as well.
To view my work, you have to be a SCS Fan Club member. You can read all the details and sign up here. It is only about $25 a year or $15 for 6-months. Is that asking too much for you all to come join me on my SCS design team journey along with the others?
Here are the other Dirty Dozen members:
Here is a sneak peek of one of the many projects I designed for this month's Fan Club gallery. Please go by and take a look at all of our projects. We have lots of fun stuff to share.

Hey there! It's Friday and boy am I happy to see it get here! Here is a fast card featuring Papertrey Ink's Wise owl set (again). Instead of using owls, I focused on one of the flowers and highlighted it in a repetitive way. It's very simple, but colorful.
Thanks for visiting and have a great weekend! Be sure to stop back by here tomorrow...I will share some news with you all!!
Card Instructions
- Trim white cardstock into an A2 card.
- Trim raspberry fizz cardstock and dry emboss.
- Tear the bottom off of the cardstock.
- Stamp flowers and cut out. I stamped the bottom in green ink, then the top in pink ink and inked together.
- Adhere to card front with foam adhesive and add rhinestones.
- Trim summer sunrise cardstock, stamp sentiment, and adhere.
- Add twine and corner round edges.
- Adhere to card front.
:: My Goodies {grow with love} ::
Stamps: Papertrey Ink - wise owl + everyday button bits
Ink: Papertrey Ink - new leaf + raspberry fizz + summer sunrise
Cardstock: Papertrey Ink - white + raspberry fizz + summer sunrise Patterned Paper: KI Memories - Elsie Jack+Abby apron dot self-adhesive fabric paper
Accessories: Papertrey Ink - twine; Provo Craft - cuttlebug + swiss dots embossing folder; KaiserCraft - rhinestones; corner chomper
Card Size: 5.5" x 4.25"
 Hey Everyone! How is it going? Here is a card using patterned {paper} that I have had for a few months. It is KI Memories Elsie collection and is really fabric that is backed on self-adhesive paper. When I removed a corner, it didn't seem to have adhesive on the fabric, so not sure about that! I kept the backing on to maintain the fabric's stiffness and used foam adhesive for dimension. I also used some ribbon in my stash I rarely pull out and I was so happy to use 'old' stuff! Another oldie, but newbie to me is my Stampin' Up! Autumn Days set. I think that is a quail, but anyway, I stamped it on Bermuda Bay to make it a little different. I love all kinds of birds on my cards (owls too)!! (ETA: Correction - it's a pheasant! Thanks ladies! I knew it was something else, but couldn't recall the name of it) The ironic thing is that I am not a bird watcher or anything! I used some Kaiser rhinestones and really like this color. I hope PTI carries this blue hue soon! HINT HINT!
Thanks for stopping by and have a great Friday EVE!! Hey, I gotta look on the bright side!
Card Instructions
- Trim kraft cardstock into an A2 card.
- Dry emboss card front.
- Trim pattern paper and corner round some edges.
- Tie ribbon and add button, then adhere to card front.
- Stamp sentiment and pheasant and cut out.
- Adhere quail to card front and add rhinestones.
:: My Goodies {take care} ::
Stamps: Papertrey Ink - paper tray; Stampin' Up! = autumn days
Ink: Stampin' Up! - chocolate chip
Cardstock: Papertrey Ink - kraft; Stampin' Up! - bermuda bay Patterned Paper: KI Memories - Elsie Jack+Abby apron dot self-adhesive fabric paper
Accessories: We R Memory Keepers - corner chomper; KaiserCraft - rhinestones; Offray - ribbon; Papertrey Ink - button + twine; Provo Craft - cuttlebug + swiss dots embossing folder
Card Size: 5.5" x 4.25"
 What's been going on? For me, lots of crafting time. I just picked up Papertrey Ink's Wise Owl set by Alli Miles and it's so versatile. Every time I look at it, I want to stamp owls. Sorry for the multiple owl cards, but it is a different one! Instead of stamping their bellies, I used those great buttons! I'm not sure if someone else has done this or not, but since the introduction of Everyday Button Bits, I've been thinking of more ways to incorporate buttons into my designs. Since I was adding buttons, I thought about the eyes and used rhinestones. Isn't it great that PTI is now offering rhinestones for sale?! Kaiser is by far my favorite rhinestone manufacturer. They have a great selection of colors. I'm so excited that PTI will be carrying them because I'm confident they will carry the best color choices all of the time, unlike some LSS where they sell out and you can't find that color again.
Anyways, enjoy your day and thanks for visiting!
Card Instructions - Trim summer sunrise cardstock to an A2 card.
- Trim patterned paper, scallop edge punch, and add ribbons, then adhere to card front.
- Stamp owls, cut out, and add buttons, then adhere to card front. Add rhinestones to owl eyes!
- Add buttons and sentiment.
- Corner round the edge.
:: My Goodies {thank you} :: Stamps: Papertrey Ink - wise owl Ink: Stampin' Up! - chocolate chip Cardstock: Papertrey Ink - hibiscus burst + spring moss + summer sunrise Patterned Paper: Papertrey Ink - bitty dots Accessories: Papertrey Ink - buttons + ribbon + twine; Stampin' Up! - scallop edge punch; Kaiser - rhinestones; corner chomper
Card Size: 5.5"" x 4.25"

Hi there! Thanks for all of your comments on my card yesterday. Today, I am sharing a card inspired by the Loonie Stampers Challenge. I used the design and color palette in the pillow for my inspiration. I did not use to be a fan of a 'tearing tool' thinking you can tear without it. However, I have discovered now that I appreciate the 'perfect' tear and use my tearing tool much more now when I want that effect. It all depends on you. The tool is relatively inexpensive, but not something to run out to purchase.
Last night, I accomplished lots! I was able to get my watermark back! I am so afraid of CS4 that I just stopped using one, as you all may have noticed. Mac helped me create them and gave me great step-by-step tutorial on editing my photos (quickly) and applying a (watermark) brush to the photo. I breezed through lots of photos tonight and now enjoy working in CS4, especially on this huge 24" monitor. I can see every detail in the photo. So, I hope my photos will be enhanced now that I am able to edit them better.
Thanks for stopping by and have a great day.
Card Instructions - Trim ripe avocado cardstock to an A2 card.
- Trim vintage cream cardstock and stamp design.
- Adhere cream cardstock to scarlet jewel cardstock.
- Using a tearing tool, tear the right side.
- Add ribbon, button, and trinket pins.
- Punch scallop circle, stamp sentiment, and adhere under button with a glue dot.
:: My Goodies {thank you} :: Stamps: Papertrey Ink - with sympathy + mega mixed messages Ink: Papertrey Ink - scarlet jewel + ripe avocado + summer sunrise Cardstock: Papertrey Ink - vintage cream + ripe avocado + scarlet jewel + summer sunrise Accessories: Papertrey Ink - scarlet jewel button + ripe avocado ribbon + twine; May Road - leaf trinket pins; Marvy Uchida - scallop circle punch; Creative Memories - tearing tool
Card Size: 4.25" x 5.5"

Hey Everyone! How was your weekend? Mine was relaxing. We did absolutely nothing! Well, we did stuff, but nothing worth blogging about! I'm on major craft deadlines, so I created LOADS of stuff! I'll share some with you through the rest of the week.
Did you guys read my tweet? I forgot to post here that CARDS magazine is highlighting me as their Designer of the Month in their January 2010 issue!! How exciting! I was so surprised when I was notified. I've known for a few weeks now, but wanted to make sure I got everything done before telling you all! I can't wait until January to see the issue.
Today's card colors are inspired by Dawn's color challenge. It is quite a unique color palette that I would never put together, but on a neutral base did not turn out as bad as I thought. I'll have to admit, it took me quite some time to think of this design and I didn't know if it would end up in the trash or on the blog. But, here it is! It's very simple, but the colors make it pop.
Well, that's it for now so stop back by tomorrow for more 'stuff!' Thanks for visiting today and enjoy your Monday!
Card Instructions - Trim plum pudding cardstock to an A2 card.
- Trim vintage cream cardstock and stamp flowers in varying inks.
- Adhere cream cardstock to card front.
- Add stitching.
- On strips of raspberry fizz cardstock, stamp sentiment.
- Add sentiment to card front using foam adhesive.
- Add button with twine to sentiment strip.
:: My Goodies {thank you} :: Stamps: Papertrey Ink - life + paper tray Ink: Papertrey Ink - scarlet jewel + raspberry fizz + plum pudding Cardstock: Papertrey Ink - vintage cream + plum pudding + raspberry fizz Accessories: Papertrey Ink - plum pudding button + twine; Janome Sew Mini; Craft Supply - thread; foam adhesive
Card Size: 4.25" x 5.5"
I can't believe I have photographed a wedding. If you asked me about being a wedding photographer a year ago, I would have laughed! My point is, you never know what you are capable of until you try. Whatever I do in life, I give it my best and my all, but sometimes my best isn't the best. I was very surprised when I finally took a look at my pictures from the wedding. Some things you cannot deny and now I cannot deny that I like photography and specifically wedding photography. I had so much fun shooting the wedding and I cannot wait until our next one in October! Thanks for listening to me and I hope you enjoy these highlighted photos that I contributed to Boldlifestyle Photography!
Enjoy the photos and your weekend! Thanks for visiting today.
TGIF! I'm so happy the weekend is finally here! I love Fridays! I hope to go to the farmer's market in the morning...or maybe I'll just sleep in! Anyway, it seems like we have been on the go this entire summer and weekends where there is nothing to do, I cherish! Aaaahhhh!
I hope to ink up lots of new and old stamps and complete some projects. I'm on major deadlines since I was in Orlando last weekend. Time sure does creep up on you when you are having fun, right?!
I planned on making a fast card today, but just did not feel up to making it. So, I'm sure I'll make it this weekend. It is all sketched out and ready to create. I love it when I get ideas throughout the day. Do get you ideas at odd times of the day? If I can't create, I jot the idea down, typically on paper (I'm kind of old school and rather use post-it notes/pieces of paper), but if I'm out and about, I type it in my Notes App on my iPhone. If you don't do this, try it out! I did not used to do this at all, but then started jotting down ideas and it works! Well, it does for me. Today, a card idea came to me while walking to the restroom. I know out of all places, right?! So, when I got back to my desk I remembered that I had an idea, but forgot what it was. Finally, the idea came back and this time I made sure I sketched it out on paper! Sorry if that was too much information!
Happy Friday and enjoy your weekend! Thanks for stopping by and HAVE SOME FUN! {Live...Laugh...Love}
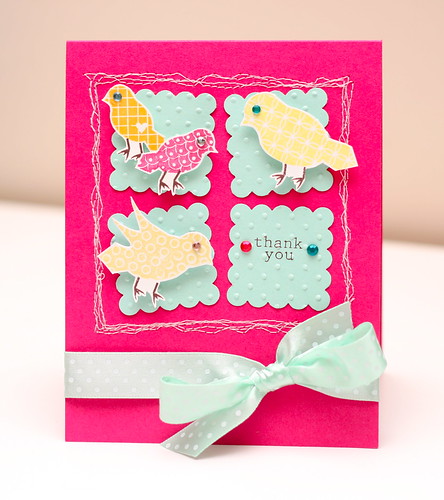
Card Instructions - Trim raspberry fizz cardstock to an A2 card.
- Punch scallop squares and dry emboss.
- Stamp birds, cut out, then adhere to squares with foam adhesive.
- Add rhinestones.
- Stamp sentiment.
- Marker perimeter, add stitching, then adhere squares.
- Add ribbon.
:: My Goodies {thank you} :: Stamps: Papertrey Ink - bird watching additions + on my couch (sentiment) Ink: Stampin' Up! - chocolate chip; Papertrey Ink - lemon tart + spring moss + raspberry fizz + summer sunrise Cardstock: Papertrey Ink - white + raspberry fizz + aqua mist Accessories: Papertrey Ink - aqua mist swiss dots ribbon; KaiserCraft - rhinestones; Janome Sew Mini; Craft Supply - thread; foam adhesive; Stampin' Up! - scallop square punch
Card Size: 4.25" x 5.5"
 Hi Everyone! It's already Thursday and that's hard to believe. This week is flying by for me, how about you? I decided to try out my now Cornish Heritage Farms Scrapblocks and my first to pick up was the distressed circles, of course. After stamping it, I was AMAZED! It looked like designer patterned paper. LOVE THIS STAMP! I can't wait to ink the others very soon! I was technically just 'testing' it out on a scrap piece of cardstock, then ended up liking and made use out of it! For the Maya Road chipboard tree limb, it is painted with brown acrylic. I painted a few limbs a while ago so that when I was ready to use one, it could be painted. This works great when you are short on time, especially when you know most of the time a tree limb will be brown.
I was able to photography my friend's (from the 6th grade) daughters (Aniyah + Jordyn) and wanted to share a few of them with you. You can view the rest of them here.
   
Thanks for stopping by! Mac appreciated all of the comments and was excited! "See" ya'll tomorrow!
Card Instructions - Trim kraft cardstock to an A2 card.
- Trim summer sunrise cardstock and stamp polka dot background.
- Trim dusty durango cardstock strip and adhere to left end of summer sunrise cardstock.
- Adhere to card front.
- On white cardstock, stamp owl and flower, then cut out.
- On summer sunrise cardstock, stamp owl parts, cut out, and adhere.
- Paint/ink chipboard tree limb and adhere to card front.
- Add owl with foam adhesive.
- Stamp sentiment, adhere, and add flower with rhinestone.
- Corner round one edge, then ink and add faux stitching.
:: My Goodies {thanks a hoot} :: Stamps: Papertrey Ink - wise owl; Cornish Heritage Farm - distressed circles Ink: ColorBox - rousillon; Stampin' Up! - chocolate chip + marker; Papertrey Ink - new leaf + chai Cardstock: Papertrey Ink - white + kraft + summer sunrise; Stampin' Up! - dusty durango Accessories: Maya Road - chipboard; KaiserCraft - rhinestone; Chomper Card Size: 4.25" x 5.5"

Hi there! It's already Hump Day! I'm so happy about that. I'm looking forward to the weekend to relax and stamp! Here is a fairly quick card that showcases PTI's couch set. I thought I would make a red 'leather' chair by heat embossing it. Although you cannot see it in the photo, in real life, it creates the leather-look.
I am also ready to share photos from the wedding we photographed last month. There is a slideshow with music as well. I hope you enjoy. I'll probably do a separate post showcasing a few of the favorite pictures that I, surprisingly, photographed. If you like what you see, feel free to leave McArthur a comment on his blog! :) He'll love that, but just don't tell him I sent you! Click HERE to view slideshow + photos.
Card Instructions - Trim dark chocolate cardstock to an A2 card.
- Trim patterned paper and mat on white cardstock.
- Stamp chair, heat emboss with red embossing powder.
- Cut out chair and set aside.
- Stamp legs, table, coffee mug, and picture.
- Add chair using foam adhesive.
- Color in picture frame using markers.
- Trim pure poppy strip and stamp sentiment.
- Add button and adhere everything to card front.
:: My Goodies {i chair-ish your friendship} :: Stamps: Papertrey Ink - on my couch Ink: Versamark; Stampin' Up! - chocolate chip; Papertrey Ink - pure poppy Cardstock: Papertrey Ink - white + dark chocolate + pure poppy Patterned Paper: Papertrey Ink - bitty box Accessories: Papertrey Ink - button + twine; red embossing powder, heat gun Card Size: 4.25" x 5.5"
 Papertrey Ink - Friday (CHA Exclusive Floral Fusion)
 Papertrey Ink - Saturday (CHA Exclusive Floral Fusion)
 Splitcoaststampers - Friday (Taylored Expressions)
 Splitcoaststampers - Saturday (Unity Stamp Co.)
Hey Everyone! I had a great time at the CHA Super Show. I was so excited to be there. When I first arrived, Mac and I undoubtedly walked right, and literally walked right into the PTI booth. It was funny because I was thinking, "These cards are great" (referring to the DT cards on the booth). Then, realized a split second later, this is PTI! I looked over and immediately recognized faces of the DT! Then, I noticed the swarm of customers, fans, and onlookers. The line was growing long. I decided to tackle it first for fear something would run out! Why I was so concerned I don't know. I can order from their site at any time and on any day! It's one of those feelings, like I've got to get it now!
Anyway, I saw Dawn and Nichole as the booth greeters. While waiting in line, Heather walked past and recognized me. I was so shocked! My 'giddy-ness' started to kick in. Next, we see Nichole and Dawn. Nichole yelled my whole name, "Ashley Newell" and began talking about my video. She loved it (as well as the rest of the PTI group, Jane and Julie). Now, when I recorded that video, I did it for the 'support group' really. Those of us who attend the release party on the 15th every month. I never thought Nichole, Julie, and Jane would watch it! I was kind of embarrassed, but in a good way. (Side Note: I get shy really quickly in public) Anyway, I met Dawn and she wanted to meet Mac since he contacted her last year to make me an anniversary card ( here). We had a quick conversation, took photos, and then shopped. At the checkout, I met Jane and Julie and discovered they were mother and daughter. Was I the only one who did not know this? I loved PTI even more after finding that out! Saw Debbie and Heather, took photos and chit chatted for a bit. Everyone....EVERYONE was so nice, sweet, and just nice (oh, I said that already)!
Next, I went to SCS booth, met Beate and Jenn Balcer! Such lovely ladies! I had fun over there and participated in the make and take featured by Taylor Vanbruggen. We walked around a bit, then I did a make and take at PTI that featured the exclusive stamp set. Heather helped me out!
On Saturday, I did the same thing! We took more pictures (using a different lens) and recorded some video. I even got Dawn and Nichole to say HEEEEY! I'll share that with you all soon! I met some blog friends, Naomi, Julie, Christy, Kisha, and lots of others like AJ Otto, Maren Benedict, Jennifer Buck, Jimmi Mayo (I don't want to leave anyone out but...), Lori Craig, and so on and so on! You saw most of the pictures in the slideshow. The photos from the slideshow (plus, some extras) are also viewable on my flickr page.
I want to thank Mac for supporting me and coming along to Orlando and attending the show on both days, for not complaining, and for not getting anxiously ready to go! I appreciate how patient you were and for taking pictures, making me feel like a super star, and compiling the slideshow! Thanks SO much!
I shopped a bit more for some stamps/fabric/accessories. Here is the video of what I picked up!
|
|


