|
|
 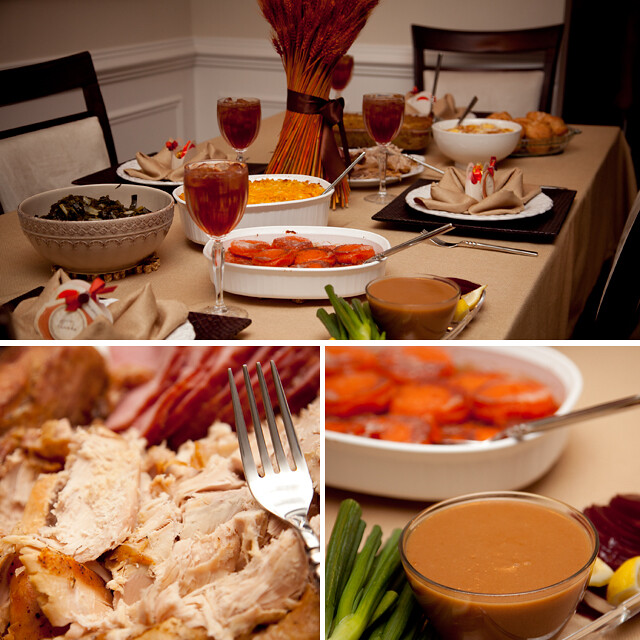 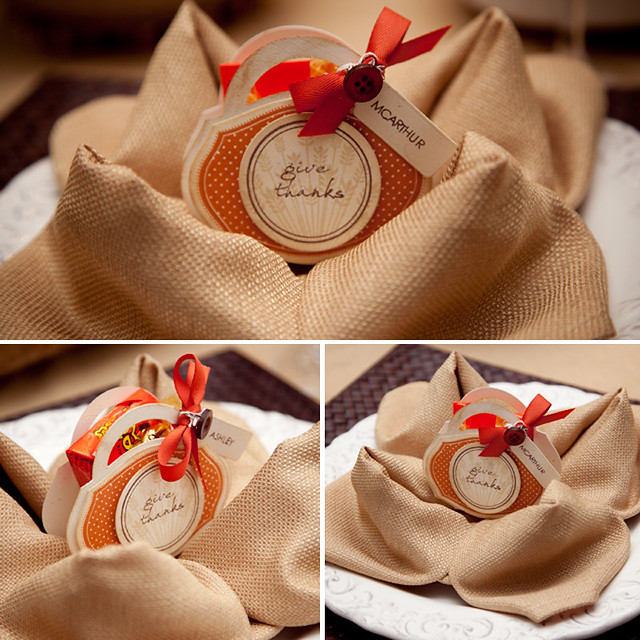 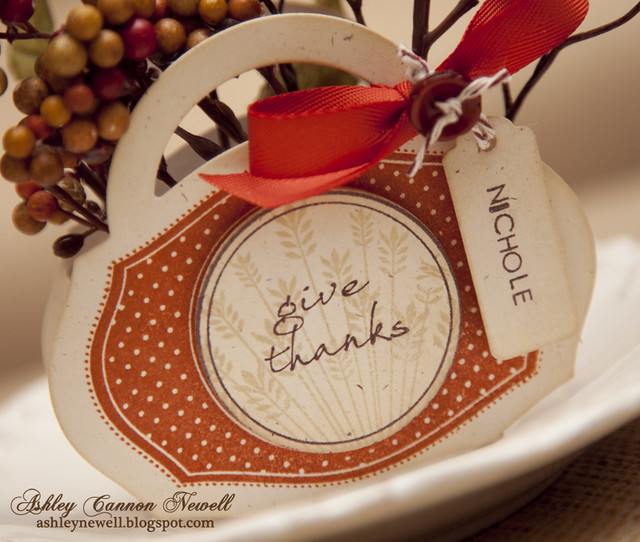 Giving thanks today for so many things including my health, family, love, and friends. With friends, I include all my bleeps! Thanks for checking my blog and following me pretty much daily. I truly appreciate your support and encouragement to continue my crafty creative journey. I'm also thankful for missed opportunities because that means that it opens doors for new and many times better opportunities! That glass of sweet tea today...is half full! Happy Thanksgiving, Bleeps! We ate super early for us this year! Thanksgiving lunch! Guess we'll eat again (about 2 more times)! Peach cobbler minis and Red Velvet Cheesecake (courtesy of the Cheesecake Factory) is about to get devoured! By the way, my sister folded the napkins into a water lily. Click here for the tutorial! If you're looking for details on the favor/place card, please visit Tiff's blog here.
 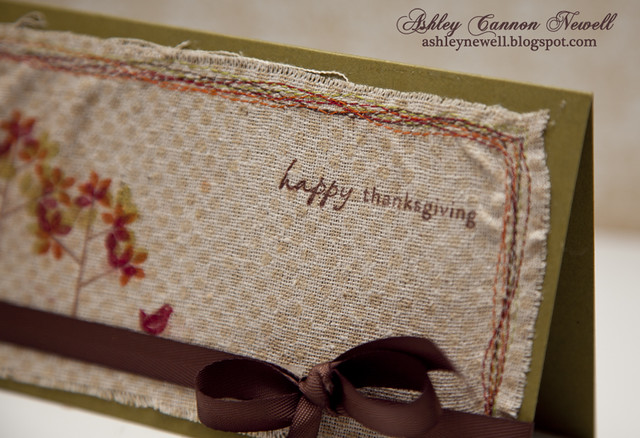 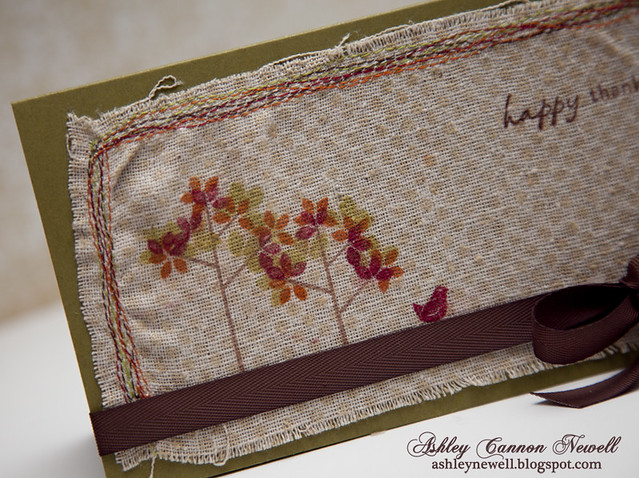 Hey Everyone! It's Friday Eve and I'm excited about that because the weekend is right out the corner. I've been wanting to participate in Waltzingmouse Stamps' sketch challenges again, but just can never find the time, until this week. So, here's my card I created using the sketch. I was inspired by so many designs using the Teeny Trees stamps set, that I felt compelled to use mine. I just used fabric as my focal point, instead of cardstock. So, have you all started making your holiday plans? I'm not sure what we're doing for Thanksgiving just yet, but I'm sure it's going to involve eating! I did put up a couple of fall things around the house, like my {fake} wheat centerpiece and front door wreath. I like shopping at Marshall's and Home Goods for seasonal items and boy did they have a lot! The Home Goods store was full of Christmas decor and I can't wait to go back to get some new stuff to replace some old! :) So, do you use the same holiday decor every year, add a few pieces to your collection, or start over completely? Starting over is probably a bit extreme, but some of the pieces that I purchased five years ago just isn't my style anymore and I'm ready to chuck it! I'll probably donate it. Oh My...while writing this post, I looked up on a bookcase and noticed one of those CHRISTMAS pieces...why is it still there? All year long? haha OKAY it's really going this year! :) Instructions- Trim muslin, stamp polka dotted background, trees, leaves, and sentiment.
- Add stitching, then run through Creatopia and adhere to card front.
- Add ribbon.
SuppliesStamps :: Waltzingmouse Stamps - teeny trees, off beat backgrounds Ink :: Clear Snap - ColorBox - chianti; Tsukineko - vintage sepia, spanish moss; Close to My Heart - autumn terracotta Cardstock :: Papertrey Ink - ripe avocado Embellishments :: Craft Supply - muslin; Papertrey Ink - dark chocolate twill tape Tools :: Janome - sewing machine; Xyron - Creatopia fabric adhesive Thanks so much for your visit! Take care and I'll see you tomorrow for another Embellish Color Challenge!
 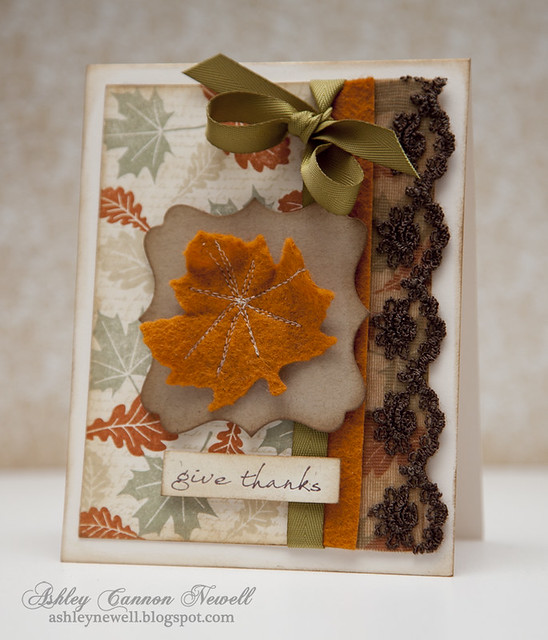 Hey Everyone! I hope you're enjoying your Sunday. I've been busy reorganizing my studio. I've organized my ribbon and buttons and added a wall mounted cabinet above my counter top workstation. I'm really excited about it and have yet to fill it up because I had to make this card! I know, really funny! Anyway, I'm really thankful for the studio space that I have and for McArthur for helping me organize my space and building the furniture and installing it! He was a real IKEA trooper yesterday and I appreciate that! I now have a full space and he's moved up to my old studio to have his own 'private' office! I'm going to miss him on the computer with me, but having an extra work table is also exciting. So, my day yesterday inspired the creation of this card to give thanks for my life. Here's a detailed photograph showcasing the felt leaf die cut that I stitched to create the veins.  Instructions Instructions- Trim cream cardstock to 4" x 5.25" and stamp leaves and text background.
- Adhere vintage trim, felt border, and green twill tape ribbon.
- Die cut label, ink the edges, and adhere to cardstock with foam adhesive.
- Die cut leaf from felt, ad stitching, then adhere to label with foam adhesive.
- Stamp sentiment on cardstock strip and adhere with foam adhesive.
- Ink the edges of the cardstock and adhere to an A2 card base, then ink those edges as well.
SuppliesStamps :: Waltzingmouse Stamps - blessed by you, teeny trees; Papertrey Ink - text background Ink :: Close to My Heart - bamboo, autumn terracotta, garden green; Ranger - antique linen, vintage photo; Stampin' Up! - chocolate chip Cardstock :: Papertrey Ink - vintage cream, rustic cream Embellishments :: Heather Bailey - felt; Websters Pages - vintage trim; Papertey Ink - ripe avocado twill tape Tools :: Spellbinders - S4-301 labels sixteen, S4-228 nested maple leaves, wizard; Janome - sewing machine Thanks so much for hopping by! I'm really thankful for my readers and all of your support! Take care and enjoy the rest of your weekend.
     Hey there, Bleeps! I hope you all enjoyed your Thanksgiving holiday! I sure did! I got a bit stressed in the end of tying everything together. You know how you have a vision of how you want everything to look and it just doesn't quite fit, well that happened to me, but it still turned out nice. Above, are a few photos taken the day of Thanksgiving and also just a few minutes ago that I staged to showcase a sample of the place card and the menu presented at the table setting.
We hosted my mom, sister, and also our neighbors. I was very excited to use my new vintage dishes found at a local retailer. Instead of making traditional place 'cards,' I made one-layer card that fit into a small pine cone to accent the table setting. The table was kept simple with a charger and a simple 'wheat' centerpiece (picked that up from Marshall's). I created the menu in Photoshop and Mac helped by printing and cutting them. I added ribbon at the last minute and wished I had time to mat them on brown cardstock, but darn...time was up! I think that would've made a bigger impact and I still will mat one later and showcase the difference just so you all can see!
The place cards are Spellbinders Labels 4 Nestabilities die cuts and stamped with Waltzingmouse Stamps coordinating set. I added oval nestabilities die cuts, stamped a pine cone theme (Stampin' Up! - autumn days) and then added the names by stamping eat individual letter (Papertrey Ink - simple alphabet). The place cards were finished off with a few green rhinestones.
Now, this year I wanted to tackle a few new baking recipes. As background, I am NOT a baker. I rarely bake anything other than box brownies or cake mix! Although I love to cook, I am not a baker. But, I did manage to attempt the recipes. I had a few disasters! The pound cake turned out great; however, I overfilled the baking pan and it bubbled over causing it to shrivel and die! We tasted some of the over flowed bits and it as GREAT, just very UGLY! So, that was not served...DARN IT (again)! I also made a peach cobbler. The dough part is most my un-favorite thing to do EVER! Mind you, I do not own a mixer (at least not at that time), only a hand mixer, which I did not use and so it was quite daunting. The dough was not 'perfect' but turned out good enough to cover the dish (whew)! The recipe was great, but I needed to add a bit more 'juice' to it. I was so afraid of it being soupy that I did not add it all...another DARN IT! However, at least it was good enough to serve! I also tried a brownie dish that I've made before. The disaster with this dessert was I forgot to thaw the cool whip...a big "OH MY GOSH" at the last minute! My sister dashed off to the store to find some cool whip spray, but it's SO not the same as traditional cool whip, but as a good enough fix to serve! Lastly, I tried my hand at homemade yeast rolls. These actually turned out great!
I said I would not bake again, but I think I will now that I went out and picked up a Kitchen Aid mixer at Wally World in the Black Friday extravaganza! I think that will make baking just a tad easier and the fact that I've tried once, it shouldn't be as hard the next go 'round, right?! Well, at least I hope not! All of the rest of food turned out okay, but not THE BEST like I like it! When I do this again, I'm going to tackle more food the night before when I'm not under the gun!
My sister and I shopped all of the door busters. We shopped at a local outlet mall from midnight and then made a few stops and did not finish up until after 7 am Friday morning. I had 2 coffees and was so energized by the shopping that staying awake was no problem until I 'crashed' at Bath and Body Works! A lot of people think it's crazy to get out there and shop with the masses, but it's really fun! I only recommend it to those who can handle crowds, people bumping, and patience. Lines are very long at times and you have to be willing to sacrifice time for a few dollars! It's just something to do for me and to experience. I can also see why some people would rather pay the extra money not to wake up at the crack of dawn and deal with the masses; it's all up to the person! People watching is so fun to me (remember, I'm the "watcher" from my anniversary post) so I truly enjoy it!
Grateful for time with family and friends and even the food disasters! I hope you enjoyed your Thanksgiving too!
Thanks for stopping by and enjoy your Sunday!
 Happy Hump Day, Bleeps! Today, starts the pre-Thanksgiving festivities for us. I hope to get off of work a little early so I can nap and start cooking all night. I'm a night owl and prefer that schedule! Today, I am sharing a wine gift bag. It is super quick to make and perfect for a hostess if you going to someone's house for the holidays. Who doesn't like wine? Well, I'm sure many don't, but wine or even some sort of sparkling bubbly (alcoholic or not) is a festive way to express your gratitude.
I'd like to take today's post and express my gratitude for you, my Bleeps! I never thought people would read my blog and I'm ever so grateful for each of you. If I could, I would make this wine gift bag (with wine included) in it to give to you because I am thankful for you. There are so many things I am thankful for, but thankful for people is the most special to me. Everything else may come and go, but people should be cherished. I would love to hear what you are thankful for this holiday, so please leave a comment and share to celebrate this joyous holiday!
Enjoy your day and thanks so much for your visit!
Instructions - Cover bag front with crushed curry cardstock. (TIP: I overlapped 2 pieces, but you can't see it!)
- Trim core'dinations cardstock and add scored lines, then sand and adhere to bag front.
- Trim polka dot patterned paper.
- Add stitching to the bottom of the patterned paper, then adhere to bag front.
- Stamp sentiment on cardstock block and adhere using foam adhesive.
Supplies
Stamps :: Papertrey Ink - first fruits Ink :: Clear Snaps - chestnut Paper :: Stampin' Up! - crushed curry; Papertrey Ink - bitty dots patterned paper; Core'dinations - chocolate collection (yellow core) Embellishments :: Nashville Wraps - wine bag, tissue paper Tools :: sewing machine; thread; Scor-Pal
 TGIF Bleeps! It has been a very long day + night + morning for me! I am still awake as I write this post. I had to get a few things completed before we skip out of town today. First off, this card is a case of another card I posted a very long time ago. My neighbor requested it and I remade it with a sentiment and more purple. I also worked on my World Card Making Day cards or so I thought! I ended up not liking one, then found one I recently made, but never showed, so that did it!
Be sure to stop back by tomorrow to see my World Card Making Day card! I'll be back home later to get my card crafting on all night!
Happy Weekend, Bleeps! Thanks for visiting today!
Card Instructions - Trim rich razzleberry cardstock to an A2 card.
- Adhere ribbon to card front.
- Stamp wreath on paper and mat on gold cardstock, then adhere to card front with foam adhesive.
- Stamp sentiment, mat on cardstock and adhere to card front.
- Add stickles.
:: My Goodies {with appreciation} ::Stamps: Papertrey Ink - mega mixed messages; PSX - rose hip wreath (discontinued) Ink: Clear Snap ColorBox - chestnut Accessories: Stickles; Paper Source - ribbon Card Size: 4.25" x 5.5"
 Hey there everyone! Today is the big day for Tracy Schultz and her new stamp line The Petal Press! Happy Harvest is now available for purchase at i {heart} papers. It is a high-quality clear stamp set and only costs $10. So, if you're looking for a fall set that will take you into Thanksgiving, this set is it! I have designed a card to share with you to get your mojo flowing on what you can create with this stamp set. There are so many options because the set is extremely versatile by allowing you to change the flower arrangements.   Need more ideas? Here is a tip ship on the various combinations to use this stamp set. Let me count the ways...better yet, you can just look at them here:  Card Instructions - Trim rustic white cardstock to an A2 card.
- Stamp images, color, cut out and set aside.
- Trim burlap and stitch on brown cardstock.
- Tie ribbon into a bow.
- Stamp sentiment, then add a tag using twine.
- Adhere focal point to card front.
:: My Goodies {give thanks} ::Ink: Stampin' Up! - chocolate chip Cardstock: Papertrey Ink - rustic white + dark chocolate
Card Size: 4.25" x 5.5"
  TGIF!! Today's posting is a first for me! I'm participating in 2 Sketches 4 You challenge this week. I love challenges, but sketches are a real challenge for me. I stared at this card forever and asked Mac about it about 5 times. I'm sure he was sick of it! He did help a bit because I moved the twine down just a tad and it made the layout look a little better (to me, at least)!
So, while I was on my way to pick up Macwell (Mac's nickname because people tell him he looks like Maxwell, the singer) and was a bit early, soooooo I stopped at one of my LSS to waste some time! I picked up a few goodies you see used here, like the glitter paper and that felt sticker! I got a few other things too. I may do a video of it, but you all may think that's boring now! Who cares what I buy, right?! Well, I ended up still being early because I had to wait in the cell phone area. So happy Mac is back...big sigh! We talked and talked and talked and talked. Boy, he can talk! Tomorrow is his b-day...OMG I forgot to do a card...seriously as I am typing this it hit me that I didn't make one. I sure hope I have time to sneak one in tomorrow night! Anyway, I was saying make sure to check back tomorrow for a special posting - but of what without a card, silly! I'll do one - I have to because he'll be expecting it that's for sure!
By the way, my card was inspired by Lori Roop on 2S4Y DT! Love your work, Lori!
I hope you have a great weekend! I'm sure we'll be doing something worthy for the birthday boy...I mean man! :) Thanks for visiting!
Card Instructions - Trim kraft cardstock to a 4.25" square card.
- Die cut circle on glitter paper and adhere to card front.
- Draw faux stitching.
- Ink edges and add twine.
- Add felt sticker.
- Stamp sentiment. (TIP: Acrylic stamps can be bent, so bend them to make the image fit your layout.)
- Set eyelets.
:: My Goodies {autumn} ::Stamps: Papertrey Ink - first fruits Ink: Stampin' Up! - chocolate chip Cardstock: Papertrey Ink - kraft + Chai Accessories: Papertrey Ink - twine; Corner Chomper; Uniball - white gel pen; Basic Grey - woolies felt sticker; Crop-a-dile + eyelets; Spellbinders - circle nestabilities; Cuttlebug
Card Size: 4.25" x 4.25"
  Hey there! It's Wednesday already!! Gotta love those four-day workweeks because the week goes by just a tad bit faster! Today, I'm sharing a sneak peek of Tracy Schultz's new stamp set from her The Petal Press collection. This stamp set will be available Wednesday, September 16 at I Heart Papers!
Since school has started back just about for everyone, it's about that time to transition into fall, believe it or not. It's perfect timing for this new stamp set. Check out that sentiment! Isn't the combination of the fonts really nice? What about the pumpkin? Think about all of the ways and color combinations you can stamp this image! I simply stamped the image and colored using Copic markers. I'm such a beginner at coloring, but I will say this, Copics are fairly easy to work with once you practice once or twice. You definitely should have a blender pen and then just color! It seems hard to make a mistake, unless you color outside of the lines (like me)! But, the blender pen forgives many accidents!
I decided to make this design clean and simple and will pop it on over for SCS CAS challenge this week because it involved making a project POP with dimension! The focal image is popped off of the card base, so I thought it was fitting for this week's challenge!
Thanks for popping in today! I hope you have a great Wednesday. Remember to take some time and enjoy yourself (even if it's for 5 minutes)! Check back next week for more sneak peeks and the full reveal!!
Card Instructions - Trim plum pudding cardstock to an A2 card.
- Trim rustic white cardstock with decorative scissors.
- Stamp image and color.
- Add rhinestones.
- Stitch around image and ink edges, then add ribbon and set aside.
- Trim patterned paper and adhere to card front.
- Add zig zag stitching.
- Adhere image cardstock to the card front with foam adhesive.
- Stamp sentiment and add rhinestones.
:: My Goodies {happy fall} ::Stamps: Petal Press - happy harvest (coming soon 9/16 via I Heart Papers) Ink: Stampin' Up! - chocolate chip; Copics; Papertrey Ink - chai ink Cardstock: Papertrey Ink - plum puding + rustic white Accessories: Papertrey Ink - rhinestone + ribbon; Craft Supply - thread + decorative scissors
Card Size: 4.25" x 5.5"
  Hi Everyone!!! How was your labor day weekend?! Mine was great! I even did a bit out outlet mall shopping. I rarely do this anymore because all of my money goes to crafts (ha ha)! I found lots of great buys and fun stuff for the fall! Speaking of fall, here is a card I created for Dawn's color challenge! I went for a vintage and aged effect without distressing too much, but just some inking and generation stamping. What I realized is that Stampin' Up!'s chocolate chip pigment ink is MUCH darker than I thought. It's almost black. I think I like ColorBox chestnut pigment ink much better for a true chocolatey color. Just thought I'd share that tidbit!
I'll be back tomorrow! Enjoy your evening! I just had to squeeze this card in there before the deadline!
By the way, thanks so much for stopping by Embellish over the weekend! All the love is so much appreciated! :)
Card Instructions - Trim kraft cardstock to an A2 card.
- Trim vintage cream cardstock and stamp text background.
- Stamp wheat flowers (use generation stamping technique - keep stamping until ink is gone - without re-inking).
- Ink the edges and adhere to brown cardstock.
- Wrap twine repeatedly around cardstock.
- Stamp peasant, cut out, and adhere to cardstock with foam adhesive.
- Stamp sentiment (lightly for a distressed/aged effect).
- Trim summer sunrise strip, ink, and adhere to card front.
- Add cardstock with foam adhesive.
:: My Goodies {count your blessings} ::Stamps: Papertrey Ink - background basics (text style) + first fruits; Stampin' Up! - autumn days Ink: Stampin' Up! - chocolate chip + river rock; Papertrey Ink - chai ink cube Cardstock: Papertrey Ink - dark chocolate + kraft + summer sunrise + vintage cream Accessories: twine; Papertrey Ink - rhinestone
Card Size: 4.25" x 5.5"
 It's Blog Hop time! Fall colors are so warm and inviting and I really enjoy designing with them. So, when I saw Nichole posted this month's Blog Hop theme, I had to join in on the fun. I chose to use burlap and stitching as my forms of texture, combined with a summer sunrise + dark chocolate + kraft color palette. I used an oldie, but goodie, First Fruits stamp set. I have always loved that wheat cluster (or whatever it is called)!
Stamping on burlap (or fabric) is really new to me. I tried to stamp with summer sunrise first to get a bit of a brightness, but the burlap is a bit too dark, so I just went for the brown. I used ColorBox pigment ink to get full coverage and stamped it twice. It worked!
Thanks for hopping by! I'll hop around later this evening!
Card Instructions - Trim summer sunrise cardstock to an A2 card.
- Stamp polka dot background on card front (half).
- Add a strip of brown cardstock.
- On burlap, stamp wheat (repeatedly).
- Die cut an oval from stamped burlap.
- Stitch around oval, then adhere to card front with glue dots.
- Stamp 'ribbon,' cut out, then adhere to burlap.
- Add rhinestone.
- Stamp sentiment.
- Corner round edges.
:: My Goodies {autumn blessings} ::Stamps: Papertrey Ink - first fruits + polka dot basics 2 Ink: Papertrey Ink - summer sunrise; Stampin' Up! - chocolate chip; ColorBox - chestnut Cardstock: Papertrey Ink - summer sunrise + dark chocolate Accessories: Papertrey Ink - orange rhinestone; Craft Supply - burlap + stitching; Janome Sew Mini; Corner Chomper; Spellbinders - oval nestabilities; Provo Craft - cuttlebug
Card Size: 4.25" x 5.5"
 
Wishing everyone a Happy Thanksgiving. Ours started early, included a nap, and now a master plan for Black Friday shopping extravaganza! These are a few photos of how I made our "little" Thanksgiving special. I made place cards and menus for each place setting. I computer generated the menu in Word and printed them out on vanilla cardstock. I left an empty space to stamp an image, then matted on orange and brown cardstocks. I added olive ribbon at the top. For the place cards, I used labels 1 nestabilities (largest, then the next size down) and folded in half. I stamped the leaf image, then cut out and popped off the cardstock. I printed out the names on orange cardstock, then inked around the edges and adhered. So easy, so simple, so special. I did this early this morning before I started cooking, so it does not take a long time. If I had many guests, then I would have probably started last weekend! Enjoy the remainder of your Thanksgiving and as always...be grateful! EDITED TO ADD:
How to create a dinner menu:
I used Edwardian Script ITC for the cursive text and Perpetua Titling MT for the all caps text. I used a template created for my menus at my wedding reception, but it is easy to create your own. Simply open a Word document, type your menu, adjust your fonts and layout, then adjust your page settings for the size of menu you would like to create. My page settings were 3.5" x 8.5", then I trimmed it down slightly after printing.
Stamp set used is by Papertrey Ink-First Fruits and ideas were inspired by Papertrey Ink Design Team Challenge-Thanksgiving Place Settings (THANKS)!
 And here we are again for this week's K. Werner Color Challenge. This card is also a preview of my Thanksgiving holiday card series. I will design a couple more to choose from if you like to give Thanksgiving cards. For the color challenge, I experienced extreme difficulty. Although the earth tones are warm and inviting, which I love, I was having difficulty coming up with a design idea. Finally, after some mishaps, I thought about my wreath stamp and starting my Thanksgiving card line. I heat embossed the wreath, first using craft chocolate chip, then heat embossed with clear embossing powder. I adorned the wreath with brown and copper stickles. I carefully cut out the wreath and popped it off of the pumpkin cardstock. I matted it on burgundy cardstock and tore the bottom edge. Pumpkin satin ribbon is tied across the burgundy cardstock for elegance. The focal point is popped off of green cardstock, also torn at the bottom, which is adhered to a brown card base.  :: My Goodies ::Stamps :: My Goodies ::Stamps: CTMH - Say it in Style (sentiment); Inkadinkado (wreath) Ink: SU! Chocolate Chip; VersaMark Paper: Cardstocks: SU! Chocolate Chip; CTMH - Canary; Bazzill Basics - Navel, Olive; DCWV - Burgundy Accessories: copper satin ribbon; copper and cinnamon stickles Technique: Stamped ; Heat Embossed
Card Size: 4-1/4 x 5-1/2 Instructions - Make card base by trimming cardstock to 4.25" x 5.5" then score at 5.5" and set aside.
- Trim green cardstock to 4.25" and tear off the bottom portion.
- Adhere to the card base.
- Trim burgundy cardstock to about 3.25" and tear off the bottom portion.
- Trim orange cardstock to about 3" x 4"
- On pale yellow cardstock, stamp wreath and cut out.
- Stamp sentiment on bottom center of orange cardstock.
- Adhere wreath to orange cardstock using dimensionals.
- Adhere orange cardstock to burgundy cardstock.
- Tie ribbon around burgundy cardstock into a knot.
- Adhere burgundy cardstock to card base using dimensionals.
- Apply stickles to wreath and let dry.
|
|


