header.gif (12,818 bytes)
Showing posts with label spiritual. Show all posts

2.26.2010

Embellish Borders Color Challenge


TGIF, Bleeps! It's almost time for the weekend and so that means there is an other Embellish Magazine challenge ready for you to start. This challenge incorporates the use of borders. That means, border punches specifically, but if you don't have border punches, then be creative! Use stamps, scissors, or die cuts from patterned paper kits. The sponsor is Verve Stamps and their stamps embellish so well with border punches. Here is how I created mine for the challenge.

Instructions
  1. Make an A2 card base.
  2. Trim yellow cardstock block and stamp flowers into a background pattern.
  3. Die cut and emboss labels.
  4. Stamp sentiment on yellow label, assemble, then pop off yellow card front center.
  5. Trim yellow cardstock strip and border punch it, then adhere it to the bottom of other cardstock.
  6. Add ribbon and adhere the entire focal point to card front center.
  7. Add pink rhinestones to flower centers.
Supplies

Ink :: PTI - melon berry
Paper :: PTI - melon berry, lemon tart
Embellishments :: Kaiser Craft - rhinestones; SU! - ribbon
Tools :: Martha Stewart - border punch; Spellbinders - labels 9 nestabilities; cuttlebug
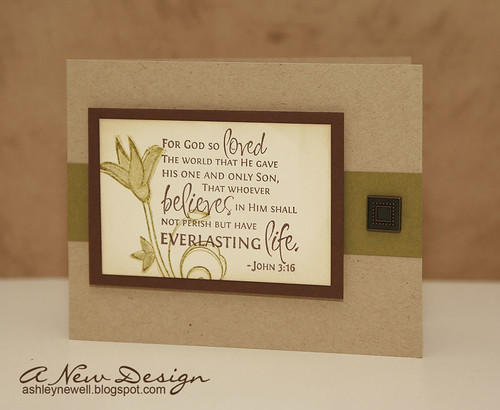


These stamps are so great, that I thought I'd make one to share today. This card exudes masculinity I think. Perfect for your pastor, right?! Aren't those card always hard to select? Well, here is one for you!

Instructions
  1. Make an A2 card base.
  2. Trim green cardstock strip and adhere to card front center.
  3. Trim cream cardstock block, then mat on brown cardstock.
  4. Stamp sentiment and flower.
  5. Color flower, then re-stamp border.
  6. Ink edges and adhere to card front.
  7. Add brad.
Supplies

Ink :: SU! - chocolate chip; PTI - ripe avocado; Ranger - antique linen
Paper :: PTI - kraft, dark chocolate, cream, ripe avocado
Embellishments :: Making Memories - antique brad

Thanks for stopping by today! I hope you enjoy the challenge. Have a great weekend!

11.30.2009

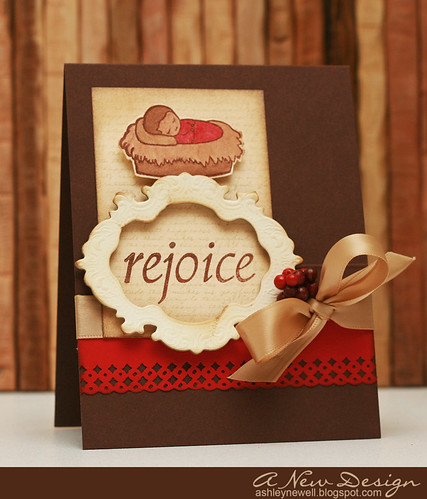
2S4Y :: Rejoice


Happy Monday, Bleeps! It's hard to return to work after a four-day weekend, but also a bit easier than a typical weekend. So, I'm grateful for those additional two days off! Today, I'm sharing with you a card I made for this week's 2 Sketches 4 You layout. This week's sketch is sponsored by Starving Artistamps. These stamps are perfect for your holiday cards and to truly celebrate the reason for the season. So, join the 2S4Y DT this week and make a fun card using this week's sketch! Here's a peek at the sketch:


Thanks for stopping by and enjoy your day!

Instructions
  1. Trim brown cardstock to create an A2 card base.
  2. Trim gold shimmer cardstock block, stamp background text.
  3. Stamp "rejoice" over background text stamped design.
  4. Stamp baby Jesus, color, and cut out, then pop on top part of the gold shimmer cardstock block.
  5. Distress frame, then adhere with foam adhesive.
  6. Score a line on card front.
  7. Add red cardstock with punched decorative edge.
  8. Tie ribbon around card front into a bow.
  9. Adhere gold cardstock block to card front.
  10. Add berries.

Supplies

Stamps :: Starving Artistamps - O Holy Night, Christmas Nativity (sentiments) ; Papertrey Ink - background basics (text)
Ink :: Clearsnaps - chestnut; Stampin' Up! - river rock; Copic - markers; Ranger - vintage photo
Paper :: Papertrey Ink - dark chocolate, pure poppy; Cut Cardstock.com - gold shimmer
Embellishments :: Offray - oatmeal ribbon; Pier One - berries; Tattered Angels - framed fonts
Tools :: EK Success - decorative edge punch

5.06.2009

Praying for You


Happy Wednesday to you! Sorry there is no video this week, but I just didn't have enough time to edit the one I recorded. But, here is a card I made for Dawn's Raspberry Color Challenge. I didn't get a chance to post it in time before the deadline, but I still wanted to share it with you all! I'm using Guidelines 2 again and can't seem to get enough of it. There are so many ways to stamp with it and it's amazing! If you don't have it, I highly recommend it, especially with the guidelines cardstock because that makes it even easier!

I hope you all enjoy your day and thanks so much for dropping by!

Card Instructions
  1. Trim dark chocolate cardstock to an A2 card.
  2. Trim aqua mist cardstock into a rectangle and stamp guidelines pattern.
  3. Adhere guidelines cardstock to card front and tie ribbon.
  4. Add hat pin and apply liquid pearls to guidelines centers.
  5. Stamp sentiment.
:: My Goodies {Praying For You}::
Stamps: Papertrey Ink - damask designs + guidelines 2
Ink: Stampin' Up!-chocolate chip + white
Cardstocks: Papertrey Ink - dark chocolate + aqua mist
Accessories: Papertrey Ink-aqua mist ribbon; Stampin' Up! - pretties kit; Ranger-liquid pearls

10.17.2008

Fast Friday Cards


Here are four super-fast cards to make. I stamped the background image, then heat embossed with clear embossing powder. I stamped the sentiment in red, then added the flower with a dew dot. That's it! It took me longer to figure out what to do than it took to actually make them!


:: My Goodies ::
Stamps: SU! Graceful Words (sentiment); Hero Arts - Floating Leaf Pattern (background)
Ink: Versamark + Red
Paper: Cardstocks: PTI-Kraft
Accessories: MM Red flowers; Leaves by CTMH; Dew Dots; Clear Embossing Powder; Heat Gun
Technique: Stamped
Card Size: 4.25 x 5.5

9.30.2008

Get your VERVE on


I designed this card for "Meet the **VERVE** Divas." The challenge was to use purple, which I do not use that often. Of course I used my Verve stamps I received in the mail yesterday! The Birthday Surprise stamp set reminds me of little girls and happy birthdays (although it could be used for much more). So, I decided to use this set for the purple challenge. The entire layout is cased from Dawn McVey. I really liked the stripes. I changed the colors (of course) and the stampe set used.

I added the gift on top of the bow and adhered glitter to the design as well as the birthday hat, which is paper-pierced. A purple rhinestone is added to the top. The lighter purple is not pink, but a very light purple called lavender moon by Papertrey Ink.


:: My Goodies ::
Stamps: Verve Visual-Birthday Surprise
Ink: PTI-Plum Pudding
Paper: Cardstocks: PTI-White, Plum Pudding, Lavender Moon; SU!-Elegant Eggplant
Accessories: PTI-saddle stitch plum pudding ribbon; SU!-scallop edge punch; Palette glitter; purple rhinestone
Technique: Stamped
Card Size: 4-1/4 x 5-1/2


For this card, I designed it for Verve's Gettin' Krafty Challenge. The challenge involved using kraft paper and anything natural. Well, this is right up my alley because I love naturals, rustics, and earth tones. I used the Abundant Blessings stamp set with kraft, brown, and red cardstocks. I stamped the larger flower, then popped a smaller flower off of it on red cardstock. The center is a dew dot. I tore the edges of the brown and red cardstock and adhered to the card base. Hemp twine is wrapped around the brown cardstock, then tied in a knot and bow. The sentiment is stamped on distressed kraft cardstock.


:: My Goodies ::
Stamps: Verve Visual-Abundant Blessings
Ink: SU!-Chocolate Chip
Paper: Cardstocks: PTI-Kraft, Poppy; SU!-Chocolate Chip
Accessories: dimensionals; dew dots; hemp twine; distresser
Technique: Stamped
Card Size: 4-1/4 x 5-1/2

8.27.2008

Baptism Book

Here is the cover of a baptism I created at the crop I went to at Scrapdoodles on Saturday. I can't believe I actually started a project and completed it. Well...almost completed it. When I returned to my studio, I just needed to add the rings and decorate the cover. That process did not take me too long. The covers of the book are KaiserCraft wood. I painted them with a metallic gold acrylic, then distressed with a cream acrylic. I added ribbon on the rings (rings purchased at Hobby Lobby). The metal alphabet letters are from Michael's and by Making Memories. They are great and feature numbers and the uppercase alpha on the opposite side. I used them here as well. I stamped the ornate cross on kraft cardstock, then inked the edges. The cross is a part of a wonderful spiritual set by Our Daily Bread Designs. I tied with hemp twine to the brown and sheer ribbons. "Baptism" are American Craft Thickers (of course) that I inked lightly with white ColorBox chalk. I really like the way this turned out!


I used baptism themed pattern paper and a simple blue cardstock for the top page. Below, I used Anna Griffin pattern paper set, purchased at Scrapdoodles. I used this paper throughout the remainder of the book. I really liked the designs and earth tones. I made a tag on the right and applied a rub-on noting "faith." Dew dots are placed on each side. Buttons with hemp twine embellish the remainder of the page.


This page could be used for journaling. I kept it simple by tearing a piece of pattern paper and inking the edges. Ribbon divides the page with a Baptism rub-on applied below. On the opposite page, I cut out a strip of Baptism-themed paper from Our Daily Bread Designs and adhered along with tinted vellum by Creative Memories. On the bottom, I stamped "blessings" by a retired SU! The large paper clip is by Quick Quotes and includes a distressed circle with the cross stamped on it. The tag on the left includes the sentiment grace.


This page features the opposite side of the tag, that has a rub-on, "Holy." The paper clip is carried over and includes a double mat of pattern paper and solid cardstock.

The actual pages I made by purchasing brown chipboard at Scrapdoodles, then cutting it to the size of the covers. This was a very simple and cost-effective book!

4.10.2008

The Power of Prayer and a Card too!

Unfortunately, we all have to send sympathy cards to support those who have lost loved ones. This customer needed two. So, I designed two simple, yet different cards.


Some people interpret color during a time of grief as an inappropriate, untraditional approach. However, color can be uplifting and healing, so I incorporated it in the card pictured left. The patterned paper is double-sided by K&Co. I triple-matted the papers. "I'm praying for you" is stamped on the front in chocolate chip ink and adhered with an antique brass metal tag. Orange ribbon is tied around the centered image to secure the ribbon and add the punch of color.


The inside of the card is stamped with Verve Visual Serenity stamps. The serenity prayer and the flowers are stamped in chocolate chip. All edges are inked on the card for a finished look.


"With Heartfelt Sympathy" is my more traditional card. The serenity leaves and sentiment is stamped in white ink on black cardstock. To give it a pop, rhinestones were added to serve as ellipses. The sentiments are from an acrylic stamp set from Michaels.


The inside of the card is very simple with the sentiment, "We wish you God's peace" stamped in blank ink on white cardstock.

As a part of life, we all experience death. I hope that these cards provide support and healing during their time of grief. Thank you for stopping by to see two of my four card creations I made on Tuesday night! I've been on a good roll lately!

3.20.2008

Every Day is a Gift


America is great; however, living in America can get the best of us. The hustle and bustle of the daily tasks can be demanding and daunting. Thus, making it is easy to forget that "Every Day is a Gift." This card is a reminder of that sentiment. This card was handstamped. The larger design was stamped, then cut out and popped for dimension.

Thanks for browsing!

3.18.2008

Amazing Grace


Stamping is the main technique used to create this card. I stamped the leaves in three earth tones (autumn terracotta, spring moss, and desert sand). "Amazing Grace" is also stamped in autumn terracotta ink. I added spring moss ribbon and two eyelets. Hemp is used vertically to suggest a cross for spirituality. This card is for a young man who was in a motorcycle accident and is recovering. I hope this card reaches him in good spirits.

3.09.2008

Blessings


I hope all of you remembered to spring forward today! I love the spring and how it transitions into the summer. Now that the days will be longer, I can get more done - right?! I decided to share a Baptism card I made for a customer last week. I stamped the tree limbs and the buds on the trees. I also stamped "Blessings." I added a red ribbon on the side and tied it in a knot to add more color. This is one of my favorite new stamp sets! Wishing everyone blessings on this Sunday!
Blog Design: Girly by Design