After December 4, 2010, all future posts are on a new site. Please subscribe to my NEW feed at www.ashleynewell.com or click below to subscribe to the NEW feed.
Where are you all? If you're still receiving this blog posting in your Google Reader or E-Mail inbox, please take a moment to update your subscription to my new blog site. E-Mail subscribers, don't forget to validate your subscription too! :) I have more new postings on the new blog and a lot of more things to come. See you soon!
Hey there! I've finally finished my blog redesign and have moved...away from Blogger and onto my own dedicated web site. This will be my last post on the "blogspot" address. I've kept my new website address simple and just removed "blogspot" so you all can still find me!
I'd love to have each of my readers to join me on my continue journey on my new blog site. This will be the only time I change my blog site address. I now have full control over the capabilities and hope you will enjoy the changes as well.
Hey there! Happy Saturday to you! Yesterday, Embellish started a new color challenge and this one focuses on scrapbook layouts. I know, I rarely do them and usually I struggle, like on this one. I sometimes get stuck and it was a challenge for me. So, I ask you to join me in this challenge. The more you work at it, the better you get! We have a great sponsor for this challenge. Canvas Corp has offered a very generous prize pack with patterned paper, canvas, clothespins, and so much more. Check out what the other team members created. They didn't seem to have as much of a challenge as I did, but I wouldn't expect that because that's why they're on the team, right?! Click here.
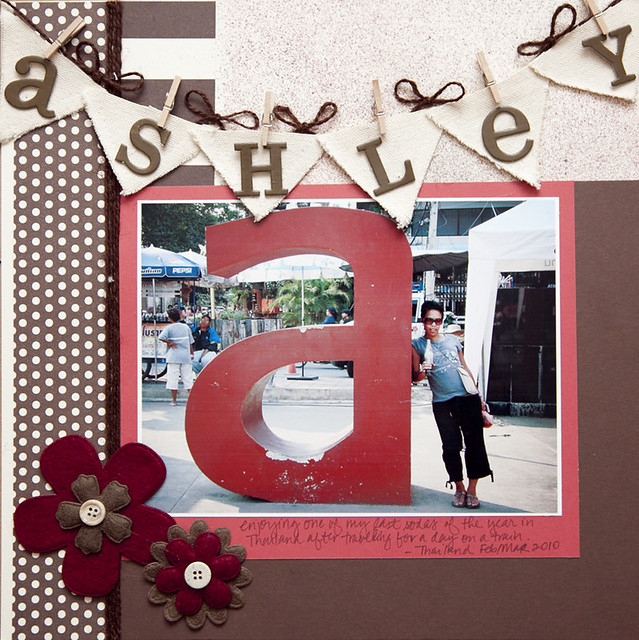
I used patterned paper from the Chocolate and Vanilla collection (Big Stripes) + (Dot Reverse) as side borders. In between the paper, I included a jute twine border using this chocolate texture. The flower die cuts are old embellishments I picked up from my LSS and I think they're by Creative Imaginations or Creative Cafe, but not 100% sure, just a hunch from my memory about 2 years ago.
Here, I added some mini clothespins to hold the "ashley" banner I created using the canvas diamond die cuts. I cut the diamond die cuts in half to create the pennant banner. I also spritzed some Maya Mist on the top part of the layout to get that paint color. I used a brown and a red mist and sprayed very far away from my page to get that sprinkle effect. About the photo: This picture was taken by McArthur in Thailand. We rode the infamous train over River Kwai through the countryside. It was VERY HOT on that hour train ride. We ended here, at this market near Kanchanaburi. We returned the day after the train ride to shop a bit in this market. Even in early March, it is very hot in Thailand. I love the heat, but also enjoy a good refreshing beverage, which leads me to my purpose of this picture. I'm leaning against a huge "a" and in my world, it's for Ashley, but as I recall, it spelled WAR and I'm not quite sure why except for that the building the train system from Burma through Thailand caused a war because people were forced to build it.
Anyway, I'm drinking a Pepsi. This picture shows one of my last times enjoying a soda. I have not had a soda since July. I did not set out to make this a rule of law for me, but it sort of just happened. I was trying to limit my intake and next thing I remember, I realized a month passed since by last soda, so I decided to try for another week, another month, etc. Now, it's been four months since by last soda. Now, that may not sound all that news breaking, but for this soda drinker, it is!
In grad school while getting my MBA, I had night and online classes, so I would stay up really late to work on my projects and study, then wake up around noonish and get ready for my day. To keep me going, I'd drink 2-3 Pepsi's at once, like they were water. This was also the time I discovered my love for Thai food. I lived in a quaint studio apartment right across the street from what I believe is the BEST Thai restaurant ever - Thai Landing in Baltimore, MD. It's authentic and they always treated me like family. I think I ate there about 4 times a week and sometimes twice a day! haha
Anyway, I cut back since then, but kept drinking sodas. No, I'm not a Pepsi only drinker, I like Coke and Ginger Ale too! I can drink almost any soda, well I used to be able to at least!
I really should have titled the page, "The Last Soda" because that's how I feel when I see this picture. At the time the photo was taken, I had no idea it would be one of my last sodas and I enjoyed it!
So, whatever your photo is and whatever motive you have behind it, make sure you scrap it to capture that moment, feeling, and time period of what's going on! I challenge you, even if you are not a scrapper like me to join us for an Embellish challenge!
Blog Update - I will be changing my blog in the next week or so. I will be migrating to a new web address, which means if you follow me in your reader or via email, you will need to re-subscribe to a new feed. I apologize for any inconvenience, but each of you will benefit from the blog transfer because of the added features, such as my being able to reply to comments and so much more! Just wanted to warn you, it's happening VERY SOON! My Blogger site will always be available for as far as I know, I just will not have current posts from it; however, new visitors will be re-directed to the new blog! So stay tuned, I'm almost done with the design!
Thanks so much for visiting! Today, I'm off to try to decorate the house for the holidays and I get to see my friend's baby for the first time! Take care and have a great weekend!
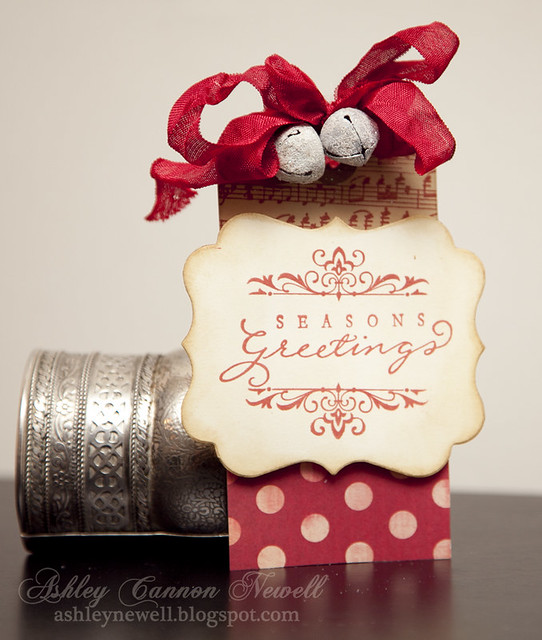
Hey there! It's time for another video. This week's project features a quick and easy holiday gift tag you can attach to presents or gift bags. You can make these ahead of time and have them ready. Simply wrap them around a gift for instant presentation or place your gift in a bag and attach the tag. So, that's enough chit chatting, off to the videooooooooo!
Hey there, Bleeps! How was your Thanksgiving? I hope it was full of food! :) I shopped a bit this weekend, mainly on Friday. We slept in and were still able to snag deals later that evening. Our refrigerator went out on Thanksgiving - yeah imagine that! Well, it happened to us. The fridge is only 4 years old and the motherboard died. We got it fixed on Friday and after that relief I went shopping with my mom and sis! The house is not decorated yet for the holidays. I barely started with a couple things here and there. I hope this weekend I'll have it all done. I'll be sure to share a few photos of my favorite holiday decor items.
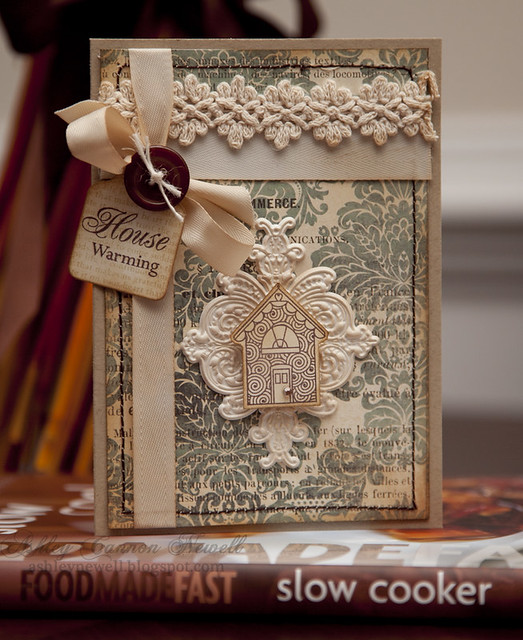
Speaking of the house, the Embellish magazine graphic designer had a house warming and this is what I designed for her! She's the best as she designs the best stuff out there. I cried the first time I saw the magazine templates - flat out cried - tears of happiness because she knew exactly what I wanted. So, I knew I had to design her something special to celebrate her new home.
If you're wondering about the next issue - I'm still working on it! I know I'm behind schedule, but it's just me doing what an entire company usually works on! It's going to be huge - featuring elements that only an e-zine can handle! So, stay tuned!
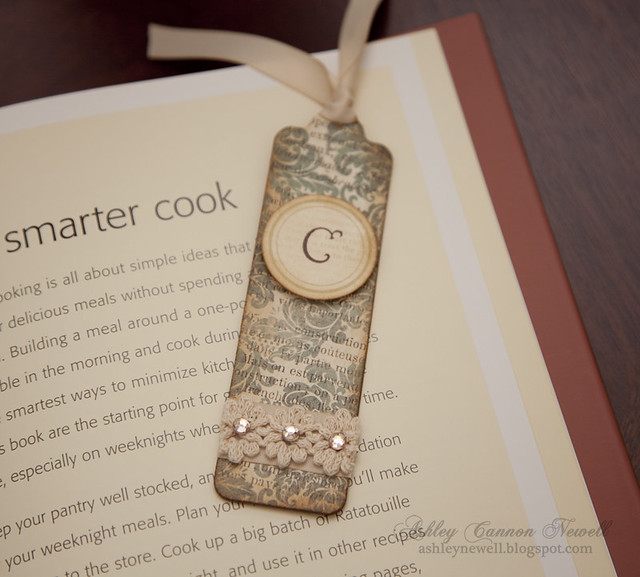
I embellished ribbon with a tag and added some crochet lace trim.
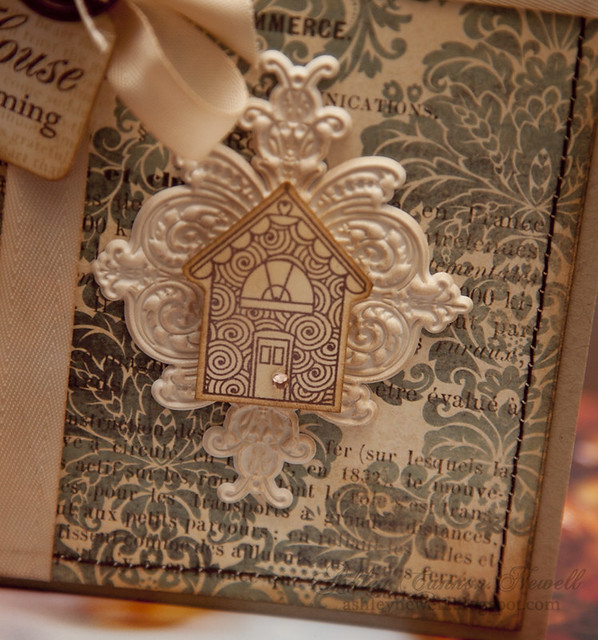
I added the stamped house on the artisan element and stitched around the edges. I used heavy duty thread this time and loved the bold look of the stitching.
Since I got her a cookbook and gift card from Williams-Sonoma, I designed a personalized bookmark.
Instructions
Trim patterned paper to about 4" x 5.75".
Ink artisan element and adhere to patterned paper.
Stamp house, cut out, ink, then adhere to artisan element with foam adhesive.
Add stitching.
Add twill tape strip, ribbon treatment, and crochet trim
Die cut tag. Stamp text background and sentiment. Ink the edges, then adhere to ribbon knot with twine and secure with button.
Ink the edges of patterned paper and add rhinestone to stamped house.
Adhere to 4.25" x 6" kraft card front.
Supplies
Stamps :: Renaissance by Design - house warming set (store now closed); Papertrey Ink - text style Ink :: Stampin' Up! - chocolate chip; Close to My Heart - bamboo; Ranger - antique linen, vintage photo Cardstock :: Papertrey Ink - kraft, white PatternedPaper :: My Mind's Eye - lost & found collection - family brocade Embellishments :: Melissa Phillips - twill tape; Papertrey Ink - dark chocolate button; May Arts twine; Pink Paislee - artisan element; Kaisercraft - rhinestone; Hero Arts - crochet lace trim Tools :: Spellbinders - tags five (retired), GC-001 grand calibur; Janome - sewing machine
Thanks so much for your visit today. Have a good one and take care!
Giving thanks today for so many things including my health, family, love, and friends. With friends, I include all my bleeps! Thanks for checking my blog and following me pretty much daily. I truly appreciate your support and encouragement to continue my crafty creative journey. I'm also thankful for missed opportunities because that means that it opens doors for new and many times better opportunities! That glass of sweet tea today...is half full!
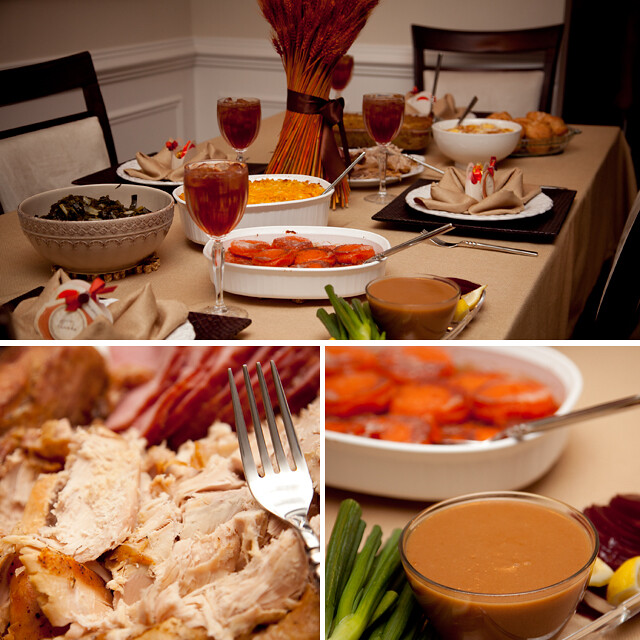
Happy Thanksgiving, Bleeps! We ate super early for us this year! Thanksgiving lunch! Guess we'll eat again (about 2 more times)! Peach cobbler minis and Red Velvet Cheesecake (courtesy of the Cheesecake Factory) is about to get devoured!
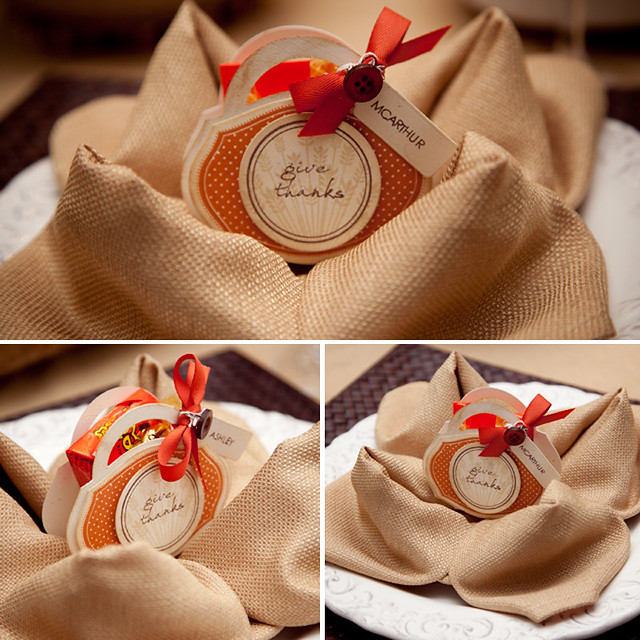
By the way, my sister folded the napkins into a water lily. Click here for the tutorial!
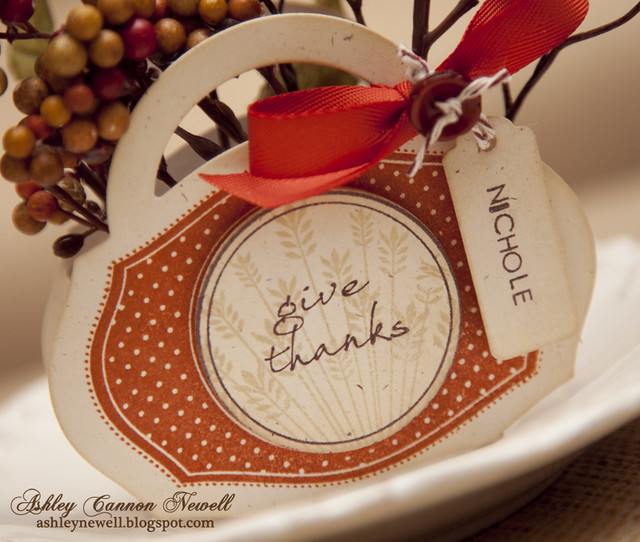
If you're looking for details on the favor/place card, please visit Tiff's blog here.
Hey Everyone! Happy Wednesday! It's time to watch me...for fun watch the first video! McArthur thought it was so funny and said this video fit me well. So, check it out before it expires January 15, 2011.
Alright, now that you all are officially in the holiday spirit with my dances, check out how I made this gift card holder!
Congratulations, Diane! You won the kit featured in last week's video! YaaaaaaaY! Diane, please e-mail me your mailing address and I'll ship your package of goodies to you around December 1.
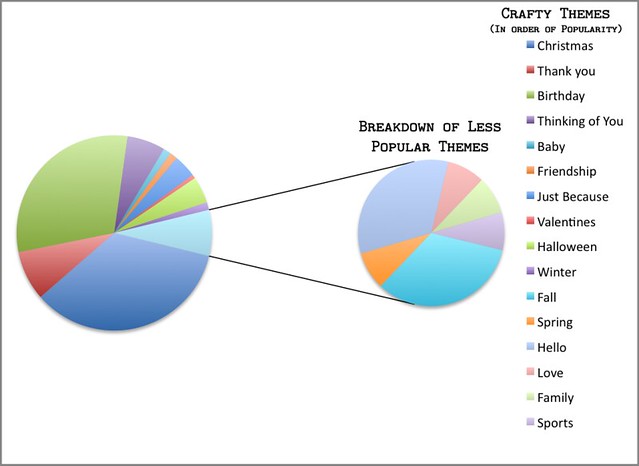
Thanks for participating everyone. As usual, I have compiled the results and the most popular theme to craft for is Christmas. I wonder if that has anything to do with everyone being in the Christmas spirit because its fast approaching? Well, it makes total sense to me because Christmas is the holiday where people give and cards are one item that most people send out to family and friends.
And I made a mistake in the graphic, the list of crafty themes is NOT in order of popularity in the key of the graph. Why I thought that when I wrote that note, I'm not sure. Anyway, the next popular theme is Birthdays! Birthdays occur all year round, so that means designers are always crafting for someone's birthday, right?!
Well, that's all for today, Bleeps! Check back in with me tomorrow for a Holiday episode of my Watch Me Wednesday video series!
Thanks for wishing McArthur and I well on our anniversary! We really appreciate that. He loved that video I compiled too (and the card)! So glad you stopped by today. Take care!
Hey Everyone! First, I'd like to thank you for all the wonderful comments I've received over the past few days. I have really enjoyed reading them and appreciate all of your kind words. For my new blog readers, Welcome!
Today, I have a special post for my husband of 5 years, McArthur. Friday was our wedding anniversary, but today is our 13th anniversary together. So, I thought it would be sweet to celebrate here on the blog for the "other" anniversary. So, check out the card and if you're interested, feel free to check out the tribute and videos as well.
Since the 5th wedding anniversary gift centers around wood, I thought it would be cool to design a wood grain card as a focal point. I stamped the pattern on the back of Jillibean Soup patterned paper (white macaroni) since it has a great kraft color - and used black ink. I die cut the car, stamped and paper pieced it together. The polka dot patterned paper is by My Mind's Eye (haunted collection, harlequin paper). I added some distress ink. I stamped polka dots on cream cardstock, then stamped the sentiment. Added a little zig zag stitching, then adhered it to the A2 card base and I was done. I popped the car right off the center to finish it off. Simple and masculine.
The choice in colors - decided based off our wedding colors of cranberry and gold. Instead of designing the exact colors in a formal style of card, I made them a little more flat using a burgundy and kraft and coupled it with black (like his tux) and cream (like my dress - it was not white even though it looks like it in photos)!
I decided to use this car stamp set as my focal point along with the wood grain pattern to celebrate me and McArthur's journey together. We have spent the past 13 years together - through undergraduate, graduate, and law school. We've experienced some great times and even a little down times, but we have held each other up along the way making sure both of us has a smile and laughs. I've enjoyed the ride so much with him over these past few years and I can't wait to continue that journey for many more years.
Seriously, I think I have the best husband in the world. He loves CHA! I mean enough said, right?! But really, he loves me unconditionally and with that there's not much more I can ask for in life. So, here is a short video I compiled using our wedding photos and video highlight from our wedding to take us back down memory lane to 2005!
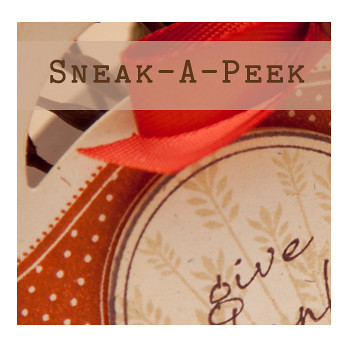
Hey you all! I'm back to share a sneak-a-peek at another project I created over on this blog. I'm guest blogging over there today, so check out what I made and who's blog I'm guesting for too!
That's it for now! I'll be back on Monday with a special post to celebrate our anniversary! :) Enjoy your weekend!
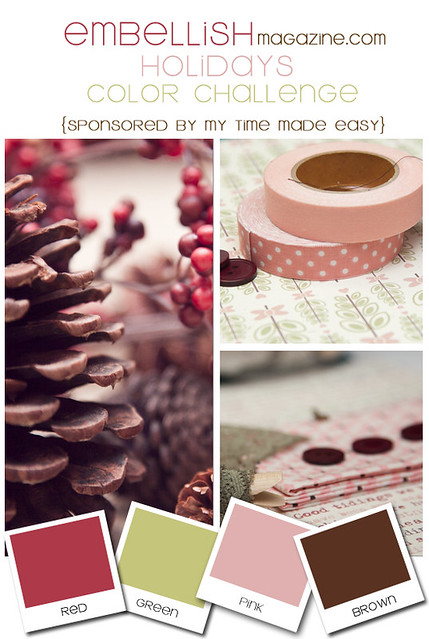
Hey Everyone! Happy Friday to you all! Today is a great day for me...it's McArthur and I's 5th wedding anniversary and 13th anniversary together! I will do a special post on that probably Monday, so stay tuned for a mushy one! Embellish Color Challenges do not stop for our anniversary, so My Time Made Easy is graciously sponsoring this holiday themed challenge. Check it out here. The design team created lots of great holiday projects. Here are the projects I designed...
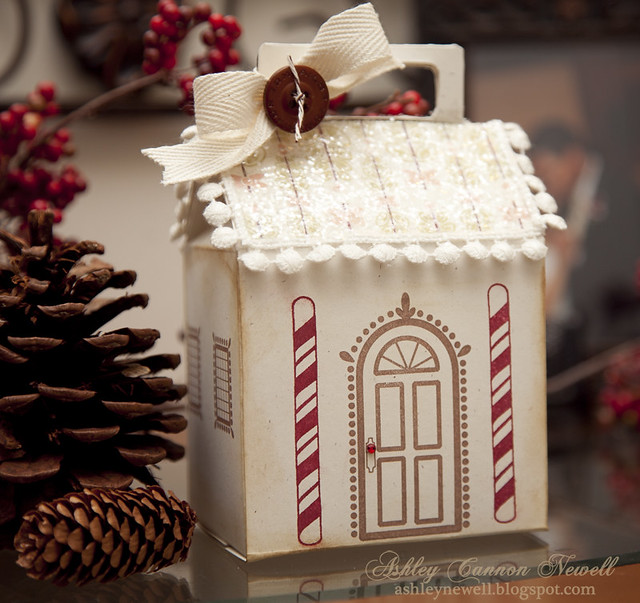
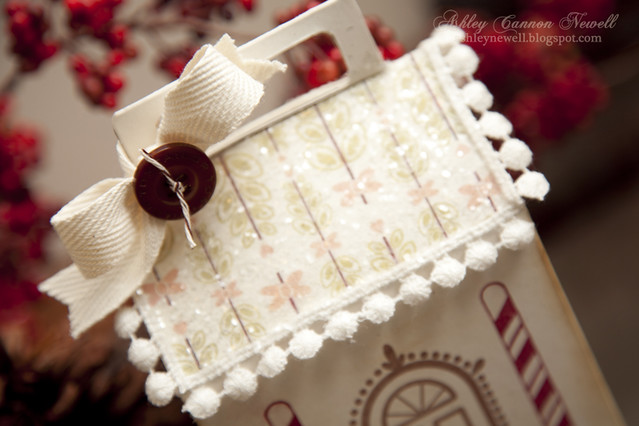
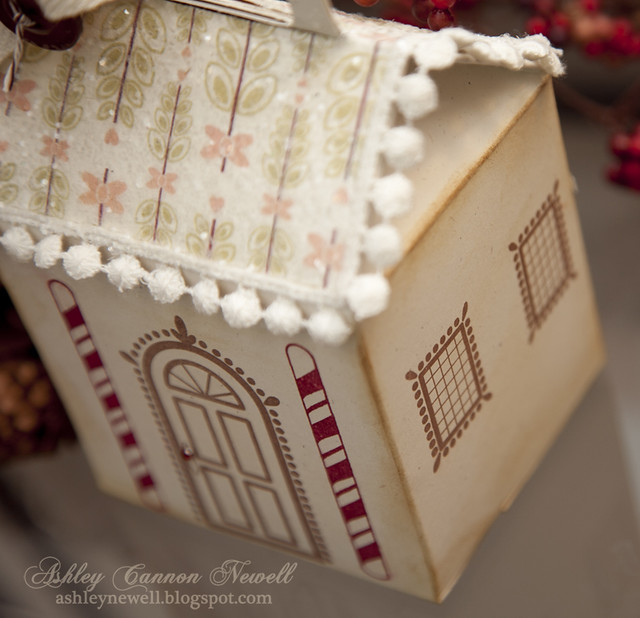
I made this house template. It's a box with a handle and perfect to give gifts during the holiday season or add to your home decor.
I added digital patterned paper to the template 'roof' and embellished it with Martha Stewart glitter. Maya Road trim decorates the roof's edge and twill tape finishes the handle off.
I used MTME's stamps to customize the box template and create a holiday house. I added a red rhinestone for the doorknob.
Here, you can see the windows. I stamped them on both sides of the house.
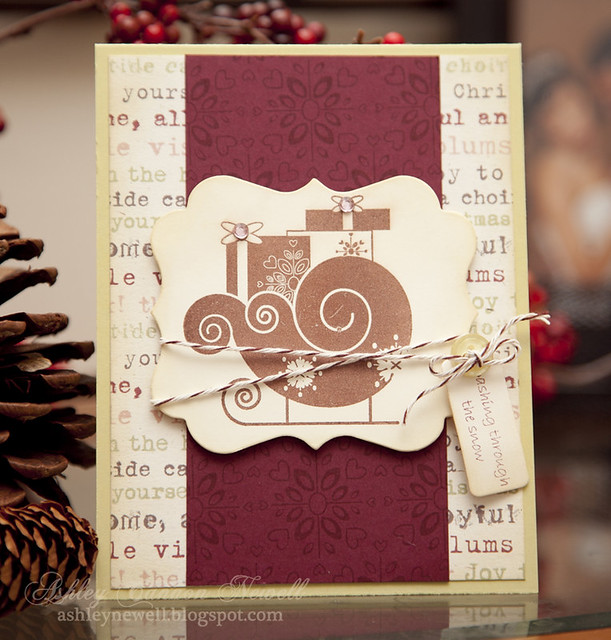
I made this simple card by printing digital patterned paper (so cute) and trimming it to about 4" x 5.25" and inking it up. I adhered the paper to an A2 card front. I took a scrap of dark red cardstock and stamped that background pattern with dark red ink. Then, adhere it to the digital patterned paper.
Using a Creative Cuts and More label die cut, I stamped the sleigh image on it and inked it up. I added baker's twine and added a die cut tag stamped with a sentiment. Then, I popped it off the card front center and added rhinestones.
I'm not adding detailed instructions to this post because I sort of explained everything above!
Supplies*links to MTME products can be found here*
Stamps :: My Time Made Easy - Dashing Through the Snow, Sugar and Spice Ink :: Clearsnap - ColorBox chestnut, chianti; Ranger - antique linen; Tsukineko - VersaFine vintage sepia; Papertrey Ink - scarlet jewel Cardstock :: Papertrey Ink - rustic white, spring moss, scarlet jewel Digital Patterned Paper :: My Time Made Easy - Candy Shoppe Embellishments :: My Time Made Easy - Carry It (box template); Craft Supply - baker's twine, twill tape; Papertrey Ink - buttons; Maya Road - trim; Martha Stewart - glitter; Kaisercraft - rhinestones; Creative Cuts and More - label die cut Tools :: Spellbinders - S3-148 tags trio, GC-001 grand calibur
Thanks so much for visiting. If you're a new blog reader, I call all of my friends "Bleeps" and I appreciate your support!! Thanks for all of your comments this week.
**I'll be back later this morning with a sneak peek of another post I'm working on, stay tuned!
Welcome to the first day of the Spellbinders™ Paper Arts Holiday Hoppin’ Blog Hop! Spellbinders, along with their Cross Promotional Partners are showcasing their newest products just in time for your Holiday crafting and gift giving. Lots of creative ideas are in store, as well as prizes galore! Each participating company has generously donated towards the prize package listed on the Spellbinders Blog. A total of two identical prize packages, one for each day, November 18 and 19 will be given away! To enter, just leave a comment on a participating blog! Comments in the first 48 hours of the post are eligible. One commenter each day will be randomly selected as the winner. Winners will be announced on November 22, on the Spellbinders Blog!
Be sure to see all of tomorrow’s Holiday Hoppin’ blogs for inspiring projects and another chance to win!
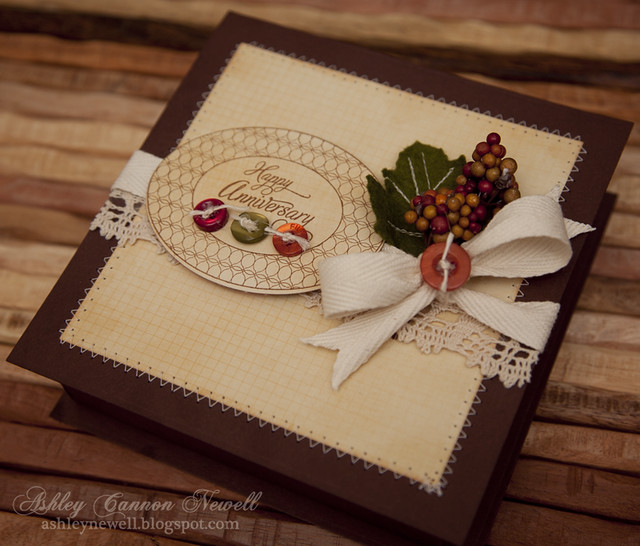
Today, I am sharing a custom gift box using LF-126 Grand Classic Squares die templates. I used the squares to create a base for the box and also a lift-up lid. I also showed how the die templates can be used as a mat on the same project by die cutting a smaller grand classic square die template from patterned paper and stitching it on the box lid.
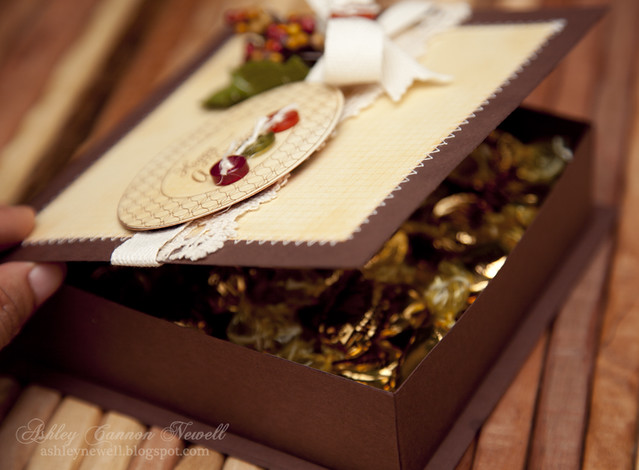
Here is a view of the box being opened. Check out those gold goodies!
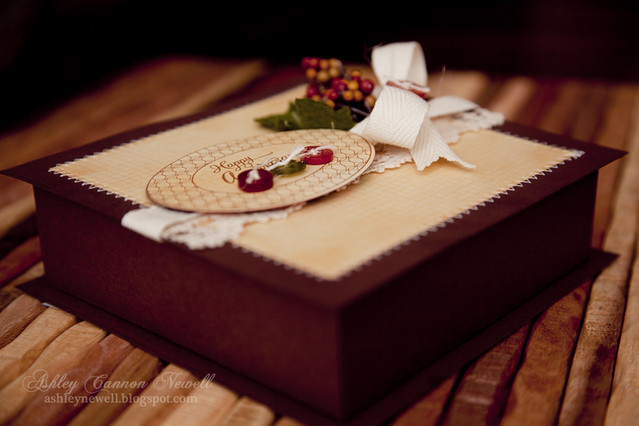
Here is a view of the box from the side. Adding the square die templates creates the traditional chocolate box look.
View an interactive version here on YouTube or below.
Simply leave a comment on my blog to be eligible to win the Spellbinders Holiday Hoppin’ Prize Package! One winner will be chosen from all the comments on all the blogs participating today. Comments made in the first 48 hours of this post will be eligible to win. Winner’s names will be published on the Spellbinders Blog on November 22, and they will have 48 hours to reply to Spellbinders to claim the prizes.
Instructions
Trim brown cardstock to 8.5" x 8.5", then score at 1-5/8" on all four sides. (Tip: When creating a box base, you may score on all sides at any height to determine the depth of your box, so less inches = shallow box and more inches = deeper box)
Cut one of the short scored lines (1-5/8") on all four sides, then assemble box base. (Tip: Cutting one of the scored lines allows you to fold the box in and assemble)
Die cut two squares from brown cardstock. Adhere one square die cut to the bottom of the box base.
Die cut another smaller square from patterned paper, then stitch to other brown die cut square.
Add twill tape and crochet ribbon.
Die cut leaf, add stitching, then adhere to square. Add berry spray and button to ribbon knot.
Die cut oval from patterned paper. Stamp border and sentiment, then pop off square die cut.
Add buttons to embellish.
Trim 5" x 1.5" brown cardstock strip, then score down the center. Adhere one side of the strip to the inside of the box, then adhere the other side to the square die cut (inside). This creates the joint for the box lid.
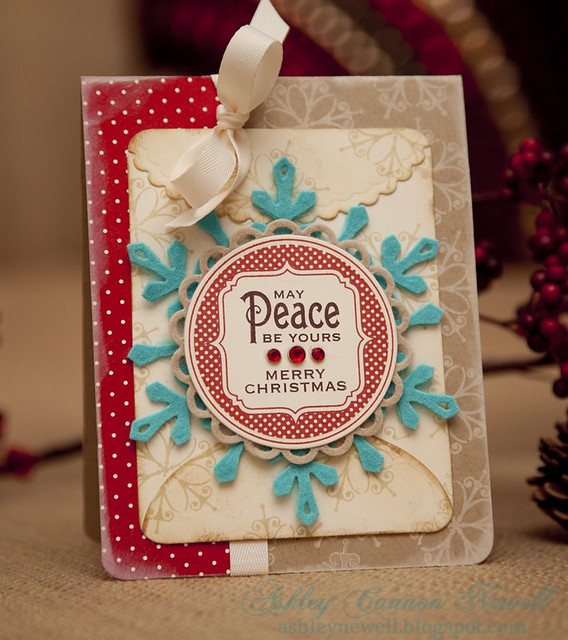
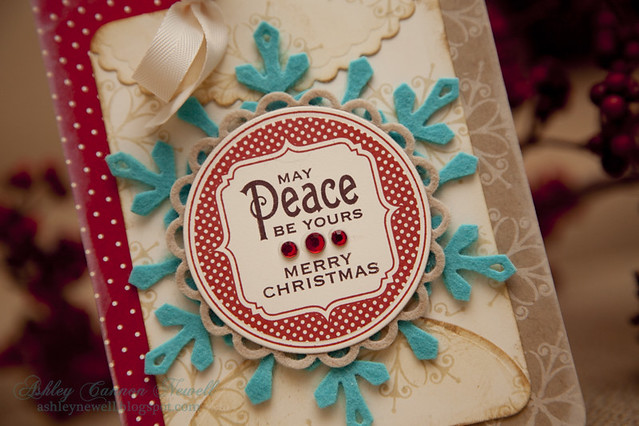
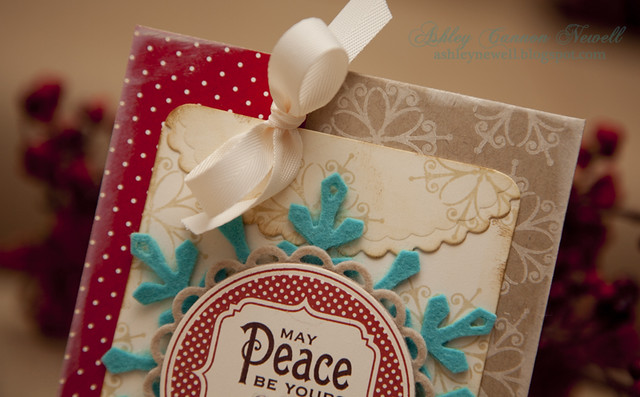
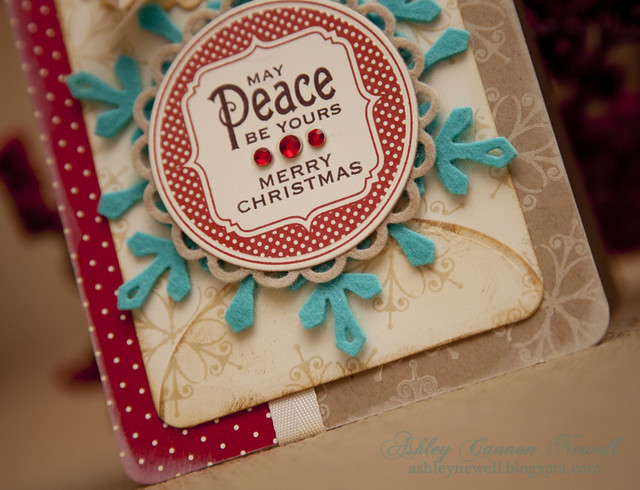
Hey Everyone! I hope your week is going well so far! It should be because it is already Wednesday and here that means time for a new video! So, I created this holiday card to share with you. It's full of read and cream and a pop of turquoise for some fun!
Check out that felt and cardstock embellishment I created with Spellbinders' die templates. You can create an endless amount of elements using dies, including basic shapes, tags, borders, shaped cards, embellishments, and even mini albums. The world is yours with die templates and that's why I enjoy using them so much.
I created a custom focal point using dies to make a decorative envelope-type element.
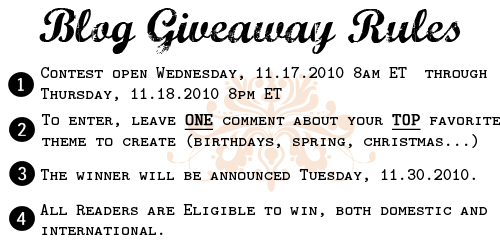
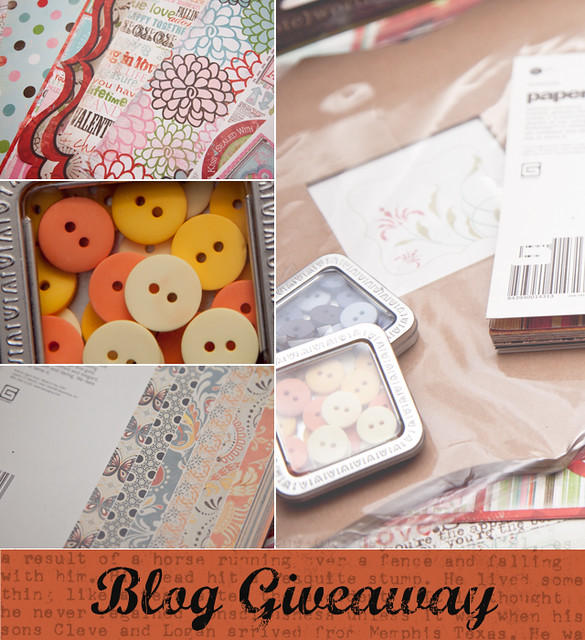
As I mentioned yesterday, I just reached the 300,000 hit mark on my blog and I'm continuing to celebrate my gratitude for my blog readers and browsers, so I have arranged another giveaway for the week. The blog giveaway prize contents are shared in the video. Please make sure you review the rules below. You must comment on this blog post to enter to win (not YouTube, Facebook or Twitter).
*Please note: I will ship prize to contest winners around the first week of December, if not sooner. This allows me to make one trip to the Post Office, instead of multiple trips.
I hope you enjoy the video. Click here to watch it on YouTube.
Supplies
Stamps :: Waltzingmouse Stamps - seasons of love, vintage circles (small) Ink :: Close to My Heart - bamboo, cranberry; Stampin' Up! - chocolate chip; Ranger - antique linen, vintage photo; Papertrey Ink - vintage cream Cardstock :: Papertrey Ink - vintage cream, kraft Patterned Paper :: Papertrey Ink - bitty dots Embellishments :: Kaisercraft - rhinestones; Papertrey Ink - vintage cream twill tape, hawaiian shores felt, linen felt Tools :: Spellbinders - S4-293 lacey circles, S4-286 2010 snowflake pendant, S4-141 petite scalloped ovals SM, S4-139 petite ovals LG, S4-114 standard circles LG, GC-001 grand calibur; We R Memory Keepers - corner chomper
Hey Bleeps! I hope you enjoyed your weekend! Today, I have some great news to share...Noora won the paper crafting kit up for grabs from last week! YAAAAY for Noora! Please e-mail me your mailing address and I'll ship it to you!
Thanks so much for participating in the Blog Giveaway. I'm really grateful for my blog readers (you) and your continued support.
So, last week's question centered around designers level of comfort. Some people discussed how their comfort level changed in their life than in their design style. I can imagine that, but I'm pretty much a risk-taker. Although I like certain styles in clothes and designs, I like to test the waters, just to see how it turns out. I'm always searching for the next big thing whether it's a new hairstyle, outfit, color combination, or technique. It makes everything fun, especially when there really is a breakthrough!
Also, many of you only liked to try new things when you have time. I think that's pretty much the way it goes. If you're like me and create a card and project on your way out the door to a party, there is no way I am trying the new stamping technique I learned. I would design the best way I know how - whatever that is!
Another thing I'd like to share is - just because you try something and it doesn't work the first time doesn't mean you can't do it. It has taken me about two and half years of card making to get to a point where I like my designs. But, I feel like there's always room to grow and with time, styles change and I'll look back on my cards today a year from now and gasp with disgust. Yep, I do that too! So, it's important to keep moving on and try something new, even if it's from time-to-time. Have fun with it!
Here's what my Bleeps think! :)
You all like to try new things. I'm not surprised because you enjoy surfing blogs, which means you're probably looking for inspiration or techniques to pick up. We all love our comfort zone, but trying new things, such as a color combination, technique, or new products is easy to incorporate in your creativity process. Give it a go if you don't already!
Thanks again for participating! I just passed 300,000 hits yesterday and I'm so grateful for every one. I just may have to REALLY celebrate this week! You all really have shown me some love so it's only proper I share a little back!
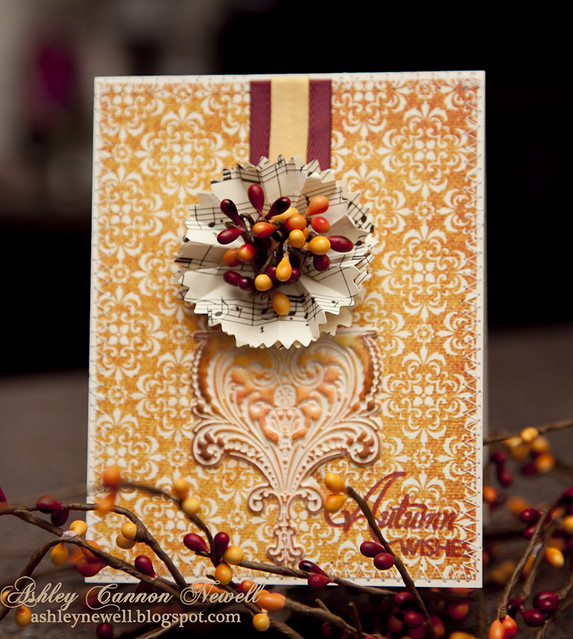
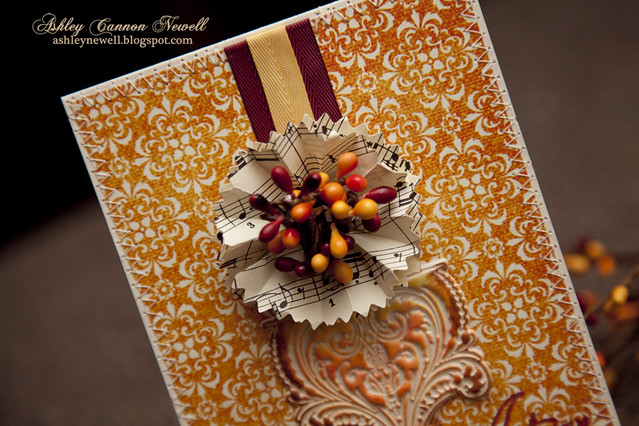
Hey there! I hope you've had a great week! To end it off, I'd like to share this autumn card. I used patterned paper, which I am super proud of since I usually ignore my stash! I wanted to create a fall card since it's finally starting to feel like autumn in the DC area. We have had a few weeks where it was unseasonably warm, but I'm not complaining because I really enjoy warm weather! But, I also like to switch up my wardrobe and I was getting sick of those tanks or dressing for a cool morning and a hot afternoon! I think it's finally time to switch my drawers - from my summer to my winter fashion collection (haha collection)!
I stamped the sentiment in a deep red ink about 3 times, then overlayed the same sentiment with a brown ink. Yep, then stitched right over that "S!" :)
I die cut two pinking circles with a circle die cut in the center, then I cut it to create an opening and accordion folded it and attached the second one and somehow flipped it to create a double "wreath."
I used a Pink Paislee artisan element and inked it with chalk and dye inks to highlight the embossed detail.
Instructions
Trim patterned paper to .25" x 4".
Die cut pinking circles and create accordion wreath. Adhere to patterned paper center.
Trim spray and adhere to center of accordion wreath.
Trim twill tape and adhere to card front.
Ink artisan element and adhere to card front.
Stamp sentiment.
Adhere patterned paper to card front and add stitching
Supplies
Stamps :: Verve Stamps - harvest blessings Ink :: Clearsnap - ColorBox chestnut roan, berrylicious Cardstock :: Papertrey Ink - rustic cream Patterned Paper :: Pink Paislee - 365 degrees collection {daydream) Embellishments :: Pink Paislee - artisan elements ornaments; Papertrey Ink - scarlet jewel twill tape, summer sunrise twill tape; Craft Supply - berry spray, music sheet paper Tools :: Spellbinders - S4-114 standard circles LG, S4-172 small pinking circles; GC-001 grand calibur; Janome Sew Mini - sewing machine __________________________________________________________________
Prize Contents
Bo Bunny Cardstock Stickers (Love is all + Adore) 12 z 12 Stickers (Persuasion Combo Stickers) 12 x 12 Patterned Paper (2 sheets - Persuasion Stripe, Dot, Forever Die Cut, Cut Outs) (1 sheet - Persuasion, Moments, Love Notes, Blooms) (9.5 x 12 scrap Persuasion My Sweet)
Basic Grey Ambrosia 6 x 6 Paper Pad
Maya Road Buttons (Rain + Sunshine
Making Memories Noteworthy 8 x 8 plain mini album with 12- 8 x 8 heavy cardstock pages
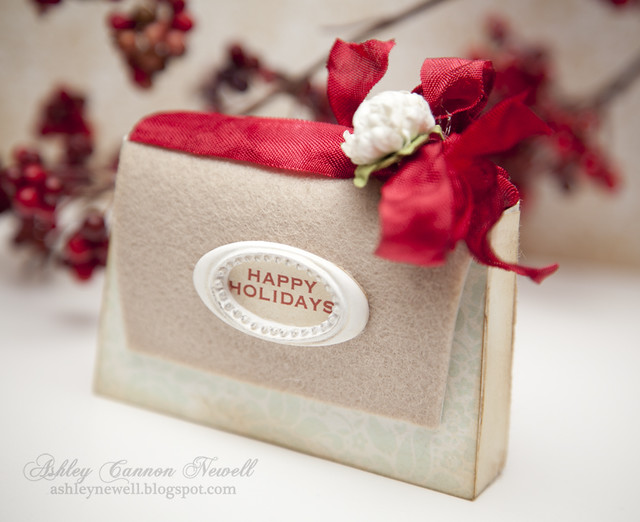
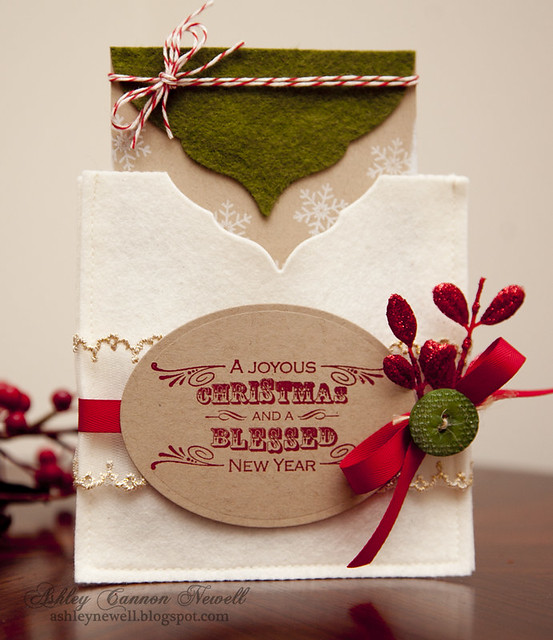
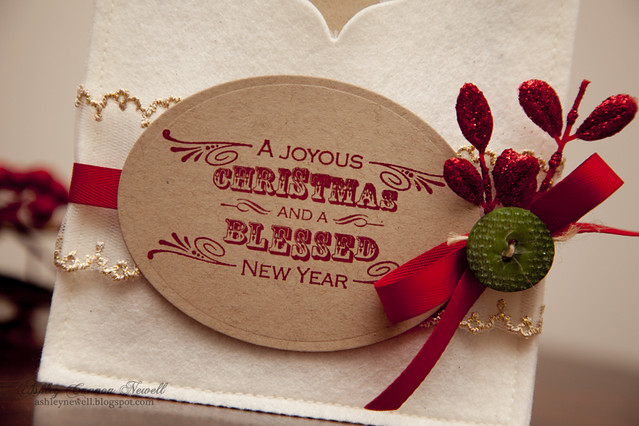
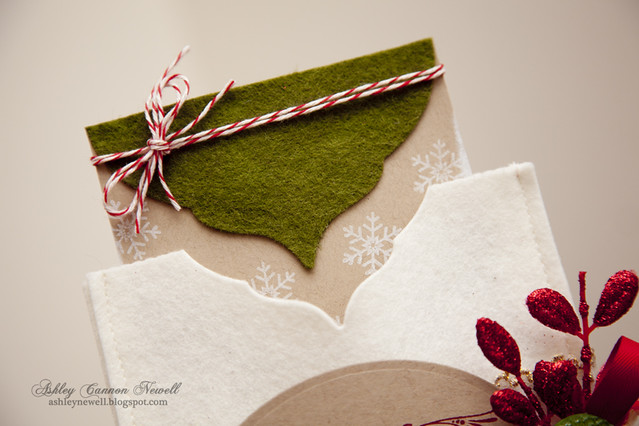
Hey There! I hope you're having a great week! I'm so happy today is Hump Day because it's the end of my work week! YAAAY! But, I'm even more excited to start sharing holiday projects for the WMW video series. Instead of creating a card, I was inspired by a felt pocket I've been holding on to for about two years! I couldn't quite use it, so I thought to create my own version.
I stitched together two 5" x 5" felt squares around the border using my sewing machine. I embellished the front with a few of my favorite current elements.
Using Spellbinders' ornament die template, I created a unique decorative edge.
Here is the simple gift card holder insert. Customize the card with a handwritten sentiment.


