|
|
 So, just for a minute, let's pretend we're all in Paris on this Valentine's Day! Here's a Paris Valentine to get you started! I hope each of you are enjoying this special day in your own way. It doesn't have to mean dates that include dinner, movie, flowers, and candy. Strong relationships that stand the test of time figure out what works best for them, as a couple. Besides, shouldn't Valentine's Day be every day? I'm not a Valentine's Day grinch, but I think it's one of those holidays that just makes people spend money when they do not have to (if you know what I mean). Do something special for your loved one every day, not just today because there may not be a tomorrow.
Thanks so much for stopping by and pass some love today!
Instructions - Make card base (larger than A7 somehow by accident)
- Trim berry sorbet cardstock to fit card front and stamp background pattern, then ink edges and adhere to card front.
- Stitch around canvas tag, then adhere to card front.
- Add rhinestones and pearls.
- Stamp sentiment, ink, and distress.
- Adhere to card front with foam adhesive.
Supplies
Stamps :: Cornish Heritage Farms - tulle damask; SU! - teeny tiny wishes Ink :: Clear Snaps - chestnut, dune; Ranger - vintage photo Paper :: PTI - dark chocolate, berry sorbet, sweet blush Embellishments :: SU! - pretties kit (pearls); Kaiser - rhinestones; Pink Paislee - canvas tag patches
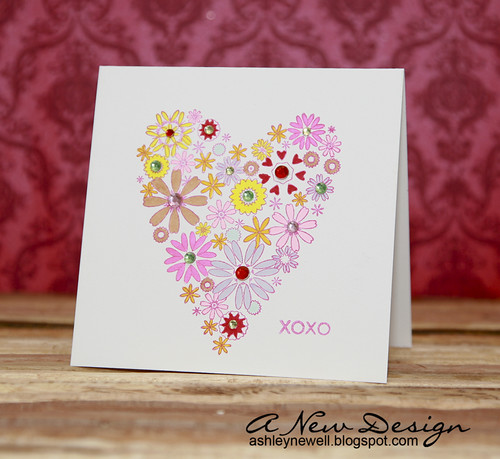 Hey there, Bleeps! I'm back with a quick card to share with you. This card was finished in about 15 minutes. The longest part was the coloring the flowers. The stamps on this card are all by Hero Arts. I colored the flowers with Copics and embellished with rhinestones. Valentine's Day is right around the corner. Do you have any plans? Let's hear them!
DC Weather Update: We're still snowed in. The federal government is still closed and we're expecting another 10"-20" tomorrow evening and through the night on top of our 30" blizzard from the weekend. I'm not even sure where we'll put the snow that's expected because there is already no more space! The mountains of snow are so high that it makes it very difficult to drive and see past them, which is causing accidents in the area. I'll be stamping tomorrow hopefully and spend my day working from home!
Thanks for visiting! Enjoy your weather, that is if you're not in the DC area!
Instructions - Create a 4.25" square card.
- Stamp heart and sentiment.
- Color stamped image.
- Embellish with rhinestones.
Supplies
Stamps :: Hero Arts - blooming heart + everyday sayings Ink :: Tsukineko - VersaColor Opera Pink; Copic markers Paper :: PTI - white Embellishments :: KasierCraft - rhinestones
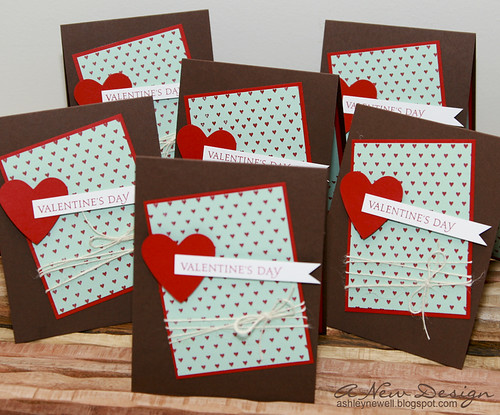
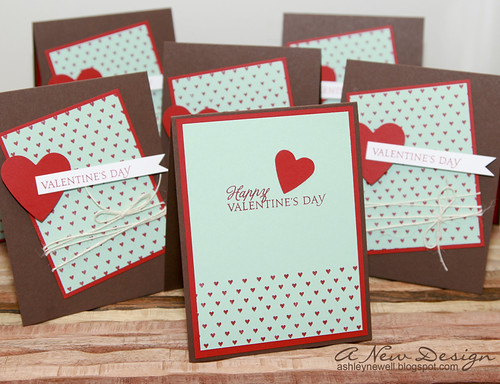
Hey there, Bleeps! I'm sure you're wondering where my photos are from CHA! They're coming! I like to post something bold and new and that takes time! But, I do have some Valentine's cards to share with you. They will be donated to St. Jude Children's Hospital. Winter is organizing a card drive as well for Texas Children's Hospital. Regardless of where my cards end up, I hope they will make a child smile and forget for a bit where they are. This time, I even finished the insides! :)
Check this out! Erin K. was inspired by my card in Stamp It! magazine and made her own version. It's super cute and I love her take on it! I still can't believe that someone would be inspired by a card that I made. Thanks, Erin for posting!
Since I'm on the topic of Stamp It!, I have a few cards in there and one is the Stamp It Three Ways column! Please check it out because this issue is a definite must-have in your craft magazine stash! You can pick it up at any bookstore with a crafts section or AC Moore!
Thanks for taking a peek and enjoy yourself!
Instructions - Outside - Make A2 card base from cardstock.
- Trim blue cardstock and stamp heart pattern, then mat on red cardstock.
- Add twine.
- Punch heart and pop off cardstock.
- Stamp sentiment and add strip to cardstock.
- Adhere cardstock to card front at an angle.
Instructions - Inside - Trim blue cardstock and stamp heart pattern.
- Stamp sentiment.
- Punch heart and adhere.
- Mat onto red cardstock and adhere to card's inside.
Supplies
Stamps :: Papertrey Ink - background basics (hearts); Heart Prints Ink :: Papertrey Ink - pure poppy Paper :: Papertrey Ink - pure poppy, aqua mist, dark chocolate, white Embellishments :: Papertrey Ink - twine Tools :: Marvy Uchida - heart punches
 Hey there! It's already Hump Day and that calls for a celebration! So, head on over to Caardvarks! There's a new challenge hanging around and it's sponsored by Lil Lambs Boutique! You have to create a card using red hearts. Now, I used only one red heart. Why, I don't know, but imagine the pink one is red too! :)
Meet my new poofy flower hair clips! This is a part of my Project 365 I'm doing on my iPhone, so bear with me! I was blog surfing one night and was on Jessica Rosario's site. She mentioned them and I had to check them out and then the next thing I knew, they were ordered. Now, they're here! Maybe I can wear one tomorrow! I feel like now I have to make some for a card...coming soon!
Thanks so much for stopping by and show some 'heart' today!
Instructions - Trim cardstock to create an A2 card base.
- Trim patterned papers and matte together, then tie ribbon around into a bow, and adhere lace trim to the bottom.
- Adhere patterned papers to card front.
- Punch hearts and adhere with foam adhesive.
- Stamp sentiment and tuck into hearts.
Supplies
Stamps :: Hero Arts - everyday sayings Ink :: Papertrey Ink - pure poppy Paper :: Papertrey Ink - sweet blush, white, bitty dots (patterned paper); Making Memories - passport collection (blue polka dot patterned paper) Embellishments :: Papertrey Ink - ribbon, twine, button; Prima - lace trim Tools :: heart punches
 Happy Monday, Bleeps! I hope you had a great weekend, even though it flew by! I got a chance to visit some great stores yesterday, including the Paper Source and Anthropologie. I forgot how much I really liked both stores, but Anthropologie blew me away. They were having a sale, which was really exciting and I picked up a few items, which put a HUGE dent in my wallet (*gulp*)! I guess I'll be wearing those pieces over and over and over again to make sure I get my monies worth! :) Here is a photo of one of the tops I found (not on sale UGH!) that I had to have. My style is a bit funky. I like traditional with something that pops. This shirt is SUPER comfortable. The necklace was much more flattering on than on the hanger. My favorite part is the embroidered colorful flowers of course! I love bright colors added to my wardrobe. I would share my other two finds, but they weren't on the site. If you have a store near you, check them out. If you don't like their clothes, you'll love their home decor!

Anyway, about the card! Today, I'm sharing a Valentine's card inspired by Laura's sketch over at 2S4Y! This week's sponsor is The Cutting Cafe and I got the chance to make an entire card from digital stamps! I had a lot of fun!
Here's a peek at the sketch! It's a great one, so I hope you all get a chance to create something inspired by it!
Thanks for visiting and enjoy your day!
Instructions - Trim raspberry fizz cardstock to create an A2 card base.
- In Photoshop CS4, add color to heart pattern and print on matte presentation paper.
- In Photoshop, size frame labels, add hearts, and print on cardstock. Cut out frame labels and hearts and assemble.
- Matte heart digital patterned paper on black cardstock, then adhere to card front.
- Add ribbon treatment.
- Adhere frame label to card front.
Supplies
Stamps :: The Cutting Cafe - All About Valentine's Day Paper :: Office Depot - matte presentation paper; Papertrey Ink - raspberry fizz, sweet blush Embellishments :: Papertrey Ink - true black ribbon
 Happy New Year! Embellish Magazine has some great news to share, so hop on over! Here is my card I made using The Cutting Cafe's printable stamps. Have you ever used digital images before to make any projects? Well, it's super easy and extremely versatile to use. Embellish has a new color challenge that you can participate in too! It features a heart theme and of course these Valentine's colors! The other news includes a new design team and a chance to win prizes, so check it out!
I'll be back later to share lots of more cards I've been busy making for Caardvarks new challenge!
Thanks for stopping by and Happy New Year!
Instructions - Trim black cardstock into an A2 card base.
- Using an editing software program, arrange frames and words, then print. I added color to the hearts and printed that image twice to cut some hearts and pop them off the card front.
- Trim around frame on white cardstock, add ribbon.
- Cut hearts and pop them off and set aside.
- Trim other frame and adhere to card front.
- Adhere other frame image on top with foam adhesive.
Supplies
Paper :: Papertrey Ink - true black, sweet blush, white Embellishments :: Papertrey Ink - pure poppy ribbon Tools :: Photoshop - CS4; Epson - 1400 printer
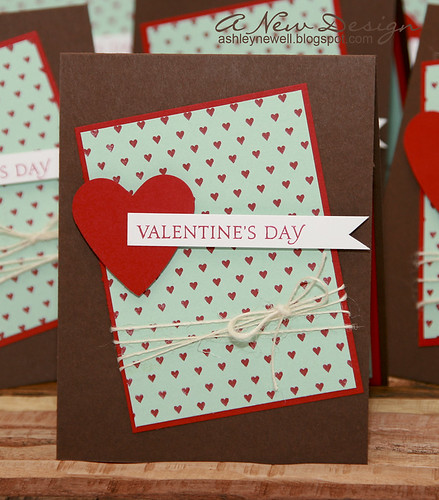
 I wanted to share these Valentine's Brunch Invitations I made for a customer who was hosting a brunch for her young daughters and friends. The brunch was last Sunday and I can't wait to hear how it turned out! She wanted simple, girly invitations. So, I made them bright and full of Papertrey Ink goodies! What you can't see is that the white panel on the front opens up to reveal all of the party details. I didn't photograph that part to protect the privacy of the host. The inside includes the title of the party and all of the details using a brown fun font on the raspberry fizz cardstock (which you can see). A few updates!I added a Facebook badge to my blog below, so if you're on Facebook, please feel free to add me as your friend! On my FB page, you can find a link to A New Design and become a fan along with others! If you do not subscribe to Papertrey Ink's newsletter, then you do not know that I was featured in it for the month of February! You can subscribe to their newsletter by signing up on their website. You can view the newsletter to read their interview of me by scrolling down to the "Publications :: Features" section of the blog and then click on "February 2009 E-Newsletter" or click here. Craft Critique is hosting a Blog Carnival for Valentine's Day themed projects. So, jump on over to see what it's all about! Invite Instructions- Trimmed brown cardstock to 4.25" x 5.5"
- Trimmed raspberry fizz cardstock to about 4" x 5.25"
- Using a word processing program, generate party details and print on raspberry fizz cardstock.
- Trim white cardstock to about 3.5" x 4.5".
- Dry emboss white cardstock with swiss dots embossing folder.
- Scallop punch one edge of white cardstock.
- Score a line at 3.5" from the punched side and corner round 2 corners.
- Stamp hearts, punch out, and adhere to white cardstock.
- Tie ribbon around white cardstock.
- Stamp sentiment on raspberry fizz cardstock, then adhere to white cardstock using dimensionals.
- Matte all cardstocks together as shown.
TIP: You can use this layout for ANY simple invitations! :: My Goodies {Valentine's Invites} ::Stamps: Papertrey Ink-Borders & Corners Mini + Heart Prints Ink: Papertrey Ink-dark chocolate Cardstocks: Papertrey Ink-white + raspberry fizz + dark chocolate + sweet blush + plum pudding; Stampin' Up-kiwi kiss Accessories: corner rounder; ProvoCraft-swiss dots embossing folder + cuttlebug; dimensionals; Papertrey Ink-raspberry fizz topnotch twill ribbon; EK Success-heart punch Card Size: 4-1/4 x 5-1/2
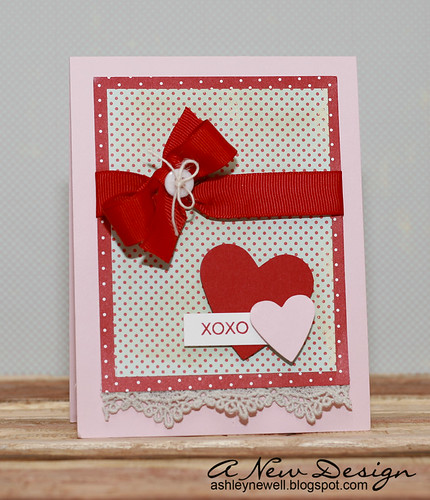
 Today, I'm sharing a card for CPS sketch, which is sponsored by PTI this week. I decided to use a more vintage style by distressing the edges and using lace. It's a really simple card and can be given to someone for many occasions, including friendship, birthday, love, or just because. So...what do you think? According to the poll that I conducted on the blog for the past week, most people want the blog to remain the same. Based on the people who did vote, a large number requested video or image tutorials. I've decided to give both a try. Now, this doesn't mean I will contribute video or image tutorials every week, but maybe once a month, depending on how much time it will take to edit and add these features. If I like one more than the other, I'll probably just select one for the future to always use. Thanks so much for each of you who voted. I appreciate your input! Here's how to create this card: - Trim brown cardstock to 4.25" x 11", then score at 5.5".
- Trim raspberry fizz cardstock to about 3.5" x 4.5"
- Stamp gridline design.
- Add lace trim.
- Distress edges and adhere to card base with dimensionals.
- Punch heart and distress edges.
- Adhere to card base with dimensionals.
- Add rhinestones and key.
- Stamp sentiment on pink cardstock, distress, and adhere under heart.
- Add rhinestones to center of gridlines design.
:: My Goodies {special life} :: Stamps: Papertrey Ink-grid lines + heartfelt sentiments Ink: Papertrey Ink-vintage cream; Stampin' Up!-chocolate chip Cardstocks: Papertrey Ink- dark chocolate + raspberry fizz + sweet blush Accessories: Tim Holtz-word key + paper distresser; Michaels-lace trim; KaiserCraft-rhinestones; dimensionals; craft supply-twine; EK Success-heart punch Card Size: 4-1/4 x 5-1/2
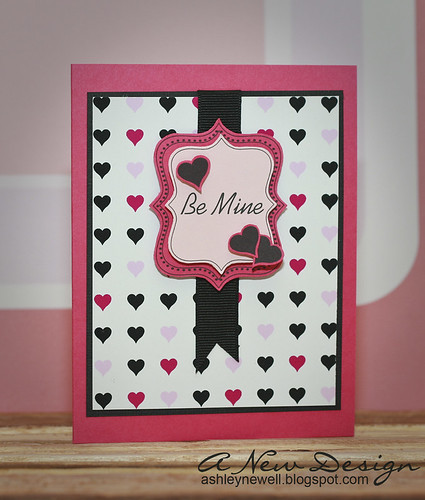
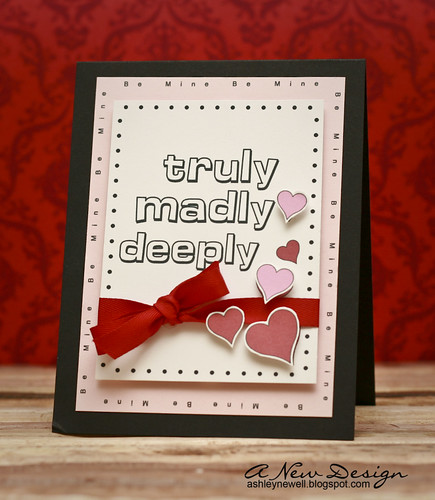
 Hi...how was your weekend? Mine was very relaxed. I hope today I'm able to do a little more crafting than I did this weekend. Last night, I did clean up my craft room significantly and organized my file cabinet to store my scraps. I'm finding that it's working really well for me and I'm actually placing the scraps in their proper location after each project! I'm using all of my scraps when I need a piece of this or that color. I highly recommend this organization idea to use all of your cardstock. For my pattern paper, I still dump that in a large photo box. For some of my pattern paper, I return to a Creative Memories paper organizer (I can't link it because I don't think it's available anymore. I can't find it). This card's colors are based off of Loonie's Stamper's Challenge. They're very fun and easy to work with! I really like it for a Valentine's card. I wanted to work with Papertrey Ink's new Heart Prints, which I won! Now, I need a couple of heart punches because I'm not too good at cutting these hearts out like I thought I would be! Anyway, this card is fairly simple (minus the heart cutting), but would be really simple if you have the punch. I added the double-ribbon, which I really like to incorporate into my cards. I just hate that I use so much ribbon! I've had the linen vellum for a while but forgot to use it. I really like it because it's heavy-weight and you can stamp on it and it adds texture. Is that enough reasons?! Happy MLK Day! Here is how you can make this exact card in less than 10 steps: - Make card base by trimming green cardstock to 4.25" x 11", then score at 5.5".
- Trim vellum to 3.5" x 3.25".
- Trim brown cardstock to about 3.75" x 4", then scallop edge punch the bottom.
- Stamp hearts using watermark ink and emboss with clear embossing powder.
- Cut or punch hearts, then adhere to vellum using dimensionals.
- Adhere vellum to brown cardstock.
- Tie pink ribbon around brown cardstock.
- Adhere brown cardstock to green card base using dimensionals.
- Stamp sentiment and hearts on bottom center of card base.
:: My Goodies {be mine}::
Stamps: Papertrey Ink-Heart Prints
Ink: Versamark; Stampin' Up!-Chocolate Chip
Cardstock: Papertrey Ink-linen vellum, dark chocolate; Stampin' Up!-Kiwi Kiss
Accessories: dimensionals; Papertrey Ink-raspberry fizz top notch twill ribbon; scallop edge punch; clear embossing powder; heat gun
Card Size: 4.25 x 5.5
 Yaaay...it's Thursday! I'm excited because I have a four-day weekend coming up and get to create to my heart's desire! This card I'm sharing with you today is very easy to create. It probably took about 10-minutes to do. This card can be for an anniversary, just because, or valentine's. Anyone watch American Idol? I don't know how I get lured into watching it every season! The auditions are just too exciting to turn away. Well, I hope you enjoy the remainder of your day. I have to finish making a masculine birthday card, which are so challenging, but fun! Instructions - Make your card base by trimming baja breeze cardstock to 4.25 " x 11", then score at 5.5".
- Stamp swirls on left side of card base.
- Stamp sentiment on right side of card base.
- Attach brads to flowers.
- Adhere flowers to card base around stamped swirls using tacky glue.
- Score lines at the bottom of card base.
:: My Goodies {Love You Forever}::Stamps: Papertrey Ink-Remember + Heart Prints
Ink: SU!-Chocolate Chip
Cardstock: SU!-baja breeze
Accessories: prima flowers; vanilla brads; scor-pal
Card Size: 4.25 x 5.5
       Only one month until Valentine's Day, so I thought I'd share this altered heart tin with you! Originally looks like this (available for purchase at Papertrey Ink). I covered it paper, ribbon, flowers, and rhinestones. Somehow, during my alteration, I came up with the idea to make it a jewerly heart tin. I thought this is the perfect Valentine's treat for anyone! Not only can you alter it to hold a ring, but also any other jewelry, such as earrings, necklace, or bracelet! This tin can also be altered to fit anyone's taste and can be given any time of the year. I think this is the perfect way to present an engagement ring because it is not in the typical jeweler's box. This can be a way to 'hide' it in an inconspicuous way. My sister had a good idea to create a few of them, one with candy, another with a note, but the last with the engagement ring. Isn't that a cute idea? Sorry for a lot of photos, I really liked the project and how it turned out and my DH had a good time photographing it (thanks, Mac)! Everything to complete this project is from Papertrey Ink, except the rhinestones and flowers (Mac gave those to me for Christmas!). The ring is only placed in the tin as an example! Want to create your own heart tin? It's easy using these quick steps: - Clean tin by wiping off any 'dirt' - it is probably clean!
- Measure paper to wrap around tin. (TIP: Papertrey Ink's 6x6 pattern paper fits perfectly around the tin. You only have to measure the width, which will be the height of the tin of about 2" or so).
- Adhere pattern paper to tin using tacky glue (my personal preference at the time).
- Measure pattern paper for the tin lid by tracing the heart and cutting it out. (TIP: Before adhering, match paper to the lid making sure it fits. Trim any excess with scissors.)
- Adhere pattern paper to lid.
- Measure ribbon for the lid and base of the tin and adhere to tin. (TIP: To keep everything uniform, select a side you will make your 'seam' side and start and finish at the same point for your pattern paper and ribbon. I used the top part of the heart because people tend to hold the heart face up/down with that part not exposed).
- Adhere ribbon to tin (I used tacky glue, which can be a little messy, but tacky tape may work well too).
- Adhere rhinestones to ribbon on tin base. (TIP: For self-adhesive rhinestones, I still use tacky glue to adhere them to prevent them from falling off easily.)
- Add flowers w/ rhinestones to the lid.
- Stamp "XOXO" on white cardstock. Trim cardstock to a strip and using scissors create a flag point on the end.
- Using tacky glue (obviously my favorite now) adhere the sentiment strip to tin lid in a wave design. (TIP: When using tacky glue, hold whatever you are adhering into place for a couple of minutes. You have time to adjust and this will make it stay in place pretty much forever!)
- For the inside of the tin, trace the heart design on paper, then cut out. Try to place inside of the tin and make any necessary trimmings. (TIP: Make sure you do not cut too much since the tin has a 'lip' on it, the paper will fit comfortably inside of the lid by pushing it down at an angle and it will automatically pop up for a perfect fit.)
- Once your heart fits, take it back out and make any 'cuts' using a craft knife or paper piercer for the jewelry. I used a craft knife to make room for a ring. A paper piercer would work great for earrings.
- Fill tin with leftover 'stuffing' from your old jewelry boxes I'm sure you have. If you do not have stuffing, cotton balls should work perfectly. This will keep the jewelry safe from falling into the tin making a noise.
- Place heart paper into tin, add jewelry and then say OOOOOH AAAAAAAAH OOOH!
I just loved this project and it only took me about 30 minutes to make and I did not know what I was doing! It was my first altered tin project and was surprisingly easy - especially for the shape in my opinion. So, I encourage you all to try something new, you will be surprised what you can do sometimes! If you do not want to make a jewelry tin, you can always fill it with treats, such as candies or dessert! Join me tonight in the Papertrey Ink forum for the release party! Nichole has some great new stamp sets, cardstock, and pattern paper to be revealed! :: My Goodies {XOXO}::Stamps: Papertrey Ink-Heart Prints
Ink: Papertrey Ink-Raspberry Fizz
Cardstock: Papertrey Ink-white, raspberry fizz
Pattern Paper: Papertrey Ink-raspberry fizz mix
Accessories: papertrey ink-raspberry fizz topnotch twill ribbon, heart tin; Kaiser Craft-rhinestones; Prima-flowers
Finished Size: 2"H x 2.5" W x 2.25"
 For the new year, I decided to go for a new look. {See the new photo?} My hair is a lot darker and shorter! It's much easier to manage and is fun! I change my hairstyles often, keeping myself {like my crafts} bold and new! The hairstyle is a week old, but I just got the chance to get this photo taken by my DH, Mac. He's a great photographer! This project was inspired by Loonie Stamper's Challenge, who challenged everyone to do an altered pink project. I altered a canvas using fabric, ribbon, metal, and a picture. Using fabric instead of paper adds so much texture, especially for home decor altered items. This project does not take a long time and you can create it too: - Cut a piece of fabric to cover the front, sides, and part of the back of the canvas.
- Apply gel medium to front of canvas, then adhere fabric.
- Apply gel medium to one side of the canvas and adhere fabric.
- To close the end, fold the end (as if you were wrapping a present) and adhere.
- Continue adhering fabric to the remaining sides.
- Tie ribbon around canvas into a bow. (TIP: Only cut ribbon to wrap around the canvas, then cut another piece to tie a bow on the front to conserve ribbon)
- Adhere metal sentiment to fabric.
- Clip embellished paper clip to photograph and adhere to fabric.
- Cut prongs of brads down, then adhere to fabric.
- Adhere rhinestones to fabric.
Here are some tips when working with fabric: - Adhere using Golden Gel Medium
- When adhering anything to fabric, use Alene's Tacky Glue (which I use almost all the time to make everything stay in place)
- Any questions? Just ask because I've worked with fabric a whopping 3 times now!
:: My Goodies {love fabric canvas}::
Fabric: Anna Griffin-Dorothy Damask (pink)
Accessories: Golden gel medium; Making Memories-charmed quotes 'time', clips, paperie mocha brads; Papertrey Ink-raspberry fizz satin ribbon; Hero Arts-rhinestones; photograph
Canvas Size: 6 x 6
|
|


