|
|
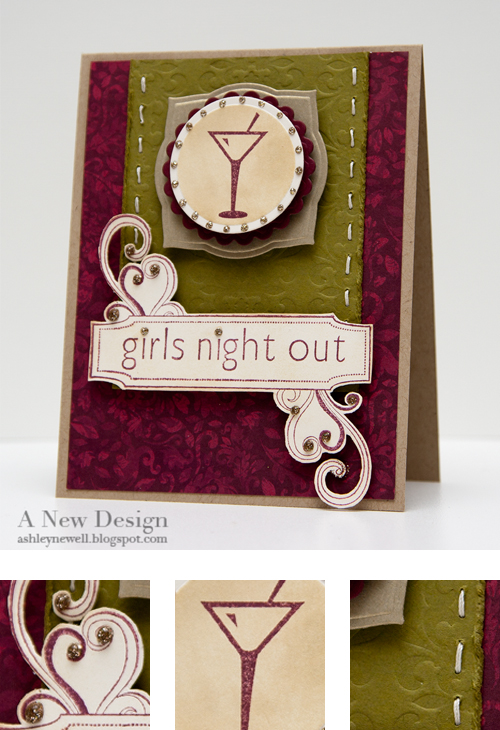 Hey there Bleeps! Happy Friday to you! It's a long holiday weekend here in the States, so I'm ready to get my 'eat on!' But before I do, I wanted to share an invitation created for Embellish Magazine's new challenge. Head on over and check it out here. Instructions- Trim patterned paper to about 4" x 5.25".
- Trim green cardstock strip, then dry emboss it, and adhere it to patterned paper.
- Hand stitch on green cardstock strip and distress the edges with your fingernail.
- Stamp text box and sentiment on cream cardstock, then cut out and pop off card front.
- Die cut and emboss label, circle, and scalloped circle.
- Stamp martini on circle, then ink.
- Mat die cuts together and pop off card front.
- Adhere everything to kraft A2 card base.
- Add stickles.
SuppliesStamps :: Unity - soirees & such Ink :: PTI - scarlet jewel; Ranger - antique linen Cardstock :: PTI - scarlet jewel, kraft, vintage cream, ripe avocado, gold Patterned Paper :: KaiserCraft - gypsie sisters collection (ella) Embellishments :: Ranger - stickles Tools :: Spellbinders - labels three (S4-189), standard circles small (S4-116), classic scalloped circles small (S4-125), fleur de lis pattern impressabilities (I4-1014), wizard Thanks so much for stopping by! If I'm not back tomorrow with my easy salad recipe, then you all have a great weekend and enjoy your "Fun Fourth" holiday!
**Please Note: I have two postings today. Please scroll down to see my special Dearest Dad Papertrey Ink post.** 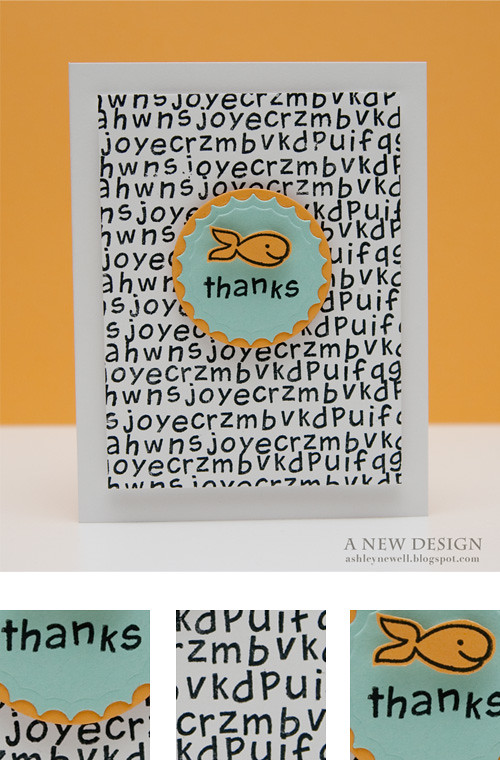  Hey Bleeps! I'm back today with another Lawn Fawn sneak-a-peek. Remember when I told you that yesterday's sneak-a-peek would relate to today's? Well, here is why - I created an ensemble to go with the entire young boy's party. I made a thank you card and party favor, which highlights the Critters in the Sea set along with Harold's ABCs. With Harold's ABCs, you can personalize anything and create your own sentiment, like I did with the "thanks" and even your own background pattern. Here's how I did it! Instructions- Trim white cardstock to 3.5" x 4.5" and stamp text background pattern. See next section on how I made it quick and easy and more options.
- Pop text background off an A2 card front.
- Die cut and emboss circle and inverted scalloped circles and mat together.
- Stamp "thanks" and pop off card front center.
- Stamp "fish" and pop off die cut.
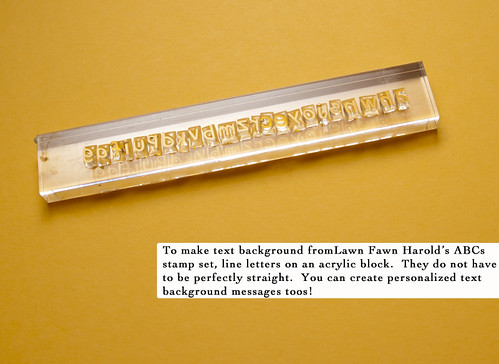
Tips, Tricks & Techniques- Line letters on acrylic block and stamp like you would any background stamp. See photo below.
- You can create a special background pattern with a personalized message.
- Imagine using a different color ink to make a special sentiment 'jump' out of the text background stamped pattern.
- Recycle containers. The container I used here was recycled from a packaged treat Mac brought home to me from a retirement party at work. There are craft supplies everywhere!
 SuppliesStamps SuppliesStamps :: Lawn Fawn - harold's abcs, critters in the sea Ink :: Memento - tuxedo black Cardstock :: PTI - stamper's select white, summer sunrise, aqua mist Embellishments :: Craft Supply - clear container Tools :: Spellbinders - standard circles large nestabilities (S4-114), classic inverted scalloped circles large nestabilities (S4-194), wizard Check out what the rest of the Lawn Fawn Design Team created here. Thanks for stopping by!
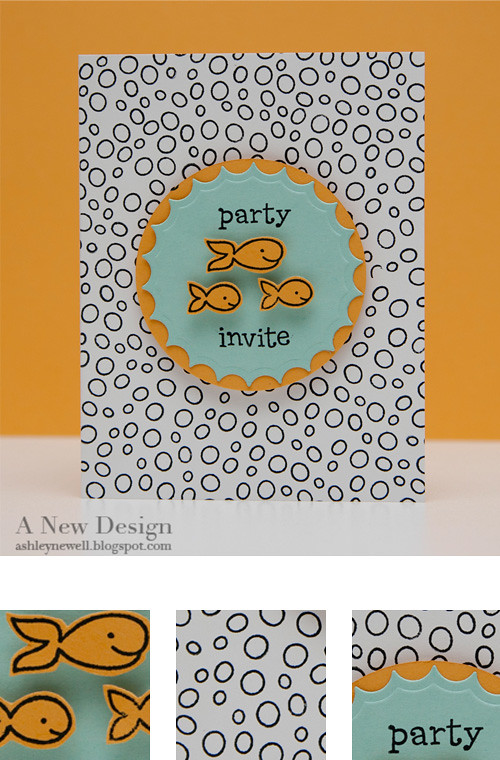 Hey there everyone! I hope you're enjoying your weekend. Today, starts the sneak-a-peeks of Lawn Fawn's new stamp sets. Critters in the Sea is the stamp set I'm featuring today; however, today's project will relate to tomorrow's sneak-a-peek, so make sure you come back! I created a simple party invitation, perfect for a little boy's party. I could only imagine how difficult it would be to create fun and cute boyish party invites, but the Critters in the Sea set will make it a cinch! Here's how I made it! Instructions- Cut white cardstock to create an A2 card base.
- Stamp 'bubble' background in black ink.
- Die cut and emboss circle and inverted scalloped circle from summer sunrise and aqua mist cardstock, respectively.
- Stamp 'fish' on summer sunrise cardstock, cut out and pop off inverted scalloped circle die cut.
- Stamp 'party invite' with black ink.
- Mat together and pop off invite front center.
Tips & Tricks- Keep handmade invitations simple so you can create them in batches.
- To add an extra step, you could color the bubbles or ink them in various colors.
SuppliesStamps :: Lawn Fawn - critters in the sea, just my type tooInk :: Memento - tuxedo black Cardstock :: PTI - stamper's select white, summer sunrise, aqua mist Tools :: Spellbinders - standard circles large nestabilities (S4-114), classic inverted scalloped circles large nestabilities (S4-194), wizard Check out what the rest of the Lawn Fawn Design Team created here. Enjoy your Memorial Day and I'll be back late tonight with a couple more posts! Thanks for your visit!
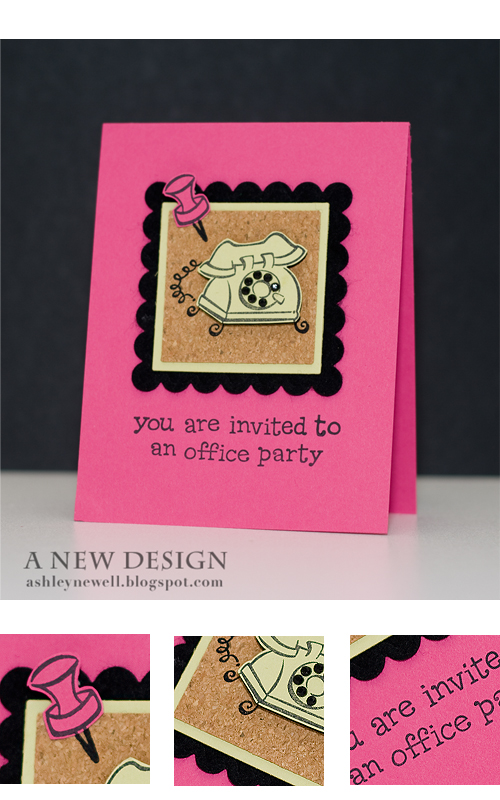 Hey there! I hope everyone had a great weekend! I'm back today with another Lawn Fawn "Sneak-a-Peek!" Today's card features an addition to the Just My Type set showcased on Friday. It includes a lot of great sentiments and wording to incorporate with Just My Type, hence the name Just My Type Too! I created an office party invitation for the fun office...it exists! I used a lot of texture for the card, including cork, felt, and rhinestones. Don't forget to take a peek at what the other "Fawnies" created using this set. You should get another peek at something new in the new stamp set! Instructions- Die cut square from cork.
- Stamp telephone; once on cork and again on spring moss cardstock.
- Cut telephone from cardstock and pop off cork.
- Add black rhinestones to telephone digit buttons.
- Stamp push pin on cork (partially off) and again on pink cardstock. Cut out.
- Mat cork on green cardstock die cut square.
- Adhere square die cuts to felt scalloped square die cut.
- Add push pin stamped image on pink cardstock.
- Adhere focal point to card front.
- Stamp greeting on card front.
SuppliesStamps :: Lawn Fawn :: Just My Type + Just My Type Too Ink :: SU! - black Cardstock :: PTI - raspberry fizz, spring moss Embellishments :: PTI - black felt; QuicKutz - cork; KaiserCraft - black rhinestones Tools :: Spellbinders - scalloped square nestabilities (S4-127), square nestabilities (S4-126, S4-128), wizard
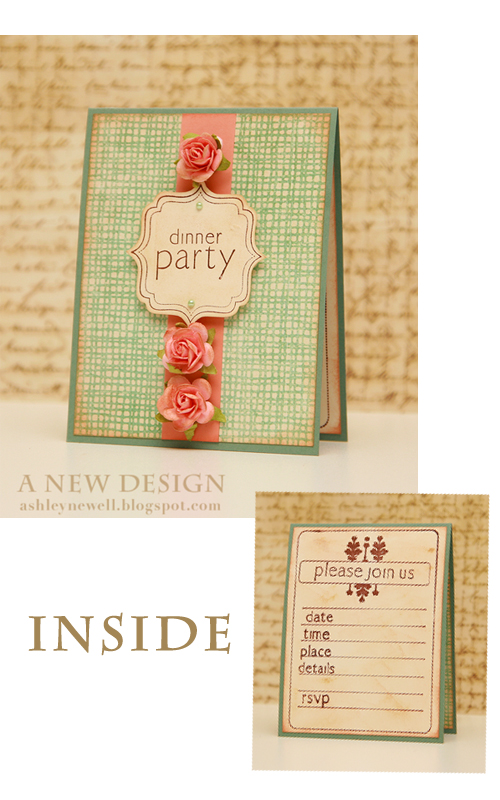 Hey Everyone! I'm so happy that Friday is just around the corner. Today, I'm sharing a quick little dinner invite that you can whip up and send out to your friends. I've been wanting a great, versatile invitation stamp set and Unity Stamp Company made that happen! It's wonderful! When hand making party invitations, you want to make sure they are simple enough to complete them all. I used patterned paper and dressed them up with the flowers. The flowers can be left off and replaced with jewels or pearls for a flatter invitation (for mailing purposes). The options are endless with this set and I thank Unity for creating it for us all to use! This new stamp set was designed just because of my special request! You can do the same thing over at Unity! Check out their blog posting here! The stamp set is revealed! Regarding envelopes, I have a recommendation. I reviewed the Ultimate Crafter's Companion for SCS last year and really liked their envelope box template. Their template allows you to make a quick and easy envelope that gives you that extra space for bulky cards. Here is my posting about the review here and the SCS link here. At the SCS link, you can find other links directly for the Crafter's Companion. I hope that helps you all with your envelope and shipping woes with those bulky cards! You're probably going to have to pay additional postage, but it's all worth it in the end to send your beautiful hand crafted projects! I made it a bit vintage. I've been on that trend lately! I wish I could invite you all over for a dinner party. I'd love to that because I love entertaining! It's so much fun to host an event from the planning to the preparation to the big show! Well, this invite will have to work for now! Thanks for coming by and taking a peek! If you have a chance, hop on over to the Unity forum at SCS to join in on some Hip Hop fun! Instructions- Create an A2 card base.
- Trim patterned paper to 4" x 5.25" and ink.
- Trim melon cardstock to about 1" x 5.25" and adhere to patterned paper center.
- Stamp label with greeting, cut out, ink, and pop off patterned paper. Embellish with pearls.
- Adhere patterned paper to card front and embellish with inked flowers.
- On the inside, trim cream cardstock to 4" x 5.25" and stamp invite greeting and ink and adhere!
SuppliesStamps :: Unity Stamp Co. - soirees and such Ink :: Ranger - antique linen, tea dye; ClearSnaps - colorbox chestnut Cardstock :: PTI - ocean tides, vintage cream, melon berry Patterned Paper :: My Mind's Eye - Ooh La La collection (lah dee dee) Embellishments :: Prima - flowers; KaiserCraft - pearls

Hey there, Bleeps! I'm back today with another sample using Cut Cardstock.com invitation templates. This template is a perfect way to make simple petal invites. I made one using a baby shower theme. Instead of the typical, "Join Us for a Baby Shower" sentiment, I combined a few of my Papertrey Ink stamps to come up with this one! I stamped the sentiment on a shipping tag to signify a new baby! The giraffe makes the invitation a bit more fun along with the brown gingham ribbon. I think the mommy-to-be for this shower definitely knows she's having a boy!
Thanks so much for stopping by and don't forget to find out if you were yesterday's blog candy winner on today's blog candy posting (below). Also, don't forget to enter today's blog candy contest!
Have a great Hump Day!
Instructions - Draw faux stitching with marker.
- On shipping tag, stamp sentiment.
- Stamp giraffe on kraft cardstock, color, and cut out.
- Tie ribbon around invitation.
- Add shipping tag.
- Add giraffe (adhere rhinestones to giraffe's eyes).
Supplies
Stamps :: Papertrey Ink - bitty baby blessings, paper tray (invited, but only stamped invite); Fiskars
Ink :: Stampin' Up! - chocolate chip (marker too); Copics; Uniball - white gel pen
Embellishments :: Michaels - brown gingham ribbon; KaiserCraft - rhinestones
 
 Happy Friday Eve! Today, I have a fun Halloween invitation to share with you. I received lots of cardstock and other goodies to try out from Cut Cardstock.com. So, you can say this is a personal review (over the next week). You have to check them out. They have a very large selection of all types of cardstocks, pre-scored invitations, place cards, envelopes, and other fun, hot items. I was surprised by all of the options available for paper here, so go...take a look! I decided to try out this Pocket Fold Invitation. I've always wanted to make these, but it is super difficult because cardstock just is not large enough. Then you have to deal with the pocket and everything, which means you might as well buy one, right?! This was super easy to design because the template was already there! I trimmed down the top part a bit to show off the label a little better, but everything else remained the same. I even ran the top portion through my Cuttlebug (twice) to get the polka dot embossed image! On the inside, I used some of their shimmer cardstock. It prints extremely well. I adhered a matching label, with an attendees name to a place card.
The label was stamped using Waltzingmouse Very Vintage Labels No. 4. The "antique key" is a rubber stamp by Rubber Stampede (picked up from Michaels or A.C. Moore). The decorative trim is a punch by EK Success (picked up from Michaels). The name on the place card was stamped using Papertrey Ink's fresh alphabet. The invite was created in Photoshop CS4.
More pictures are available on my Flickr page!
I also did another card for an Embellish challenge. Please go check it out here. Go make a card today too because the challenge does not end until late tonight!!
Thanks for visiting and enjoy your Thursday!
I hope this gets you feeling the need for some candy! Hurry up and go pick some up, it's already starting to go on sale (trick or treater or not)! Supplies- Stamps :: Waltzingmouse - Very Vintage Labels No. 4; Papertrey Ink - fresh alphabet; Rubber Stampede - antique key
- Ink :: Stampin' Up! - basic black
- Paper :: CutCardstock.com - pocket fold invitation, place card, shimmer cardstock; Papertrey Ink - true black, vintage cream
- Embellishments :: Spellbinders - labels 4 nestabilities; KaiserCraft - rhinestones; Papertrey Ink - button, ribbon
- Tools :: Provo Craft - cuttlebug, swiss dots embossing folder; EK Success - border punch; Photoshop - CS4
 Bridal Shower Invitation
 Thank You Note
Wedding Invitation
 Menu
 Placecard
In Paper Crafts July/August issue, it encourages crafters to use limited supplies to make a variety of projects (in the magazine 5 different cards for $5). So, I decided a couple of months ago to embark on that venture. Here is a wedding series using minimal cardstock, patterned paper, ribbon, and tools.
Additional tools were used such as Cuttlebug, stamp, ink, nestabilities, computer, and printer, but those costs are nominal considering I use them on an almost everyday basis. So, that is why I decided not to include them in my overall cost analysis. The total cost for making the coordinating wedding ensemble is $5.50. So, I am $.50 over what Paper Crafts suggests, but this is for a wedding! I splurged on the patterned paper because it is a super limited supply. The matstack only includes 3 sheets of patterned paper, so in real life, I would substitute with a readily available patterned paper OR create my own by stamping a damask pattern. Those two options would greatly decrease my overall cost.
I call my first Wedding Series line, "Punch of Elegance" because it is elegant with the flocked damask patterned paper and packs a punch of color with the bold raspberry fizz cardstock. I say my first because I plan to add additional samples to my collection.
So, what do you think?
:: My Goodies {Packs a Punch} ::
Stamp: Stampin' Up! - elegant thank you; Papertrey Ink - Piece of Cake Ink: Stampin' Up! - black Cardstock: Papertrey Ink - vintage cream + raspberry fizz + true black Patterned Paper: DCWV La Creme matstack Accessories: Papertrey Ink - true black ribbon; Provo Craft - Cuttlebug; Spellbinders - Labels 4 nestabilities; Hero Arts-black rhinestones
 I wanted to share these Valentine's Brunch Invitations I made for a customer who was hosting a brunch for her young daughters and friends. The brunch was last Sunday and I can't wait to hear how it turned out! She wanted simple, girly invitations. So, I made them bright and full of Papertrey Ink goodies! What you can't see is that the white panel on the front opens up to reveal all of the party details. I didn't photograph that part to protect the privacy of the host. The inside includes the title of the party and all of the details using a brown fun font on the raspberry fizz cardstock (which you can see). A few updates!I added a Facebook badge to my blog below, so if you're on Facebook, please feel free to add me as your friend! On my FB page, you can find a link to A New Design and become a fan along with others! If you do not subscribe to Papertrey Ink's newsletter, then you do not know that I was featured in it for the month of February! You can subscribe to their newsletter by signing up on their website. You can view the newsletter to read their interview of me by scrolling down to the "Publications :: Features" section of the blog and then click on "February 2009 E-Newsletter" or click here. Craft Critique is hosting a Blog Carnival for Valentine's Day themed projects. So, jump on over to see what it's all about! Invite Instructions- Trimmed brown cardstock to 4.25" x 5.5"
- Trimmed raspberry fizz cardstock to about 4" x 5.25"
- Using a word processing program, generate party details and print on raspberry fizz cardstock.
- Trim white cardstock to about 3.5" x 4.5".
- Dry emboss white cardstock with swiss dots embossing folder.
- Scallop punch one edge of white cardstock.
- Score a line at 3.5" from the punched side and corner round 2 corners.
- Stamp hearts, punch out, and adhere to white cardstock.
- Tie ribbon around white cardstock.
- Stamp sentiment on raspberry fizz cardstock, then adhere to white cardstock using dimensionals.
- Matte all cardstocks together as shown.
TIP: You can use this layout for ANY simple invitations! :: My Goodies {Valentine's Invites} ::Stamps: Papertrey Ink-Borders & Corners Mini + Heart Prints Ink: Papertrey Ink-dark chocolate Cardstocks: Papertrey Ink-white + raspberry fizz + dark chocolate + sweet blush + plum pudding; Stampin' Up-kiwi kiss Accessories: corner rounder; ProvoCraft-swiss dots embossing folder + cuttlebug; dimensionals; Papertrey Ink-raspberry fizz topnotch twill ribbon; EK Success-heart punch Card Size: 4-1/4 x 5-1/2
 Here are two princess invitations I made for a mom to select for her princess' birthday party! Typically, I give my customers a few options. This time I only gave two, well because I worked so hard on one I was hoping she would select it...and she did! Can you guess which one? It's the one pictured right! I named it the "Laura Princess Pocket Invite." The card is a 5x7 pocket card. I trimmed 12x12 pink cardstock into 5x12, then scored at 7". I used clear embossing powder and heat embossed the polka dot background (SU!) and the you're invited sentiment (PTI). I used oval/scallop nestabilities to die cut the oval around the sentiment on pink and purple cardstocks. I placed a pink and purple ribbon around the bottom flap of the card (TT - I think). Two rhinestone jewels are place don each side of the sentiment that is popped off of the card base (KaiserCraft). For the letters, they are MM felt stickers (A.C. Moore). The tiara is clear embossed on purple cardstock with a pink rhinestone (TT). The inside pocket has a white cardstock base with pink and purple cardstocks matted on top. I used French Script font in Microsoft Word with a pink/purple font to detail all of the party information. The top of the pocket insert is punched with a ribbon slit with various pink and purple ribbons.  The "Ella tri-fold Princess Invite" is also nice, but not as fun as the pocket. I used pink polka dot pattern paper for the strips on the tri-fold. On the green cardstock, I stamped "little princess" and a want from Technique Tuesday collection. The same tiara was used (TT). Ella are the same MM felt stickers. The inside include party details. But, my favorite feature of this invite is how it closes. I used Basic Grey's magnets on each side so it automatically closes. I think I played with the magnet closure part for about 10 minutes! HA! Two very different styles, one glamorous and the other simple! I'll be making these invites over the weekend until next week. To make bulk paper art easier, I complete every component in steps. So, all trimming is done in one step, then all embossing and so forth! Doing one at a time would drive me nuts!
|
|


