|
|
 Hey there, Bleeps*! I hope you had a great Monday. Today, I have some fun news. I'm going to be sharing some fun designs inspired by Skipping Stones Design for the month of April! Have you been there yet to check out their great stamps? I'm really excited to be a part of the team this month and play around with some super fun sketches and stamps and I hope you'll join me every Tuesday for a new sketch and project! Run on over to the blog and check out the sketch for this week AND to see what everyone else created! It has lots of scalloped layers and a very clean and simple layout. The fabulous Kimberly Crawford created them for us all to use! Thanks, Kimberly! Although sympathy cards are very difficult to create, especially when you really NEED one, this stamp set makes it a bit easier giving you those beautiful butterflies and great sentiments. The good thing is, the set can be used for countless other occasions as well. You can't have enough butterflies in your collection. Well, I know I can't! *I've updated my stamps for sale! Thanks so much for stopping by! Enjoy your Tuesday! *Bleeps = Blog Peeps Instructions- Trim fabric paper to about 3.75" x 4" and ink it up with a blending tool and dye inks.
- Trim three strips of natural muslin and die cut them edges with a scallop border die and ink.
- Adhere the fabric layers together with tacky glue.
- Run fabric through Creatopia fabric adhesive and adhere to fabric paper.
- Tie ribbon treatment around fabric paper and muslin and tie into a bow.
- Add inked flower to ribbon knot with tacky glue.
- Adhere fabric paper/fabric to a 4.75" x 6" rustic cream card base.
- Ink the card base.
- Stamp butterfly, cut out, and ink.
- Adhere to card front and add pearls.
- Color pearls with Copic marker to soften the stark white color.
- Stamp sentiment on bottom center card front.
Tips & Tricks- When muting colors on your designs, think to tone down all elements. Here, I used a Copic marker to color on pearls to make it not appear so white. Now, I have a more cream pearl as opposed to white.
SuppliesStamps :: Skipping Stones Design - healing wingsInk :: Ranger - antique linen, tea dye; SU! - chocolate chip; Copic marker (Sand - E33) Cardstock :: PTI - rustic cream Fabric :: American Crafts - tickled tulip fabric paper (dear lizzy collection); Craft Supply - natural muslin Embellishments :: Prma - flower; KaiserCrafts - pearls; MemrieMare - cabbage rose ribbon Tools :: PTI - large scallop die; Provo Craft - cuttlebug; Xyron - Creatopia
**NOTE: This is my second post for the day. If you are here looking for the JustRite Stampers Mega March Blog Hop, please scroll down to the next post! Thanks for your visit!**
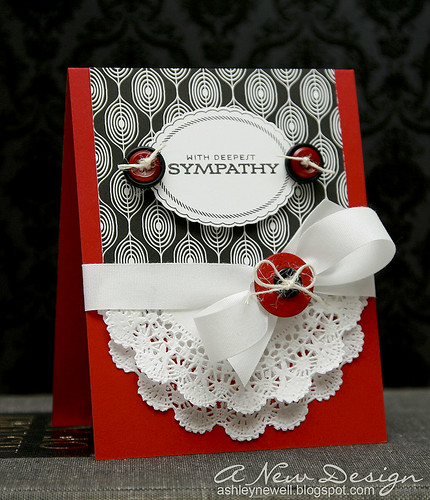 I'm back again today to participate in Papertrey Ink's Blog Hop. This month's challenge is to use buttons. I used them in a traditional way by embellishing my ribbon and sentiment focal point on this sympathy card.
Instructions
(1) Trim pure poppy cardstock to create an A2 card base. (2) Trim patterned paper and adhere to card front. (3) Trim doily in half. Adhere half to card front and the overlay the other half with foam adhesive. (4) Add ribbon treatment with button and twine. (5) Stamp oval decorative border and sentiment and cut out/die cut. (6) Adhere sentiment focal point to card front with foam adhesive. (7) Embellish each side with buttons/twine.
Supplies
Stamps :: JustRite - Christmas Joy Borders & Centers; PTI - Everyday Classics Ink :: SU! - black Paper :: PTI - pure poppy, white Patterned Paper :: PTI - black & white basics Embellishments :: PTI - buttons, twine; Offray - ribbon; Nice Package - doily

Hey there! Today, I'm sharing a card inspired by Melissa Phillips photo challenge. I really liked the pink and green color combination along with the clean white elements. I'm off to some appointments, so not too chatty this morning!
I hope you all enjoy and as always, thanks so very much for stopping by. Have a great Tuesday.
Instructions
(1) Trim spring moss cardstock to create a 5" card base. (2) Trim white cardstock block and stamp text background pattern in pink cardstock. (3) Punch the bottom edge of white cardstock strip and add to white stamped patterned block. (4) Add ribbon treatment. (5) Die cut tag, stamp sentiment, and tie around ribbon. (6) Stamp flowers and leaves and cut out. (7) Color, add rhinestones, and glitter, then pop off card front.
Supplies
Stamps :: Hero Arts - old letter writing; PTI - in bloom + mixed messages Ink :: PTI - hibiscus burst; Clear and Simple Stamps - green with envy; Copic marker - RV21 Paper :: PTI - spring moss + white Embellishments :: Our Craft Lounge - chunky crystal; KaiserCraft - rhinestones; PTI - hibiscus burst ribbon + twine Tools :: Spellbinders - tag die; EK Success - border punch; Provo Craft - cuttlebug
 TGIF, Bleeps! Whew! This is a late night or should I say early morning! I was able to finish all of my tasks by the deadline. Take a peek over at Splitcoaststampers today to see all of the projects and my last gallery upload to the fan club as a design team member. The time went by so fast and it was a great ride!
Today, I'm sharing a card I made for our friend whose grandmother passed away. She already has it, so just in case she sees it on Facebook she won't be surprised! YaY for a long weekend!
Enjoy yourself and thanks for visiting!
Instructions - Trim cardstock to create an A2 card base.
- Trim cream cardstock and stamp polka dot pattern.
- Overlay with floral images and add ribbon.
- Matte on purple cardstock, then adhere to card front.
Supplies
Stamps :: Gina K Designs - comfort and peace; Papertrey Ink - background basics (polka dot) Ink :: Papertrey Ink - ripe avocado; Clear Snap - chestnut Paper :: Papertrey Ink - ripe avocado, vintage cream; Cut Cardstock - purple Embellishments :: Papertrey Ink - ripe avocado ribbon
 Hey there! I hope you all are enjoying your weekend! I have had a very low-key Saturday. I've taken my time, gotten side tracked, and created at my leisure. During one of my side tracks, I was surfing online (one of my favorite past times) and came across Verve's Viva La Verve's sketch/inspiration challenge. This is my first time participating, but I could not resist after taking a peek at Amber's sketch and the inspirational photos. I had a lot of fun with this one too!
Enjoy the rest of your weekend and thanks for taking a peek!
Instructions - Create an A2 card from brown cardstock.
- Trim yellow cardstock and stamp flowers, then matte on cream cardstock.
- Tie ribbon around yellow cardstock into a bow and set aside.
- Stamp sentiment on cream cardstock.
- Trim polka dot patterned paper and adhere to card front.
- Adhere yellow cardstock with foam adhesive.
- Add cream cardstock with foam adhesive.
Supplies
Stamps :: Verve Stamps - serenity, wonderful wishes Paper :: Papertrey Ink - vintage cream, dark chocolate, bitty dots (patterned paper) Ink :: Clear Snaps - chestnut Embellishments :: Papertrey Ink - ocean tides ribbon
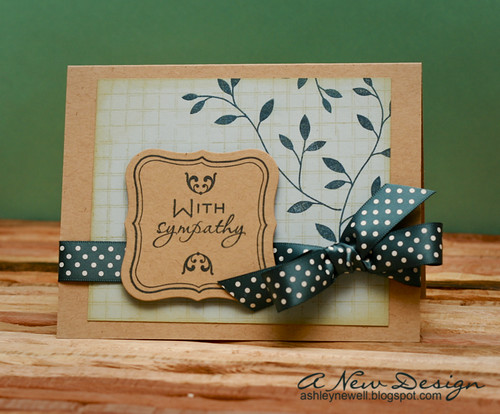 Hey There! I'm back today with a card I unfortunately 'had' to make. I needed a masculine sympathy card, if that makes any sense. I know it has a ribbon, but I couldn't resist. Anyway, it's for a family friend who lost his mom near the holidays. His mom was my mom's friend for a very long time (before we were thought of). Losing loved ones during the holidays is very difficult. I know this because right before I started blogging, my father passed away two days after Christmas. You just never know if someone will be here tomorrow, so remember to show you care.
This card was inspired by CPS Sketch 148. I cheated a bit and placed the center focal point off the left so it fit my card design. Hey...I couldn't be called a designer if I did not go off and make it my own, right?!
Thanks so much for stopping by. I also wanted to say thanks for all of the comments on yesterday's card. Whenever I think a card is not up to par, you all show me much love to change my mind! I appreciate that so much! Have a great Tuesday and do something for yourself!
Instructions - Trim kraft cardstock into an A2 card base.
- Trim spring rain cardstock to fit card front, stamp background design, and ink edges.
- Stamp leaf pattern and adhere to card front.
- Tie ribbon around card front into a bow.
- Die cut label, stamp sentiment and images, then pop off card front.
Supplies
Stamps :: Papertrey Ink - turning a new leaf, communique curves sentiments, vintage labels; Cornish Heritage Farms - distressed grid Ink :: Papertrey Ink - enchanted evening; Ranger - antique linen; Stampin' Up! - river rock Paper :: Papertrey Ink - kraft, spring rain Embellishments :: Papertrey Ink - enchanted evening polka dot ribbon Tools :: Spellbinders - labels 4 nestabilities
 Inspired by Dawn's color challenge, so I created this card. At first, it seemed impossible. I decided to use the colors in minimal ways as opposed to bold versions. I did not have soft stone, so I used SU! going gray, which is almost the same color. Looking at the card, you may think that the pink and green are not raspberry fizz and new leaf, but they are. I colored the stamp in using those inks and my blender pen, which is how I achieved a softer hue of those shades.
Thanks for stopping by! Don't forget to vote in the Gallery Idol contest today! Enjoy!
Card Instructions
- Trim going gray cardstock into an A2 card.
- Stamp flower on card front (stamp a portion of the stamp again).
- Using a blender pen and ink, color in flower stamp.
- Stamp sentiment.
- Trim raspberry fizz cardstock and adhere.
- Add ribbon.
:: My Goodies {New Days Ease Sorrow} ::
Stamps: Stampin' Up! - flower fancy; Papertrey Ink - with sympathy
Ink: Close to My Heart - black; Papertrey Ink - new leaf + raspberry fizz
Cardstock: Papertrey Ink - raspberry fizz; Stampin' Up! - going gray
Accessories: Stampin' Up!-blender pen; Papertrey Ink - true black ribbon
Card Size: 4.25" x 5.5"
 Hey Everyone! How is it going? This is a case of my own card. I did change it up a bit. The card size is smaller and the color combination is different. The original design is here.
Today, we are on our way to New Orleans to the Essence Music Festival. We will be capturing the events and Susan G. Komen's Circle of Promise presence. We hope to see lots of celebrities and be excused to photograph them with our media passes! I think that's a perfect way to camoflauge the reason why you're taking their picture. Just maybe I can sneak in and join them in a few shots too! :) heeyyy why not?! What I am looking forward to is blackened alligator, red beans and rice, double chocolate bread pudding, and of course a hurricane! Oh yeah, I forgot about the music...we'll listen to that too!
Don't forget to follow my tweets through the weekend to see what we're up to!
Enjoy yourself today and thanks for visiting!
Card Instructions
- Trim melon berry cardstock to an A2 card.
- Trim guidelines cardstock and stamp guidelines pattern.
- Stamp flourish on top left corner of card front.
- Adhere guidelines cardstock.
- Corner round the edges.
- Tie ribbon into a bow and add trinket pins.
- Stamp sentiment.
:: My Goodies {With Sympathy}::
Stamps: Papertrey Ink - with sympathy + guidelines 2 + out on a limb
Ink: Papertrey Ink - ocean tides + melon berry + lemon tart; Stampin' Up!-chocolate chip
Cardstocks: Papertrey Ink - melon berry + guidelines
Accessories: Papertrey Ink- lemon tart ribbon; EK Success - Corner Rounder Card Size: 3.75" x 5.5"
 TGIF! I made some cards last night, but none were 'fast cards.' So, I decided to share this sympathy card I made the other night. Guidelines stamp set can be used for just about any occasion and that's why I like it so much. You can barely see it, but I stamped a flourish in yellow ink on top of the yellow cardstock. Do you have any plans this weekend? I have a few things I have to do, but they are all mostly errands. BLAH! I'm looking forward to next week and you'll find out why on Monday! :) Thanks for stopping by and visiting Mac's Flickr page! He was really happy people viewed his pictures! Card Instructions- Trim lemon tart cardstock to an A2 card.
- Trim guidelines cardstock to 4.25" x 3.5" and stamp guidelines pattern.
- Stamp flourish on top left corner of card front with lemon tart ink.
- Adhere guidelines cardstock and add rhinestones.
- Trim a strip of dark chocolate cardstock and adhere to the bottom of card front.
- Corner round the edges.
- Tie ribbon into a bow and add trinket pins.
- Stamp sentiment.
:: My Goodies {With Sympathy}:: Stamps: Papertrey Ink - with sympathy + guidelines 2 + out on a limb
Ink: Papertrey Ink - ocean tides + hibiscus burst + lemon tart; Stampin' Up!-chocolate chip Cardstocks: Papertrey Ink - dark chocolate + guidelines + lemon tart Accessories: Maya Road-clear trinket pins; Papertrey Ink-ocean tides ribbon; Kaiser Craft-rhinestones; Corner Rounder
 TGIF for a Fast Friday Card! I thought I'd share this layout with you because it's super fast and super easy! All you need is your favorite pattern paper, coordinating cardstock and ribbon and some embellishments. I'm using my new SEI velvet damask I purchased last weekend. CARDS FOR SALETonight, I worked hard updating my store website with new cards for anyone to purchase. So, please check them out and buy one, two, or more! They are all available and ready to ship the next available shipping day. Items are available from $1 up and there should be something for everyone! I'm sure you'll recognize many of the cards. You make your purchases through PayPal, so it's safe and secure! BUY HEREMaybe this weekend, I'll be able to photograph some of my supplies I'm willing to part with and post them on there too, but I'll let you know! So, even if you don't want cards, I'll bet you I'll have some stamps, paper, and other goodies that you can use that I've been neglecting for the past year! Card Instructions - 5 Easy Steps- Trim ripe avocado cardstock to A2 card.
- Trim pattern paper to 4-1/4" x 3-3/4" and adhere to card base.
- Tie ribbon around card base.
- Add embellishments.
- Stamp sentiment.
:: My Goodies {our prayers are with you}:: Stamps: My Sentiments Exactly - sympathy sentiments
Ink: Stampin' Up!-chocolate chip Cardstocks: Papertrey Ink-ripe avocado Pattern Paper: SEI-windsor Accessories: Papertrey Ink-melon berry ribbon; Maya Road-leaf trinket pin; Prima-flower
 I can't believe it's Thursday already! YAAAY! Tonight, I finished the baby scrapbook (whew)! I took some photos of it, but they're not too great. I'll share them with you this weekend. The scrapbook is very simple and basic. When I make scrapbooks without the photos, it is very limiting because I can't embellish areas of the page that I might if I had the photo to to add to the page. Regardless, it's a great idea for a new mom who does not have time to make a scrapbook. Here's a special, handmade one in an instant (well, for her it will be an instant - for me it took 4 nights)! I'm just glad I chose to do an 8x8 book and not anything larger. Anyway, today's card is a sympathy card and uses the pleated trim I bought in NYC a couple of weekends ago. Man, I love NYC and can't wait to visit again. I just can't get enough of that City. There are so many new things to see and do every visit. I hope each of you find strenth in family and friends because that's priceless and something you can't buy in NYC! :) Thanks for stopping by and have a throwback Thursday (whatever that means)! Instructions- Trim kiwi kiss cardstock to 4.25" x 11", then score at 11".
- Stamp floral spray and cut out.
- Adhere trim to card base.
- Adhere stamped floral spray to card base with dimensionals.
- Stamp sentiment.
- Punch butterflies and adhere to floral spray.
- Add rhinestones.
:: My Goodies {strength in family and friends}::Stamps: Papertrey Ink-with sympathy Ink: Stampin' Up!-chocolate chip + kiwi kiss Cardstocks: Papertrey Ink-stamper's select white + dark chocolate; Stampin' Up!-kiwi kiss Accessories: dimensionals; Martha Stewart-butterfly punch; M&J Trimmings-pleated satin ribbon; Hero Arts-rhinestones Card Size: 4-1/4 x 5-1/2
 Today, I decided to share this sympathy card I made this past weekend (for my mom to give). It's very simply style. This design is perfect to finish the card on the inside and the envelope. Don't forget to answer the poll on the left side of the blog! You have a few more days! I received my SU! order the other night and really have not had the chance to play with anything yet except my top note die! I have a cuttlebug and risked buying the die to see if it really works. Well, it does! I will make a separate post for it later, but wanted to share the great news for those of you who already have a die machine and didn't want to purchase a Big Shot just to use the dies. You don't have to , just purchase the dies! It went through very easy and die cut perfectly. I'll share the very QUICK card I made using part of the die cut later. Here's how you can make this card: - Make card base by trimming brown cardstock to 4.25" x 11", then score at 5.5".
- Trim white cardstock to about 4" x 5".
- Trim brown cardstock to about 3.75" x 4.75".
- Heat emboss design with white embossing powder.
- Die cut tag.
- Stamp sentiment on tag.
- Tie ribbon into a bow around brown cardstock.
- Tie tag around ribbon.
- Add rhinestones.
- Matte brown cardstock on white, then white on card base, using dimensionals.
:: My Goodies {Sympathy} :: Stamps: Papertrey Ink-With Sympathy; Mixed Messages Ink: Versamark; Papertrey Ink-plum pudding Cardstocks: Papertrey Ink- white + dark chocolate Accessories: Bazzill Basics-purple floss; Papertrey Ink-plum pudding satin ribbon; Spellbinders-tag nestabilities; heat gun; white embossing powder; cuttlebug; KaiserCraft-rhinestone; dimensionals Card Size: 4-1/4 x 5-1/2
 We're having our first bit of inclement weather in the DC area. We're now expecting some ice/freezing rain, so I'm sure the morning rush hour will be slow or non-existent due to closings. So, I predict more crafting tomorrow! Well, at least I hope so! It's a bit late and I'm acting like a kid who doesn't want to go to school! Since I just received my PTI Sympathy set, I played with it some more. The floral spray is so beautiful and can be used for any occasion card. I wanted to emboss with black and try that out with flowers. I added butterflies and rhinestones to make it not so dark. It still needs to be adhered to a card base. Does anyone else do that? Make a card front, then put it on a card base later? Instructions- Make card base by trimming cardstock to 4.25" x 11" then score at 5.5"
- Trim berry sorbet cardstock to about 4" x 5.25"
- Stamp floral spray image with watermark ink, then heat emboss with black embossing powder.
- Stamp sentiment.
- Adhere rhinestones.
- Tie ribbon around berry sorbet cardstock into a bow.
- Adhere berry sorbet cardstock to card base.
- Punch butterflies and add rhinestones, then adhere to card front.
::My Goodies {With Sympathy}::
Stamps: Papertrey Ink-Mixed Messages + With Sympathy
Ink: Close to My Heart-Black; Versamark
Cardstocks: Papertrey Ink-berry sorbet; American Crafts-black
Accessories: Papertrey Ink-black satin ribbon; Martha Stewart-butterfly punch; Paper Studio-rhinestones; heat gun; black embossing powder
Card Size: 4-1/4 x 5-1/2
 The loss of a furry friend can be very difficult and I could only imagine. My sister-in-law + family lost their dog (labradoodle) a couple of weeks ago. It's been pretty tough for them all. He was only about 3-4 years old and was poisoned by something, they assume he ate. So, his passing was very sudden. Kirby was the sweetest dog. He was very big, but very affectionate and fluffy! He will be missed. So, I decided to make this card using Papertrey Ink's new sympathy set that features at addition loss of pet set. I would have never thought I needed this set, but wouldn't you know. The card didn't turn out how I envisioned, but I made the best of it! Instructions - Make card base by trimming brown cardstock to 4.25" x 11", then score at 5.5"
- Trim berry sorbet cardstock to 4" x 5.25"
- Stamp sanded background image on berry sorbet cardstock.
- Tie ribbon around berry sorbet cardstock into knots.
- Stamp sentiment on brown cardstock, then adhere to berry sorbet cardstock.
- Punch 1/4" circles, then stamp paw prints and adhere to cardstock using dimensionals.
- Adhere berry cardstock to card base using dimensionals.
:: My Goodies {RIP Kirby}::
Stamps: Papertrey Ink-With Sympathy-loss of pet; Stampin' Up!-Sanded
Ink: Stampin' Up!-chocolate chip; Close to My Heart-Desert Sand; Papertrey Ink-Vintage Vanilla
Cardstock: Papertrey Ink-berry sorbet+ dark chocolate+ vanilla
Accessories: dimensionals; 1/4" circle punch; Papertrey Ink-dark chocolate topnotch twill ribbon
Card Size: 4.25 x 5.5
 {insert inside bag}  {insert + card} I had to make a sympathy card and needed to insert a gift card as well to give to the family. So, I always wanted to use Dawn's card she made for Mac to give to me for our anniversary for gift card holders, so I cased it. I changed the card layout to portrait and the colors. I think this is such a neat idea because it is a unique card front, plus serves a gift card holder purpose. You could also use the bag on the inside of the card too! Want to make this card...well here is how: - Trim cardstock to 11" x 4.25", then score at 5.5".
- Trim the top of the glassine bag to fit the front of the card, then scallop edge the top using punch.
- Emboss bag using swiss dots and cuttlebug. I also added brown ink to the negative side (with the logo) to transfer ink onto the bag for a vintage/distressed effect.
- Tie polka dot ribbon around the bag.
- Add crochet flower brad to the knot.
- Adhere bag to the card base.
- Trim brown cardstock to 3.25" x 4.5", then corner round the top edges.
- Apply rub-on to the brown cardstock.
- On the back of the brown cardstock, adhere gift card using two small glue dots.
- Insert brown cardstock into the glassine bag.
- Stamp sentiment on vanilla cardstock. Distress and ink the edges and adhere just above the polka dot ribbon.
:: My Goodies {with sympathy}::
Stamps: PTI-Garden of Life (sentiment)
Ink: Brown
Paper: Cardstocks: PTI-Ocean; Vanilla; dark chocolate
Accessories: glassine bag; polka dot chocolate ribbon; chatterbox-fabulous brad; swiss dots embossing folder; cuttlebug; SEI-rub-on
Technique: Stamped; Dry embossed
Card Size: 4.25 x 5.5
   This post is in remembrance of my great uncle, Basil. He passed away last week. He was 83 years old and everyone loved him dearly. This photo was taken at my wedding in 2005. He was upset I walked myself down the aisle, saying he could have walked me. But, my mom had to assure him that I did what I wanted to do. You will be missed. This card is for his wife and immediate family. It was inspired by Beate's Inspiration Challenge. I used the Pottery Barn console table as my focal feature and some of the colors as well. The flowers at the top were inspired by the picture and the vase. The torn edge was inspired by the varying level of books in the baskets below the table. My husband noticed that I designed the card in threes - meaning, I have 3 feathers, 3 leaves, 3 leaves on the stem, and 3 branches of flowers stamped at the top. I liked how he broke down my design and said it was for the past, present, and future. One of the floral branches at the top was stamped on yellow cardstock, then carefully cut out and adhered to the paper. Stickles were used to create dimension. :: My Goodies ::Stamps: MSE; Artfully Asian
Ink: Brown Craft
Paper: Cardstock: Bazzill Basics Canteloupe, Green, PTI Kraft, Lemon Tart Accessories: square punch: Creative Memories; stickles; crop-a-dile; eyelets
Technique: Stamped
 I hope you had a fantastic 4th! I did! You can check out a quick synopsis of some stuff we did here and here. One of my biggest adventures was Ozzy falling in my mom's swimming pool! He has never been around a pool before and somehow got in and was swimming for his life. No pictures to share then because I had to save him! He doggie-paddled his way back to the edge close enough for me to pick him up, instead of jump in...WHEW! I know I'm posting late, but I'm in one of my stubborn funks! Hey...at least I'll admit it, recognize it, and move on! I'm not feeling too creative at this very moment and I know two reasons why: (1) my craft room looks like a tornado hit it - an F5 to be exact; and (2) I am getting excited about a couple of upcoming trips. Those trips mean I will be out of town for the next week and a half, so not much crafting then either. So, I hope to get inspiration somewhere along the way. I'll drop a hint to my first stop. It is on the west coast and is considered an artsy place. Any guesses? Leave a comment and let me know! Here is one of my 'older' creations I made last week. My GoodiesStamp: MM magnetic alphabet stamps
Ink: red
Paper: gray, navy, basic grey pattern paper
Accessories: eyelets, brads, flowers, thickers
Technique: Stamped This is a case of a case I have created. This is one of my favorites, but I changed it up a little by personalizing it with a name using my MM alphabet stamps and making it more feminine. I have owned these stamps for over 3 years now, but forgot about them. That is, until I was cleaning up and found my old scrapbook supplies. Still, I placed them in my room, but neglected them. I pulled them out and as you can see, used them on both of these cards! I pop cut them out and pop them off the page! Oh yeah...Happy Birthday Allison!
My GoodiesStamp: MM alphabet stamps
Ink: CTMH desert sand, quick quotes amaretto powder puff
Paper: vanilla, target pattern paper
Accessories: cuttlebug, happy birthday embossing folder, Midori pistachio ribbon
Technique: Stamped, embossed
 This card was made for a customer as a 'rush order' due to the circumstances of death in a family. I created this card in about 5 minutes. I decided simplicity was the best, so I used an easy rub-on, matted on a patterned paper, and adorned with a variety of flowers of different shades, patterns, and textures. Today is a special day because my shopping web site construction begins! You may notice some changes to the site. I will continue to post on this blog to keep you updated on the progress. Tomorrow, I will post one of my Mother's Day card designs that you may order this season! I will post a few other design options you may choose later this week as well. Supplies
Paper: BoBunny Mint Dot pattern paper; Recollections black pre-scored card Accessories: Deja Views Rub-on; MM 5th Avenue blossoms; MM brads Card Size: 5" x 7"
 I decided to share a card with you today since my earlier post was 'boring!' This sympathy and friendship card was made for some friends of mine who lost a loved one. I stamped the bird on the blue cardstock. The edges of the blue cardstock are paper pierced using SU! mat pack. The square and scalloped square are punched using nestabilities. The background of the card is embossed using swiss dots cuttlebug folder (my new favorite). I added two ribbons for a matching effect. Ingredients
Stamps: SU! Always; My Sentiments Exactly (MSE!) Sympathy Sentiments Ink: SU! Chocolate Chip craft Paper: Papertrey Ink aqua mist; CTMH brown Accessories: Paper Source satin brown; Papertrey Ink satin aqua mist; Nestabilities Techniques: Dry emboss; Stamp 
Unfortunately, we all have to send sympathy cards to support those who have lost loved ones. This customer needed two. So, I designed two simple, yet different cards.  Some people interpret color during a time of grief as an inappropriate, untraditional approach. However, color can be uplifting and healing, so I incorporated it in the card pictured left. The patterned paper is double-sided by K&Co. I triple-matted the papers. "I'm praying for you" is stamped on the front in chocolate chip ink and adhered with an antique brass metal tag. Orange ribbon is tied around the centered image to secure the ribbon and add the punch of color.  The inside of the card is stamped with Verve Visual Serenity stamps. The serenity prayer and the flowers are stamped in chocolate chip. All edges are inked on the card for a finished look.  "With Heartfelt Sympathy" is my more traditional card. The serenity leaves and sentiment is stamped in white ink on black cardstock. To give it a pop, rhinestones were added to serve as ellipses. The sentiments are from an acrylic stamp set from Michaels.  The inside of the card is very simple with the sentiment, "We wish you God's peace" stamped in blank ink on white cardstock. As a part of life, we all experience death. I hope that these cards provide support and healing during their time of grief. Thank you for stopping by to see two of my four card creations I made on Tuesday night! I've been on a good roll lately!
|
|


